String properties are very flexible and can be used to specify information such as text to display on a page, URLs for banner images, or meta keywords for search engine optimization.
To add a string property to a template:
The following example shows a variety of string properties:
<ContentTemplate xmlns="http://endeca.com/schema/content-template/2008"
                 xmlns:xavia="http://endeca.com/schema/xavia/2010"
                 xmlns:editors="editors"
                 type="SidebarContent">
    <!-- additional elements omitted from this example -->
    <ContentItem>
        <Name>Dimension Navigation</Name>
        <Property name="dimensionName">
            <String/>
        </Property>
        <Property name="dimensionId">
            <String/>
        </Property>
        <Property name="sort">
            <String>default</String>
        </Property>
        <Property name="showMoreLink">
            <Boolean>false</Boolean>
        </Property>
        <Property name="moreLinkText">
            <String>Show More Refinements...</String>
        </Property>
        <Property name="numRefinements">
            <String>10</String>
        </Property>
        <Property name="maxNumRefinements">
            <String>200</String>
        </Property>
        <!-- additional elements omitted from this example -->
    </ContentItem>
    <!-- additional elements omitted from this example -->
</ContentTemplate>
You add a string editor to enable configuration of string properties. The string editor displays in the Experience Manager interface as a text field or text area depending on the configuration.
String editors enable content administrators to supply arbitrary values for a string property. If you want to constrain the input to a specific enumeration of values, use a choice editor.
To add a string editor to a template:
Insert an
<StringEditor>element within<BasicContentItemEditor>.Specify label attributes and additional attributes for the editor:
Attribute Description propertyNameRequired. The nameof the string property that this editor is associated with. This property must be declared in the same template as the string editor.enabledIf set to false, this attribute makes the property read-only so that the value of the property displays in the Content Details Panel in Experience Manager, but cannot be edited. Set this tofalseonly if you specify a default value in the definition of the string property. Editors are enabled by default.widthThe width in pixels of the text field presented in the Experience Manager interface. The default width is 100% and scales with the screen width. Note
You cannot specify a percent value in your editor configuration. You must specify the editor width in pixels.
heightThe height in pixels of the text field presented in the Experience Manager interface. The default height for a single-row field is 24 pixels. Setting the value to 34 pixels or higher creates a multiline text area with word wrap enabled.
The following example shows a variety of editing options for string properties:
<ContentTemplate xmlns="http://endeca.com/schema/content-template/2008" xmlns:editors="editors"
                 type="ResultsPage">
  <!-- additional elements omitted from this example -->
  <ContentItem>
    <Name>Three-Column Navigation Page</Name>
    <Property name="title">
      <String>Discover Electronics</String>
    </Property>
    <Property name="metaKeywords">
      <String>camera cameras electronics</String>
    </Property>
    <Property name="metaDescription">
      <String>Endeca eBusiness reference application.</String>
    </Property>
    <!-- additional elements omitted from this example -->
  </ContentItem>

  <EditorPanel>
    <BasicContentItemEditor>
      <GroupLabel label="Page metadata"/>
      <editors:StringEditor propertyName="title" label="Title" enabled="true"/>
      <editors:StringEditor propertyName="metaKeywords" label="Meta keywords"
        enabled="true" height="72"/>
      <editors:StringEditor propertyName="metaDescription" label="Meta description"
        enabled="true" height="72"/>
    </BasicContentItemEditor>
  </EditorPanel>
</ContentTemplate>
Note
Neither Experience Manager nor the Assembler applies HTML escaping to strings. This enables content administrators to specify HTML formatted text in Experience Manager and have it rendered appropriately. If you intend to treat a string property as plain text, be sure to add HTML escaping to your application logic in order to avoid invalid characters and non-standards-compliant HTML.
A choice editor enables the user to select from predefined string values for a property that are presented in a drop-down list.
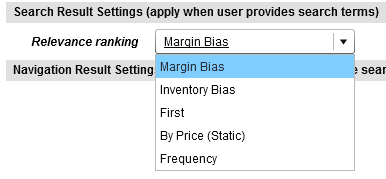
Choice editors affect the value of a string property. For example, you might use a choice editor to provide sorting options for dimension values in a Guided Navigation cartridge:
To add a choice editor:
Insert an
<editors:ChoiceEditor>element within<BasicContentItemEditor>.Specify additional attributes for the editor:
Attribute Description propertyNameRequired. The
nameof the string property that this editor is associated with. This property must be declared in the same template as the choice editor.editableIf set to
true, this attribute allows Experience Manager users to specify custom string values. By default, choice editors are not editable.enabledIf set to
false, the choice editor displays in Experience Manager but the value cannot be changed by the user. By default, choice editors are enabled.promptSpecifies a custom prompt. The default prompt is an empty string.
tooltipIf present, specifies optional help text to display in a tool tip window. The default behavior is no tool tip.
widthThe width, in pixels, of the choice editor. By default, the width of the editor adjusts to fit the longest choice in the editor. Use this attribute if you want to set a fixed width for the editor.
Specify one or more menu options for the choice editor by adding
<choice>elements.<choice>takes the following attributes:Attribute Description valueRequired. The string value to assign to the associated property if this
<choice>is selected.labelThis attribute allows you to specify a more descriptive label for this option in the drop down list. If no label is specified, the
valueis used by default. You must either specify alabelfor all of the choices or none of them. You cannot have labels for some choices and not others.Note
If you choose to make a choice editor editable (so that users can enter arbitrary strings), you should not use the
labelattribute for choices. Instead, the choice editor should display the raw value of the string so that users entering custom values can see the expected format of the string property.Optionally, set a default value in the corresponding
<ContentItem>property.For example, to specify the default sort order for a dimension as the default choice for a choice editor with
propertyName="sort":<Property name="relrank"> <!-- Margin Bias --> <String>nterms,maxfield,exact,static(product.analytics.conversion_rate,descending)</String> </Property>Note
Ensure that the default value for the property is one of the options defined for the choice editor in a
<choice>element.
The following example shows a choice editor configured with a default
value. The selected value when the editor is first instantiated is
nterms,maxfield,exact,static(product.analytics.conversion_rate,descending),
which displays with the label "Margin Bias" in the drop-down menu. Content
administrators can select a different sort order.
<ContentTemplate xmlns="http://endeca.com/schema/content-template/2008"
xmlns:editors="editors"
xmlns:xavia="http://endeca.com/schema/xavia/2010"
type="MainContent">
<!-- additional elements omitted from this example -->
<ContentItem>
<Name>Results List</Name>
<!-- additional elements omitted from this example -->
<Property name="relrank">
		<!-- Margin Bias -->
        <String>nterms,maxfield,exact,static(product.analytics.conversion_rate,descending)</String>
    </Property>
<!-- additional elements omitted from this example -->
</ContentItem>
<EditorPanel>
<BasicContentItemEditor>
<!-- additional elements omitted from this example -->
<GroupLabel label="Search Result Settings (apply when user provides search terms)"/>
<editors:ChoiceEditor propertyName="relrank" label="Relevance ranking">
<choice label="Margin Bias" value="nterms,maxfield,exact,static(product.analytics.conversion_rate,descending)" />
<choice label="Inventory Bias" value="nterms,maxfield,exact,static(product.inventory.count,descending)" />
<choice label="First" value="first" />
<choice label="By Price (Static)" value="static(product.price)" />
<choice label="Frequency" value="freq" />
</editors:ChoiceEditor>
<!-- additional elements omitted from this example -->
</BasicContentItemEditor>
</EditorPanel>
</ContentTemplate>
A radio group editor is similar to the choice editor in that it enables the user to select from predefined string values for a property. The choices are presented as a set of radio button controls.
Although radio buttons are often used for binary choices such as yes/no, the radio group editor can be used for any scenario where the user must specify exactly one value out of a number of options. In order to enable the more general use case, the radio group editor affects the value of a string property.
To add a radio group editor:
Insert an
<editors:RadioGroupEditor>element within<BasicContentItemEditor>.Specify label attributes and the additional attributes for the editor:
Attribute Description propertyNameRequired. The
nameof the string property that this editor is associated with. This property must be declared in the same template as the choice editor.enabledIf set to
false, the radio group editor displays in Experience Manager but the value cannot be changed by the user. By default, radio group editors are enabled.Specify one or more radio button options by adding
<choice>elements.<choice>takes the following attributes:Optionally, set a default value in the corresponding
<ContentItem>property.For example, to specify the default value for a radio group editor with
propertyName="showDisabledRefinements":<Property name="showDisabledRefinements"> <String>false</String> </Property>Note
Ensure that the default value for the property is one of the options defined for the editor in a
<choice>element.
The following example shows a radio group editor configured with a
default value. The selected value when the editor is first instantiated is
false, which displays with the label "No."
<ContentTemplate xmlns="http://endeca.com/schema/content-template/2008"
xmlns:xavia="http://endeca.com/schema/xavia/2010"
xmlns:editors="editors"
type="SidebarItem">
<!-- additional elements omitted from this example -->
<ContentItem>
<!-- additional elements omitted from this example -->
        <Property name="showDisabledRefinements">
            <String>false</String>
        </Property>
<!-- additional elements omitted from this example -->
</ContentItem>
<EditorPanel>
<BasicContentItemEditor>
<!-- additional elements omitted from this example -->
<editors:RadioGroupEditor propertyName="showDisabledRefinements"
label="Show 'Disabled Refinements'" enabled="true">
<choice label="Yes" value="true"/>
<choice label="No" value="false"/>
</editors:RadioGroupEditor>
<!-- additional elements omitted from this example -->
</BasicContentItemEditor>
</EditorPanel>
</ContentTemplate>
