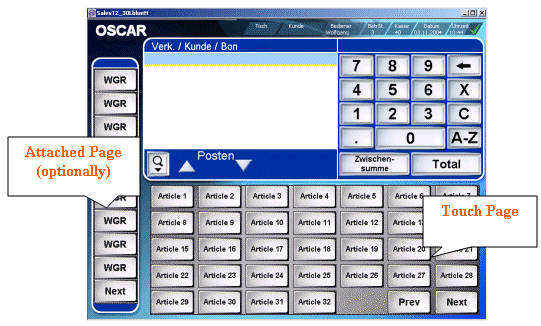
Touch layout
This documentation describes how a touch layout is drawn up or changed for the terminal program to allow this to be customized for the cashier operation.
Normally, a touch layout is dependent on the terminal program in use. Linkage of a touch layout to the appropriate program is described in the documentation Terminal program / Touch layout.
The procedure for configuration of a screen-based POS terminal is as follows:
1.The POS program is activated by entering the internal name of the program in field Program name of the linked Process unit of the terminal and linking the appropriate layout in program Terminal.
2. The internal name of the terminal program can be found in program System -> User interface -> Application -> ECR application.
3. In program Terminal a specific touch layout should be linked in field Touch layout as per the Terminal program in use.
Customization of a touch layout
The MICROS Retail OSCAR POS application provides default touch layouts for the various terminal programs and these are stored in the database. In practical applications new touch layouts are changed on the basis of existing touch layouts and are stored under a new number in the system.
The following touch layouts are provided in the standard version:
|
No. |
Layout name |
|
1 |
Standard layout |
|
2 |
Fast Food layout |
|
3 |
Big layout |
|
4 |
PocketPC layout |
|
5 |
PocketPC layout_H |
|
6 |
Big layoutXA |
|
7 |
Layout_40_1024 |
|
8 |
Layout_40_1152 |
|
10 |
Standard layout_30 |
|
11 |
Standard Layout_30L |
|
12 |
Std layout_30XA |
|
13 |
Std Layout_30LXA |
|
14 |
Std layout_30XB |
|
15 |
Std Layout_30LXB |
|
20 |
Standard layout_30H |
|
21 |
Standard Layout_30LH |
|
22 |
Std layout_30HXA |
|
23 |
Std Layout_30LHXA |
|
24 |
Std layout_30HXB |
|
25 |
Std Layout_30LHXB |
Note:
Please note that only certain
touch layouts can be linked to Terminal programs.
Store a customized touch layout under a number higher than 50 in the database
before making any changes. The linkage of a touch layout to the appropriate
terminal program can be found in the documentation Terminal program / Touch layout.
In the following example touch layout no. 21 "Standard Layout_30LH" is changed as follows for program "Terminal T2_30LblueH".
- Copy touch layout no. 21 into the new
touch layout no. 50.
This is necessary to ensure that no changes will be made to standard layout no. 21 from a release change or after command "oscar dofgl.fgl". - Open program System -> User interface -> Touch layout and select touch layout no. 21 (standard layout_30LH).
- Enter a new number (over 50) and assign a name to the new touch layout in field Descriptor.
- Then execute command "Copy object tree" in menu "Process". The complete touch layout no. 21, including all pages and keys is then copied into the new touch layout and can then be customized under the new number.
Changing/adding touch pages
After an existing touch layout has been stored with function "Copy object tree" under a new number in the system, changes can then be made.
Adjustments of the screen sector can be done for the function key section only, i.e. the number of pages and their keys and functions can be changed.

The following update programs are available for the touch pages:
- System ->
User interface -> Touch layout.
The general layout and the linked touch pages can be defined with this program, i.e. height and width as well as the number of columns and rows for the function key concerned. The general layout for the touch pages of the following terminal screens is defined with the setting in field "Layout type". This setting has priority over the values in fields Height, Width, Columns, Lines.
|
Layout type |
Description |
|
Non POS 30 |
All touch layouts without coding "_30", "_30L" and "_30LH". |
|
POS 30 |
All touch layouts with coding "_30" and "_30H" and _30FH". (30L = 35 keys, 30F = 54 keys) |
|
POS 30 large |
All touch layouts with coding "_30L" and "_30LH". |
|
POS 30 Pocket |
All touch layouts with coding "PocketPC". |
|
POS 40 large |
All touch
layouts with coding " Layout_40". (= Resolution 1024 und 1152). |
- System -> User interface -> Touch
layout -> Touch page.
The layout of the touch page is defined in this program. In addition, new pages can be added to the touch layout and existing pages can be deleted.
New pages are added via button "Create page". An existing page is selected and a new page no. and name are entered. After depression of button "Init.page" the layout of the selected page is added to the touch layout under a new number.
If an existing page is to be deleted from the touch layout, the linked pages must firstly be deleted. This is done by depressing button "Delete keys". The screen page can then be deleted with the Delete function. - System -> User interface -> Touch
layout -> Touch page. -> Layout prg.
This program defines the function of each key on a touch page, i.e. keys can be blocked, the key events can be defined and the appearance and key descriptors can be defined.
This program has a graphic user interface to allow the user to follow the changes made to the touch layout on the screen.
A general description of this program can be found in the documentation "Layout program"; detailed information can be found in the description of the program System -> User interface -> Touch layout -> Touch page. -> Layout prg.
Salzufer 8
D-10587 Berlin