Chapter 109: Entering Catalog Requests (WCAT)

Purpose: Use catalog requests to capture inquiries and manage requests for catalogs from new or existing customers. Creating catalog requests lets you track inquiry information, report on trends with respect to requests for specific catalogs, and quickly print labels in response to those requests.
You use the Work with Catalog Requests Screen when you want to create, change, delete, or display individual catalog requests or when you want to display or print a list of catalog customers whose names are still in the Catalog Request file.
Note: You can also receive catalog requests through the catalog request interface and phone order interface. See Chapter 112: Working with the Catalog Request Interface (WCRU), Order Entry Chapter 31: Using the Phone Interface.
The EC_CAT_REQ job, started through Working with E-Commerce Job Control (EJCT) creates catalog requests through the e-commerce interface.
• If the E-Commerce Catalog Request Message (CWCatRequest) passes validation, a catalog request record is created. You can review and change the catalog request at the Work with Catalog Requests Screen.
• If the E-Commerce Catalog Request Message (CWCatRequest) does not pass validation, a catalog request interface record is created. You can review and correct the catalog request through Working with the Catalog Request Interface (WCRU).
Catalog request response: You can also send an E-Commerce Catalog Request Response Message (CWCatreqResponse) to the web storefront. The catalog request response message indicates the customer number and optionally, individual number, used to create the catalog request. If the customer number in the catalog request response message is blank, the catalog request did not process correctly and needs to be corrected through Working with the Catalog Request Interface . Note: The e-commerce customer updates response message is available for XML messages only, not name/value pair messages.
The response_required field in the catalog request message indicates if a catalog request response message is sent to the web storefront.
• 0, blank, or a value other than 1 indicates a catalog request response message is not sent to the web storefront.
• 1 indicates a catalog request response message is sent to the web storefront.
Customer updates: Additionally, if the customer associated with the catalog request does not exist, the system will create a new customer; see Customer Creation/Update Logic in E-Commerce Catalog Requests. In this case, it is useful to send a catalog request response message to the web storefront indicating the newly assigned customer number.
See E-Commerce Catalog Requests for additional processing information.
In this chapter:
• Work with Catalog Requests Screen
• Catalog Request Creation Options
• Create Catalog Request Screen
• Select Customer for Catalog Request Screen
• Change Catalog Request Screen
• Ghost Customer Warning Window
• Display Catalog Request Screen
Work with Catalog Requests Screen
How to display this screen: Enter WCAT in the Fast path field at the top of any menu or select Work with Catalog Request from a menu.
CSR0147 DISPLAY Work with Catalog Requests 9/29/98 9:44:21 The KL Mail Order Company Request Opt Customer Ofr Source Date Printed
Type options, press Enter. 2=Change 4=Delete 5=Display
3 J03 THE JOY OF THE HOLIDAYS JOY03 9/09/98 Yes LETENDRE, PAM 8 J03 THE JOY OF THE HOLIDAYS JOY03 9/09/98 Yes SLOSBERG, MICHELLE R 26 M09 THE GREAT WIDE YONDER MAW09 8/30/98 No MIRANDA, BERNADETTE T 12544 E02 SUMMER DISCOUNTS A123E02 9/10/98 Yes SANDER HOSPITAL ATTN: AUCLAIR, KIMBERLY R
F3=Exit F6=Create F12=Cancel F21=Print list F24=Select Company |
Field |
Description |
Customer |
A unique number the system assigns to each Sold-to customer on creation of the customer through Order Entry, Customer Maintenance, or catalog requests. Ghost customers: If you enter the customer number of a ghost customer, the scan screen does not display any catalog requests; this is because a merge/purge has assigned any catalog requests using that customer number to the “target” customer. You can identify a ghost customer by the setting of the Ghost flag. Numeric, 9 positions; optional. |
Ofr (Offer) |
A code that represents the advertising medium that you use to present merchandise to your customers. Your entry is validated against the Offer file. Alphanumeric, 3 positions; optional. |
Source |
A code that identifies a list of customers. The source code drives marketing, forecasting, pricing, and freight information on an order. A source code will appear here only if a source code was entered when the catalog request was created. Alphanumeric, 9 positions; optional. |
Request date |
The date the catalog request was created. Numeric, 6 positions (MMDDYY format); display-only. |
Printed |
A flag that indicates whether you have printed a catalog for the customer. No displays in this field next to a request until the catalog label is printed. Once the catalog label is printed, this value changes to Yes. Records remain on this list, regardless of their printed status, until you delete them selectively, or in batch mode. See Display Catalog Request Screen. Values are: Yes = A catalog label has been printed. No = A catalog label has not been printed. Alphanumeric, 1 position; optional. |
Screen Option |
Procedure |
Create a catalog request |
Press F6 to advance to the Create Catalog Request Screen. |
Change a catalog request |
Enter 2 next to a catalog request to advance to the Change Catalog Request Screen. |
Delete one or more catalog request records |
Enter 4 next to a catalog request to display a pop-up window containing deletion options. You can delete a request using this method regardless of whether the label has been printed. |
Display catalog request records |
Enter 5 next to a catalog request to advance to the Display Catalog Request Screen. |
Catalog Request Creation Options
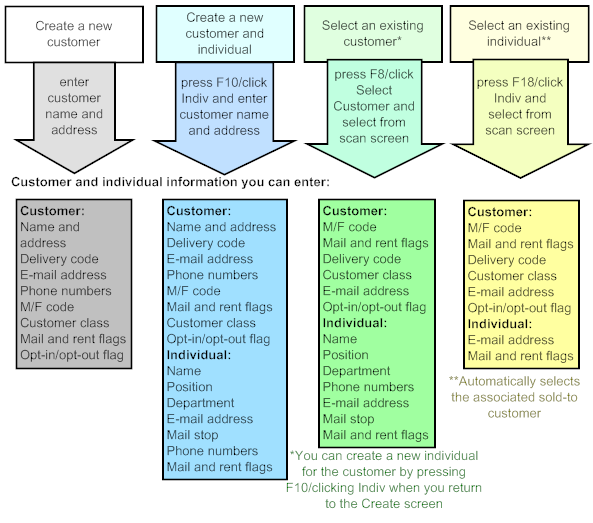
Note: You must have the Enable Catalog Request at Individual Level (H81) system control value set to Y to enter a catalog request for an individual.
E-commerce catalog requests: If the customer associated with an e-commerce catalog request does not exist, the system will create a new customer; see Customer Creation/Update Logic in E-Commerce Catalog Requests.
Ghost customers: If you enter the customer number of a ghost customer, the system displays the Ghost Customer Warning Window.
Purpose: Use this screen to create a catalog request for a new or existing customer.
How to display this screen: At the Work with Catalog Requests Screen, press F6.
Note: You can also display this screen by pressing F15 from the Select Customer Sold To For Order Screen or the Customer Selection Screen in Order Entry.
CSR0152 ENTER Create Catalog Request 1/16/03 11:11:48 KAB Co. Indiv name Name . . . Company . M/F Mail N Rent N Address . Apt/Suite Position Department
Postal Code City St Country USA Delivery code R (B,N,R) Customer Class Phone (Day) ext Indiv Phone (Day) ext (Eve) ext (Eve) ext (Fax) ext (Fax) ext Email Address Opt In O3 Ind Email Addr Ind OptIn O3 Mail Stop . . . . # of copies 1 Source . . . . Offer Item . . . . . COLO/STYL/SIZE
F3=Exit F8=Select Customer F10=Indiv F12=Cancel F16=Customer Ownership F18=Select Indiv F23=Notes |
Note: If you are creating a catalog request for an existing customer, do not complete the following fields; instead, press F8 to select an existing customer, then complete the Offer, Item, Source, and # of copies fields. See Catalog Request Creation Options for an overview.
Ghost customers: If you enter the customer number of a ghost customer, the system displays the Ghost Customer Warning Window.
Field |
Description |
Indiv name |
The following five fields can hold the individual’s full name: Prefix A title that belongs before the individual’s name (such as "Mrs." or "Dr."). The prefix will print on labels. If the Validate Prefix (I27) system control value is set to Y, your entry is validated against the Prefix file; see Working with Prefix Codes (WPFX). However, only the three-position prefix code prints on catalog request labels. Alphanumeric, 3 positions; optional if you are creating a new individual, or display-only if you select an existing individual. First Name The individual’s first name. Alphanumeric, 15 positions; optional if you are creating a new individual, or display-only if you select an existing individual. Initial The initial of the individual’s middle name. Alphanumeric, 1 position; optional if you are creating a new individual, or display-only if you select an existing individual. Last Name The individual’s last name. Alphanumeric, 25 positions; optional if you are creating a new individual, or display-only if you select an existing individual. Suffix An addition to the individual’s full name (such as "M.D.," "Fr.," or "III"). Alphanumeric, 3 positions, optional if you are creating a new individual, or display-only if you select an existing individual. |
|
Note: • These fields display only if you press F10 to enter individual information. You must have the Enable Catalog Request at Individual Level (H81) system control value set to Y. • The individual’s name will print on the catalog request label only if you have the Label 1-Up Printing Program (C83) system control value set to MSR1286, or the Label 4-Up Printing Program (C84) system control value set to MSR1287; otherwise, the sold-to customer’s name will print. |
Name |
The following five fields can hold the sold-to customer's full name: Prefix A title that belongs before the customer's name (such as "Mrs." or "Dr."). The prefix will print on labels. If the Validate Prefix (I27) system control value is set to Y, your entry is validated against the Prefix file; see Working with Prefix Codes (WPFX). However, only the three-position prefix code prints on catalog request labels. Alphanumeric, 3 positions; optional if you are creating a new customer, or display-only if you select an existing customer. First Name The customer's first name. Alphanumeric, 15 positions; optional if you are creating a new customer, or display-only if you select an existing customer. Initial The initial of the customer's middle name. Alphanumeric, 1 position; optional if you are creating a new customer, or display-only if you select an existing customer. Last Name The customer's last name. Alphanumeric, 25 positions; required if company name is not present and you are creating a new customer, or display-only if you select an existing customer. Suffix An addition to the customer's full name (such as "M.D.," "Fr.," or "III"). Alphanumeric, 3 positions, optional if you are creating a new customer, or display-only if you select an existing customer. |
Company |
The name of the company to which the catalog should be mailed, if applicable. Alphanumeric, 30 positions; required if last name is not present and you are creating a new customer, or display-only if you select an existing customer. |
M/F (Male/Female code) |
A code that identifies the customer's gender. The system may default a value to this field based on the Default Male/Female Profile Code (C74) system control value. If you have set this field, the system references the Demographic Profiles file, searches for the default profile option (such as FEMALE or MALE), and loads an F or M to the M/F field on the Create Catalog Request screen. You can, however, override or remove this value. Alphanumeric, 1 position; optional. |
This value indicates whether the customer wants to receive future catalog mailings from your company. Valid values are: Y = You can mail catalogs to this customer. N = You can not mail catalogs to this customer. This value may default from the Default Mail Name (D10) system control value, but you can override it. Entity-level override If the Track Customer History at Entity Level (F89) system control value is set to Y, you can press F4 to prompt on this field and set the mail flag for each entity within your company. Setting the mail flag for an entity also creates a customer entity record, using a current and original mail type of C, for catalog request. See First Create Sold To Customer Screen. Update to individual Your entry in this field also updates the Mail flag for the individual when you create a new individual through the catalog request; however, it does not update an existing individual on a catalog request. Alphanumeric, 1 position; required. |
|
Rent |
This value indicates whether you can sell this customer's name to another company for their catalog mailings. Valid values are: Y = You can sell this customer's name when you generate your house list. N = You can not sell this customer's name. This value may default from the Default Rent Name (D11) system control value, but you can override it. Update to individual Your entry in this field also updates the Rent flag for the individual when you create a new individual through the catalog request; however, it does not update an existing individual on a catalog request. Alphanumeric, 1 position; required. |
Address |
The customer's street address. This is the primary delivery address. Alphanumeric, 32 positions; required if you are creating a new customer, or display-only if you select an existing customer. |
Apt./suite |
The apartment number or suite number of the delivery address. To enter an apartment or suite address: 1.Enter APT to indicate an apartment or STE to indicate a suite. 2.Insert a space and enter the number of the apartment or suite (for example, APT 4 or STE 116). Field contents must conform to United States Parcel Service (USPS) address formatting Field Description standards. Always precede the apartment or suite number with the applicable abbreviation (such as APT or STE), to meet USPS regulations and correctly identify this information on labels or reports. Alphanumeric, 10 positions; optional if you are creating a new customer, or display-only if you select an existing customer. |
Address lines 2-4 (Unlabeled fields directly beneath the street address) |
Additional entry fields for the customer's address. The contents of address line 2 of the address must conform to United States Postal Service (USPS) formatting standards. For example, if the address represents a post office box, you must enter P.O. Box on this line to meet USPS regulations and correctly identify this information on labels. Alphanumeric, 30 positions; optional if you are creating a new customer, or display-only if you select an existing customer. |
Position |
This code represents the individual's position within the organization. Position codes are defined in and validated against the Individual Position file; see Chapter 40: Working with Individual Positions (WPOS). Note: This field displays only if you press F10 to enter individual information or press F18 to select an existing individual. You must have the Enable Catalog Request at Individual Level (H81) system control value set to Y. See Catalog Request Creation Options for an overview. Alphanumeric, 3 positions; required if you are creating a new individual, or display-only if you select an existing individual. |
Department |
This code represents the individual's department within the organization. Department codes are either required, optional, or invalid, depending on how the individual's position code is defined. Department codes are defined in and validated against the Individual Department file; see Chapter 39: Working with Individual Departments (WDPM). Note: This field displays only if you press F10 to enter individual information. You must have the Enable Catalog Request at Individual Level (H81) system control value set to Y. Alphanumeric, 3 positions; may be required, optional, or invalid, depending on the position code selected if you are creating a new individual, or display-only if you select an existing individual. |
Postal code |
The postal or zip code for this customer. The system calls a user-defined program to validate postal code formats outside the CWDirect environment if you enter a Y in the External Postal Code Validation (E62) system control value. Scan length: The Postal Code Scan Length (F61) system control value controls how many characters of the postal code to use when searching for a customer. See that system control value for a discussion. Note: If postal codes have been entered into the Postal Code/City/State file, the postal code will control which City and State will be defaulted. If you enter a valid postal code that does not correspond to the city or state you entered, the system will change the city or state information to correspond with the zip code you entered. Numeric, 10 positions; required if you are creating a new customer, or display-only if you select an existing customer. |
City |
The city where the customer lives, or receives mail or shipments. The system will complete this field for you when you enter a valid postal code if the postal code exists in the Postal Code/City/State file. Alphanumeric, 25 positions; required if you are creating a new customer, or display-only if you select an existing customer. |
St (State) |
The state or province where the customer lives, or receives mail or shipments. The system validates that the state you enter is assigned to the SCF in the first three positions of the postal code. State codes are defined in and validated against the State file, which is accessible through the Work with Countries menu option; see Chapter 14: Setting Up the Country File (WCTY). The system will complete the state field automatically when you enter a valid postal code, if the postal code exists in the Postal Code/City/State file. Alphanumeric, 2 positions; optional if you are creating a new customer, or display-only if you select an existing customer. |
Country |
The code for the customer's country. This value may default from the Default Country for Customer Address (B17) system control value; however, you can override it. Country codes are defined in and validated against the Country file. See Chapter 14: Setting Up the Country File (WCTY). Alphanumeric, 3 positions; required if you are creating a new customer, or display-only if you select an existing customer. |
Delivery code |
This code identifies the address as a business or residential address. This code is used by shippers who charge different rates when shipping to a business or home. Valid values are: B = Business N = No distinction (Not valid for a UPS shipper) R = Residential This field may default based on the Default Delivery Code for New Order Entry Customers (D13) system control value, but you can override it. Alphanumeric, 1 position; required. |
Customer class |
A code that categorizes the consumer environment at a high level for reporting purposes. You can use a customer class code to: • direct offerings to a limited customer group • restrict item sales to a group of customers, for example, restricting the sale of guns to minors • set a default for bypassing item reservation for a group of customers • generate a list of customers for reporting purposes, or segment reports by class code |
|
If you enter a new customer class code in this field, the system updates the Customer Sold To file with the code you entered. Required? The Require Customer Class in OE, WCAT, and WCST (H85) system control value defines whether this field is required. Secured? The Maintenance of Customer Class Field (B07) secured feature defines whether you can enter or maintain the customer class field at this screen. Note: If the Require Customer Class in OE, WCAT, and WCST (H85) is set to Y and the customer does not have a customer class code assigned, a user who does not have authority based on the Maintenance of Customer Class Field (B07) secured feature will not be able to enter a catalog request. See Chapter 17: Setting Up the Customer Class File (WCCL) for information on working with customer classes. Numeric, 2 positions; optional. |
Phone |
The customer's daytime, evening, and third (fax or mobile) numbers. The Third Phone Number Type (L53) system control value determines whether the third phone number is labeled the Fax or Mobile number. Alphanumeric, one 14-position field (phone number) and one 4-position field (phone extension); optional if you are creating a new customer, or display-only if you select an existing customer. |
Indiv phone |
The individual’s daytime, evening, and third (fax or mobile) phone numbers. The Third Phone Number Type (L53) system control value determines whether the third phone number is labeled the Fax or Mobile number. Note: These fields display only if you press F10 to enter individual information or press F18 to select an existing individual. You must have the Enable Catalog Request at Individual Level (H81) system control value set to Y. See Catalog Request Creation Options for an overview. Alphanumeric, one 14-position field (phone number) and one 4-position field (phone extension); optional if you are creating a new individual, or display-only if you select an existing individual. |
Email address |
The customer's primary email address. This address, along with any other email addresses for the customer, is stored in the Customer Sold To Email file. A plus sign (+) indicates that there are additional email addresses on record for the customer. See Email Address Validation for information on how the system verifies that your entry is formatted correctly. Entering a new email address: If you overwrite the existing email address in this field, the system flags your entry as the primary email address for the customer, but retains the previous email address in the Customer Sold To Email file. In order to delete the previous email address, you need to press F4 to display the Select Customer Email Address Screen and delete the previous email address there. See Working with Customer Email Addresses for an overview. Deleting the email address: Similar to entering a new email address, if you delete the email address from this field, the system removes the primary email flag for the address but retains the address in the Customer Sold To Email file. Email notifications: See When Does the System Generate an Email Notification? for an overview. Alphanumeric, 50 positions; optional. |
Opt in |
This value determines the preferred method of correspondence for the sold-to customer email address. Valid values are: O1 (Email): Email is the preferred method of correspondence. O2 (Order-only email): Use email for order-related correspondence only; generate a spool file for other correspondence. O3 (No email): Do not use email for any correspondence; generate a spool file instead. O4 (Do not ask the customer): Do not ask the customer for his/her email address; the customer has already been asked and has declined to provide it. The system does not generate any email correspondence to the customer, even if an email address is specified. This value defaults from the Default Opt In/Opt Out Flag (G97) system control value, but you can override it. Note: The above values use the letter O, not the number 0 (zero). The system updates this field when you change the setting of the Opt in/Opt out value at any other screen, such as order entry, order maintenance, or customer maintenance. |
|
Email notifications: See When Does the System Generate an Email Notification? for an overview. Alphanumeric, 2 positions; required. |
Ind email address |
The individual’s email address. See Email Address Validation for information on how the system verifies that your entry is formatted correctly. Note: This field displays only if you press F10 to enter individual information or press F18 to select an existing individual. You must have the Enable Catalog Request at Individual Level (H81) system control value set to Y. See Catalog Request Creation Options for an overview. Alphanumeric, 50 positions; optional. |
Ind OptIn (Individual opt in/opt out) |
Indicates the preferred method of correspondence for the individual email address. Valid values are: O1 (Email): Email is the preferred method of correspondence. O2 (Order-only email): Use email for order-related correspondence only; generate a spool file for other correspondence. O3 (No email): Do not use email for any correspondence; generate a spool file instead. O4 (Do not ask customer): Do not ask the customer for his/her email address; the customer has already been asked and has declined to provide it. The system does not generate any email correspondence to the customer, even if an email address is specified. If you are creating a catalog request for an existing customer, this value defaults from the Opt in/opt out field for the associated sold-to customer, but you can override it. If you are creating a catalog request for a new customer, this value defaults from the Default Opt In/Opt Out Flag (G97) system control value, but you can override it. Note: The above value uses the letter O, not the number 0 (zero). Note: This field displays only if you press F10 to enter individual information or press F18 to select an existing individual. You must have the Enable Catalog Request at Individual Level (H81) system control value set to Y. See Catalog Request Creation Options for an overview. Alphanumeric, 2 positions; required. |
Mail stop |
The individual's delivery address within the organization. Note: • This field displays only if you press F10 to enter individual information or press F18 to select an existing individual. You must have the Enable Catalog Request at Individual Level (H81) system control value set to Y. • This field will print on the catalog request label only if you have the Label 1-Up Printing Program (C83) system control value set to MSR1286, or the Label 4-Up Printing Program (C84) system control value set to MSR1287. Alphanumeric, 32 positions; optional if you are creating a new individual or display-only if you select an existing individual. |
# of copies |
The number of catalogs the customer wants to receive. If you do not have authority to the Allow Number of Copies to Maintain in Catalog Request (A75) secured feature, this field is display-only. Numeric, 2 positions; required. |
Source |
A code that identifies a list of names for this catalog mailing. The source code drives marketing, forecasting, pricing, and freight information on an order. Note: You can press F4 to view a list of the source codes you can use. Only those source codes set to display in Order Entry and catalog requests appear in the Select Source pop-up window. The first source code you enter on this screen will default for any other catalog requests you create so you can enter them quickly. Once you exit this screen, the Source field will clear. The source code will default in the Source field for alternate address and standard address format. Source codes are defined in and validated against the Source Code file. See Marketing Chapter 6: Working with Source Codes (WSRC). Alphanumeric, 7 positions; required. |
Offer |
The code for the catalog that the customer is requesting. Offer codes are defined in and validated against the Offer file. See Marketing Chapter 2: Working with Offers (WOFR). The first offer code you enter on this screen will default for any other catalog requests you create so you can enter them quickly. This field clears when you exit the screen. The offer code will default in the Offer field for alternate address and standard address format. Note: You must enter an offer code or an item/SKU. Numeric, 3 positions; required unless you complete the Item field. |
Item (Item number) |
The code for the item you are sending to the customer with the catalog. Examples would be swatches of material or promotional items printed with your company name. Item numbers are defined in and validated against the Item file. See Merchandising Chapter 24: Performing Initial Item Entry (MITM). Alphanumeric, 12 positions; optional. |
SKUs |
A code for the style of the item, such as its color or size. Alphanumeric, three, 4-position fields (if using split SKUs) or one 14-position field (if using the full SKU); required if entering an item that contains SKUs. |
Catalog Request Customer Updates
When you create a new customer here, the system creates the new customer in the Customer Sold To file. The current and original mail type fields are set to C (catalog request). If the Track Customer History at Entity Level (F89) system control value is set to Y, the system also creates a Customer Entity record for the entity associated with the source code. If you create an individual customer at this time, the system creates the new individual in the Customer Individual file.
If you select an existing customer and change the value of an existing field, such as the Opt in/opt out field or the Customer class, the system updates the customer file. See Chapter 28: Creating and Updating Sold-to Customers (WCST).
When the catalog request label is printed, the Customer Mail History file is updated through the catalog request. The Original source field is updated if you added a new customer. See First Create Sold To Customer Screen. However, if the catalog request includes an individual, only the Individual Mail History file is updated.
If the customer you enter already exists: The system displays the Duplicate Customer window if the customer information you enter matches an existing customer in the Sold To Customer file. The system displays this window based on match code.
You can use the existing customer information and cancel the creation of the new customer, or you can override this message and create the additional customer. You might use the duplicate customer information, for example, if two different people with the same name, such as John Smith, live at addresses that are so similar that the system thinks they are the same person.
If the customer's catalog request already exists: The system displays the Display Duplicate Sold To pop-up window if the customer and offer/item information you enter at the Create Catalog Request Screen matches an existing customer sold to, based on match code. A match code is made up of parts of the customers name, address, and postal code. The match code is a user-defined code defined in the Match Code file; see Customer Service Chapter 19: Setting Up Match Codes (MMCH).
Note: If you do not set up a match code in the Match Code file, the system displays the first sold to customer, based on sold to customer number, as a duplicate each time you enter a new address.
Duplicate catalog requests: The system uses the Edit for Duplicate Catalog Requests (E46) system control value to update duplicate catalog requests. If this value is set to Y, the system checks for a duplicate when you create a new catalog request; if there is a match, the system replaces the existing request with the new one. If this value is set to N or blank, the system creates a new catalog request without checking the existing records.
Individual updates: If you pressed F10 and entered an individual for the sold-to customer, the system creates the new individual for the customer. The individual’s Orig mail type (Original mail type) and Current mail type will be C, the Mail and Rent flags will default from the sold-to customer’s, and the Mail code will default from the Mail flag. If you pressed F18 to select an existing individual, the system updates the individual’s email address, mail flag, and rent flag if you have changed them.
If the individual you enter already exists: If you pressed F10 and entered an individual for the sold-to customer, and the first three positions of the individual’s first name and the first four positions of the individual’s last name match an existing individual for the sold-to customer, you advance to the Display . You can select the existing individual without update, or create the new individual using the information you just entered.
When the catalog request label is printed, the mail history information in the Individual Mail History file (available for review at the Display Individual Mail History Screen) is updated through the catalog request; the Customer Mail History is not updated if there is an individual on the catalog request.
Screen Option |
Procedure |
Enter a catalog request for a new customer |
Complete the fields as described under Create Catalog Request Screen. See Catalog Request Creation Options for an overview. |
Select an existing customer |
Press F8 to advance to the Select Customer for Catalog Request Screen. See Catalog Request Creation Options for an overview. |
Enter individual customer information |
Press F10 to display additional fields for individual customer creation. The Enable Catalog Request at Individual Level (H81) system control value must be set to Y. See Catalog Request Creation Options for an overview, or see Create Catalog Request Screen for individual field descriptions. |
Work with products a customer owns |
Press F16. • If the customer is currently associated with customer ownership records, you advance to the Work with Customer Ownership Screen. • If the customer is currently not associated with customer ownership records, you advance to the Create Customer Ownership Screen. |
Select an existing individual customer |
Press F18 to advance to the Select Customer Individual Screen. The Enable Catalog Request at Individual Level (H81) system control value must be set to Y. See Catalog Request Creation Options for an overview. Note: The system does not prevent you from entering a catalog request for an individual whose Status is Inactive. |
Add notes for the customer |
Press F23 to advance to the Edit Customer Notes Screen. |
Select Customer for Catalog Request Screen
Purpose: In addition to creating catalog requests for people who are not yet customers, you can also create catalog requests for existing customers from the Create Catalog Request Screen.
When creating a catalog request for an existing customer, the system copies customer information from the Sold To Customer directly into the catalog request. See Catalog Request Creation Options for an overview.
How to display this screen: From the Create Catalog Request Screen, press F8.
CSR0193 ENTER Select Customer For Catalog Request 3/23/99 15:36:10
Type Customer information to select and press Enter to continue.
Customer . . . .
Postal code . . Last Name . . . First Name . . . Company . . . .
Telephone# . . .
Alt cust nbr . .
Email Address
F3=Exit F6=Create F12=Cancel |
How to use this screen: Use this screen to advance to scan screens that let you locate existing customer records. If the customer exists, you can select that customer and the system will copy information from the customer into the customer fields on the Create Catalog Request Screen.
Field |
Description |
Customer |
A unique number the system assigns to each customer on creation of the customer through Order Entry, Customer Maintenance, or catalog requests. Ghost customers: If you enter the customer number of a ghost customer, the system displays the Ghost Customer Warning Window. Numeric, 9 positions; optional. |
Postal code |
The postal or zip code that identifies the customer's geographic location. Enter a full or partial code to advance to the Scan Sold To by Postal Code/Company screen. This screen lists all customers by postal code in ascending (lowest to highest) numeric sequence, beginning with the code you entered. If you enter a postal code, last name, and first name, you advance to the Scan Customer Sold To by Postal Code screen, which lists all customers alphabetically beginning with the postal code you entered. Alphanumeric, 10 positions; optional. |
Last name |
The sold-to customer's last name. Enter a last name, first name, and postal code to advance to the Scan Customer by Postal Code/Last Name screen, positioned to the customer with the last name, first name, and postal code you entered. Enter a full or partial name to advance to a Scan Cust Sold To By Last Name screen, which lists all customers alphabetically beginning with the name you entered. You can also include a full or partial first name along with a full (not partial) last name to restrict the scan further. Alphanumeric, 25 positions; optional. |
First name |
The sold-to customer’s first name. Enter the last name, first name, and postal code to advance to the Scan Customer Sold To by Postal Code screen, which lists all customers alphabetically beginning with the postal code you entered. You can also enter just the full (not partial) last name and full or partial first name to advance to the Scan Cust Sold To By Last Name screen. Note: First name must be used in conjunction with Postal code, Last name for scanning. You cannot scan on first name alone, or on first name, last name. Alphanumeric, 15 positions; optional. |
Company |
The name of the company placing the catalog request. Alphanumeric, 30 positions; optional. |
Telephone # |
The customer's daytime, evening, or third (fax or mobile) phone number. The Third Phone Number Type (L53) system control value determines whether the third phone number is labeled the Fax or Mobile number. You can scan on the entire Telephone # field, or from any of the segments of the field. Note: Your entry should include any formatting specified by the telephone number format for the country; for example, if the telephone number format for the United States is (111) 111-111, your entry should include the parentheses and hyphen. See Chapter 14: Setting Up the Country File (WCTY), for more information on telephone number formats by country. Alphanumeric, 14 positions; optional. |
Alt cust nbr (Alternate customer number) |
A number to identify the customer, such as a serial number or an old customer number from a system conversion. Enter an alternate customer number to advance to a subsequent scan screen that lists customers by alternate customer number. See Display Alternate Customer Cross Reference Window (I84) for more information. Alternate Customer Number Label Description The field label name that displays on this screen is based on the name you enter in the Alternate Customer Number Label Description (H95) system control value; if you do not enter a name in this system control value, the field label is Alt cust nbr. Example: If you enter the field label name PC MEMBER# in the system control value, the field label name that displays on this screen is PC MEMBER#. Note: Scanning by the alternate customer number of a ghost customer is not currently implemented if the Display Alternate Customer Cross Reference Window (I84) system control value is set to Y. Alphanumeric, 15 positions; optional. |
Email Address |
An email address for the customer. When you enter a full or partial email address, you advance to the Scan Customer by Email Address screen, where you can scan by any email address on file for a customer. This field is not case sensitive; an email address of abc@example.com matches an entry of ABC@EXAMPLE.COM, and vice versa. Alphanumeric, 30 positions; optional. |
.
Screen Option |
Procedure |
Create a catalog request for an existing customer |
Press F6 to return to the Create Catalog Request Screen without selecting a customer. |
A ghost customer is a customer whose records have been merged with the records of a matching customer through a merge/purge. The ghost customer was the source customer in the merge; records for this customer were merged with the records for a matching target customer. When performing the merge you can elect to flag a source customer as a Ghost. Ghost customer records are retained in the Customer Sold To file for informational purposes, but they do not represent the most recent customer order information from the merged (target customer) records.
When you enter the number of a ghost customer, the pop-up Warning Window displays.
WARNING
Customer number 202 has been merged with Customer 137 . Customer number 137 will be used for this transaction.
Please verify Name and Address with Customer.
F3=Exit F12=Cancel ENTER=Continue
|
Press Enter to advance to the Create Catalog Request Screen with the target customer number entered on the screen. For example, if you enter 202, a ghost customer, the system will display this window informing you that customer 202 has been merged into customer 137. When you continue with the catalog request process, customer 137 will default on the Create Catalog Request screen.
Note: The Ghost Customer Warning pop-up window does not display when you use the Customer Selection Screen.
See Marketing Chapter 37: Working with Merge/Purge Sold-to Names (MMCS) for more information on the merge/purge function.
Canceling the creation: Once you select a customer from the Select Customer for Catalog Request Screen, you return to the Create Catalog Request Screen, which displays the information from the request you selected. If, on review, you learn that the customer information is incorrect, you can remove it from the screen without creating a catalog request.
Press F6 to erase the selected customer information from the Create Catalog Request Screen. The system clears your entries and you can begin again.
Purpose: Use this screen to change the offer number, item number, SKU, source code, or the number of copies for a catalog request.
How to display this screen: At the Work with Catalog Requests Screen, enter 2 next to a catalog request.
CSR0149 CHANGE Change Catalog Request 9/29/98 13:22:22 The KL Mail Order Company
Customer : 26 Catalog requested on 3/30/98 at 9:05:30 by LWARREN Name . . : BERNADETTE T MIRANDA Company : Mail Y Rent Y Street . : 11 EXAMPLE STREET Apt/Suite FRONT Address :
Postal Code 02053 City MEDWAY St MA Country USA Phone (day) (508) 626-2600 ext 264 Customer class 5 (Eve) (508) 533-8038 ext (Fax) ext E-mail address
Offer . . . . MAW THE GREAT WIDE YONDER Item . . . . . COLO/STYL/SIZE Source . . . . MAW SOURCE CODE FOR FIRST TIME BUYERS Printed . . : N (Y/N) # of copies 1
F3=Exit F12=Cancel F16=Customer Ownership F23=Notes |
Field |
Description |
Printed |
A code that identifies whether the catalog mailing label has been printed for a catalog request. The system updates the value in this field when you process the catalog requests; see Chapter 110: Processing Catalog Requests (PCAT). Values are: Y = The catalog label has been printed. N = The catalog label has not been printed. Alphanumeric, 1 position; display-only, updated by the system. |
Date printed |
The date the catalog label was printed. Numeric, 6 positions (MMDDYY format); display-only. |
Catalog requested on |
The date and time of the catalog request. Date: numeric, 6 positions (MMDDYY format); updated by the system. Time: numeric, 6 positions; HHMMSS (hour/hour, minute/minute, second/second) format, updated by the system. |
Catalog requested by |
The name of the system user who entered or processed the catalog request. Alphanumeric, 10 positions; display-only. |
See Create Catalog Request Screen for a description of the other fields on this screen.
Display Catalog Request Screen
To display catalog request: Enter 5 next to a catalog request at the Work with Catalog Requests Screen to advance to the Display Catalog Request screen. You cannot change any information on this screen. See Change Catalog Request Screen for a sample screen and field descriptions.
| Part K: Working with Catalog Requests | Contents | SCVs | Search | Glossary | Reports | XML | Index | Chapter 110: Processing Catalog Requests (PCAT) |

CS11_01 CWDirect 18.0 August 2015 OTN