Chapter 144: Displaying More Options

Purpose: Press F10 when you are Entering Orders, Using Order Inquiry or order maintenance to display a screen that contains additional related options that are unavailable on the regular screens.
In this chapter:
• Alternate Currency View Screen
• Work with Ticklers Screen (order view)
• Edit Customer Actions Window
• Work with Customer Action Notes (WCAN)
• Work with Customer Action Notes Screen
• Change Customer Action Screen
• Resolving or Deleting an Action Issue
• Display Customer Action Screen
• Customer Action Note Details Screen
• Work with Email by Order Number Screen
• Work with Customer Profile Screen
• Work with Email by Customer Sold To Number Screen
• Work with Email by Customer Ship To Number Screen
• Display Return Notices Screen
• Display Return Notice Screen
• Work with Email by Customer Bill To Number Screen
• Display Pick Tickets for Order Screen
• Work with Email by Customer Individual Screen
• Working with Telemarketing Specials
• If Displaying by Item Category
• Updates
• Display Telemarketing Items Window
• Display Order Telemarketing Special Items Window
• Telemarketing Specials Window
• Order Telemarketing Specials Window
• Select Affinity Items Window
• Work with Subscriptions Screen
• Display Carton Contents Screen
• Display Return Notices Screen
• Display Return Notice Screen
• Brokered Backorder Summary Screen
OER0767 ENTER Display More Options 3/11/04 11:44:34 EZK Mail Order
Order # . : 6086 - 001 Sold To . : 43 PARKSIDE APARTMENTS ATTN: MCSTAY, MATTHEW Bill To . : 42 A/R Credit Balance . :
1=Select Alt Currency View Ticklers Cust Action Notes Email for Order Pres Club Membership Customer Profile Email for Cust Sold To Customer Ownership Customer Notes Email for Cust Ship To Dsp Return Notices Void/Reprt Picks Email for Cust Bill To Display Picks Email for Cust Ind Brokered B/O Summary Ord Totals (all recips) Cust Email Addresses Telemarketing Spcls Cust Warranty Info Display Invoices Cust Memberships WW A/R Open Items Customer Affinity Subscriptions Dsp Ctn Contents Letter Request Dsp Batch OM Trans
F3=Exit F12=Cancel |
Note:
• The following options are not available in order inquiry:
• Telemarketing Specials
• Void/Reprint Picks
• Work with A/R Open Items
• The Subscriptions option is not available in order entry/maintenance.
• The CC Application Request option is not available in order maintenance or order inquiry. In addition, the option is available only if a credit card offer is associated with the source code on the order and the CC application mode defined for the order type on the order is set to M (manual).
However, these options are consolidated on one screen for documentation purposes.
Field |
Description |
Order # |
The number of the order and the order ship-to (shipping address) you are currently working with. Order number: numeric, 8 positions; display-only. Ship-to number: numeric, 3 positions; display-only. |
Sold to |
A unique number to identify the customer who placed the order, and the customer's name or company name. Customer number: numeric, 9 positions; display-only. Name: alphanumeric, 41 positions; display-only. |
Bill to |
The bill-to customer associated with the customer who placed the order. This number will be zero if the customer did not use an accounts receivable pay type, or a pay type with an accounts receivable alternate refund type, on the order. Numeric, 7 positions; display-only. |
A/R credit balance |
The total amount of A/R credit and on-account open items due on the bill-to customer account. This credit total is not reduced by the total amount of invoice open items, and includes all A/R credit open items, but does not include items flagged for refund checks and credit card credits or disputed items. Note: This field appears only in order entry/maintenance, and if the Allow A/R Credits as Payments (E81) system control value is set to Y. See the Work with A/R Open Items Screen in Accounts Receivable Chapter 6: Work with A/R Open Items (WARI). Numeric, 9 positions with a 2-place decimal; display-only. |
Available options:
• Alternate currency view: select this option to review order totals in the alternate currency (the currency defined for the offer associated with the source code on the order header). This option is available only if the Use Alternate Currency Pricing (H89) system control value is set to Y and the order is associated with an alternate currency. See Alternate Currency View Screen.
• Ticklers: select this option to work with ticklers associated with the order. See Work with Ticklers Screen. This option is available only if the Use Workflow Management (H96) system control value is set to Y.
• Customer action notes: select this option to enter, update, delete or resolve an action issue for a customer. A pop-up action window opens each time you select the customer until the issue is resolved. See About Customer Action Notes.
• Email for order: select this option to advance to the Work with Email by Order Number Screen, where you can review or work with emails sent to or received from the customer related to the current order.
• President’s Club Membership: select this option to advance to the President’s Club Membership Window where you can review president’s club membership information for the customer, such as the membership program, the cost of the membership, and when the membership expires. You can review President’s Club membership information only for customers that are currently a member of the President’s Club or an error message indicates: Customer is not a President’s Club Member. See Customer Service Chapter 45: President’s Club Memberships for an overview and required set up. This option is available only if the Use President’s Club Membership (H94) system control value is set to Y.
• Customer profile: select this option to create a demographic profile for the current customer, which may describe the customer's gender, age, income, geographic location, or other types of demographic data. See the Work with Customer Profile Screen.
• Email for customer sold to: select this option to advance to the Work with Email by Customer Sold To Number Screen, where you can review or work with emails sent to or received from the sold-to, ship-to, bill-to, or individual customer on the order.
• Customer ownership: select this option to work with products a customer owns. If customer ownership records have been defined for the customer, you advance to the Work with Customer Ownership Screen; otherwise, you advance to the Create Customer Ownership Screen.
• Customer notes: select this option to record or view information about the current customer. See Edit Customer Notes Screen.
• Email for customer ship to: select this option to advance to the Work with Email by Customer Ship To Number Screen, where you can review or work with emails sent to or received from the sold-to or individual customer on the order.
• Display return notices: select this option to advance to the Display Return Notices Screen, where you can review return notices related to SmartLabel returns. This option is available only if a Return Notifications record exists for the order. See Using SmartLabel Returns Processing for an overview.
• Void/reprint picks (order entry/maintenance only): select this option to void or reprint a pick slip for a previous order for the customer, if, for example, the customer wants to use a different shipping service. See the Reprint/Void Pick Slips by Order Screen in Fulfillment Chapter 21: Reprinting and Voiding Pick Slips (WVRP).
• Email for customer bill to: select this option to advance to the Work with Email by Customer Bill To Number Screen, where you can review or work with emails sent to or received from the sold-to or bill-to customer on the order.
• Display picks: select this option to find out the status of picks printed for an order, such as when they were printed and/or confirmed. See the Display Pick Tickets for Order Screen.
• Email for customer individual: select this option to advance to the Work with Email by Customer Individual Screen.
• Order totals: select this option to view accumulated totals across all shipping addresses (recipients) on an order. See Display Order Totals Window.
• Customer email addresses: select this option to advance to the Work with Customer Email Address Screen, where you can review and work with email addresses for a sold-to customer.
• Telemarketing specials (order entry/maintenance only): select this option to view items on telemarketing special for this offer, which might lead you to upsell the customer. See Working with Telemarketing Specials.
• Customer warranty information: select this option to review, create, change, and delete customer warranty information for a product on the order. See the Work with Customer Warranty Information Screen.
• Display invoices: select this option to advance to the Display Invoices Screen where you can review invoices associated with the order.
• Customer memberships: select this option to review or work with membership programs you use to generate periodic orders for the customer. This screen opens each customer membership for the sold-to customer on the current order. This information appears only for the customer who purchased the membership, not the recipient (if any). If the membership was created through order entry rather than the Work with Customer Membership menu option, the order number appears on this screen. You cannot create a customer membership through this screen. See Chapter 130: Working with Customer Memberships (WWCM).
• Work with A/R open items (order entry/maintenance only): select this option to review or work with the disposition of A/R credit and invoice open items for the bill-to customer associated with the customer who placed the order. This option is available only if the Allow A/R Credits as Payments (E81) system control value is set to Y. Additionally, the Access Work with A/R Open Items for Order Entry/Order Maintenance (A67) secured feature controls access to this function. See the Work with A/R Open Items Screen in Accounts Receivable Chapter 6: Work with A/R Open Items (WARI).
• Customer affinity: select this option to display the Select Affinity Items Window listing upsell items for the customer placing the order. From this window you can select one or more items to add to the order. See Chapter 44: Working with Customer Affinity Preferences (WCST).
• Subscriptions (order inquiry only): select this option to review, fulfill, or modify the subscription ordered by the customer. See the Work with Subscriptions Screen.
• Display carton contents: select this option to review the contents of a carton that has shipped. This option is only available if the Use PkMS Interface Values (F31) system control value is set to Y.
• Letter request: This option is not currently supported.
• Display batch OM transactions: select this option to review errors created when the customer attempted to maintain or cancel this order from the web storefront. See Working with Batch Order Maintenance Transactions (WBOM).
• CC Application request (order entry only): select this option to send a credit card application request to a credit card service to determine if the sold to customer on the order is eligible to apply for a new credit card offer. While the request is being processed, the operator can exit the Display More Options screen and continue entering the order. Note: This option is available only if a credit card offer is associated with the source code on the order and the CC application mode defined for the order type on the order is set to M (manual). See Processing Credit Card Applications.
• Brokered B/O Summary: select this option to advance to the Brokered Backorder Summary Screen, displaying information about all backorder lines on the order that were sent to Locate’s Order Broker module for fulfillment. This option is available only if the order includes any brokered backorder lines. See Order Broker Integration for background.
Alternate Currency View Screen
Purpose: Use this screen to review the order totals in the alternate currency associated with the order. This screen is available only if you use alternate currency pricing (the Use Alternate Currency Pricing (H89) system control value is set to Y) and the order is associated with an alternate currency. See Chapter 12: Using Alternate Currency Pricing for an overview and required set up.
If the order is not associated with an alternate currency (the order is in the local currency), the order totals on this screen do not display. You can review the order totals in the local currency on the Display Order Summary Screen or the Work with Order/Recap Screen.
An order is associated with an alternate currency if the offer associated with the source code on the order header has a currency code and conversion rate defined, other than the local currency. The local currency is defined in the Local Currency Code (A55) system control value.
The order totals on this screen relate to the current order only. This means that, although the customer may have placed several orders at the same time that will ship to different addresses, the order totals shown relate just to one order.
Currency calculations: The system multiplies the amount in the local currency by the conversion rate defined in the Order Header Extended file to determine the amount in the alternate currency. Likewise, the system divides the amount in the alternate currency by the conversion rate to determine the amount in the local currency.
Local currency to alternate currency: The system uses this calculation when converting the local currency to the alternate currency: local amount x conversion rate = alternate (foreign) amount.
Alternate currency to local currency: The system uses this calculation when converting the alternate currency to the local currency: alternate (foreign) amount / conversion rate = local amount.
How to display this screen: At the Display More Options Screen, enter 1 next to Alternate Currency View.
OER1239 DISPLAY Alternate Currency View 4/09/02 8:17:47 KAB Co.
Order #: 5663 - 1 Currency Code: JPY
Merch Frt Frt+ Chg Tax Hnd 71040.00 1337.00 668.00 334.00 10657.00 .00 Total 84036.00
Ln# Qty Item COLO STYL SIZE Description Price 1 1 JPY1 ASIAN 16PC DINNERWARE: BLUE 12771.00 2 1 JPY2 ASIAN TEA SET: BLUE WAVE PAT 10691.00 3 1 JPY3 ASIAN PATTERN GLASSES: BLUE 14851.00 4 1 JPY4 ASIAN DINNERWARE 6533.00 5 1 JPY5 ASIAN DINNERWARE: 8PC SET 12623.00 6 1 JPY6 ASIAN 16PC DINNERWARE: BLUE 12771.00 7 1 JPY1SKU RED SMLL ASIAN TABLECLOTH: RED WAVE 400.00 8 1 JPY1SKU BLUE SMLL ASIAN TABLECLOTH: BLUE WAVE 400.00
F3=Exit |
Field |
Description |
Order # |
The order number and ship to number whose order totals you are reviewing in the alternate currency. Numeric, 9 positions; display-only, assigned by the system. |
Currency code |
The code for the currency associated with the order. An order is associated with an alternate currency if the offer associated with the source code on the order header has a currency code and conversion rate defined, other than the local currency. The local currency is defined in the Local Currency Code (A55) system control value. The currency code and conversion rate for the order are stored in the Order Header Extended file. Alphanumeric, 3 positions; display-only. |
Merch (Merchandise) |
The total value of merchandise on this order in the alternate currency. This does not include freight, additional charges, tax (except for hidden tax), duty, handling, or sold out items. The value in the Merch field is the grand total of the item price on the line multiplied by the quantity ordered. Numeric, 9 positions with a 2-place decimal; display-only, updated by the system. |
Frt (Freight) |
The total charge for shipping the current order in the alternate currency. Shipping charges are based on the freight method defined for the source code used on the order. This amount also includes any service charges by ship via and order weight charges by ship via. See Fulfillment Chapter 30: Working with Ship Via Codes (WVIA). This amount does not include any additional charges associated with shipping this item (see the Frt+ field for these totals). This field is blank if no freight is charged on the order (Calc freight = N). Numeric, 7 positions with a 2-place decimal; display-only, updated by the system. |
Frt+ (Additional freight) |
The total additional freight charges on the current order in the alternate currency. Additional freight charges can be defined for a shipper in the Ship Via file. For example, a shipper can charge a premium for overnight or express deliveries. Numeric, 7 positions with a 2-place decimal; display-only, updated by the system. |
Chg (Additional charges) |
The total extra charges added to the current order in the alternate currency. This can be an additional service charge defined for the source code or offer used on the order, an additional shipping charge for an item on the order, a guaranteed service charge defined for the offer, or any type of miscellaneous charge or credit added to the order. Numeric, 7 positions with a 2-place decimal; display-only, updated by the system. |
Tax |
The total sales tax on the current order in the alternate currency, based on the merchandise dollar value of the order and, optionally, freight and special handling. Tax does not accumulate here for orders subject to VAT and tax-inclusive pricing. Numeric, 7 positions with a 2-place decimal; display-only, updated by the system. |
Hnd (Handling) |
The total special handling charge on the current order in the alternate currency. Numeric, 7 positions with a 2-place decimal; display-only, updated by the system. |
Total (Order total) |
The grand total of all charges on the current order in the alternate currency. This includes merchandise, freight, additional freight, additional charges, tax, and handling. Numeric, 11 positions with a 2-place decimal; display-only, updated by the system. |
Ln# |
The line number of the item on the order. Numeric, 3 positions; display-only. |
Qty |
The number of units ordered of the item. Numeric, 5 positions; display-only. |
Item |
A code for the item on the order. Alphanumeric, 12 positions; display-only. |
SKU |
The style of the item, such as its color or size. Alphanumeric, one 14-position field (full SKU) or three 4-position fields (split SKU). |
Description |
A description of the item on the order. Alphanumeric, 40 positions; display-only. |
Price |
The extended selling price of the item in the alternate currency, based on the quantity ordered. The system calculates the price by taking into account any price breaks, source or order discounts. The system calculates the price using the pricing hierarchy in the System Control file. Numeric, 7 positions with a 2 place decimal; display-only, calculated by the system. |
Work with Ticklers Screen (order view)
Purpose: Use this screen to review, work with, and resolve ticklers associated with the order, sold to customer on the order, and bill to customer on the order.
Secured feature: If you do not have authority to the Update All Ticklers (B09) secured feature, you cannot update a tickler that is not assigned to you or your tickler groups or an error message indicates: Not authorized to change.
This secured feature controls updating a tickler by:
• entering 2 next to a tickler to change it.
• entering 4 next to a tickler to delete it.
• entering 7 next to a tickler to assign the tickler to yourself.
• entering 11 next to a tickler to resolve it.
If you do not have access to this feature, you can update only ticklers assigned to you or your tickler groups. However, you can still release an order associated with the tickler from hold.
See Workflow Management Overview and Setup for an overview and required setup for workflow management processing.
How to display this screen: At the Display More Options Screen, enter 1 next to Ticklers.
CSR1313 DISPLAY Work with Ticklers 8/20/02 16:18:56 KAB Co. CURRENT OPEN
Order# . . : 6186 Status: X Sold To . : 6 PAWS AND CLAWS PET SUPPLIES ATTN: MIRANDA Bill To . . : 49 MIRANDA, BERNADETTE T
Opt S P Assigned Ev Cat Tickler# User Group User Item OST# 1
Type options, press Enter. 2=Change 4=Delete 5=Display 6=Release 7=In process 8=Notes 9=Detail 10=History 11=Resolve 12=Procedure
O 6 8/08/02 NO NO 2981 CPSUPER 1 O 6 8/08/02 NO NO 2982 KBOTTGER 1
F3=Exit F6=Create F9=Count F12=Cancel F14=Open/Resolved F16=Cust Sold To F21=List F24=Select company |
Field |
Description |
Order # |
The order associated with the ticklers on the screen. Numeric, 9 positions; display-only. |
Status |
The status of the order. blank = open A = archived to optical disk C = cancelled H = held P = purged S = suspended X = closed Alphanumeric, 1 position; display-only. |
Sold to |
The number and description of the sold to customer associated with the ticklers on the screen. Sold to number: Numeric, 9 positions; display-only. Sold to description: Alphanumeric, 40 positions; display-only. |
Bill to |
The number and description of the bill to customer associated with the ticklers on the screen. Bill to number: Numeric, 9 positions; display-only. Bill to description: Alphanumeric, 40 positions; display-only. |
S (tickler status) |
The status of the tickler. O = Open; the tickler is open and is available to work on in the assigned tickler work queue. I = In use; the tickler is currently being worked on by the assigned user. R = Resolved; the tickler has been resolved. Alphanumeric, 1 position; optional. |
P (tickler priority) |
The priority of the tickler, indicating how important the issue associated with the tickler is to resolve (1 is the lowest priority and 9 is the highest priority). Numeric, 1 position; optional. |
Assigned (assign date) |
The date the tickler was assigned to the user or tickler user group. Numeric, 7 positions (CYYMMDD format); optional. |
Ev (tickler event code) |
The code for the tickler event that created the tickler. AR = A/R accounts BO = Backorders CO = Cancelled orders HO = Held orders MN = Manually created NO = New orders OO = Aged open orders SO = Sold out orders UP = Unconfirmed pick tickets VP = Voided pick tickets WF = Remote workflow See System Delivered Tickler Events. Alphanumeric, 2 positions; optional. |
Cat (tickler category) |
The tickler category assigned to the tickler. Tickler categories are defined in and validated against the Tickler Category file; see Working with Tickler Category (WTCT). Alphanumeric, 3 positions; optional. |
Tickler# |
The tickler number assigned to the tickler, from the Tickler Number number assignment record. Numeric, 9 positions; optional. |
User group |
The group ID of the tickler user group assigned to the tickler. Tickler user groups are defined in and validated against the Tickler User Group file; see Working with Tickler User Groups (WTUG). Tickler group ID: Alphanumeric, 10 positions; display-only. |
User |
The user ID of the user assigned to the tickler. Users are defined in and validated against the User file; see Working with User Records (WUSR). User ID: Alphanumeric, 10 positions; display-only. |
Item |
The item associated with the tickler. Alphanumeric, 12 positions; optional. |
OST# (order ship to number) |
The order ship to associated with the tickler. Numeric, 3 positions; optional. |
Screen Option |
Procedure |
Change a tickler |
Enter 2 next to a tickler to advance to the Change Tickler Screen. |
Delete a tickler |
Enter 4 next to a tickler to delete it. You can only delete MN (manually created) ticklers. |
Display a tickler |
Enter 5 next to a tickler to advance to the Display Tickler Screen. |
Release the order associated with the tickler from hold |
Enter 6 next to a tickler to advance to the Release Reason Prompt Pop-Up Window (order header hold), Release Recipient Hold Reason Pop-Up Window (recipient hold), and/or Release Order Payment Method Window (pay type hold). If you release an order from hold for an HO (held order) tickler, the system automatically resolves the tickler. Also, the system evaluates any other ticklers associated with the order to determine if they can be resolved. If you enter 6 next to a tickler not associated with a held order, an error message indicates: Order not on hold. If you enter 6 next to a tickler not associated with an order, an error message indicates: Tickler not eligible for this option. Note: You must have authority to the Release Held Orders (ERHO) menu option to release the order from hold. |
Select a tickler to work on |
Enter 7 next to a tickler to change the status of the tickler from open (O) to in use (I). You can only select to work with a tickler that is in an open status; if you enter 7 next to a tickler that is in an in use (I) or resolved (R) status, an error message indicates: Tickler status cannot be changed - resolved or already in process. Selecting this option automatically assigns the tickler to the user and creates a tickler history record. |
Enter or review tickler work notes |
Enter 8 next to a tickler to advance to the work notes screen, based on the note type defined for the tickler. Note type A advances you to the Edit Customer Actions Window. Note type B advances you to the Work with Bill To Notes Screen. Note type O advances you to the Work with Order Messages Screen. Note type S advances you to the Edit Customer Notes Screen. Note type T advances you to the Work with Tickler Notes Screen. |
Review the tickler source |
Enter 9 next to a tickler to advance to the source screen, based on the tickler event associated with the tickler. AR ticklers advance you to the Work with Open Items Screen. BO, CO, HO, NO, OO, SO, UP, VP, and WF ticklers advance you to the Order Inquiry Header Screen. You cannot view the source for MN ticklers: Requested tickler has no source reference. |
Review tickler history |
Enter 10 next to a tickler to advance to the Work with Tickler History Screen. |
Resolve a tickler |
Enter 11 next to a tickler to advance to the Resolve Tickler Window. |
Review procedures for a tickler |
Enter 12 next to a tickler to advance to the Work with Tickler Event Rule Procedure Screen. You cannot add or change tickler procedures when you advance from the Work with Tickler screen. You cannot review procedures for MN ticklers. |
Create a tickler for the MN (manually created) tickler event |
Press F6 to advance to the Create Tickler Screen. Note: To create a MN tickler, you must have authority to the Create Manual Tickler (B13) secured feature. |
Review the number of ticklers in the work queue, based on the selection criteria you have defined |
Press F9 to advance to the Current Tickler Count Window window. |
Toggle between displaying open and in use ticklers or resolved ticklers |
Press F14. The system toggles between displaying: • ticklers in an open (O) or in use (I) status. • tickler in a resolved (R) status. |
Review ticklers associated with the sold to customer on the order |
Press F16 to advance to the Work with Ticklers Screen (sold to customer view). |
Purpose: Use Customer Action Notes to identify and address critical customer issues that need action. The two options you can use to enter, delete, display, resolve, update the status, or attach detailed notes about a customer issue are:
• Edit Customer Actions Window
• Work with Customer Action Notes (WCAN)
You can use the Customer Actions function to enter and track customer issues regarding an order (or anything else). In a customer action note you can:
1. Enter a brief statement about a customer issue or problem.
2. Enter a reason code to identify the issue or problem for further grouping and reports.
3. Assign the issue to a specific user for follow up or resolution.
4. Add detailed information describing the customer issue.
5. Update the status of the action from O (open) to W (work in process), and, optionally, override the assigned user.
6. Identify the issue as R (resolved) when it meets the customer's satisfaction.
Dealing with customer action issues: To resolve an unresolved action issue you should:
1. Review the action description, which is a brief description of the problem.
2. Respond to the issue by:
• Entering 4 to delete the issue immediately.
• Entering 5 to review time and date statistics associated with the customer action.
• Entering 23 to view or enter detailed information about the action issue.
• Entering 7 to view or enter detailed information about the action issue. This option also automatically updates the status from O (open) to W (work in process), and automatically updates the most recent user.
• Entering 8 to resolve the issue and change the status from O (open) or W (work in process) to R (resolved).
Secured features: The following secured features define whether you have authority to add, delete, update, or resolve customer action issues:
• Change Customer Action Notes Description (A93)
• Add Customer Action Detail Notes (A94)
• Change Customer Action Detail Notes (A95)
• Delete Customer Action Notes (A96)
• Change Customer Action Notes Status/Work in Process (A97)
• Change Customer Action Notes Status/Resolve (A98)
Purpose: A pop-up window opens during order entry or when you work with Customer Memberships when you select a customer with an unresolved action issue. This window appears when you press Enter at the order header or order header/detail screen and the system validates your entries. The system assigns a status of O (open) to all new customer action issues. The status can be updated to W (work in process) if the issue has been investigated but not yet resolved. The customer actions pop-up window appears each time you select this customer (through order entry, order inquiry, order maintenance, customer maintenance, customer memberships, or catalog requests) until you mark the action issue as R (resolved).
Note:
• this window opens automatically only once per order.
• this window displays the customer action issues entered for a single customer. To review all action issues in your company, use the Work with Customer Action Notes (WCAN) menu option.
• You can print a report listing customer action notes by date or by the person who entered them. See Chapter 41: Printing the Customer Exposure Report (PCER).
How to display this window:
• at the Display More Options Screen, enter 1 next to Customer Action Notes.
• enter 16 next to a customer at a Work with Customer screen (see Chapter 27: Selecting Customers)
• press F16 at the Create or Change Customer Sold To screen (see Chapter 28: Creating and Updating Sold-to Customers (WCST)).
If you Use Workflow Management (H96):
• enter 8 next to a tickler at the Work with Tickler Screen (user/group view) or Workflow Management Screen (tickler supervisor).
• press Enter at the Create Tickler Screen.
• press F8 at the Change Tickler Screen or Display Tickler Screen.
Edit Customer Actions
Customer : 137 MARLOW, DAN W
Type options, press Enter. 4=Delete 5=Display 7=Work in Process 8=Resolve 23=Detail notes
Opt Action Description Rn User S Resolved LOST PACKAGE IS BEING TRACKED P LWARREN W D CUSTOMER RECEIVED DAMAGED PACKAGE D LWARREN O GIFT WRAP ORDER FREE OF CHARGE D LWARREN R 4/13/99
ENTER = twice to update F3=Exit F12=Cancel |
Field |
Description |
Customer (Sold-to customer number) |
A number assigned by the system to identify the customer. Numeric, 9 positions; display-only, assigned by the system. |
Customer name (unlabeled field to the right of the Customer field) |
The customer's last name, first name and middle initial. Last name: alphanumeric, 25 positions; display-only. First name: alphanumeric, 15 positions; display-only. Initial: alphanumeric, 1 position; display-only. |
Action description |
The issue that needs to be investigated and resolved for the customer. Enter only 1 issue per line. If necessary, enter more information about the issue by entering 23 next to the issue. Note: If there is more than one action note for the customer, the Customer Detail Exposure Report by Reason Code lists just the first note. Alphanumeric, 40 positions; required. |
Rn (Customer action reason code) |
This value identifies the reason behind the customer action note. Reason codes are defined in and validated against the Customer Action Reason Codes file; see Chapter 23: Working with Customer Action Reason Codes (WCAR). Alphanumeric, 2 positions; optional. |
User |
The user ID of the person who should follow up on or resolve the action issue. Alphanumeric, 10 positions, optional. |
S (Status) |
The current status of the issue. Valid status codes are: O = Open: initial status of all action issues W = Work in Process: issue investigated but not yet resolved. Enter 7 next to the issue to view the details of the issue, update the user ID, and update the status to W (work in Process). R = Resolved: issue resolved and closed Enter 8 next to the issue to update the status to R (resolved). Alphanumeric, 1 position; display-only, updated by the system. |
Resolved (Date resolved) |
The date when the customer action issue was resolved. The current date defaults when you Enter 8 next to an issue to close it. Numeric, 6 positions (MMDDYY format); display-only, updated by the system. |
D (Details; unlabeled field to the right of the Resolved field) |
This value identifies whether the customer action note contains a further description. Enter 23 next to an issue to view the details. Alphanumeric, 1 position; display-only. |
Screen Option |
Procedure |
Create a note for an action issue |
Enter a brief description of an issue on one of the lines available. Optionally, you can enter a reason code and the ID of the user assigned to follow up on the issue. |
Delete an action issue |
Enter 4 next to an issue to delete it. See Resolving or Deleting an Action Issue. |
Display statistics for an action issue |
Enter 5 next to an issue to advance to the Display Customer Action Screen. |
Update the status of an action issue to “work in process” |
Enter 7 next to an issue to set its status to W and advance to the Customer Action Note Details Screen. |
Identify an issue as “resolved” |
Enter 8 next to an issue to “resolve” it. See Resolving or Deleting an Action Issue. |
Enter detailed notes for an issue |
Enter 23 next to an issue to advance to the Customer Action Note Details Screen. |
Work with Customer Action Notes (WCAN)
Purpose: Use this menu option when you want to view or work with a list of all customer action issues for a company. Using this menu option, you can delete, display, resolve, update the status of an issue, or attach detail notes for a customer action issue, by using options similar to those on the Edit Customer Actions Window. At the Work with Customer Actions menu option, you can also:
• View a list of all unresolved customer action issues for your company
• View the ID of the user who initially entered the customer action issue, as well as the ID of the user assigned to the customer action issue when it was created, or the most recent user to work with this customer action issue
• Scan for an action issue by reason code, status and date
• Advance to the Scan Orders by Customer screen (option 9)
• Advance to Order Inquiry Scan Screen
• Select another company
• Customer action issues that have been resolved do not display on this screen.
• You cannot create a note for a new customer action issue at this screen. Use the Edit Customer Actions Window to create a customer action note.
• You can print a report listing customer action notes by date or by the person who entered them. See Chapter 41: Printing the Customer Exposure Report (PCER).
Work with Customer Action Notes Screen
How to display this screen: Enter WCAN in the Fast path field at the top of any menu or select Work with Customer Action Notes from a menu.
SR1026 DISPLAY Work With Customer Action Notes 4/14/99 11:28:28 EZK MAIL ORDER COMPANY
Entry Ent Worked On Opt Rn S Date Customer# User User Date Dtl
Type options, press Enter. 2=Change 4=Delete 5=Display 7=Work in Process 8=Resolve 9=Order Inq 23=Detail Notes
B W 2/15/99 26 KLETENDRE LWARREN 4/13/99 D BACKORDER UPDATE SENT B O 4/13/99 137 DMARLOW LWARREN BACKORDER DEADLINE NOT MET D W 4/12/99 130 KLETENDRE LWARREN 4/13/99 D CUSTOMER RECEIVED DAMAGED PACKAGE D W 4/10/99 137 SROSSI NTRAVIS 4/16/99 D GIFT WRAP ORDER FREE OF CHARGE NS O 4/22/99 129 DMARLOW NTRAVIS D CUSTOMER NOT SATISFIED W/ COLOR
F3=Exit F8=Order Inquiry F12=Cancel F24=Select Company |
Field |
Description |
Rn (Reason Code) |
The code representing the reason for the customer action issue. See Chapter 23: Working with Customer Action Reason Codes (WCAR). Alphanumeric, 2 positions; optional. |
S (Status) |
The status of the customer action issue. Enter O to display all customer action issues whose status is “open,” or W to display all customer action issues whose status is “work in process.” Alphanumeric, 1 position; optional. |
Entry date |
The date the customer action issue was entered. Numeric, 6 positions; optional. |
Customer # |
A number which identifies the customer. Numeric, 9 positions; display-only. |
Ent user (Entered user) |
The user who initially entered the customer action issue Alphanumeric, 10 positions; display-only. |
Worked on user |
The user who has most recently worked on the customer action issue. This field automatically updates when a user selects option 7 (work in process) to update the status of an issue and enter details of its investigation; if the status of an issue has not been updated, this field displays the ID of the user initially assigned to investigate the issue. Alphanumeric, 10 positions; display-only. |
Worked on date |
The most recent date that the issue was investigated and “work in process” details were entered. This field automatically updates when a user selects option 7 (work in process) to update the status of the issue and enter details of its investigation. If no action has been taken on the issue, its status remains O (open) and this field is blank. Numeric, 6 positions; display-only. |
Dtl (Details) |
The code indicating whether detail notes have been entered for this issue. D indicates detail notes have been entered; otherwise, the field remains blank. Alphanumeric; 1 position; display-only. |
Description (Unlabeled field) |
A brief description of the customer action issue. Alphanumeric, 40 positions; display-only. |
Screen Option |
Procedure |
Change a customer action note |
Enter 2 next to a customer action note to advance to the Change Customer Action Screen. |
Delete a customer action note |
Enter 4 next to a customer action note to delete it. See Resolving or Deleting an Action Issue. |
Display a customer action note |
Enter 5 next to a customer action note to advance to the Display Customer Action Screen. |
Enter detailed notes for a customer action issue |
Enter 23 next to a customer action note to advance to the Customer Action Note Details Screen, where you can enter details of the action issue. This option will not update the status of the issue. |
Update the status of a customer action issue to indicate that the issue has been investigated but not yet resolved |
Enter 7 next to a customer action note to advance to the Customer Action Note Details Screen, where you can detail any actions that have been taken on the customer issue. This option automatically updates the Status and Worked on user fields of the issue. |
Resolve the issue |
Enter 8 next to a customer action note to resolve the issue and clear it from this screen. |
Advance to the Scan Orders by Customer screen |
Enter 9 next to a customer action note to advance to the Scan Orders by Customer screen. See Chapter 52: Using the Order Inquiry Scan Screens (OIOM). |
Advance to the Order Inquiry screen |
Press F8 to advance to the Order Inquiry Scan Screen. |
Purpose: Use this screen to change the description of the action issue, the reason code, and the user assigned to follow up on the issue.
Note: You can also change a customer action note at the Edit Customer Actions Window by entering over the previous entries.
How to display this screen: Enter 2 next to a customer action issue at the Work with Customer Action Notes Screen.
Note: If you do not have authority to the Change Customer Action Notes Description (A93) secured feature, you cannot change the description of an action note on the Edit Customer Actions Window, and when you try to advance to the Change Customer Action Screen from the Work with Customer Action Notes Screen, the system displays a message:
Not authorized to change
.
CSR1028 CHANGE Change Customer Action 4/16/99 9:01:31 EZK MAIL ORDER COMPANY
Customer : 130 WARREN, ABBEY
Action . . PACKAGE DAMAGED, ITEM WATER-STAINED Status . : Work in process
For user . LWARREN Linda Warren
Reason . . D CUSTOMER RECEIVED DAMAGED PACK
Entered : 4/12/99 9:32:44 by LWARREN Linda Warren Resolved : 0:00:00 by
F3=Exit F12=Cancel |
Field |
Description |
Customer (Sold-to customer number) |
A number assigned by the system to identify the customer. Numeric, 9 positions; display-only, assigned by the system. |
Customer name (Unlabeled field to the right of the customer field) |
The customer's last name, first name and middle initial. Last name: alphanumeric, 25 positions; display-only. First name: alphanumeric, 15 positions; display-only. Initial: alphanumeric, 1 position; display-only. |
Action |
A brief sentence describing the customer action issue. Alphanumeric, 40 positions. |
Status |
The current status of the customer action issue. Valid values are: O = Open: this is a new issue. W = Work in process: the issue has been investigated but not yet resolved. R = Resolved: the issue has been investigated and closed using option 8. Alphanumeric, 1 position; display-only, updated by the system. |
For user |
The user ID of the person who should follow up on or resolve the action issue. Alphanumeric, 10 positions. |
Reason |
The reason code and description behind the customer action note. Reason code: alphanumeric, 2 positions. Reason description: alphanumeric, 30 positions; display-only. |
Entered |
The date the customer action issue was entered. This field defaults to the current date when you create the customer action note. Numeric, 6 positions (MMDDYY format); display-only. |
Entered user name (Unlabeled field next to the Entered field) |
The user ID and name of the person who entered the action issue. User ID: alphanumeric, 10 positions; display-only. User name: alphanumeric, 30 positions; display-only. |
Resolved (Date resolved) |
The date the customer action issue was resolved. This field defaults to the current date when you use option 23 to resolve the issue. Numeric, 6 positions (MMDDYY format); display-only. |
Resolved user name (Unlabeled field next to the Resolved field) |
The user ID and name of the person who resolved the action issue. User ID: alphanumeric, 10 positions; display-only. User name: alphanumeric, 30 positions; display-only. |
How to use this screen: To change the action description, the user, or the reason code, enter over the information already entered in these fields to return to the Work with Customer Action Notes Screen.
Resolving or Deleting an Action Issue
Purpose: There are two ways to close a customer action issue at the Edit Customer Actions Window: deleting it or resolving it.
Note: Similarly, you can also resolve or delete a customer action issue at the Work with Customer Action Notes Screen.
To delete: Enter 4 next to the issue you want to delete.
Note: The action issue is deleted immediately from the screen; there is no Confirm Delete pop-up window.
The deleted issue no longer displays automatically for the customer.
To resolve: Enter 8 next to the issue you want to identify as “resolved.”
The resolved issue will no longer display on the Work with Customer Action Notes Screen; however, a resolved issue will continue to appear on the Edit Customer Actions Window in a status of R (resolved) until it is deleted. This may be useful if, for example, the action has been resolved but you still need to notify the customer.
Optionally, you can enter 23 next to a resolved issue to advance to the Customer Action Note Details Screen, where you can enter notes about how you resolved the issue.
Note: If you do not have authority to the Delete Customer Action Notes (A96) secured feature, a message indicates when you try to delete a customer action issue: Not authorized to delete. If you do not have authority to the Change Customer Action Notes Status/Resolve (A98) secured feature, a message indicates when you try to resolve a customer action issue: Not authorized to this option.
Display Customer Action Screen
Purpose: Use this screen to review time and date statistics for a customer action issue, which are updated by the system. You cannot update any information on this screen.
How to display this screen: Enter 5 next to a customer action issue at the Edit Customer Actions Window or at the Work with Customer Action Notes Screen.
CSR0082 DISPLAY Display Customer Action 10/24/97 9:39:06 The KL Mail Order Company
Customer : 26 MIRANDA, BERNADETTE T
Action . : GIFT WRAP ORDER FREE OF CHARGE Status . : Resolved
For user : ELISE_K Elise Kaplan
Reason . : D CUSTOMER RECEIVED DAMAGED PACK
Entered : 10/23/97 16:27:23 by KAREN_L Karen Letendre Resolved : 10/23/97 16:41:51 by KAREN_L Karen Letendre
F3=Exit F12=Cancel |
Field descriptions: Each field on this screen is described under Edit Customer Actions Window and Work with Customer Action Notes Screen.
Customer Action Note Details Screen
Purpose: Use this screen to add additional information about a customer action issue. The comments you enter on this screen are attached to the short description of the customer issue that appears on the Edit Customer Actions Window. You can also use this screen to enter information about what steps you have taken toward resolving the issue, and to update the status from O (open) to W (work in process).
How to display this screen: Enter 23 next to an action issue at the Edit Customer Actions Window and the Work with Customer Action Notes Screen. You can also display this screen by entering 7 next to an action issue; in this situation, the status of the issue changes from O (open) to W (work in process).
CSR0325 CHANGE Customer Action Note Details 10/24/97 9:56:24 The KL Mail Order Company
Customer # 26 Status R Entry date 10/23/97 User KAREN_L Description : GIFT WRAP ORDER FREE OF CHARGE Note (KL)Customer sent gift package to recipient. The recipient received a damaged package (the package was dented) though the item purchased was not damaged. Customer should receive gift wrap free of charge on next order for good customer service. (EK): Added gift wrap free of charge on customer's order.
F3=Exit F12=Cancel |
User override: If you are not the assigned user, the system displays the following pop-up window:
Confirm User Override
User ( KLETENDRE ) already assigned. To override user press F9.
F3=Exit F9=Accept |
Press F9 to advance to the Customer Action Note Details Screen. The status of the customer action issue will automatically change from O (open) to W (work in process), indicating that the issue has been investigated, and the user ID will automatically update to the current user.
Field |
Description |
Customer# (Sold-to customer number) |
A number assigned by the system to identify the customer. Numeric, 9 positions; display-only, assigned by the system. |
Status |
The current status of the customer action issue. Valid values are: O = Open: this is a new issue. W = Work in process. R = Resolved: the issue has been investigated and closed. Alphanumeric, 1 position; display-only. |
Entry date |
The date the customer action issue was entered. This field defaults to the current date when the issue is entered. Numeric, 6 positions (MMDDYY format); display-only. |
User |
The user ID of the person who entered the action issue. This is not necessarily the same as the user assigned to follow up on the issue, or the most recent user to work on the issue. Alphanumeric, 10 positions. |
Description |
A short description of the customer action issue, which was entered on the Edit Customer Actions screen. Alphanumeric, 40 positions |
Note |
Entry fields for you to enter as much information as necessary to fully describe the customer action issue. If you need extra space, use Shift/Roll or Page Down to display more entry fields. The notes you enter on this screen are attached to the short description of the customer action issue. Alphanumeric, 60 positions per line. |
About this screen: Enter as much information as necessary to fully describe the customer action issue. If you need additional space, press Shift/Roll or Page Down to display extra entry fields. Press Enter when you are through entering notes.
Note: If you do not have authority to the Add Customer Action Detail Notes (A94) secured feature, you cannot add extra lines of detail notes to this screen. If you do not have authority to the Change Customer Action Detail Notes (A95) secured feature, you cannot change the notes already entered; the notes are display-only.
Work with Email by Order Number Screen
Purpose: Use this screen to review emails associated with an order.
About emails: The Correspondence History file stores outbound and inbound emails related to an order, customer (including sold-to, ship-to, individual, and bill-to customers), vendor or purchase order. You can associate an email with an order by indicating the order number when you forward the email into the system, or by specifying the order number at the Change Email Screen. See Email Repository Overview for more information.
Outbound emails: The Write Outbound Email to Email Repository (H99) system control value controls whether to store header information for outbound email notifications, or for the Outbound Email XML Message (CWEmailOut) if specified for the notification type.
How to display this screen: Enter 1 next to Email for Order at the Display More Options Screen.
CSR1244 DISPLAY Work with Email By Order # 9/23/02 10:10:33 EZK Mail Order
Order #. . : 7488 - 1 Status: Closed Customer # : 291 COMMERCIALWARE ATTN: BROWN, SARAH
Create Email Opt Date Date Cat Src SUBJECT
Type options, press Enter. 2=Change 4=Delete 5=Display 6=Create tickler 7=Display detail
9/05/02 9/05/02 NTF INT ORDER UPDATE CONFIRMATION 8/29/02 8/15/02 EXT WHERE IS MY ORDER? 8/21/02 8/21/02 NTF INT ORDER CONFIRMATION
F3=Exit F7=W/W Email By Customer# F8=Subject/Email address F12=Cancel |
Field |
Description |
Order # |
A number identifying the order that you are currently reviewing or working with. The order ship-to number is separated by the order number with a semicolon (-). Order number: numeric, 8 positions; display-only. Order ship-to number: numeric, 3 positions; display-only. |
Status |
The status of the order. Possible statuses are: • Canceled • Held • Suspended • Closed • Open Alphanumeric, 10 positions; display-only. |
Customer # |
A number to identify the customer who placed the order, the customer’s name, and the company name, if any. Customer number: numeric, 9 positions; display-only. Customer company and name: alphanumeric, 41 positions; display-only. |
Create date |
The date when the email was forwarded into the system, and the Correspondence History record was created. Numeric, 6 positions (MMDDYY format); optional. |
Email date |
The date when the email was originally sent. Numeric, 6 positions (MMDDYY format); optional. |
Category |
A category that you use to group email correspondence between you and your customers. A category of NTF indicates that the email was a notification generated by the system and sent to the customer. Alphanumeric, 3 positions; optional. |
Source |
Indicates whether the email was inbound or outbound. Valid values are: • EXT = the email was forwarded into CWDirect • INT = the email originated in CWDirect and was sent to a customer. A user-supplied code indicating the email’s source is not currently implemented. Alphanumeric, 3 positions; optional. |
Subject |
The subject line of the email. • Inbound emails: Things to note: • When you forward an email into CWDirect, the system deletes FW: from the beginning of the subject line; however, if the email has been forwarded multiple times, only the first occurrence will be deleted. • The system renders the text of the subject line in all capital letters. • The subject line is truncated if it exceeds the maximum length of this field. • The system converts certain special characters. See Symbol and Special Character Conversion in Emails. The system deletes the email identifiers from the subject line if translation is successful. For example, a subject line reading FW: COMPANY=27;CUSTOMER=613;ATTACHMENT=N; Where is my order? would be translated to WHERE IS MY ORDER? Even if translation is successful, however, it does not necessarily mean that the email is assigned to a customer; it is possible for the email identifiers to be formatted correctly, but for the values specified to be incorrect or inconsistent. |
|
• Outbound emails: Possible subject lines for outbound email notifications are: • ORDER CONFIRMATION • Credit Card Credit Acknowledge • SOLD OUT NOTIFICATION • Ship Conf. - Order #99999999 • BACKORDER NOTIFICATION • GIFT CERTIFICATE • Return Conf. - Order #99999999 • ORDER UPDATE CONFIRMATION Summary information for an outbound email or Outbound Email XML Message (CWEmailOut) is stored only if the Write Outbound Email to Email Repository (H99) system control value is set to Y. See When Does the System Generate an Email Notification? for information on system-generated emails. To switch between displaying the subject line and the originating email address for the email, press F8. Alphanumeric, 78 positions; display-only. |
Email address |
The email address of the person who originated the email. When an email is forwarded into the system by a customer service representative, this is not the email address of the person who sent the email into CWDirect; instead, the email site in CWIntegrate searches the text of the forwarded message for the originating email address. For example, if the forwarded message begins: -----Original Message----- From: lak@yahoo.com Sent: 08/09/2002 10:33:38 AM To: Elise Kaplan Cc: Subject: where is my order The email site can determine that lak@yahoo.com is the originating email address. If the email site cannot find the originating email address, it substitutes a standard email address that indicates the originating address was not available. The default is forwardMissing@error.com, but can vary depending upon your setup. See Default Values to Identify the Originating Email Address in the CWIntegrate Emails Integration Manual for an overview of how the email site determines the originating email address. To switch between displaying the subject line and the originating email address for the email, press F8. Alphanumeric, 50 positions; display-only. |
Option |
Procedure |
Change the assignment of an email |
Enter 2 next to an email to advance to the Change Email Screen. The system confirms that your entries at this screen are consistent; see Identifying an Unrouted Email for more information. Note: The Changed Routed Email (B08) secured feature controls the ability to change an email assigned to an order number or customer. If you do not have authority to change a routed (assigned) email, you can enter 5 next to an email to advance to the Display Email Screen, where you can review all of the same information. |
Delete an email |
Enter 4 next to an email to delete it. |
Display information about an email |
Enter 5 next to an email to advance to the Display Email Screen. |
Create a tickler for the MN (manually created) tickler event |
Enter 6 next to an email to advance to the Create Tickler Screen. Note: To create a MN tickler, you must have authority to the Create Manual Tickler (B13) secured feature. |
Display email subject and text |
Enter 7 next to an email to advance to the Display Email Detail Screen. |
Review all emails assigned to the sold-to customer |
Press F7 to advance to the Work with Email by Customer Sold To Number Screen. |
Switch between displaying the subject line and the originating email address for the email |
Press F8. |
Work with Customer Profile Screen
Purpose: Use this screen to create or view the customer's demographic profile. This helps you gather as much information as possible about the customer, categorize the customer, target the customer for specific promotions or catalog mailings, and include the customer name in customer lists you sell to other companies.
You define customer profile categories, such as age, income, or gender, and the valid values for each category through the Work with Profile Categories function. See Chapter 16: Setting Up Customer Profiles (WPFL).
How to display this screen:
• enter 1 next to a Customer Profile at the Display More Options Screen;
• enter 17 next to a customer at a Work with Customer screen (see Chapter 27: Selecting Customers);
• press F17 at the Create or Change Cust Sold To screen (see Chapter 28: Creating and Updating Sold-to Customers (WCST)).
Additionally, this screen opens automatically in order entry if you need to collect information in a demographic profile category flagged as mandatory. The screen also opens automatically in order maintenance if the Prompt for Mandatory Demographics in Order Maintenance (E60) field in the System Control file is set to Y.
CSR0276 DISPLAY Work with Customer Profile 2/13/98 11:00:05 The KL Mail Order Company
Customer # . : 26 MIRANDA, BERNADETTE T
Profile Description Data Description Mandatory
1 GENDER F FEMALE 2 AGE 3 INCOME 4 MARITAL STATUS S SINGLE 5 LOCATION
F3=Exit F9=All/selected F12=Cancel F21=Print list |
Field |
Description |
Customer # |
A number assigned by the system to identify the customer. Numeric, 9 positions; display-only, assigned by the system. |
Customer name (unlabeled field to the right of Customer #) |
The customer's last name, first name and middle initial. Last name: Alphanumeric, 25 positions; display-only. First name: Alphanumeric, 15 positions; display-only. Initial: Alphanumeric, 1 position; display-only. |
Profile |
A number used to identify a demographics category, such as gender, income, or geographic area. Demographic categories are defined through the Work with Profile Categories option; see Chapter 16: Setting Up Customer Profiles (WPFL). Numeric, 3 positions; display-only. |
Description |
Text associated with the demographics category, such as Gender, Income, or Geographic Location, etc. Alphanumeric, 20 positions; display-only. |
Data |
A valid response code for the demographics category. The current demographic data, if any, appears in the Data field; if you have not yet gathered the data from the customer, but you have assigned a default response for the category, then this value appears here. For example, if the category (in the Profile field) is Gender, you can enter or select the appropriate value for this customer, such as Female, Male, or Unknown. If you assign a default response for a profile category, then you will not be able to leave this category blank; the system will default the response back into the field when you press Enter. Alphanumeric, 1 position. |
Description |
The description associated with the demographic data, such as Male, Female, or Unknown. Alphanumeric, 30 positions; display-only. |
Mandatory |
This field indicates whether the profile category is mandatory. The system prompts you to collect a response for any category flagged as mandatory by advancing to this screen automatically when you press F9 or F19 to accept an order in order entry. You also advance to the screen automatically in order maintenance if the Prompt for Mandatory Demographics in Order Maintenance (E60) field in the System Control file is set to Y. If you have assigned a default response to a mandatory profile category, the Work with Customer Profile Screen does not display automatically; instead, the system assigns the default response to the customer in order entry or order maintenance if you have not already collected the data from the customer. Valid values are: Y = This is a mandatory profile category. N or blank = This is not a mandatory profile category. Alphanumeric, 1 position; display-only. |
Work with Email by Customer Sold To Number Screen
Purpose: Use this screen to review emails associated with a customer.
About emails: The Correspondence History file stores outbound and inbound emails related to an order, customer (including sold-to, ship-to, individual, and bill-to customers), vendor or purchase order. You can associate an email with a customer by indicating the customer number when you forward the email into the system, or by specifying the customer number at the Change Email Screen; also, the system can assign the email based on a matching email address. See Email Repository Overview for more information.
Outbound emails: The Write Outbound Email to Email Repository (H99) system control value controls whether to store header information for outbound email notifications, or for the Outbound Email XML Message (CWEmailOut) if specified for the notification type.
How to display this screen:
• Enter 1 next to Email for Customer Sold To at the Display More Options Screen, or Customer Email Correspondence at the More Customer Sold To Options Screen
• Press F7 at the Work with Email by Order Number Screen
CSR1245 DISPLAY Work with Email By Customer Sold To # 9/23/02 10:23:06 EZK Mail Order
Customer #: 613 JACKRABBIT, OPHELIA
Create Email Opt Date Date Cat Src SUBJECT
Type options, press Enter. 2=Change 4=Delete 5=Display 6=Create tickler 7=Display detail 10=Order Inquiry
9/12/02 9/12/02 WMO EXT WHERE IS MY ORDER? 9/11/02 9/11/02 NTF INT ORDER CONFIRMATION 9/11/02 9/11/02 NTF INT Shipment Confirmation
F3=Exit F8=Subject/Email address F12=Cancel |
Field |
Description |
Customer # |
A number to identify the customer, the customer’s name, and the company name, if any. Customer number: numeric, 9 positions; display-only. Customer company and name: alphanumeric, 41 positions; display-only. |
Create date |
The date when the email was forwarded into the system, and the Correspondence History record was created. Numeric, 6 positions (MMDDYY format); optional. |
Email date |
The date when the email was originally sent. Numeric, 6 positions (MMDDYY format); optional. |
Category |
A category that you use to group email correspondence between you and your customers. A category of NTF indicates that the email was a notification generated by the system and sent to the customer. Alphanumeric, 3 positions; optional. |
Source |
Indicates whether the email was inbound or outbound. Valid values are: • EXT = the email was forwarded into CWDirect • INT = the email originated in CWDirect and was sent to a customer. A user-supplied code indicating the email’s source is not currently implemented. Alphanumeric, 3 positions; optional. |
Subject |
The subject line of the email. • Inbound emails: Things to note: • When you forward an email into CWDirect, the system deletes FW: from the beginning of the subject line; however, if the email has been forwarded multiple times, only the first occurrence will be deleted. • The system renders the text of the subject line in all capital letters. • The subject line is truncated if it exceeds the maximum length of this field. • The system converts certain special characters. See Symbol and Special Character Conversion in Emails. The system deletes the email identifiers from the subject line if translation is successful. For example, a subject line reading FW: COMPANY=27;CUSTOMER=613;ATTACHMENT=N; Where is my order? would be translated to WHERE IS MY ORDER? Even if translation is successful, however, it does not necessarily mean that the email is assigned to a customer; it is possible for the email identifiers to be formatted correctly, but for the values specified to be incorrect or inconsistent. |
|
• Outbound emails: Possible subject lines for outbound email notifications are: • ORDER CONFIRMATION • Credit Card Credit Acknowledge • SOLD OUT NOTIFICATION • Ship Conf. - Order #99999999 • BACKORDER NOTIFICATION • GIFT CERTIFICATE • Return Conf. - Order #99999999 • ORDER UPDATE CONFIRMATION Summary information for an outbound email or Outbound Email XML Message (CWEmailOut) is stored only if the Write Outbound Email to Email Repository (H99) system control value is set to Y. See When Does the System Generate an Email Notification? for information on system-generated emails. To switch between displaying the subject line and the originating email address for the email, press F8. Alphanumeric, 78 positions; display-only. |
Email address |
The email address of the person who originated the email. When an email is forwarded into the system by a customer service representative, this is not the email address of the person who sent the email into CWDirect; instead, the email site in CWIntegrate searches the text of the forwarded message for the originating email address. For example, if the forwarded message begins: -----Original Message----- From: lak@yahoo.com Sent: 08/09/2002 10:33:38 AM To: Elise Kaplan Cc: Subject: where is my order The email site can determine that lak@yahoo.com is the originating email address. If the email site cannot find the originating email address, it substitutes a standard email address that indicates the originating address was not available. The default is forwardMissing@error.com, but can vary depending upon your setup. See Default Values to Identify the Originating Email Address in the CWIntegrate Emails Integration Manual for an overview of how the email site determines the originating email address. To switch between displaying the subject line and the originating email address for the email, press F8. Alphanumeric, 50 positions; display-only. |
Option |
Procedure |
Change the assignment of an email |
Enter 2 next to an email to advance to the Change Email Screen. The system confirms that your entries at this screen are consistent; see Identifying an Unrouted Email for more information. Note: The Changed Routed Email (B08) secured feature controls the ability to change an email assigned to a customer. If you do not have authority to change a routed (assigned) email, you can enter 5 next to an email to advance to the Display Email Screen, where you can review all of the same information. |
Delete an email |
Enter 4 next to an email to delete it. |
Display information about an email |
Enter 5 next to an email to advance to the Display Email Screen. |
Create a tickler for the MN (manually created) tickler event |
Enter 6 next to an email to advance to the Create Tickler Screen. Note: To create a MN tickler, you must have authority to the Create Manual Tickler (B13) secured feature. |
Display email subject and text |
Enter 7 next to an email to advance to the Display Email Detail Screen. |
Switch between displaying the subject line and the originating email address for the email |
Press F8. |
Advance to order inquiry |
Enter 10 next to an email. If the email is associated with an order number, you advance to the Order Inquiry Header Screen or the Order Inquiry Detail Screen, depending on the setting of the Default Version for Order Inquiry (C34) system control value. If the email is not associated with an order number, you advance to the Order Inquiry Scan Screen. Note: This option is not available if you advanced to this screen through order inquiry. |
Purpose: Use this screen to enter, view, or delete informational messages about sold-to customers. You can view this information through several key areas in the system, such as order entry or Customer Maintenance.
You can create customer note types that make the note display automatically in a pop-up window when you select this customer in order entry. You can also define text that defaults into the Note field when you select the note type. See Chapter 24: Working with Customer Note Types (WNTY).
Note: There is also a screen available to work with bill-to customer notes; see Work with Bill To Notes Screen.
How to display this screen:
• enter 1 next to Customer Notes at the Display More Options Screen.
• enter 23 next to a customer on a Work with Customer screen (see Chapter 27: Selecting Customers).
• press F23 at the first or second Create or Change Cust Sold To screen (see Chapter 28: Creating and Updating Sold-to Customers (WCST)).
• press F16 at the Customer Selection Screen
If you Use Workflow Management (H96):
• enter 8 next to a tickler at the Work with Tickler Screen (user/group view) or Workflow Management Screen (tickler supervisor).
• press Enter at the Create Tickler Screen.
• press F8 at the Change Tickler Screen or Display Tickler Screen
OER0140 CHANGE Edit Customer Notes 12/08/97 10:01:07 EZK Mail Order
Customer : 524 DODGESON, GEORGE Notes T User Date Customer Address Change was made ELISE_ 10/28/97 Customer Address Change was made Customer Address Change was made Customer Address Change was made Customer Address Change was made EKAPLA 12/02/97 CUSTOMER IS POSSIBLE FRAUD: DO NOT UPSELL A 12/08/97 Customer Address Change was made
F3=Exit F8=Enter Customer Note Type F12=Cancel |
Note sequence: The Display Customer Notes in LIFO Sequence (D55) system control value controls how customer notes are listed on the screen. If you set this value to Y, the notes display in reverse chronological order (most recent first). If you set this value to N, the notes display in chronological order.
Address changes: The system writes a message to the Customer Note file each time you enter a change to a sold-to or permanent ship-to customer's name, address or phone number. The messages for a ship-to customer change are stored with the sold-to customer messages. See Chapter 37: Reviewing Customer Address Changes.
Field |
Description |
Customer (Sold-to customer number) |
A number assigned by the system to identify the customer. Numeric, 9 positions; display-only, assigned by the system. |
Customer name (unlabeled field to the right of Customer #) |
The customer's company, and/or last name, first name and middle initial. Company: alphanumeric, 30 positions; display-only. Last name: alphanumeric, 25 positions; display-only. First name: alphanumeric, 15 positions; display-only. Initial: Alphanumeric, 1 position; display-only. |
Notes |
Fields where you can view, enter, or delete customer messages. If you need extra space, use Shift/Roll or Page Down to display additional entry fields. Alphanumeric, 60 positions per line. |
T (Type) |
The type of customer note. You can use the Work with Customer Note Type menu option to define note types, and set up note types to display automatically in a pop-up window in order entry or order maintenance. You can also define text that will default into the Note field. This text will default only if you have not already made an entry in that note line, and you can override any default. See Chapter 24: Working with Customer Note Types (WNTY). This field is display-only when you first advance to the screen. Press F8 to make it enterable. Alphanumeric, 1 position; optional or display-only. |
User (User Id) |
A code that identifies the person who entered the customer messages. Alphanumeric, 6 positions (truncated from 10); display-only. |
Date |
The date when the customer notes were entered. Numeric, 6 positions (MMDDYY format); display-only, updated by the system. |
Screen Option |
Procedure |
Enter a new customer note |
Begin typing in the first available Note field. You may need to press Page Down or Shift/Roll until a blank line is available. Press Tab to advance from line to line, and press Enter when you are done. |
Change an existing note |
Enter over the existing note(s). Press Tab to advance from line to line, and press Enter when you are done. |
Make the Type field enterable or switch it back to display-only |
Press F8. |
Work with Email by Customer Ship To Number Screen
Purpose: Use this screen to review emails associated with a ship-to customer.
About emails: The Correspondence History file stores outbound and inbound emails related to an order, customer (including sold-to, ship-to, individual, and bill-to customers), vendor or purchase order. You can associate an email with a ship-to customer by indicating the sold-to and ship-to customer numbers when you forward the email into the system, or by specifying these numbers at the Change Email Screen; also, the system can assign the email based on a matching email address. See Email Repository Overview for more information.
Outbound emails: The Write Outbound Email to Email Repository (H99) system control value controls whether to store header information for outbound email notifications, or for the Outbound Email XML Message (CWEmailOut) if specified for the notification type.
How to display this screen: Enter 1 next to Email for Customer Ship To at the Display More Options Screen. You can also display this screen by entering 97 next to a ship-to customer at the Work with Customer Ship Tos Screen.
CSR1248 DISPLAY Work with Email By Customer Ship To # 9/23/02 10:25:38 EZK Mail Order
Customer #: 291 COMMERCIALWARE ATTN: BROWN, SARAH Ship To # : 1 PETS 'R' US ATTN: KAPLAN, ELISE Z
Create Email Opt Date Date Cat Src SUBJECT
Type options, press Enter. 2=Change 4=Delete 5=Display 6=Create tickler 7=Display detail 10=Order Inquiry
9/12/02 9/11/02 WMO EXT WHERE IS MY ORDER? 9/09/02 9/09/02 NTF INT ORDER UPDATE CONFIRMATION 9/06/02 9/06/02 NTF INT ORDER CONFIRMATION
F3=Exit F8=Subject/Email address F12=Cancel |
Field |
Description |
Customer # |
A number to identify the customer, the customer’s name, and the company name, if any. Customer number: numeric, 9 positions; display-only. Customer company and name: alphanumeric, 41 positions; display-only. |
Ship to # |
A number to identify a permanent shipping address associated with a sold-to customer. The ship-to customer name is indicated to the right. Numeric, 3 positions; optional. |
Create date |
The date when the email was forwarded into the system, and the Correspondence History record was created. Numeric, 6 positions (MMDDYY format); optional. |
Email date |
The date when the email was originally sent. Numeric, 6 positions (MMDDYY format); optional. |
Category |
A category that you use to group email correspondence between you and your customers. A category of NTF indicates that the email was a notification generated by the system and sent to the customer. Alphanumeric, 3 positions; optional. |
Source |
Indicates whether the email was inbound or outbound. Valid values are: • EXT = the email was forwarded into CWDirect • INT = the email originated in CWDirect and was sent to a customer. A user-supplied code indicating the email’s source is not currently implemented. Alphanumeric, 3 positions; optional. |
Subject |
The subject line of the email. • Inbound emails: Things to note: • When you forward an email into CWDirect, the system deletes FW: from the beginning of the subject line; however, if the email has been forwarded multiple times, only the first occurrence will be deleted. • The system renders the text of the subject line in all capital letters. • The subject line is truncated if it exceeds the maximum length of this field. • The system converts certain special characters. See Symbol and Special Character Conversion in Emails. The system deletes the email identifiers from the subject line if translation is successful. For example, a subject line reading FW: COMPANY=27;CUSTOMER=613;ATTACHMENT=N; Where is my order? would be translated to WHERE IS MY ORDER? Even if translation is successful, however, it does not necessarily mean that the email is assigned to a customer; it is possible for the email identifiers to be formatted correctly, but for the values specified to be incorrect or inconsistent. |
|
• Outbound emails: Possible subject lines for outbound email notifications are: • ORDER CONFIRMATION • Credit Card Credit Acknowledge • SOLD OUT NOTIFICATION • Ship Conf. - Order #99999999 • BACKORDER NOTIFICATION • GIFT CERTIFICATE • Return Conf. - Order #99999999 • ORDER UPDATE CONFIRMATION Summary information for an outbound email or Outbound Email XML Message (CWEmailOut) is stored only if the Write Outbound Email to Email Repository (H99) system control value is set to Y. See When Does the System Generate an Email Notification? for information on system-generated emails. To switch between displaying the subject line and the originating email address for the email, press F8. Alphanumeric, 78 positions; display-only. |
Email address |
The email address of the person who originated the email. When an email is forwarded into the system by a customer service representative, this is not the email address of the person who sent the email into CWDirect; instead, the email site in CWIntegrate searches the text of the forwarded message for the originating email address. For example, if the forwarded message begins: -----Original Message----- From: lak@yahoo.com Sent: 08/09/2002 10:33:38 AM To: Elise Kaplan Cc: Subject: where is my order The email site in CWIntegrate can determine that lak@yahoo.com is the originating email address. If the email site cannot find the originating email address, it substitutes a standard email address that indicates the originating address was not available. The default is forwardMissing@error.com, but can vary depending upon your setup. See Default Values to Identify the Originating Email Address in the CWIntegrate Emails Integration Manual for an overview of how the email site determines the originating email address. To switch between displaying the subject line and the originating email address for the email, press F8. Alphanumeric, 50 positions; display-only. |
Option |
Procedure |
Change the assignment of an email |
Enter 2 next to an email to advance to the Change Email Screen. The system confirms that your entries at this screen are consistent; see Identifying an Unrouted Email for more information. Note: The Changed Routed Email (B08) secured feature controls the ability to change an email assigned to a customer. If you do not have authority to change a routed (assigned) email, you can enter 5 next to an email to advance to the Display Email Screen, where you can review all of the same information. |
Delete an email |
Enter 4 next to an email to delete it. |
Display information about an email |
Enter 5 next to an email to advance to the Display Email Screen. |
Create a tickler for the MN (manually created) tickler event |
Enter 6 next to an email to advance to the Create Tickler Screen. Note: To create a MN tickler, you must have authority to the Create Manual Tickler (B13) secured feature. |
Display email subject and text |
Enter 7 next to an email to advance to the Display Email Detail Screen. |
Switch between displaying the subject line and the originating email address for the email |
Press F8. |
Advance to order inquiry |
Enter 10 next to an email. If the email is associated with an order number, you advance to the Order Inquiry Header Screen or the Order Inquiry Detail Screen, depending on the setting of the Default Version for Order Inquiry (C34) system control value. If the email is not associated with an order number, you advance to the Order Inquiry Scan Screen. Note: This option is not available if you advanced to this screen through order inquiry. |
Purpose: Use this screen to review return notices that have been generated through SmartLabel returns integration. These notices are stored in the Return Notifications file and updated when you receive updates from the Newgistics server via FTP, or use the Processing SmartLabel Returns (PSLR) menu option to process a return or exchange. See Using SmartLabel Returns Processing for an overview.
How to display this screen: Enter 1 next to Display Return Notices at the Display More Options Screen. This option is available only if there is a Returns Notification record associated with the order.
CSR1392 DISPLAY Display Return Notices 3/01/04 17:31:34 EZK Mail Order
Order #: 9604 - 1 Sold To : 162 COMMERCIALWARE ATTN: KAPLAN, ELISE Z Bill To : 446
Return Label Pick SL Scan SL Ship SL Del Return Opt Barcode Cntl # Date Date Date Date
Type options, press Enter. 5=Display
610120160234340003457263 3457263 2/27/04 3/01/04
F3=Exit F12=Cancel |
Field |
Description |
Order # |
A number identifying the order that you are currently reviewing or working with. The order ship-to number is separated by the order number with a semicolon (-). Order number: numeric, 8 positions; display-only. Order ship-to number: numeric, 3 positions; display-only. |
Sold to |
A number assigned by the system to identify the customer. The customer name is indicated to the right. Sold to number: Numeric, 9 positions; display-only. Sold to name: Alphanumeric, 41 positions; display-only. |
Bill to |
A number identifying a customer responsible for payment on an order. Validated against the Customer Bill To file. The bill-to customer’s name appears to the right. Bill-to number: numeric, 7 positions; display-only. Bill-to name: alphanumeric, 41 positions; display-only. |
Return label barcode |
The SmartLabel barcode from the Return Notifications file. The last seven positions are the same as the Pick control #. See SmartLabel Contents for a description of the other data in your company that is included in this barcode. Alphanumeric, 24 positions; display-only. |
Pick control # |
A control number that uniquely identifies the pick slip used to ship the order to the customer. Numeric, 7 positions; display-only. |
SL (SmartLabel scan date) |
The date when the returned package was scanned for arrival at the Newgistics facility. Numeric, 6 positions (MM/DD/YY format); display-only. |
SL (SmartLabel) ship date |
The date when the Newgistics facility shipped the returned package to your warehouse. Numeric, 6 positions (MM/DD/YY format); display-only. |
SL (SmartLabel) delivery date |
The date when the Newgistics facility confirmed delivery of the returned package at your warehouse. Numeric, 6 positions (MM/DD/YY format); display-only. |
Return date |
The date when you processed the return against the order using the Processing SmartLabel Returns (PSLR) menu option. Returns you process using order maintenance or return authorizations without going through the SmartLabel Returns Screen do not update the Returns Notification record. Numeric, 6 positions (MM/DD/YY format); display-only. |
Option |
Procedure |
Display detail information about a return notice |
Enter 5 next to a return notice to advance to the Display Return Notice Screen. |
Purpose: Use this screen to review the details of a SmartLabel return notification record.
How to display this screen: Enter 5 next to a return notice at the Display Return Notices Screen.
CSR1393 DISPLAY Display Return Notice 3/01/04 17:35:49 EZK Mail Order
Order # : 9604 - 1 Sold To : 162 COMMERCIALWARE ATTN: KAPLAN, ELISE Z Bill To : 446
Return Label Barcode : 610120160234340003457263 Prepaid Shipping . : Y Pick Control # . . . : 3457263 Complimentary Label : N Evaluated Add'l Chg : N
SL Scan SL Ship SL Del Return Date: 2/27/04 Time: 12:39:55 0:00:00 0:00:00
BOL ID:
Package Condition: GOOD CONDITION
F3=Exit F12=Cancel |
Field |
Description |
Order # |
A number identifying the order that you are currently reviewing or working with. The order ship-to number is separated by the order number with a semicolon (-). Order number: numeric, 8 positions; display-only. Order ship-to number: numeric, 3 positions; display-only. |
Sold to |
A number assigned by the system to identify the customer. The customer name is indicated to the right. Sold to number: Numeric, 9 positions; display-only. Sold to name: Alphanumeric, 41 positions; display-only. |
Bill to |
A number identifying a customer responsible for payment on an order. Validated against the Customer Bill To file. The bill-to customer’s name appears to the right. Bill-to number: numeric, 7 positions; display-only. Bill-to name: alphanumeric, 41 positions; display-only. |
Return label barcode |
The SmartLabel barcode from the Return Notifications file. The last seven positions are the same as the Pick control #. See SmartLabel Contents for a description of the other data in your company that is included in this barcode. Alphanumeric, 24 positions; display-only. |
Indicates whether the customer has prepaid for shipping the return to the Newgistics facility; if so, the reverse shipping charge does not default when you process a return through the Processing SmartLabel Returns (PSLR) menu option. Valid values are: Y = The customer has prepaid for return shipping and should not be charged reverse shipping charges. N = The customer did not prepay for return shipping. See When Do Reverse Shipping Charges Default for a Return? for an overview. Alphanumeric, 1 position; display-only. |
|
Pick control # |
A control number that uniquely identifies the pick slip used to ship the order to the customer. Numeric, 7 positions; display-only. |
Indicates whether the SmartLabel shipping is complimentary; if so, the reverse shipping charge does not default when you process a return through the Processing SmartLabel Returns (PSLR) menu option. Valid values are: Y = This is a complimentary label; the customer should not be charged reverse shipping charges. N = This is not a complimentary label. See When Do Reverse Shipping Charges Default for a Return? for an overview. Alphanumeric, 1 position; display-only. |
|
Indicates whether the SmartLabel has already been evaluated for reverse shipping charges. Once you process a return or exchange against the shipment, this flag is set to Y, regardless of whether the reverse charge was actually applied. Valid values are: Y = You have created a return or exchange for this shipment through the Processing SmartLabel Returns (PSLR) menu option and evaluated the return for the reverse shipping charge. N = The reverse shipping charge has not been evaluated for this Return Notifications record. See When Do Reverse Shipping Charges Default for a Return? for an overview. Note: This flag applies to this Return Notifications record only; if there were multiple shipments made for the order, there can be additional Return Notifications records that are eligible for the reverse shipping charge. Alphanumeric, 1 position; display-only. |
|
Note: All times provided by the Newgistics facility (scan, ship, and delivery) are in Central Standard Time (CST). |
|
SL scan (SmartLabel scan) |
The date and time when the return was scanned upon arrival at the Newgistics facility. Date: numeric, 6 positions (MM/DD/YY format); display-only. Time: numeric, 6 positions (HH:MM:SS format); display-only. |
SL ship (SmartLabel ship) |
The date and time when the return was shipped from the Newgistics facility to your warehouse. Date: numeric, 6 positions (MM/DD/YY format); display-only. Time: numeric, 6 positions (HH:MM:SS format); display-only. |
SL del (SmartLabel delivery) |
The date and time when delivery of the return to your warehouse was confirmed. Date: numeric, 6 positions (MM/DD/YY format); display-only. Time: numeric, 6 positions (HH:MM:SS format); display-only. |
Return |
The date and time when you processed a return or exchange against the shipment. Date: numeric, 6 positions (MM/DD/YY format); display-only. Time: numeric, 6 positions (HH:MM:SS format); display-only. |
BOL ID (Bill of lading ID) |
The number assigned by Newgistics to identify the bill of lading for the shipment from its facility to your warehouse. Newgistics groups returned packages together for shipment from its facility to your warehouse, so many Return Notifications records can have the same BOL ID. Alphanumeric, 50 positions; display-only. |
Package condition |
Any notes on the condition of the returned package when it arrived at the Newgistics facility. The description is truncated if it exceeds 78 positions. Alphanumeric, 78 positions; display-only. |
Work with Email by Customer Bill To Number Screen
Purpose: Use this screen to review emails associated with a bill-to customer.
About emails: The Correspondence History file stores outbound and inbound emails related to an order, customer (including sold-to, ship-to, individual, and bill-to customers), vendor or purchase order. You can associate an email with a bill-to customer by indicating the bill-to customer number when you forward the email into the system, or by specifying the bill-to customer at the Change Email Screen; also, the system can assign the email based on a matching email address. See Email Repository Overview for more information.
Outbound emails: The Write Outbound Email to Email Repository (H99) system control value controls whether to store header information for outbound email notifications, or for the Outbound Email XML Message (CWEmailOut) if specified for the notification type.
How to display this screen: Enter 1 next to Email for Customer Bill To at the Display More Options Screen. You can also display this screen by entering 97 next to a bill-to customer at the Work with Bill To Customers Screen.
CSR1247 DISPLAY Work with Email By Customer Bill To # 9/23/02 10:34:29 EZK Mail Order
Customer Bill To #: 191 COMMERCIALWARE ATTN: BROWN, SARAH
Create Email Opt Date Date Cat Src SUBJECT
Type options, press Enter. 2=Change 4=Delete 5=Display 6=Create tickler 7=Display detail 10=Order Inquiry
8/21/02 8/21/02 NTF INT ORDER UPDATE CONFIRMATION 8/21/02 8/21/02 NTF INT BACKORDER NOTIFICATION 8/16/02 8/15/02 WMO EXT WHERE IS MY ORDER?
F3=Exit F8=Subject/Email address F12=Cancel |
Field |
Description |
Customer bill to # |
A number identifying a customer responsible for payment on an order. Validated against the Customer Bill To file. The bill-to customer’s name appears to the right. Bill-to number: numeric, 7 positions; display-only. Bill-to name: alphanumeric, 41 positions; display-only. |
Create date |
The date when the email was forwarded into the system, and the Correspondence History record was created. Numeric, 6 positions (MMDDYY format); optional. |
Email date |
The date when the email was originally sent. Numeric, 6 positions (MMDDYY format); optional. |
Category |
A category that you use to group email correspondence between you and your customers. A category of NTF indicates that the email was a notification generated by the system and sent to the customer. Alphanumeric, 3 positions; optional. |
Source |
Indicates whether the email was inbound or outbound. Valid values are: • EXT = the email was forwarded into CWDirect • INT = the email originated in CWDirect and was sent to a customer. A user-supplied code indicating the email’s source is not currently implemented. Alphanumeric, 3 positions; optional. |
Subject |
The subject line of the email. • Inbound emails: Things to note: • When you forward an email into CWDirect, the system deletes FW: from the beginning of the subject line; however, if the email has been forwarded multiple times, only the first occurrence will be deleted. • The system renders the text of the subject line in all capital letters. • The subject line is truncated if it exceeds the maximum length of this field. • The system converts certain special characters. See Symbol and Special Character Conversion in Emails. The system deletes the email identifiers from the subject line if translation is successful. For example, a subject line reading FW: COMPANY=27;CUSTOMER=613;ATTACHMENT=N; Where is my order? would be translated to WHERE IS MY ORDER? Even if translation is successful, however, it does not necessarily mean that the email is assigned to a customer; it is possible for the email identifiers to be formatted correctly, but for the values specified to be incorrect or inconsistent. |
|
• Outbound emails: Possible subject lines for outbound email notifications are: • ORDER CONFIRMATION • Credit Card Credit Acknowledge • SOLD OUT NOTIFICATION • Ship Conf. - Order #99999999 • BACKORDER NOTIFICATION • GIFT CERTIFICATE • Return Conf. - Order #99999999 • ORDER UPDATE CONFIRMATION Summary information for an outbound email or Outbound Email XML Message (CWEmailOut) is stored only if the Write Outbound Email to Email Repository (H99) system control value is set to Y. See When Does the System Generate an Email Notification? for information on system-generated emails. To switch between displaying the subject line and the originating email address for the email, press F8. Alphanumeric, 78 positions; display-only. |
Email address |
The email address of the person who originated the email. When an email is forwarded into the system by a customer service representative, this is not the email address of the person who sent the email into CWDirect; instead, the email site in CWIntegrate searches the text of the forwarded message for the originating email address. For example, if the forwarded message begins: -----Original Message----- From: lak@yahoo.com Sent: 08/09/2002 10:33:38 AM To: Elise Kaplan Cc: Subject: where is my order The email site can determine that lak@yahoo.com is the originating email address. If the email site cannot find the originating email address, it substitutes a standard email address that indicates the originating address was not available. The default is forwardMissing@error.com, but can vary depending upon your setup. See Default Values to Identify the Originating Email Address in the CWIntegrate Emails Integration Manual for an overview of how the email site determines the originating email address. To switch between displaying the subject line and the originating email address for the email, press F8. Alphanumeric, 50 positions; display-only. |
Option |
Procedure |
Change the assignment of an email |
Enter 2 next to an email to advance to the Change Email Screen. The system confirms that your entries at this screen are consistent; see Identifying an Unrouted Email for more information. Note: The Changed Routed Email (B08) secured feature controls the ability to change an email assigned to a customer. If you do not have authority to change a routed (assigned) email, you can enter 5 next to an email to advance to the Display Email Screen, where you can review all of the same information. |
Delete an email |
Enter 4 next to an email to delete it. |
Display information about an email |
Enter 5 next to an email to advance to the Display Email Screen. |
Create a tickler for the MN (manually created) tickler event |
Enter 6 next to an email to advance to the Create Tickler Screen. Note: To create a MN tickler, you must have authority to the Create Manual Tickler (B13) secured feature. |
Display email subject and text |
Enter 7 next to an email to advance to the Display Email Detail Screen. |
Switch between displaying the subject line and the originating email address for the email |
Press F8. |
Advance to order inquiry |
Enter 10 next to an email. If the email is associated with an order number, you advance to the Order Inquiry Header Screen or the Order Inquiry Detail Screen, depending on the setting of the Default Version for Order Inquiry (C34) system control value. If the email is not associated with an order number, you advance to the Order Inquiry Scan Screen. Note: This option is not available if you advanced to this screen through order inquiry. |
Display Pick Tickets for Order Screen
Purpose: Through order inquiry or order entry/maintenance, you can display the Pick Slip Generation Inquiry screens. Use these screens to review pick slips for the order you are working with.
How to display this screen: Enter 1 next to the Display Picks option at the Display More Options Screen.
FLR0321 DISPLAY Display Pick Tickets for Order 2/13/98 11:20:06 The KL Mail Order Company
Opt Ship To# Pick# Printed Confirmed Status Reprint 1
Type options, press Enter. 5=Display 7=Details
1 479 10/24/97 V Void 480 1 480 10/24/97 R Reprinted 479
F3=Exit F12=Cancel |
Field |
Description |
Ship to # |
A number to identify the shipping address on the order. Numeric, 3 positions; optional. |
Pick # (Pick control number) |
The control number for this pick. Numeric, 7 positions; optional, assigned by the system. |
Printed |
The date the pick slip was printed. Numeric, 6 positions (MMDDYY format); display-only. |
Confirmed |
The date the items on the pick slip were shipped and billed. Numeric, 6 positions (MMDDYY format); display-only. |
Status |
The status of the pick slip. Valid status codes and the corresponding descriptions are: Async processing error (E) Authorized (Z) Carryover (O) Confirmed (C) Declined authorization (D) Waiting for carousel system (L) Manifest submission (M) |
|
Open (‘ ‘) Packed (P) Post-authorization (2) Pre-authorization (1) Reprinted (R) Submitted to async jobs (A) Suspended (S) Void (V) Waiting for authorization (W) Post carousel (3) Alphanumeric, 1 position; display-only, updated by the system. |
Reprint |
The pick control number that has been reprinted. Numeric, 7 positions; display-only. |
Screen Option |
Procedure |
Display pick control header information |
Enter 5 next to a pick slip to advance to the Display Pick Control Header (1 of 2) Screen. |
Display pick details |
Enter 7 next to a pick slip to advance to the Work with Pick Details Screen. |
Work with Email by Customer Individual Screen
Purpose: Use this screen to review emails associated with an individual customer.
About emails: The Correspondence History file stores outbound and inbound emails related to an order, customer (including sold-to, ship-to, individual, and bill-to customers), vendor or purchase order. You can associate an email with an individual customer by indicating the sold-to number and individual when you forward the email into the system, or by specifying the sold-to number and individual at the Change Email Screen; also, the system can assign the email based on a matching email address. See Email Repository Overview for more information.
Outbound emails: The Write Outbound Email to Email Repository (H99) system control value controls whether to store header information for outbound email notifications, or for the Outbound Email XML Message (CWEmailOut) if specified for the notification type.
How to display this screen: Enter 1 next to Email for Customer Individual at the Display More Options Screen. You can also display this screen by entering 97 next to an individual at the Work with Sold-to Individuals Screen.
CSR1249 DISPLAY Work with Email By Customer Individual 9/23/02 10:37:43 EZK Mail Order
Customer #. : 291 COMMERCIALWARE ATTN: BROWN, SARAH Individual #: 4 SARAH BROWN
Create Email Opt Date Date Cat Src SUBJECT
Type options, press Enter. 2=Change 4=Delete 5=Display 6=Create tickler 7=Display detail 10=Order Inquiry
8/21/02 8/21/02 NTF INT ORDER UPDATE CONFIRMATION 8/20/02 8/21/02 NTF INT BACKORDER NOTIFICATION 8/19/02 8/19/02 WMO EXT WHERE'S MY ORDER?
F3=Exit F8=Subject/Email address F12=Cancel |
Field |
Description |
Customer # |
A number to identify the customer, the customer’s name, and the company name, if any. Customer number: numeric, 9 positions; display-only. Customer company and name: alphanumeric, 41 positions; display-only. |
Individual # |
A number identifying the individual customer, if any, associated with the email. The individual customer name is indicated to the right. Individual number: numeric, 3 positions; display-only. Individual name: alphanumeric, 41 positions; display-only. |
Create date |
The date when the email was forwarded into the system, and the Correspondence History record was created. Numeric, 6 positions (MMDDYY format); optional. |
Email date |
The date when the email was originally sent. Numeric, 6 positions (MMDDYY format); optional. |
Category |
A category that you use to group email correspondence between you and your customers. A category of NTF indicates that the email was a notification generated by the system and sent to the customer. Alphanumeric, 3 positions; optional. |
Source |
Indicates whether the email was inbound or outbound. Valid values are: • EXT = the email was forwarded into CWDirect • INT = the email originated in CWDirect and was sent to a customer. A user-supplied code indicating the email’s source is not currently implemented. Alphanumeric, 3 positions; optional. |
Subject |
The subject line of the email. • Inbound emails: Things to note: • When you forward an email into CWDirect, the system deletes FW: from the beginning of the subject line; however, if the email has been forwarded multiple times, only the first occurrence will be deleted. • The system renders the text of the subject line in all capital letters. • The subject line is truncated if it exceeds the maximum length of this field. • The system converts certain special characters. See Symbol and Special Character Conversion in Emails. The system deletes the email identifiers from the subject line if translation is successful. For example, a subject line reading FW: COMPANY=27;CUSTOMER=613;ATTACHMENT=N; Where is my order? would be translated to WHERE IS MY ORDER? Even if translation is successful, however, it does not necessarily mean that the email is assigned to a customer; it is possible for the email identifiers to be formatted correctly, but for the values specified to be incorrect or inconsistent. |
|
• Outbound emails: Possible subject lines for outbound email notifications are: • ORDER CONFIRMATION • Credit Card Credit Acknowledge • SOLD OUT NOTIFICATION • Ship Conf. - Order #99999999 • BACKORDER NOTIFICATION • GIFT CERTIFICATE • Return Conf. - Order #99999999 • ORDER UPDATE CONFIRMATION Summary information for an outbound email or Outbound Email XML Message (CWEmailOut) is stored only if the Write Outbound Email to Email Repository (H99) system control value is set to Y. See When Does the System Generate an Email Notification? for information on system-generated emails. To switch between displaying the subject line and the originating email address for the email, press F8. Alphanumeric, 78 positions; display-only. |
Email address |
The email address of the person who originated the email. When an email is forwarded into the system by a customer service representative, this is not the email address of the person who sent the email into CWDirect; instead, the email site in CWIntegrate searches the text of the forwarded message for the originating email address. For example, if the forwarded message begins: -----Original Message----- From: lak@yahoo.com Sent: 08/09/2002 10:33:38 AM To: Elise Kaplan Cc: Subject: where is my order The email site can determine that lak@yahoo.com is the originating email address. If the email site cannot find the originating email address, it substitutes a standard email address that indicates the originating address was not available. The default is forwardMissing@error.com, but can vary depending upon your setup. See Default Values to Identify the Originating Email Address in the CWIntegrate Emails Integration Manual for an overview of how the email site determines the originating email address. To switch between displaying the subject line and the originating email address for the email, press F8. Alphanumeric, 50 positions; display-only. |
Option |
Procedure |
Change the assignment of an email |
Enter 2 next to an email to advance to the Change Email Screen. The system confirms that your entries at this screen are consistent; see Identifying an Unrouted Email for more information. Note: The Changed Routed Email (B08) secured feature controls the ability to change an email assigned to a customer. If you do not have authority to change a routed (assigned) email, you can enter 5 next to an email to advance to the Display Email Screen, where you can review all of the same information. |
Delete an email |
Enter 4 next to an email to delete it. |
Display information about an email |
Enter 5 next to an email to advance to the Display Email Screen. |
Create a tickler for the MN (manually created) tickler event |
Enter 6 next to an email to advance to the Create Tickler Screen. Note: To create a MN tickler, you must have authority to the Create Manual Tickler (B13) secured feature. |
Display email subject and text |
Enter 7 next to an email to advance to the Display Email Detail Screen. |
Switch between displaying the subject line and the originating email address for the email |
Press F8. |
Advance to order inquiry |
Enter 10 next to an email. If the email is associated with an order number, you advance to the Order Inquiry Header Screen or the Order Inquiry Detail Screen, depending on the setting of the Default Version for Order Inquiry (C34) system control value. If the email is not associated with an order number, you advance to the Order Inquiry Scan Screen. Note: This option is not available if you advanced to this screen through order inquiry. |
Purpose: Use this window to review the total charges across all shipping addresses on an order, which is the initial order plus any recipient orders.
A recipient order is an order that is placed by and paid by a customer, but will ship to another address.
This window provides some basic order information (order number, number of recipients, prepaid amount, and current order balance), and breaks out the order charges by individual charge, namely:
• Merchandise
• Freight
• Additional freight
• Tax
• Handling
• Additional charges
The individual order charges for each recipient order “roll up” to this screen and are summarized in the Total bucket. This allows you to determine the total amount the customer will be charged.
The system updates this window as the customer places additional recipient orders. The system updates the Order Totals fields as you change any single order by adding or deleting items on an order or as you add additional recipient orders. Initially, the fields on the Order Totals pop-up window are blank, but are updated automatically as you enter the order.
How to display this screen: Enter 1 next to Order Totals (All Recipients) at the Display More Options Screen.
Display Order Totals
Order#. . . . . . . . . : 3945 # of Recipients . . . . : 1 Merchandise . . . . . . : 7.50 Freight . . . . . . . . : .75 Additional freight. . . :
Tax . . . . . . . . . . : .83 Handling. . . . . . . . : Additional charges. . . : Total . . . . . . . . . : 9.08
Press Enter to continue. |
This window differs from the running order totals on the order entry screens because it represents the accumulated totals for all shipping addresses on the order. The totals on the individual orders, however, represent the totals for the current order only.
About recipient orders: The Order Totals window accumulates the totals for the original order and any additional orders with different shipping addresses entered using F19.
Recipient orders use the same order number; however, the suffix attached to the Order# field indicates an alternate shipping address -- signifying a recipient order. For example, the original order is order# 1255 - 1. The system adds “- 1" to the order number to indicate the number of shipping addresses. The shipping number increases by 1 with each additional order you place.
Still using the example above, the system assigns order# 1255 - 2 to the order with a different shipping address. As a result, the system groups all related orders under the same order number, but creates separate order records for historical and order management purposes.
Field |
Description |
Order# |
A unique number assigned by the system to identify an order. Numeric, 8 positions; display-only, assigned by the system. |
# of recipients |
The number of shipping addresses on the current order. Each shipping address represents a recipient, which is the person or company for whom an order is placed. For example, when a customer places an order for herself only, there is one shipping address on the order and only one recipient. However, if the customer places an order for herself and for another person there are 2 recipients on this order -- the initial order plus a “related” orders. The initial order always is recipient number 1. You may add up to 999 recipients to an order. Note: The ship-to suffix (in an unlabeled field to the right of the Order# field) initially contains a 1 to indicate the first recipient order; the system increments this field by a 1 for each additional recipient order entered using F19. Numeric, 3 positions; display-only, updated by the system. |
Merchandise |
The total value of merchandise across all recipient orders, which is the item price multiplied by the quantity ordered. This total does not include freight, additional charges (such as gift wrap or special handling), tax, or handling. The system updates this field as items are added to or canceled from each order. Numeric, 9 positions with a 2-place decimal; display-only, updated by the system. |
Freight |
The total charge for shipping all orders. The system performs this calculation based on the freight method defined for the source code on the each order. This total may depend on the quantity or weight of items ordered or on the order as a whole. The system updates this field as items are added to or canceled from each order. This field does not include any additional charges associated with shipping this item (see the Additional Freight field for these totals). Shipping charges will not be included in the order totals (and the Freight field will be blank) if the Calc freight field on all recipient orders contains an N to indicate that freight will not be calculated for these orders. Marketing Chapter 2: Working with Offers (WOFR) discusses each freight method and freight calculation. Numeric, 7 positions with a 2-place decimal; display-only, updated by the system. |
Additional freight |
The total dollar amount for additional freight charges on all orders, above and beyond the regular shipping charges. Additional freight charges for shipper Additional freight charges for a shipper are defined in the ship via record. For example, additional shipping charges may be added to an order being delivered by an overnight shipper. Numeric, 7 positions with a 2-place decimal; display-only, updated by the system. |
Tax |
The total sales tax on all recipient orders. The value in the Tax field is based on the value of the merchandise on the order, and may also include tax on freight and handling. Tax is not accumulated in the Tax field on orders subject to VAT; instead, a hidden tax is included in the order detail line. See the description of the Tax Included in Price (E70) system control value. Numeric, 7 positions with a 2-place decimal; display-only, updated by the system. |
Handling |
The total charge for gift wrapping or special handling. What is special handling? Special handling is any type of item personalization, such as monogramming, alterations, engraving, etc. The SKU/Offer record controls whether the item may be personalized and defines the special handling charge if special handling is allowed. Can any item be gift wrapped? The SKU/Offer record controls whether an item may be gift wrapped and defines the gift wrapping charge if gift wrapping is allowed. This field will be blank if none of the items on the order will be gift wrapped or personalized. Numeric, 7 positions with a 2-place decimal; display-only, updated by the system. |
Additional charges |
The total extra charges added to each recipient order. Note: Another type of additional charge is a credit that may be added to the order during order maintenance. Additional charges may be added to the order in a variety of ways, for a variety of reasons, including: 1. An additional service charge defined for the source code, based on the dollar value of merchandise on the order. 2. An additional shipping charge defined for the item in the Shipper/Item record. 3. An additional charge entered manually through F16 (Charges). Each type of additional charge is described briefly below. Source code additional charges An additional charge may be added to an order, depending on whether service charges have been defined for the source code. In this case, a record exists in the service charges table for the source code. The system will add an additional charge to the order based on the total dollar value of merchandise. Shipper/item additional charges An additional charge may be defined for an item, depending on the shipper you select to deliver the item. For example, a special shipper/item record may exist for a desk when it will be delivered by Acme Shippers. Usually, Acme Shippers charges $8.50 to deliver most items, but, because the desk is oversized and heavy, the customer will be charged $25.00 for delivery. |
|
A record exists on the system in the Shipper/ Item file that specifies this information. The $25.00 additional shipping charge will be added to the order automatically in the Additional charges field when the customer orders the desk and requests delivery through Acme Shippers. Manually entered additional charges You may add any type of additional charge to an order by pressing F16. A pop-up window appears for you to select an additional charge code and specify the additional charge. This allows you to add additional charges to an order at any time. Additional charges are defined in and validated against the Additional Charges file; see Chapter 3: Establishing Additional Charge Codes (WADC). You may define additional charge codes for any reason, such as a store-restocking fee, duty fee, long- distance telephone charges, etc. This field will be blank if no additional charges exist on any order. Numeric, 7 positions with a 2-place decimal; display-only, updated by the system. |
Total |
The sum of all charges for all recipient orders, including: merchandise, freight, additional freight, tax, handling, and additional charges. This is the amount that the customer owes for the entire order. The order total will be adjusted by the system if the order or customer is eligible for any discounts. The system increases or decreases the order totals as orders are added or changed. Numeric, 11 positions with a 2-place decimal; display-only, updated by the system. |
Prepaid amount |
The total dollar amount prepaid on the order by the customer on check, credits, and coupons. This field is blank if no prepayment was received or if the customer will pay by credit card, A/R account or C.O.D. This is the grand total of all prepayments for each recipient order, because you must define a method of payment for each order placed. Numeric, 11 positions with a 2-place decimal; display-only, updated by the system. |
Balance |
The balance due for all recipient orders, calculated by subtracting the value in the Prepaid amount field from the value in the Total field. A zero balance? If the balance is zero, the customer has prepaid for all recipient orders and there is no balance due from the customer. A negative balance? If the balance is negative (such as 54.99-), there is a balance due on the order that will be charged to the customer's credit card, collected on account or C.O.D., etc. A positive balance? If the balance is positive, the customer has overpaid on the prepayment amount with a check, credit, and/or coupon. Numeric, 11 positions with a 2-place decimal; display-only, updated by the system. |
The status of the order in relation to the balance is:
Balance |
Why? |
The next step is... |
Zero |
The customer has prepaid for all recipient orders with a check, credit or coupon. |
The customer has paid what was owed. No further activity required. |
Negative |
The customer has not prepaid all or part of the order. The customer owes you money (balance due). |
Charge the customer's credit card, bill the customer's account or collect the balance due on C.O.D. |
Positive |
The customer has overpaid for all recipient orders. You owe the customer some type of credit. |
Credit the customer's account the overpayment amount. The type of credit issued is determined by the payment type used on the order or the value in the Alt refund type field in the Pay Type file if you cannot credit the original pay type (such as C.O.D.). Ultimately, the system determines how you will credit the customer for the overpayment. |
Working with Telemarketing Specials
Purpose: Use the Telemarketing Specials windows during order entry to review the items on special or suggest these items to the customer.
Types of telemarketing specials: You can set up telemarketing specials that are available to orders based on the related offer, or set up specials that are available to all orders regardless of offer. The Display Non-Offer-Specific Telemarketing Specials in Order Entry (J31) system control value controls which specials to display in order entry:
• By offer: You use the Work with Telemarketing Specials Screen to set up telemarketing specials for a particular offer. The source code on the order header controls which telemarketing specials are available for the order. The system displays these specials if the Display Non-Offer-Specific Telemarketing Specials in Order Entry (J31) system control value is set to N. When you use this type of telemarketing special, you can set up items as telemarketing specials without lowering the price in order to upsell them.
• For all orders: You use Working with Order Telemarketing Specials (WOTS) to set up telemarketing specials for all orders. The system displays these specials if the Display Non-Offer-Specific Telemarketing Specials in Order Entry (J31) system control value is set to Y.
You cannot display both the offer-specific and non-offer-specific specials. For example, if the Display Non-Offer-Specific Telemarketing Specials in Order Entry (J31) system control value set to Y, the system displays just the specials set up with Working with Order Telemarketing Specials (WOTS), and does not display an specials set up through the Work with Telemarketing Specials Screen even if they exist.
How to display telemarketing specials: A telemarketing specials window opens automatically in order entry if:
• the Display Telemarketing Window in Order Entry (H02) system control value is selected, and
• the Upsell windows flag for the order type is set to B (Both) or P (Promotional pricing), and
• there are eligible, current telemarketing specials
You can also display telemarketing specials through the Display More Options Screen by entering 1 next to the Telemarketing Specials option. If there are no telemarketing specials available for display, the system displays an error message.
Determining whether specials are available: The setting of the Display Non-Offer-Specific Telemarketing Specials in Order Entry (J31) system control value indicates how the system should determine whether telemarketing specials are available on the current order:
• If the system control value is set to N: specials are available if you have set them up for the offer associated with the source code on the order header
• If the system control value is set to N: specials are available if you have set them up in the Order Telemarketing Specials file
About aliases: If the Display Item Alias (D56) field in the System Control file is set to Y and you have defined an alias for the item and the offer associated with the order, the system displays the alias rather than the actual item code on each of the telemarketing specials windows. An alias is an alternate name for an item that you can use to determine if demand varies for an item depending on how and where you present it within an offer. If more than one alias exists for the item and offer, the system selects the first alias it finds searching alphanumerically.
• .
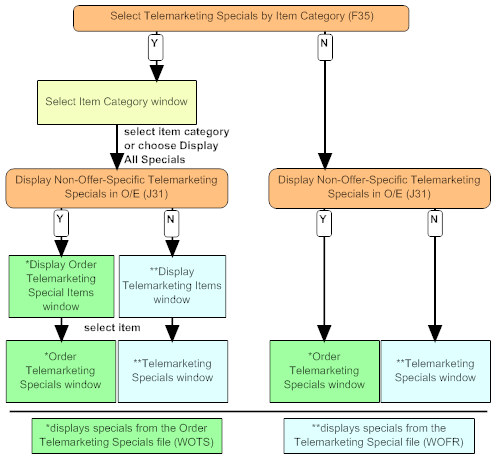
If Displaying by Item Category
The Select Telemarketing Specials by Item Category (F35) system control value controls which telemarketing specials windows open first. If this system control value is set to Y, the window flow is as follows:
Display Non-Offer-Specific Telemarketing Specials in Order Entry (J31) set to: |
Purpose of window: |
|
set to Y: |
set to N: |
|
Select an item category for display or press F8 to display all. |
||
Review the base items within an item category or all item categories. This window does not display SKUs or allow you to add an item or SKU to the current order. Enter 1 next to a SKU’d or non-SKU’d item to advance to the next window. |
||
Review original price, markdown price, and savings for each item or SKU or add the item or SKU to the order. |
||
If not selecting by item category: If the Select Telemarketing Specials by Item Category (F35) system control value is set to N or is blank, you advance directly to the Telemarketing Specials Window or the Order Telemarketing Specials Window, where you can review detail information for each item or SKU and/or add it to the order.
Item category assignment: The system uses the item category assigned to the telemarketing special to determine how and when to display the item in the pop-up windows. The item’s category defaults when you create the telemarketing special; however, if there is no item category assignment for the telemarketing special, the item is not displayed under an item category, even if there is a category assigned in the SKU file through Performing Initial Item Entry (MITM).
When you add an item on telemarketing special to an order, the system:
• updates the SKU/Offer/Page record for any orders from the Telemarketing Special
• sets the Upsell/cross-sell field in the Order Detail file to T for each item you add to an order by selecting it from a telemarketing specials window, regardless of whether the item was marked down. This field does not appear on an inquiry screen in CWDirect, but is available for querying and reports.
Price override reason: When you add a discounted telemarketing special to an order, the system uses the price override reason code defined in the Telemarketing Special Price Override Reason (F36) system control value, if any. If this system control value is blank, the system uses the price override reason code defined in the Default Price Override Reason (B35) system control value.
Posting discount to the General Ledger Interface file: When you confirm shipment of the telemarketing special, the BILL_ASYNC process posts the discount, if any, for the telemarketing special to the G/L number in the Discount field of the Division record. The system calculates the discount by taking the difference between the “was” (regular) item price and the “now” (telemarketing) item price (or markdown %). In the case of orders subject to VAT, the tax-inclusive sale price is indicated, and the markdown percentage is calculated based on the tax-inclusive price for the offer. (If you are using offer-specific telemarketing specials, you can set up items as specials for a specific offer without defining a discounted price, for upsell purposes only.)
If the Display Backordered Telemarketing Special Items (F37) system control value is set to Y or is blank, telemarketing special items are displayed regardless of availability or inventory status.
If the Display Backordered Telemarketing Special Items (F37) system control value is set to N, backordered items or SKUs are not included in the telemarketing specials pop-up windows. To review how this works, it is helpful to look at the two different screen flows for telemarketing specials based on whether you review specials by item category:
If Select telemarketing specials by item category is set to N or blank: You advance directly to the Telemarketing Specials Window or the Order Telemarketing Specials Window, where only available items are listed. Backordered items are not included.
If Select telemarketing specials by item category is set to Y: Regardless of how the Display Backordered Telemarketing Special Items (F37) system control value is set, all item categories associated with any item in the Telemarketing Special file are included at the Select Item Category Window. However, when you advance to the subsequent pop-up windows you use to review telemarketing specials or select special items for the current order, only items or SKUs that are available are listed. Specifically,
1. Select Item Category Window: All categories for the eligible telemarketing specials are listed, regardless of availability.
2. Display Telemarketing Items Window and Display Order Telemarketing Special Items Window: Non-SKU’d items are not included if they are backordered. All SKU’d items are listed.
3. Telemarketing Specials Window and Order Telemarketing Specials Window: No backordered items or SKUs are included.
Use this window:
• to select the item category for which you would like to review telemarketing specials, or
• to indicate you would like to review all telemarketing specials.
How to display this window:
• If the Display Telemarketing Window in Order Entry (H02) system control value is selected, this window opens automatically when you press F9 after entering items on an order in order entry if the Upsell windows flag for the order type is set to B (Both) or P (Promotional pricing).
• At the Display More Options Screen, enter 1 next to Telemarketing Specials.
System control value: This window is available only if the Select Telemarketing Specials by Item Category (F35) system control value is set to Y. If this system control value is set to N or is blank, you advance directly to the Telemarketing Specials Window or the Order Telemarketing Specials Window.
Select Item Category
Offer: S06 SPRING 2006 Opt Categ Description
Type option, press Enter. 5=Display specials
KITC KITCHENWARE PC PERSONAL COMPUTING SUBS SUBSCRIPTIONS TOYS FUN STUFF FOR KIDS
F3=Exit F8=Display all specials |
Field |
Description |
Offer |
The offer associated with the source code on the order header. Note: This field is included only if the Display Non-Offer-Specific Telemarketing Specials in Order Entry (J31) system control value is set to N. In this situation, you can select a telemarketing special only if it is set up for the offer related to the source code on the order header. Alphanumeric, 3 positions; display-only. |
Offer description (Unlabeled field to the right of the offer) |
The description of the offer. Note: This field is included only if the Display Non-Offer-Specific Telemarketing Specials in Order Entry (J31) system control value is set to N. In this situation, you can select a telemarketing special only if it is set up for the offer related to the source code on the order header. Alphanumeric, 30 positions; display-only. |
Categ (Category) |
A code used to classify items according to product relationships or compatibilities. For example, you might use an item category code to identify petite or tall sizes. Item Categories are defined in and validated against the Item Category file; see Merchandising Chapter 4: Working with Item Category Codes (WITG). Note: The system includes items based on the item category assigned to the telemarketing special (at the Work with Telemarketing Specials Screen or the Create Order Telemarketing Specials Screen) rather than the item category, if any, assigned in the SKU file through Performing Initial Item Entry (MITM). A category is included here only if there are any eligible telemarketing specials for items or SKUs assigned to this item category. Alphanumeric, 4 positions; optional. |
Description |
The description of the item category. Alphanumeric, 30 positions; optional. |
Screen Option |
Procedure |
Display telemarketing specials for a specific item category |
Enter 1 next to a category to advance to the Display Telemarketing Items Window (if Display Non-Offer-Specific Telemarketing Specials in Order Entry (J31) is set to N) or the Display Order Telemarketing Special Items Window (if Display Non-Offer-Specific Telemarketing Specials in Order Entry (J31) is set to Y) in order to review items and SKU’s assigned to that category. |
Display telemarketing specials for all item categories |
Press F8 to advance to the Display Telemarketing Items Window (if Display Non-Offer-Specific Telemarketing Specials in Order Entry (J31) is set to N) or the Display Order Telemarketing Special Items Window (if Display Non-Offer-Specific Telemarketing Specials in Order Entry (J31) is set to Y) in order to review all telemarketing specials regardless of item category. |
Display Telemarketing Items Window
Purpose: Use this window to review the eligible items on telemarketing special within a particular item category, or within all item categories. From this window, you must enter 1 next to a SKU’d or non-SKU’d item to display detailed discount information or add the item or one of its SKUs to the order.
To review or select an item that is not assigned to an item category, you must advance to this screen by pressing F8 at the Select Item Category Window. You can also use this option to display all telemarketing specials regardless of item category assignment.
Setting up offer-based telemarketing specials: You use the Work with Telemarketing Specials Screen to set up telemarketing specials by offer. See Working with Telemarketing Specials for a discussion.
How to display this window: Enter 1 next to an item category at the Select Item Category Window (displays that category only), or press F8 at the Select Item Category Window (displays items in all categories and items not assigned to categories).
Note: You advance to this window only if the Display Non-Offer-Specific Telemarketing Specials in Order Entry (J31) is set to N. If the Display Non-Offer-Specific Telemarketing Specials in is set to Y, you advance instead to the Display Order Telemarketing Special Items Window.
Display Telemarketing Items Offer . . . : S98 Category . : TOYS FUN STUFF FOR KIDS
Opt Page# Item Description Price 3
Type option, press Enter 7=SKUs 3 CR123 CREATURES CD-ROM 24.95 This is the artificial life game you have been hearing about. 3 AN678 ANGEL WINGS AND HALO 14.95
3 BE234 DACHSHUND BEAN BAG DOLL 2.50 Cute dachshund beanbag doll makes a great gift for kids 4 AU123 AUGIE DOGGIE DOLL 8.00 An Augie Doggie doll, great for kids or collectors
F12=Cancel |
Which items are included?
• Selected category: If you advanced to this window by selecting a particular item category at the Select Item Category Window, only telemarketing specials assigned to that item category are included. If different SKUs of an item are assigned to different item categories, only items with at least one SKU assigned to the item category you selected are included.
Note: The system includes items based on the item category assigned for the telemarketing special (at the Work with Telemarketing Specials Screen or the Create Order Telemarketing Specials Screen) rather than the item category, if any, assigned in the SKU file through Performing Initial Item Entry (MITM).
• All categories: If you advanced to this window by pressing F8 to select all categories, all items on telemarketing special for this offer are included. If the telemarketing specials for different SKUs of an item are assigned to different page numbers, the item is listed once for each different page number.
• Item availability: If the Display Backordered Telemarketing Special Items (F37) system control value is set to N, items are included only if they are not backordered.
How do items sort? Items sort in this window:
1. numerically by page number
2. alphanumerically by item code
If the telemarketing specials for different SKUs of an item are assigned to different page numbers, the item is listed once for each different page number.
What if no items are displayed? There might be no items displayed at this window if the Display Backordered Telemarketing Special Items (F37) system control value is set to N, and there are no items, or SKU’s of an item, that are on telemarketing special and not backordered. For example, if the Display Telemarketing Window in Order Entry (H02) system control value is selected, the item’s category is displayed at the Select Item Category Window even if all of the items or SKUs on special are currently backordered; however, when you select a category, there are no available items or SKUs to display.
Field |
Description |
Offer |
The offer associated with the source code on the order header. Alphanumeric, 3 positions; display-only. |
Category |
The code representing the item category you selected, and its description. These fields are not included if you pressed F8 at the Select Item Category Window to display all categories. Category: alphanumeric, 4 positions; display-only. Description: alphanumeric, 30 positions; display-only. |
Page# |
The number of the catalog page where the telemarketing special appears. This is the number assigned to the telemarketing special only, and may differ from the page number assignment for the item/offer. Numeric, 5 positions; optional. |
Item |
The code representing the unit of inventory on telemarketing special. If the item has SKUs, this is the base item. Alphanumeric, 12 positions; optional. |
Description |
The description of the item. Alphanumeric, 40 positions; display-only. |
Price |
The price at which you are offering this item as a telemarketing special. If there is one or more SKU offered as a telemarketing special in the same item category, this is the price of the first SKU (selected by page number, then in alphanumeric order). Note: • The telemarketing special price need not represent a discount on the offer price. • Even if the current order is subject to tax-inclusive pricing, this is the regular sale price, not the tax-inclusive sale price. Numeric, 7 positions with a 2-place decimal; display-only. |
Message (Unlabeled field below the item) |
A descriptive or persuasive message for the telemarketing special. Alphanumeric, 70 positions; display-only. |
How to use this window: To review details of the telemarketing special pricing or add an item or SKU to the order, you must advance to the Telemarketing Specials Window, regardless of whether the item has SKUs. Enter 1 next to the item; otherwise, press F12 to return to the Select Item Category Window.
Display Order Telemarketing Special Items Window
Purpose: Use this window to review the eligible items on telemarketing special within a particular item category, or within all item categories. From this window, you must enter 1 next to a SKU’d or non-SKU’d item to display detailed discount information or add the item or one of its SKUs to the order.
To review or select an item that is not assigned to an item category, you must advance to this screen by pressing F8 at the Select Item Category Window.
Setting up non-offer-based telemarketing specials: You use the Work with Order Telemarketing Specials Screen to set up telemarketing specials that are not restricted by offer. See Working with Telemarketing Specials for a discussion.
How to display this window: Enter 1 next to an item category at the Select Item Category Window (displays that category only), or press F8 at the Select Item Category Window (displays items in all categories and items not assigned to categories)
Note: You advance to this window only if the Display Non-Offer-Specific Telemarketing Specials in Order Entry (J31) is set to Y. If the Display Non-Offer-Specific Telemarketing Specials in is set to N, you advance instead to the Display Telemarketing Items Window.
Display Order Telemarketing Special Items
Special Opt Item Description Price
1=Select
ALLSPICE ALLSPICE 2 OZ. 6.99 save 30% on allspice! BASIL BASIL 2 OZ. 6.99
RAB234 SOLID PREMIUM MILK CHOCOLATE BUNNY .99
CLOVE CLOVE 2 OZ. 6.99 Limited time: save on ground cloves! +
F12=Cancel |
Which items are included?
• Selected category: If you advanced to this window by selecting a particular item category at the Select Item Category Window, only telemarketing specials assigned to that item category are included. If different SKUs of an item are assigned to different item categories, only items with at least one SKU assigned to the item category you selected are included.
Note: The system includes items based on the item category assigned to the telemarketing special (at the Create Order Telemarketing Specials Screen) rather than the item category, if any, assigned in the SKU file through Performing Initial Item Entry (MITM).
• All categories: If you advanced to this window by pressing F8 to select all categories, all items on telemarketing special for this offer are included.
• Item availability: If the Display Backordered Telemarketing Special Items (F37) system control value is set to N, items are included only if they are not backordered.
What if no items are displayed? There might be no items displayed at this window if the Display Backordered Telemarketing Special Items (F37) system control value is set to N, and there are no items, or SKU’s of an item, that are on telemarketing special and not backordered. For example, if the Display Telemarketing Window in Order Entry (H02) system control value is selected, the item’s category is displayed at the Select Item Category Window even if all of the items or SKUs on special are currently backordered; however, when you select a category, there are no available items or SKUs to display.
Field |
Description |
Category |
The code representing the item category you selected, and its description. These fields are not included if you pressed F8 at the Select Item Category Window to display all categories. Category: alphanumeric, 4 positions; display-only. Description: alphanumeric, 30 positions; display-only. |
Item |
The code representing the unit of inventory on telemarketing special. If the item has SKUs, this is the base item. Alphanumeric, 12 positions; optional. |
Description |
The description of the item. Alphanumeric, 40 positions; display-only. |
Price |
The price at which you are offering this item as a telemarketing special. If there is one or more SKU offered as a telemarketing special in the same item category, this is the price of the first SKU (selected by page number, then in alphanumeric order). Note: Even if the current order is subject to tax-inclusive pricing, this is the regular sale price, not the tax-inclusive sale price. Numeric, 7 positions with a 2-place decimal; display-only. |
Message (Unlabeled field below the item) |
A descriptive or persuasive message for the telemarketing special. Alphanumeric, 70 positions; display-only. |
Purpose: Use this window to enter a quantity of a telemarketing special item to add to the order. This window presents important information about the item, including the regular price, the telemarketing special price, the markdown on the item, and the quantity immediately available to sell.
How to display this window:
• If the Select Telemarketing Specials by Item Category (F35) system control value is set to N or is blank, you can display this window by selecting Telemarketing Specials at the Display More Options Screen. All eligible telemarketing specials for the order are included. Additionally, if the Display Telemarketing Window in Order Entry (H02) system control value is selected and the Upsell windows flag for the order type is set to B (Both) or P (Promotional pricing), this window opens automatically when you press F9 after entering items on an order in order entry, provided there are eligible telemarketing specials for the order.
• If the Select Telemarketing Specials by Item Category (F35) system control value is set to Y, you can display this window by entering 1 next to a SKU’d or non-SKU’d item at the Display Telemarketing Items Window.
Setting up offer-based telemarketing specials: You use the Work with Telemarketing Specials Screen to set up telemarketing specials by offer. See Working with Telemarketing Specials for a discussion.
Note: You advance to this window only if the Display Non-Offer-Specific Telemarketing Specials in Order Entry (J31) is set to N. If the Display Non-Offer-Specific Telemarketing Specials in is set to Y, you advance instead to the Order Telemarketing Specials Window.
Telemarketing Specials Offer . . . : S98 Category . : TOYS FUN STUFF FOR KIDS Type quantities, press Enter. Qty Page# Item CLR SIZE WDTH WAS NOW SAVE M/D% 10 BU001 CHOC SMLL 10.00 3.00 7.00 70 % CHOCOLATE EASTER BUNNY Avl: 79 Any size chocolate rabbit at one low price 10 BU001 WHIT LRGE 10.00 3.00 7.00 70 % CHOCOLATE EASTER BUNNY Avl: 32 Any size chocolate rabbit at one low price 10 BU001 WHIT SMLL 10.00 3.00 7.00 70 % CHOCOLATE EASTER BUNNY Avl: 160 Any size chocolate rabbit at one low price
F12=Cancel |
Note: If the Display Backordered Telemarketing Special Items (F37) system control value is set to N, only available, regular inventory items display; otherwise, all current telemarketing specials for the offer display.
How do items sort? If the Select Telemarketing Specials by Item Category (F35) system control value is set to N or is blank, items sort in this in the following order:
1. alphanumerically by item category, with blank categories (i.e., unassigned) coming first (Note: the item category itself is not listed)
2. numerically by page number
3. alphanumerically by item code
If the Select Telemarketing Specials by Item Category (F35) system control value is set to Y and you selected a SKU’d item, this window displays only SKUs of the same item.
• If you advanced to this window by selecting an item category: Only the SKUs assigned to the selected item category are listed.
• If you advanced to this window by pressing F8 to display all categories: All SKUs for the item are listed. SKUs are sorted by item category (with blank categories appearing first), then by page number.
Field |
Description |
Offer |
The offer associated with the source code on the order header. Alphanumeric, 3 positions; display-only. |
Category |
The code representing the item category you selected, and its description. These fields are not included unless you selected an item category at the Select Item Category Window. Category: alphanumeric, 4 positions; display-only. Description: alphanumeric, 30 positions; display-only. |
Qty (Quantity) |
Use this field to enter the number of units of the item or SKU to add to the order. Numeric, 5 positions; required. |
Page# |
The number of the catalog page where the telemarketing special appears. This is the number assigned to the telemarketing special only, and may differ from the page number assignment for the item/offer or SKU/offer. Numeric, 5 positions; display-only. |
Item |
The code for the item. Items are defined in and validated against the Item file. The item description is listed below. Alphanumeric, 12 positions; display-only. |
SKU |
The specific style of the item, such as its color, size, width, etc. Alphanumeric, one 14-position field (full SKU) or three 4-position fields (split SKU); display-only. |
Was |
The regular single-unit selling price of the item specified for this offer. When this window opens on an order subject to VAT, the regular tax-inclusive price is indicated. Note: • If the single-unit price with the latest date is not yet effective (that is, the date is in the future), the system uses this future date as the offer price for comparison purposes. • Even if the customer is flagged as an Associate, the price displayed here is the regular price (or regular tax-inclusive price, if the order is subject to VAT). • If there is no Item Price or SKU Price for this item with any current offer, the offer price displayed here is .00. Numeric, 7 positions with a 2-place decimal; display-only. |
Now |
The price of the item for the telemarketing special. When you are using this window on an order subject to VAT, this is the tax-inclusive sale price, provided one is specified. If there is no telemarketing special price specified, the offer price is indicated here. Numeric, 7 positions with a 2-place decimal; display-only. |
Save |
The dollar amount you save off the original offer price for each unit you purchase at the telemarketing special price. This amount is calculated by subtracting the telemarketing special price from the offer price. When you are using this window on an order subject to VAT, the calculation is based on the tax-inclusive pricing. The telemarketing special price is listed here if there is no offer price for comparison. If there is no telemarketing special price, the amount indicated here is .00. Numeric, 5 positions with a 2-place decimal; display-only, calculated by the system. |
Markdown% |
The percentage discount taken off the item's regular price during the telemarketing special. The system calculates this value by dividing the “save” amount (dollars saved) by the “was” price (original offer price). When you use this window on an order subject to VAT, the calculation is based on the tax-inclusive pricing. Numeric, 5 positions with a 2-place decimal; display-only, calculated by the system. |
Item description (Unlabeled field below Item field) |
The description associated with the item, from the Item file. Alphanumeric, 25 positions; display-only. |
Avl (Quantity available) |
The quantity of the item or SKU available. A negative number indicates that the item or SKU is backordered. When using Immediate Reservation, the system limits the quantity available to the quantity of the item that is available to sell in the eligible warehouse(s) in order to represent the true availability of the item based on where the item may actually ship. See Item Availability Calculation to review the calculation the system uses to determine item availability. Numeric, 7 positions; display-only. |
Message (Unlabeled field below the item) |
A descriptive or persuasive message for the telemarketing special. If the item or SKU is already on the current order, a message indicates: <<< On Current Order >>> Alphanumeric, 70 positions; display-only. |
How to use this window:
1. If necessary, press Page Down to locate the item or SKU desired.
2. Enter the desired quantity of the item or SKU in the Qty field.
3. Repeat for each desired item.
4. Press Enter. You return to the Display More Options Screen if the Select Telemarketing Specials by Item Category (F35) system control value is set to N or is blank; otherwise, you return to the Display Telemarketing Items Window. Also, a message such as the following indicates:
Item (AN123 PINK SMLL) has been added to current recipient (1).
Messages: The window might display these messages if they are associated with a selected item:
• Item status messages: You can set up a one- or two-line message to display in order entry based on a status code you assign to an item. You see this message after you add an item on telemarketing special to the order. See Merchandising Chapter 7: Working with Item Status (WIST).
• Item information: You can enter up to four lines of item information for an item to display in order entry for an item if you have previously set up an item class template for its class. You see the first two lines after you add the item on telemarketing special to the order. See Merchandising Chapter 7: Working with Item Status (WIST) for information on setting up an item class template, and Merchandising Chapter 24: Performing Initial Item Entry (MITM) for information on setting up additional item information, such as item information.
Note: If you have set up both an item status message and item information for an item, you see only the item status message.
Order Telemarketing Specials Window
Purpose: Use this window to enter a quantity of a telemarketing special item to add to the order. This window presents important information about the item, including the regular price, the telemarketing special price, the markdown on the item, and the quantity immediately available to sell.
How to display this window:
• If the Select Telemarketing Specials by Item Category (F35) system control value is set to N or is blank, you can display this window by selecting Telemarketing Specials at the Display More Options Screen. All eligible telemarketing specials for the order are included. Additionally, if the Display Telemarketing Window in Order Entry (H02) system control value is selected and the Upsell windows flag for the order type is set to B (Both) or P (Promotional pricing), this window opens automatically when you press F9 after entering items on an order in order entry, provided there are eligible telemarketing specials for the order.
• If the Select Telemarketing Specials by Item Category (F35) system control value is set to Y, you can display this window by entering 1 next to a SKU’d or non-SKU’d item at the Display Telemarketing Items Window.
Setting up non-offer-specific telemarketing specials: You use the Work with Order Telemarketing Specials Screen to set up telemarketing specials that are not restricted by offer. See Working with Telemarketing Specials for a discussion.
Note: You advance to this window only if the Display Non-Offer-Specific Telemarketing Specials in Order Entry (J31) is set to Y. If the Display Non-Offer-Specific Telemarketing Specials in Order Entry (J31) is set to N, you advance instead to the Telemarketing Specials Window.
Order Telemarketing Specials
Category . : BAKE BAKING
Type quantities, press Enter. Qty Item COLR SIZE WDTH WAS NOW SAVE M/D% VANILLA LRGE 10.00 7.49 2.51 25.10 PURE VANILLA EXTRACT Avl: 90 Save over 25% with the six-ounce bottle! VANILLA MEDM 6.00 5.99 .01 .16 PURE VANILLA EXTRACT Avl: 37
VANILLA SMLL 4.00 3.49 .51 12.75 PURE VANILLA EXTRACT Avl: 52
F12=Cancel |
Note: If the Display Backordered Telemarketing Special Items (F37) system control value is set to N, only available, regular inventory items are displayed; otherwise, all eligible telemarketing specials are displayed.
How do items sort? If the Select Telemarketing Specials by Item Category (F35) system control value is set to N or is blank, items sort in this in the following order:
1. alphanumerically by item category, with blank categories (i.e., unassigned) coming first (Note: the item category itself is not listed)
2. alphanumerically by item code
If the Select Telemarketing Specials by Item Category (F35) system control value is set to Y and you selected a SKU’d item at the previous window, this window displays only SKUs of the selected item.
• If you advanced to this window by selecting an item category: Only the SKUs assigned to the selected item category are listed.
• If you advanced to this window by pressing F8 to display all categories: All SKUs for the item are listed. SKUs are sorted by item category, with blank categories appearing first).
Field |
Description |
Category |
The code representing the item category you selected, and its description. These fields are not included unless you selected an item category at the Select Item Category Window. Category: alphanumeric, 4 positions; display-only. Description: alphanumeric, 30 positions; display-only. |
Qty (Quantity) |
Use this field to enter the number of units of the item or SKU to add to the order. Numeric, 5 positions; required. |
Item |
The code for the item. Items are defined in and validated against the Item file. The item description is listed below. Alphanumeric, 12 positions; display-only. |
SKU |
The specific style of the item, such as its color, size, width, etc. Alphanumeric, one 14-position field (full SKU) or three 4-position fields (split SKU); display-only. |
Was |
The regular selling price of the item specified for the offer specified in Working with Order Telemarketing Specials (WOTS); if no offer is specified there, this is the regular selling price of the item in the offer associated with the source code on the order header. When this window opens on an order subject to VAT, this is the regular tax-inclusive price. If there is no price set up for the item or SKU in the related offer, the regular selling price indicated is .00. Numeric, 7 positions with a 2-place decimal; display-only. |
Now |
The price of the item for the telemarketing special. When you are using this window on an order subject to VAT, this is the tax-inclusive sale price. Numeric, 7 positions with a 2-place decimal; display-only. |
Save |
The dollar amount you save off the original offer price for each unit you purchase at the telemarketing special price. This amount is calculated by subtracting the telemarketing special price from the offer price. When you are using this window on an order subject to VAT, the calculation is based on the tax-inclusive pricing. The telemarketing special price is listed here as a credit if there is no offer price for comparison. For example, a telemarketing special at $7.99 is listed as 7.99CR. Numeric, 5 positions with a 2-place decimal; display-only, calculated by the system. |
Markdown% |
The percentage discount taken off the item's regular price during the telemarketing special. The system calculates this value by dividing the “save” amount (dollars saved) by the “was” price (original offer price). When you use this window on an order subject to VAT, the calculation is based on the tax-inclusive pricing. The markdown percentage is listed as zero (0%) if there is no offer price for comparison. Numeric, 5 positions with a 2-place decimal; display-only, calculated by the system. |
Item description (Unlabeled field below Item field) |
The description associated with the item, from the Item file. Alphanumeric, 25 positions; display-only. |
Avl (Quantity available) |
The quantity of the item or SKU available. A negative number indicates that the item or SKU is backordered. When using Immediate Reservation, the system limits the quantity available to the quantity of the item that is available to sell in the eligible warehouse(s) in order to represent the true availability of the item based on where the item may actually ship. See Item Availability Calculation to review the calculation the system uses to determine item availability. Numeric, 7 positions; display-only. |
Message (Unlabeled field below the item) |
A descriptive or persuasive message for the telemarketing special. If the item or SKU is already on the current order, a message indicates: <<< On Current Order >>> Alphanumeric, 70 positions; display-only. |
How to use this window:
1. If necessary, press Page Down to locate the item or SKU desired.
2. Enter the desired quantity of the item or SKU in the Qty field.
3. Repeat for each desired item.
4. Press Enter. You return to the Display More Options Screen if the Select Telemarketing Specials by Item Category (F35) system control value is set to N or is blank; otherwise, you return to the Display Order Telemarketing Special Items Window. Also, a message such as the following indicates:
Item (AN123 PINK SMLL) has been added to current recipient (1).
Messages: The window might display these messages if they are associated with a selected item:
• Item status messages: You can set up a one- or two-line message to display in order entry based on a status code you assign to an item. You see this message after you add an item on telemarketing special to the order. See Merchandising Chapter 7: Working with Item Status (WIST).
• Item information: You can enter up to four lines of item information for an item to display in order entry for an item if you have previously set up an item class template for its class. You see the first two lines after you add the item on telemarketing special to the order. See Merchandising Chapter 7: Working with Item Status (WIST) for information on setting up an item class template, and Merchandising Chapter 24: Performing Initial Item Entry (MITM) for information on setting up additional item information, such as item information.
Note: If you have set up both an item status message and item information for an item, you see only the item status message.
Purpose: Use this screen to identify items that appeal to a customer’s preferences. You can offer those items as potential add-on sales when the customer places an order.
About affinity add-on sales: The Affinity Add-on Sales function tracks each customer’s order history to determine the customer affinity preferences (See: Working with Customer Affinity Preferences (WCST)). The Select Affinity Items pop-up window presents upsell items from your current offer (the offer linked to the source code on the order header) which match the customer’s preferences.
The system tracks customer preferences for specific Attributes of the items you offer for sale, and specific Values of those attributes. For example, a customer might have a preference for the attribute Fabric, and prefer linen or cotton. You can link these Item Attributes and Values to items or SKUs you offer for sale. The Select Affinity Items window will list all items from the current offer whose attribute values match the customer’s preference for specific attribute values.
About Net Perceptions recommendations: If you are using the Net Perceptions Interface, the Select Affinity Items window will also display items from your current offer which have been selected by the Net Perceptions Recommendation Engine. You do not need to set up Affinity information in order to use the Net Perceptions interface; if you are not using Affinity functionality, or if the customer for the order does not qualify for Affinity preferences, the Net Perceptions items will be the only items displayed on Select Affinity Items window.
For more information:
• Setting up affinity preference items: Marketing Chapter 52: Affinity Add-on Sales
• Customers’ affinity preference records: Customer Service Chapter 44: Working with Customer Affinity Preferences (WCST)
• Net Perceptions: Marketing Chapter 57: Net Perceptions Interface
How to display this screen:
• This window opens when you select Customer Affinity at the Display More Options Screen.
• This window also opens when you accept a customer’s order, provided:
• the Display Customer Affinity Upon Order Accept (G58) system control value is set to Y
• the Display Order Recap (A75) system control value is set to Y
• the customer has been flagged as having one or more affinity preferences at the Work with Affinity Preferences Screen
Select Affinity Items
Offer . : CCC EARLY SPRING SPECIALS
Opt Qty Item Price Page# Avail Exp Dt Exp Qty
Type option or quantity, press Enter 1=Display SKUs 6=Avail 7=Pricing 8=POs 10=Attributes 11=Info SPRING BULBS 15.00 0 33 3/04/99 100 SPRING BULB ARRANGEMENT DRESS 60.00 25 251 LINEN DRESS SKIRT 50.00 25 LINEN SKIRT TOP 25.00 25 LINEN TOP +
F12=Cancel |
Field |
Description |
Qty (Quantity) |
The quantity of the item you want to add to the customer’s order. When you enter a quantity, the system displays the following message: Item (XXXXXXX) has been added to current recipient (X). Numeric, 5 positions; optional. |
Item |
The item code for an item that qualifies as a customer affinity preference. For a customer who is flagged for an affinity preference, all items from the current offer (the offer associated with the source code on the order header) which are linked to the customer’s preference will display on this window, unless the items have already been added to the order. Example: The customer’s source code on the order header indicates that she is ordering from your FALL offer, and she has been flagged for a preference for linen. The Select Affinity Items pop-up window will list all items in your FALL offer which are linked to the attribute value Linen, excluding items which are already on the customer’s order. See Chapter 53: Work with Item Attributes and Values (WIAT) for information about setting up affinity preference items. Alphanumeric, 12 positions; display-only. |
Price |
The price of the item, in the offer associated with the source code on the order header. Numeric, 5 positions with a 2-place decimal; display-only. |
Page # |
The page number in the current offer for this item. Numeric, 5 positions; display-only. |
Avail |
The available quantity for this item in shippable warehouses. When using Immediate Reservation, the system limits the quantity available to the quantity of the item that is available to sell in the eligible warehouse(s) in order to represent the true availability of the item based on where the item may actually ship. See Item Availability Calculation to review the calculation the system uses to determine item availability. Numeric, 7 positions; display-only. |
Exp Dt (Expected date) |
The expected date of delivery of this item if you have outstanding purchase orders for the item. See Determining the Expected Ship Date for more information on how the system determines which purchase orders can fulfill the order line. Note: If the item is SKU’d, the expected delivery date will display only for the SKUs of the item (Option 1 next to an item). Numeric, MM/DD/YY format; display-only. |
Exp qty (Expected quantity) |
The expected quantity you are expecting to have delivered for this item, if you have outstanding purchase orders for the item. Note: If the item is SKU’d, the expected delivery date will display only for the SKUs of the item (Option 1 next to an item). Numeric, 7 positions; display-only. |
Screen Option |
Procedure |
Display the SKUs of an item |
Enter 1 next to an item to advance to the Select Affinity SKUs window, where you can select a SKU to be included on the order. |
The following options are available at this window only for non-SKU’d items; to use these options for SKU’d items, you must advance to the Select Affinity SKUs window. |
|
Select an item to include on the order |
Enter a quantity in the Quantity field next to the item. |
Display item availability by warehouse |
Enter 6 next to an item to advance to the Item Availability Screen. |
Display quantity price breaks |
Enter 7 next to an item to advance to the Display Quantity Pricing Window. |
Display open purchase order information |
Enter 8 next to an item to advance to the Display Open Purchase Orders Screen. |
Display the attributes/values that created the affinity preference |
Enter 10 next to an item to advance to the Display Item Attribute screen. |
Display item information |
Enter 11 in the options field next to an item to advance to the Work with Item Information Screen (Customer Service Template). |
How to display this screen: Enter 1 in the options field next to a SKU’d item at the Select Affinity Items Window.
Select Affinity SKUs Item . : TOP LINEN TOP Offer . : CCC
Opt Qty COLO STYL SIZE Price Avail Exp Dt Exp Qty
Type option or quantity, press Enter 6=Avail 7=Pricing 8=POs 11=Info
MEDM 25.00 93 4/21/00 5 SMLL 25.00 100 4/21/00 5
F2=Options on/off F12=Cancel |
See Select Affinity Items Window for field descriptions and options, except for the following option:
Screen Option |
Procedure |
Hide/display options fields |
Press F2. |
Work with Subscriptions Screen
Purpose: Use this screen to view the subscription items ordered by a customer. The system adds a record to this file automatically when you generate a pick slip for a subscription item. This file contains the required information to fulfill or modify the customer's subscription.
This option is not available in order entry or maintenance, only order inquiry.
Definition: A subscription item is:
• identified by a Y in the Subscription field in the Item record
• defined as a non-inventory item in the Item record (Y in the Non-inv field)
• defined further in the Item Subscription file in terms of the current issue, frequency of issues, etc.
• express billed (the entire amount) and closed immediately by the system when you generate a pick slip for the order
For more information: For more information on generating an extract file of customers to receive subscriptions, or on purging this file, see Part N: Processing and Purging Subscriptions.
How to display this screen: At the Display More Options Screen, enter 1 next to the Subscriptions option. You can also display this screen by entering 9 next to a customer on any Work with Customers screen (see Chapter 27: Selecting Customers), or pressing F9 at the Change Customer or Create Customer screen (see Chapter 28: Creating and Updating Sold-to Customers (WCST)).
CSR0536 DISPLAY Work with Subscriptions 2/13/98 13:22:08 The KL Mail Order Company
Customer# . . : 26 MIRANDA, BERNADETTE T
-- First -- -- Last -- Exp Interval Opt S Item CLR /SIZE/WDTH Iss Date Iss Date Iss # Dys
Type options, press Enter. 2=Change 4=Cancel 5=Display 9=Order Inquiry
X JU876 1 0 12 12 30
F3=Exit F12=Cancel |
Field |
Description |
Customer # |
A number to identify the customer receiving the subscription. Numeric, 9 positions; display-only, assigned by the system. |
Customer name (Unlabeled field to the right of the customer number) |
The name of the customer receiving the subscription. Alphanumeric, 41 positions; display-only. |
S (Status) |
The status of the subscription. Valid values include: C = Canceled; changed to this status when the operator cancels the subscription using option 4 on the Work with Subscriptions screen. Note: Canceling the order detail line containing the subscription item does not update the status of the subscription item to C (Canceled); you must manually update the status by using option #4 to cancel. Additionally, if you use an outside service to fulfill your subscriptions, you must notify them of any cancellations to active subscriptions. X = Closed (Expired); automatically updated to this status when expiring issue = last issue sent. If this subscription was included in a subscription extract file you generated using option 2 (Select All Open Subscriptions), the status of the subscription will be X. See Chapter 125: Generating the Subscription Extract File (WGSE). O = Open P = Purged Alphanumeric, 1 position; updated by the system. |
Display Carton Contents Screen
Purpose: Use this screen to review the contents of each carton associated with the order that has shipped to the ship to customer. This screen is helpful if the order has shipped in more than 1 carton and you wish to know what items are in each carton.
You can review:
• the date the carton shipped
• the associated pick control number, carton number, and tracking number
• the shipper who delivered the merchandise
• the weight of the carton
• the name, description, and quantity of each item/SKU in the carton
When can you review the contents of a carton? You can only review the contents of a carton if you use PkMS to package your merchandise. When the PK_BILLING ASYNC processes the PkMS Invoice Header, PkMS Invoice Detail, PkMS Invoice Carton Header, and PkMS Invoice Carton Detail files, the system creates a record in the WMS Carton Header/Detail file.
If the invoice header and/or invoice detail records from PkMS are placed in an error status, but the associated carton header and carton detail do not contain any errors, the system allows you to review the associated carton information on this screen.
The WMS Carton Header/Detail file contains this information:
Field |
Description |
Company |
The CWDirect company code from the PkMS Invoice Header file. |
Order number |
The CWDirect order number from the PkMS Invoice Carton Header file. |
Pick control number |
The CWDirect pick control number from the PkMS Invoice Carton Header file. |
Carton |
The carton number from the PkMS Invoice Carton Header file. |
Date shipped |
The date the PkMS invoice carton header record was created. |
WMS ship via |
The ship via from the PkMS Invoice Carton Header file. |
Tracking number |
The tracking number assigned by the delivery company for this carton. |
Actual weight |
The weight of the carton from the PkMS Invoice Carton Header file. |
Sequence number |
A number used to identify each item in the carton. |
Item |
The CWDirect item number. The system translates the PkMS item number in the PkMS Invoice Carton Detail file to the CWDirect item number, using the |
SKU |
The SKU of the item. |
Quantity shipped |
The quantity of the item/SKU shipped from the PkMS Invoice Carton Detail file. |
See Warehousing Chapter 77: WMS Background Jobs (WPBJ).
How to display this screen: Enter 1next to the Display Carton Contents option at the Display More Options Screen.
Note: The Display Carton Contents option is available on the Display More Options Screen only if the Use PkMS Interface Values (F31) system control value is set to Y.
OER1219 DISPLAY Display Carton Contents 9/26/00 10:01:55 KAB Co.
Order # . : 7448 - 001 Sold to: . : 52 COMMERCIALWARE ATTN: NAVONI, JEANNE
Ship Dte Pick # Carton Number Tracking Number Via Wgt
09/23/00 14605 1837373636381OF10 8483738394848494383 1 OF 01 9.12 DB40SKU PURP LRGE ANGORA WRAP SWEATER QTY: 101 09/23/00 14605 193838374947437383 3838374495737359473 10 OF 01 4.77 DB40SKU PURP MEDM ANGORA WRAP SWEATER QTY: 100 09/23/00 14605 8737346485732OF10 9838374857383463847 2 OF 01 5.34 DB40SKU PURP SMLL ANGORA WRAP SWEATER QTY: 100 09/23/00 14605 4746586573633OF10 5474575637484576375 3 OF 18 6.31 DB40SKU BRWN LRGE ANGORA WRAP SWEATER QTY: 90 09/23/00 14605 2983737585844OF10 1049478475047495737 4 OF 01 4.35 DB40SKU BRWN MEDM ANGORA WRAP SWEATER QTY: 100 09/23/00 14605 4940595847745OF10 4040484747585857585 5 OF 02 5.32 DB40SKU BRWN SMLL ANGORA WRAP SWEATER QTY: 120 +
F3=Exit F12=Cancel |
Field |
Description |
Order # |
The order number and ship to number associated with the cartons that have shipped. Order number: Numeric, 8 positions; display-only. Ship to number: Numeric, 3 positions; display-only. |
Sold to |
The sold to customer number and name. Sold to number: Numeric, 9 positions; display-only. Sold to name: Alphanumeric, 41 positions; display-only. |
Ship dte |
The date the carton shipped to the customer. This is the date PkMS confirmed the order and charged the customer. Numeric, 6 positions (HHMMSS format); display-only. |
Pick # |
The pick control number assigned to the pick slip associated with the merchandise in the carton. This is the pick control number from the WMS Carton Header/Detail file. Numeric, 7 positions; display-only. |
Carton number |
The carton number assigned to this carton. This is the carton number from the WMS Carton Header/Detail file. You can use the carton number to track the merchandise. Numeric, 20 positions; display-only. |
Tracking number |
The tracking number assigned by the delivery company for this carton. The first 25 characters of the tracking number from the WMS Carton Header/Detail file is indicated. Numeric, 25 positions; display-only. |
Via |
The code that represents the carrier that shipped this carton to the ship to customer. Ship via codes are defined in and validated against the Ship Via file. See Working with Ship Via Codes (WVIA) for more information. Numeric, 3 positions; display-only. |
Wgt |
The cumulative weight of the carton. The system determines the weight of each carton based on the weight defined for each item and the dunnage weight of the packing materials in the carton. You can define the weight of each item in Performing Initial Item Entry (MITM). You can define the dunnage weight in Working with Dunnage Weight (WDUN). Numeric, 7 positions with a 3-place decimal; display-only. |
Item number |
The code for the item packed in this carton. Item numbers are defined in and validated against the Item file. Alphanumeric, 12 positions; display-only. |
SKU |
The unique attributes of the item, such as color, style, and size. Alphanumeric, one 14-position field (full SKU) or three 4-position fields (split SKU); display-only. |
Item description |
A description of the item. Alphanumeric, 40 positions; display-only. |
Qty |
The quantity of the item/SKU packed in this carton. Numeric, 7 positions; display-only. |
Brokered Backorder Summary Screen
Purpose: Use this screen to review the current status of all backordered lines that were submitted to Locate’s Order Broker for fulfillment.
Multiple lines? If multiple lines were backordered, each line could be assigned to a different location for fulfillment.
More information on Order Broker activity? You can use the Display Order Broker Details Screen and the Display Broker History Screen to review more information about communication with Locate related to the brokered backordered lines. See Brokered Backorder Integration with Locate for background.
Locate version? This screen is available regardless of whether you use the cw_locate site to integrate with version 2.1 or 2.5 of Locate, or integrate directly with version 5.1 or higher.
How to display this screen: Select Brokered Backorder Summary at the Display More Options Screen. This option is available only if the order includes any brokered backordered lines.
OER1596 DISPLAY Brokered Backorder Summary 10/15/14 17:25:01 EZK Mail Order
Order # . . . . : 200832 - 1
Ord - Locate - Ln# Item SKU Qty Ln# Qty Location Sts
1 KABNOSKU 1 1 1 RTE 9 WESTBOROUGH A 2 CUMIN 2 1 2 NATICK COLLECTION A
F3=Exit |
Field |
Description |
Order # |
The order number and ship-to number that you are currently reviewing. Order number: numeric, 8 positions; display-only. Ship-to number: numeric, 3 positions; display-only. |
Line # |
The sequence number in the Order Detail table that identifies the order line to be fulfilled through the Order Broker integration. The sequence number might differ from the order line number displayed in order maintenance or order inquiry if, for example, you deleted or canceled one of the previous lines on the order. Numeric, 5 positions; display-only. |
Item/SKU |
The backordered item and SKU submitted to the Order Broker for fulfillment. Item: alphanumeric, 12 positions; display-only. SKU: alphanumeric, three 4-position fields; display-only. |
Order qty |
The ordered quantity for the order detail line. Numeric, 5 positions; display-only. |
Qty |
The quantity of a brokered backorder line that is currently assigned to Locate for fulfillment, or that has been fulfilled or canceled. Numeric, 5 positions; display-only. |
Location |
The location selected by the Order Broker to fulfill the brokered backorder. The description is from the Order Broker record, as displayed in Working with Order Broker Requests (WOBR). You use Working with Store Cross References (WSXR) to set up store location cross-references and descriptions. If the description of the store cross-reference exceeds 25 positions, it is truncated. Alphanumeric, 25 positions; display-only. |
Status |
The current status of the Order Broker request. Possible statuses are: A = Accepted. The assigned fulfilling location has accepted the order. The status in Locate might be Accepted or Picked. C = Closed. The Order Broker request was canceled before creating an order in the Order Broker. E = Error. The Order Broker has returned an error response and has not created the order in Locate. This status occurs only when the Locate Platform is set to .NET for integration with Locate 2.1 or 2.5 through the cw_locate site. When CWDirect receives an error response, it returns the order line to normal backorder processing and warehouse fulfillment. You can review the error received at the Second Display Order Broker History Screen. K = Acknowledged. The Order Broker has received the order request, assigned a request ID, selected a fulfilling location, and created the order in its database. Locate initially creates the order in New Order status. If the current status in Locate is Verified, CWDirect also sets the Order Broker record’s status to Acknowledged. P = Polled. The assigned fulfilling location has polled the Order Broker for new orders and been notified of this order. The status in Locate is also Polled. R = Ready. The Order Broker record has been created, but not yet submitted to Locate. |
|
U = Unfulfillable. The Order Broker has not found a fulfilling location for the order based on the existing locations that stock the item and the rules you have set up in Locate. When CWDirect receives an unfulfillable response, it returns the order line to normal backorder processing and warehouse fulfillment, or sells the line out if eligible. This status also occurs when the Order Broker returns an error in the submit order response message, and the Locate Platform is set to JAVA. In this case, the Error displayed at the Second Display Order Broker History Screen is FAILED. W = Waiting. The brokered backorder has been submitted to Locate, but Locate has not yet responded. X = Shipped. The order has been shipped from the assigned fulfilling location. When CWDirect receives a status update indicating that the order was shipped, it bills the order line and saves the ship via and tracking information in the Order Transaction History file. The status in Locate is Fulfilled. Y = Cancel Pending. You have canceled the order line (including the Order Broker request) in order maintenance, or canceled just the Order Broker request at the Work with Order Broker Screen, but you have not yet received a confirmation of the cancellation from the Order Broker. Z = Canceled. The Order Broker request has been canceled, and you have received the confirmation from the Order Broker. If the Locate Platform is set to .NET, when you receive the confirmation, the Fulfilling location and Fulfilling location description fields are cleared. Status code: alphanumeric, 1 position; display-only. Status description: alphanumeric; display-only. |
| Part S: Appendices | Contents | SCVs | Search | Glossary | Reports | XML | Index | Chapter 145: Loading Address Updates |

CSAPPC CWDirect 18.0 August 2015 OTN