Chapter 16: Setting Up General Usage Values

Purpose: The General Usage section of the System Control file defines:
• System default values
• Forms' names
• Library names
For more information: For instructions and screen samples on how to create, change, delete, and copy a system control value, see Chapter 12: System Control File Components.
Quick Reference of General Usage System Control Values
This table describes briefly each system control value for the General Usage application area and lists the control value, a short definition, other control values to which you should refer in this section, if necessary, and a column where you can indicate the value that you assigned for your company.
If you have more than one company on your system, make a copy of this table for each company on your system.
Company: ______________________________
System Control Value |
Description |
Your Value |
Defines the system name for the data base library. |
System name: |
|
Defines the system name for the default output queue where reports are sent to print. |
System name: |
|
Defines the number of copies of reports that should print. |
Number: |
|
Indicates if reports should print when submitted or be held. |
Yes/No: |
|
Indicates if a copy of a report will be saved after it prints. |
Yes/No: |
|
Defines the iSeries folder name containing letter templates. This option is not currently supported. |
System name: |
|
Defines the system name for the library where letter query programs are stored. This option is not currently supported. |
System name: |
|
Defines the number of copies that will print as a result of the letter writing function. This option is not currently supported. |
Quantity: |
|
Defines the name of the library where data is copied when performing a purge. |
System name: |
|
Defines the name of the tape drive used for back ups and restores. |
System name: |
|
Indicates whether you use IPCS (International Package Consignment Service) to deliver packages to foreign addresses. |
Yes/No: |
|
Defines your company ID for use by IPCS. |
System name: |
|
Defines the default weight to use for items on call tags when no shipping weight is defined in the Item file. |
Number: |
|
Defines whether the system date is written to the Invoice Header file when an order is billed. |
Yes/No: |
|
Defines whether to retrieve the company address from the Company file and print it on invoices. |
Yes/No: |
|
Defines whether to retrieve the company address from the Company file and print it on A/R statements. |
Yes/No: |
|
Defines whether to retrieve the warehouse address from the Warehouse file and print it on pick slips. |
Yes/No: |
|
Defines whether custom special handling instructions you enter in Order Entry are in upper and lower case, or upper case only. |
Yes/No: |
|
Defines whether the system creates an extract file of custom special handling information when you generate pick slips. |
Yes/No: |
|
Defines whether to calculate special handling charges in Order Entry by the number of order lines or by the item quantity. |
Yes/No: |
|
Defines whether the system checks a user's authority to individual vendors when the user operates certain functions. |
Yes/No: |
|
Defines whether the system supports processing orders in multiple currencies, requiring you to specify the currency for each offer. |
Yes/No: |
|
Additional Charge Group Code for Shipping and Handling Analysis Report (E54) |
Defines the additional charge group to include on the Shipping and Handling Analysis Report. |
Code: |
Defines whether the system calls a user-defined program to validate phone numbers outside of CWDirect. |
Yes/No: |
|
Defines the number of billing async jobs that start when you start the background ASYNC jobs. |
Number: |
|
Defines whether the system displays basic system control values only when you enter 8 next to an application area in Work with System Values/Features. |
Yes/No: |
|
Defines the 3-character abbreviation where the unique libraries for a specific customer reside. |
Code: |
|
Controls whether specific CWDirect data changes are captured for transfer to a data warehouse. |
Yes/No: |
|
Defines the number of days to retain DW Transaction records after they have been processed. |
Number: |
|
Defines the alphanumeric retrieval code that triggers a search of the Customer Source Finder file when you enter it in the Source code field in order entry, allowing you to retrieve the customer’s most recent source code based on mail history, even if the customer does not know the source code. |
Code: |
|
Default Miscellaneous Source Code for Existing Customers (H83) |
Defines the miscellaneous source code to select for existing customers when you are using the source code retrieval option. |
Code: |
Defines the miscellaneous source code to select for new customers when you are using the source code retrieval option. |
Code: |
|
Defines whether the system supports pricing offers in foreign currencies, requiring you to specify the currency and conversion rate for each offer. |
Yes/No: |
|
Defines how often, in hour intervals, the Threshold Monitor Async submits the Batch Order Control job to update the Order Control Summary file, update the actual values in the Threshold Values file, and monitor for breached threshold values. |
Number: |
|
Defines the library to use when creating the Financial Sales Download file or the Inventory Extract file. |
System name: |
|
Suppress Customer Credit Card Information in Data Warehouse (I49) |
Defines whether the system downloads and stores customer credit card information in the CWData data warehouse. |
Yes/No: |
Defines whether the system passes the hidden tax amount included in the order line price as a separate amount to CWData. |
Yes/No: |
|
Defines how long to retain credit card data for closed and cancelled orders. |
Number: |
Purpose: Use this screen to define the system name for the data base library that contains the system's files and programs.
MSR0053 OPEN Change System Control Value 10/23/95 11:57:41
Description . : Data Base Library
System name . . CWIM12PMDL Narrative . . .
Application . : ALL Applic group . ALL Sequence# . . . 1
F3=Exit F12=Cancel |
System name field: This field contains the name of the data base library that contains the system's files and programs. This library name is defined by MICROS. This is a 10 position, alphanumeric field.
You must change the library name if the files and programs for this company reside in a library different from the one defined.
Purpose: Use this screen to define the name of the default output queue where the system sends a report when you submit a report request, if no output queue has been defined.
MSR0053 CHANGE Change System Control Value 11/13/97 11:27:22
Description . : Default OUTQ
System name . . QPRINT Narrative . . .
Application . : ALL Applic group . ALL Sequence# . . . 1
F3=Exit F12=Cancel |
System name field: Enter the name of a valid output queue on the iSeries for printing reports. This is a 10-position, alphanumeric field. The system uses this output queue if one has not been defined in the report control record.
If you leave this field blank, the system searches this list for a defined output queue, using the first output queue it finds:
• The output queue defined in Working with Report Controls (WRPT).
• The output queue defined in Chapter 4: Working with User Records (WUSR).
• The output queue defined in Setting Up User Classes (WUCL) or in the Output queue field on the Work with User Classes screen (F15).
• The default output queue defined for the iSeries.
The system creates a report control record the first time you run a report if no report control record exists. You can change the output queue for a report using the Work with Report Control function.
When you print pick slips, the system does not use the output queue defined here; instead, it uses the printer defined for the warehouse. See Displaying Pick Slip Generation Inquiry (DPSI) for information on defining a printing device for a warehouse.
For more information:
• working with report controls: See System Operations Chapter 75: Working with Report Controls (WRPT).
• other report control defaults: Default # Copies (A39), Hold Listing Default (A40), and Save Listing Default (A41).
Purpose: Use this screen to define the default number of copies to print for a report if no report control record exists.
MSR0054 OPEN Change System Control Value 12/23/95 12:11:35
Description . : Default # Copies
Number . . . . 1 Narrative . . .
Application . : ALL Applic group . ALL Sequence# . . . 1
F3=Exit F12=Cancel |
Number field: Enter the number of copies of a report to print. The system uses this default if there is no report control record.
The system creates a report control record the first time you print a report if a record does not exist, using the default number of copies defined in this field. You can change the number of copies for a report using the Work with Report Control function.
If you leave this field blank, the value defaults to 1.
For more information:
• working with report controls: See System Operations Chapter 75: Working with Report Controls (WRPT).
• other report control defaults: Default OUTQ (A38), Hold Listing Default (A40), and Save Listing Default (A41).
Purpose: Use this screen to indicate if reports should print automatically when you submit them if a report control record does not exist.
MSR0052 OPEN Change System Control Value 12/11/95 12:15:42
Description . : Hold Listing Default
Yes/No . . . . Y (Y,N) Narrative . . .
Application . : ALL Applic group . ALL Sequence# . . . 1
F3=Exit F12=Cancel |
Yes/No field: If you enter Y in this field, the reports will be held on the output queue.
Holding reports allows you to review them prior to printing, so you can delete the reports you do not need. The system uses this default if a record has not been defined for the report program in the Work with Report Control function.
If you enter N or leave this field blank, reports with no existing report control records will print automatically.
The system creates a report control record the first time you submit the report to print if a report control record does not exist, using the default value defined in this field. You can change the default value using the Work with Report Control function.
For more information:
• working with report controls: System Operations Chapter 75: Working with Report Controls (WRPT) for more information on working with report controls.
• other report control defaults: Default OUTQ (A38), Default # Copies (A39), and Save Listing Default (A41).
Purpose: Use this screen to indicate whether to save a copy of a report on the output queue after you print it if no report control record exists.
MSR0052 OPEN Change System Control Value 12/11/95 12:19:51
Description . : Save Listing Default
Yes/No . . . . N (Y,N) Narrative . . .
Application . : ALL Applic group . ALL Sequence# . . . 1
F3=Exit F12=Cancel |
Yes/No field: If you enter Y in this field, the system will save a copy of reports. This enables you to reprint the report without having to regenerate it. The system uses this default if no record has been defined in the Work with Report Control function.
If you enter N or leave this field blank, a copy of the report is not saved on the output queue once it has been printed. To reprint the report, you must regenerate it.
The system creates a report control record the first time you submit a report to print if there is no report control record, using the default value defined in this field. You can change the value using the Work with Report Control function.
For more information:
• working with report controls: System Operations Chapter 75: Working with Report Controls (WRPT).
• other report control defaults: Default OUTQ (A38), Default # Copies (A39), and Hold Listing Default (A40).
Purpose: Use this screen to define the name of the archive library where data is copied when performing a purge.
MSR0053 OPEN Change System Control Value 12/11/95 14:04:04
Description . : Archive Library
System name . . CWIM11PARC Narrative . . .
Application . : ALL Applic group . ALL Sequence# . . . 1
F3=Exit F12=Cancel |
System name field: Enter the name of the archive library that stores historical data (such as inventory transactions, invoices, purchase orders) before you purge it from the system. This is a 10 position, alphanumeric field.
When you perform a purge, the system copies the data to this library before it purges the data from the file. You should back up this library to tape. Each time you perform a purge, the system will check to see if data from the previous purge has been backed off from this library. If the data from the previous purge still exists in the library, you will be prevented from performing the purge.
Purpose: Use this screen to define the name of the tape drive used for system backups and restores.
MSR0053 OPEN Change System Control Value 3/15/95 11:22:45
Description . : Default tape drive
System name . . Narrative . . .
Application . : ALL Applic group . Sequence# . . .
F3=Exit F12=Cancel |
System name field: This field contains the name of the tape drive to which system file backups and restores are directed automatically. The name of the tape drive is user-defined. This is a 10-position, alphanumeric field.
Use International Package Consignment Service (D43)
Purpose: Use this screen to indicate whether you will be transmitting shipping information electronically to the USPS (United States Postal Service) International Package Consignment Service (IPCS), which delivers packages to foreign addresses.
MSR0052 OPEN Change System Control Value 10/04/95 14:04:48
Description . : Use IPCS Package Consignment Service
Yes/No . . . . Y (Y,N) Narrative . . .
Application . : ALL Applic group . ALL Sequence# . . . 1
F3=Exit F12=Cancel |
Yes/No field: If you enter Y in this field, the system creates files containing information on orders you want IPCS to ship. You transmit this information to IPCS electronically before you deliver the packages to them for shipment.
Important: IPCS ship via functionality is not currently implemented.
IPCS Mail Order Company Identification Number (D44)
Purpose: Use this screen to define the identification number the USPS (United States Postal Service) International Package Consignment Service (IPCS) assigns to your company, if you use IPCS to deliver packages to foreign addresses.
MSR0053 OPEN Change System Control Value 10/04/95 14:36:30
Description . : IPCS Mail Order Company ID
System name . . MOCID Narrative . . .
Application . : ALL Applic group . ALL Sequence# . . . 1
F3=Exit F12=Cancel |
System name field: Enter the identification code you use to identify your company to IPCS when you transmit shipping information.
Important: IPCS ship via functionality is not currently implemented.
Default Weight for Call Tags (D50)
Purpose: Use this screen to define the default weight to assign to an item for call tags. You give a call tag to your shipper when you want an item picked up from a customer and returned to you. The call tag includes the customer's name and address, return address, and the estimated weight of the package. The shipper uses the estimated weight for billing. If no shipping weight is defined for an item in the Item or Item/SKU file, the system uses the weight you define here.
MSR0054 CHANGE Change System Control Value 11/16/95 9:31:43
Description . : Default Weight for Call Tags
Number . . . . 10.000
Narrative . . .
Application . : ALL Applic group . Sequence# . . .
F3=Exit F12=Cancel |
Number field: Enter the default item weight for call tags here.
The system assigns this weight to each unit; the combined weight that appears on the call tag is the total for all items to be picked up.
For more information: See Customer Service Chapter 59: Creating Call Tags Through Order Inquiry and Chapter 93: Processing Call Tags (MCTG) for information on call tags.
Update Invoice File with System Date During Billing (D51)
Purpose: Use this screen to define whether the system defaults the current system date to the invoice when an order is billed (that is, processed through Working with the BILL_ASYNC Job). Writing the system date to the invoice may be helpful if you would like to run custom queries and reporting against the Invoice Header and Invoice Detail files.
MSR0052 CHANGE Change System Control Value 5/28/98 16:06:06
Description . : Update Invoice File with System Date during Billing Async
Yes/No . . . . (Y,N) Narrative . . .
Application . : ALL Applic group . ALL Sequence# . . . 1
F3=Exit F12=Cancel |
Yes/No field: Enter Y in this field if you want the system to default the current system date to the invoice when an order is billed. You can review the invoice date on the Display Invoices Screen.
Note: If you do not use the invoice date in your custom queries or reports, enter N in this system control value.
Related SCV: If you have the Use Async Start Date for Billing Transactions (E95) system control value set to Y, the system uses the async start date rather than the current system date to update the invoice date, regardless of the setting of the Update Invoice File with System Date during Billing Async (E51) system control value.
The table below indicates the date the system defaults to the invoice date, based on the settings of the Update Invoice File with System Date during Billing Async (D51) and Use Async Start Date for Billing Transactions (E95) system control values.
D51 |
E95 |
Async start date |
System date |
Invoice date |
N |
N |
5/08/09 |
5/10/09 |
5/08/09 (async date) |
N |
Y |
5/08/09 |
5/10/09 |
5/08/09 (async date) |
Y |
Y |
5/08/09 |
5/10/09 |
5/08/09 (async date) |
Y |
N |
5/08/09 |
5/10/09 |
5/10/09 (system date) |
Consolidate invoices: If this system control value is set to Y, you cannot consolidate invoices regardless of the setting of the Consolidated Invoice (B49) system control value.
Generating the Point of Sale Download File: When Generating the Point of Sale Download File (GGPD), the system does not update the Invoice posted date field with the date the P.O.S. Download file was generated if the Update Invoice File with System Date During Billing (D51) system control value is set to Y.
Enter N or leave this field blank if you do not want the system to default the async date to the invoice when the order is billed.
Print Company Address on Invoice (D57)
Purpose: Use this screen to define whether the system should print the company address on customer invoices.
MSR0052 CHANGE Change System Control Value 3/22/96 10:14:17
Description . : Print Company Address on Invoice
Yes/No . . . . N (Y,N) Narrative . . .
Application . : ALL Applic group . ALL Sequence# . . . 1
F3=Exit F12=Cancel |
Yes/No field: Enter Y in this field if you want the system to retrieve the address from the Company file (see Setting Up Companies (WCMP)) and print it on invoices. This might be useful if you are in a multi-company environment and it is easier to use invoice forms without a preprinted company address.
Printing the company address works only if you are using an invoice printing program that supports this function.
For more information: See Chapter 17: Setting Up Accounts Receivable Values for information on defining an invoice printing program.
Enter N or leave the field blank if you do not want the system to print the company address.
Print Company Address on Statements (D58)
Purpose: Use this screen to define whether the system should print the company address on accounts receivable (A/R) statements.
MSR0052 CHANGE Change System Control Value 3/22/96 10:21:41
Description . : Print Company Address on Statement
Yes/No . . . . N (Y,N) Narrative . . .
Application . : ALL Applic group . ALL Sequence# . . . 1
F3=Exit F12=Cancel |
Yes/No field: Enter Y in this field if you want the system to retrieve the address from the Company file (see Setting Up Companies (WCMP)) and print it on statements to your A/R customers. This might be useful if you are in a multi-company environment and it is easier to use statement forms without a preprinted company address.
Printing the company address works only if you are using a statement printing program that supports this function.
For more information: See Chapter 17: Setting Up Accounts Receivable Values for information on defining a statement printing program.
Enter N or leave this field blank if you do not want the system to print the company address.
Print Warehouse Address on Pick Slips (D60)
Purpose: Use this screen to define whether the system should print the address of the shipping warehouse on pick slips.
MSR0052 CHANGE Change System Control Value 3/22/96 11:05:35
Description . : Print Warehouse Address on Pick
Yes/No . . . . N (Y,N) Narrative . . .
Application . : ALL Applic group . ALL Sequence# . . . 1
F3=Exit F12=Cancel |
Yes/No field: Enter Y in this field if you want the system to retrieve the address of the shipping warehouse from the Warehouse file and print it on pick slips. This might be useful if you are in a multi-warehouse environment and it is easier to use pick forms without a preprinted warehouse address.
Printing the warehouse address works only if you are using a pick slip printing program that supports this function.
Enter N or leave this field blank if you do not want the system to print the warehouse address.
For more information:
• See Warehousing Creating and Maintaining Warehouses (WWHS).
• See Fulfillment Introducing Pick Slip Generation.
Enter Custom Special Handling in Upper and Lower Case (D65)
Purpose: Use this screen to define whether you can enter custom special handling instructions in upper and lower case, or in all upper case only.
MSR0052 CHANGE Change System Control Value 3/29/96 9:00:35
Description . : Enter Custom Special Handling in Upper and Lower Case
Yes/No . . . . Y (Y,N) Narrative . . .
Application . : ALL Applic group . ALL Sequence# . . . 1
F3=Exit F12=Cancel |
Yes/No field: Enter Y in this field if you would like to enter custom special handling instructions in Order Entry in upper and lower case. This might be useful if you offer personalization or inscriptions, which can be case-sensitive, as custom special handling on certain items.
Custom special handling differs from standard special handling in that you can define entry fields, valid and default responses, and pricing by individual features. You associate the custom special handling format with an item by defining an additional charge code for the special handling format, and entering that additional charge code in the Item/Offer or Item/SKU/Offer file.
When you enter an order for an item with custom special handling, a screen opens:
OER0733 CHANGE Work with Custom Special Handling 3/29/96 9:22:54 Enter Mail Order
Order # . . . . . : 2343 - 1 Item . . . . . . . : B25 Line#: . . . . . . . : 1 CUSTOMIZED INVITATIONS Special handling : E INVITATIONS
Label Input Charge SPECIAL INK Rose 10.00 TYPE Bodoni 10.00 INK COLOR? Y LINE 1 The pleasure of your company is requested LINE 2 LINE 3 LINE 4 LINE 5 LINE 6 LINE 7 LINE 8
F3=Exit F11=Delete all F12=Cancel |
Enter N if you would like this screen to accept only upper case entries in the custom special handling input fields.
For more information:
• working with custom special handling formats and additional charge codes: Customer Service Chapter 9: Establishing Custom Special Handling Formats (WSHF).
• working with Item/Offers and Item/SKU/Offers: Merchandising Chapter 27: Assigning Items/SKUs to Offers and Chapter 50: Creating Item/SKU Offers (MISO).
• working with custom special handling items in Order Entry: Order Entry Chapter 6: Working with Items on the Order.
Generate Custom Special Handling File (D66)
Purpose: Use this screen to define whether to create extract files containing information on items to receive custom special handling. The system creates these files when you generate pick slips for the items, as long as the Extract? field for the custom special handling format is set to Y.
MSR0052 CHANGE Change System Control Value 3/29/96 9:39:24
Description . : Generate Custom Special Handling File
Yes/No . . . . Y (Y,N) Narrative . . .
Application . : ALL Applic group . ALL Sequence# . . . 1
F3=Exit F12=Cancel |
Yes/No field: Enter Y in this field if you want to generate files containing information on items to receive custom special handling. The system generates two files, which you can use to convey customer information and special handling instructions to on outside service for processing.
Enter N if you do not want the system to generate the files.
Note:
• The system does not generate extract files for items to receive standard special handling. See Enter Custom Special Handling in Upper and Lower Case (D65) for more information on custom special handling.
• The charge amount derived from a special handling charge break is not included in the price in the Custom Special Handling Detail Extract File (OECSDP). For more information on special handling charge breaks, see Using Special Handling Charge Breaks.
Custom Special Handling File Layouts
The system creates these files when you generate pick slips for items with custom special handling if the Generate Custom Special Handling File (D66) field in the System Control file is set to Y. The Extract? field for the individual custom special handling format must also be set to Y. The information in the files is extracted from the Order, Special Handling Format, and Pick Control Header and Detail files.
Custom Special Handling Header Extract File (OECSHP) |
|
Field |
Attributes |
Company Code |
3 positions, numeric |
Pick Control Header |
7 positions, numeric |
Pick Control Detail Sequence Number |
5 positions, numeric |
Sequence Number |
7 positions, numeric |
Order Number |
8 positions, numeric |
Order Detail Sequence Number |
5 positions, numeric |
Customer Sold To Number |
9 positions, numeric |
Customer Sold To Prefix |
3 positions, alphanumeric |
Customer Sold To First Name |
15 positions, alphanumeric |
Customer Sold To Initial |
6 positions, alphanumeric |
Customer Sold To Last Name |
25 positions, alphanumeric |
Customer Sold To Suffix |
3 positions, alphanumeric |
Customer Sold To Street Address |
32 positions, alphanumeric |
Customer Sold To Address Lines 2, 3 and 4 |
32 positions each, alphanumeric |
Customer Sold To Apartment Number |
10 positions, alphanumeric |
Customer Sold To Company Name |
30 positions, alphanumeric |
Customer Sold To City |
25 positions, alphanumeric |
Customer Sold To State |
2 positions, alphanumeric |
Customer Sold To Postal Code |
10 positions, alphanumeric |
Customer Sold To PO Box Code |
1 position, alphanumeric |
Customer Sold To Delivery Code |
1 position, alphanumeric |
Customer Ship To Number |
9 positions, numeric |
Customer Ship To Prefix |
3 positions, alphanumeric |
Customer Ship To First Name |
15 positions, alphanumeric |
Customer Ship To Initial |
6 positions, alphanumeric |
Customer Ship To Last Name |
25 positions, alphanumeric |
Customer Ship To Address Lines 1, 2, 3 and 4 |
32 positions each, alphanumeric |
Customer Ship To City |
25 positions, alphanumeric |
Customer Ship To State |
2 positions, alphanumeric |
Customer Ship To Postal Code |
10 positions, alphanumeric |
Customer Ship To Apartment Number |
10 positions, alphanumeric |
Customer Ship To Company Name |
30 positions, alphanumeric |
Customer Ship To Suffix |
3 positions, alphanumeric |
Customer Ship To PO Box Code |
1 position, alphanumeric |
Customer Ship To Delivery Code |
1 position, alphanumeric |
Item Code |
12 positions, alphanumeric |
SKU Code |
14 positions, alphanumeric |
Item Description |
40 positions, alphanumeric |
Quantity Ordered/Printed |
7 positions, numeric |
Price |
9 positions with a 2-place decimal, numeric |
Order Special Handling Format File Sequence Number |
3 positions, numeric |
Order Special Handling Format Detail File Sequence Number |
3 positions, numeric |
Date Extracted |
7 positions, numeric (You can update this field at the time you run an extract.) |
Field |
Attributes |
Company Code |
3 positions, numeric |
Pick Control Number |
7 positions, numeric |
Pick Control Detail Line Number |
5 positions, numeric |
Custom Special Handling File Sequence Number |
7 positions, numeric |
Custom Special Handling Detail File Sequence Number |
7 positions, numeric |
Special Handling Cost |
13 positions with a 4-place decimal, numeric |
Special Handling Input Field Label |
15 positions, alphanumeric |
Special Handling Input |
45 positions, alphanumeric |
Special Handling Charge |
9 positions with a 2-place decimal, numeric Note: The charges added through a special handing charge break are not included in this field. See Using Special Handling Charge Breaks for background. |
For more information:
• working with custom special handling formats and additional charge codes: Customer Service Chapter 9: Establishing Custom Special Handling Formats (WSHF).
• working with Item/Offers and Item/SKU/Offers: Merchandising Chapter 27: Assigning Items/SKUs to Offers and Chapter 50: Creating Item/SKU Offers (MISO).
• working with custom special handling items in Order Entry: Order Entry Chapter 6: Working with Items on the Order.
• generating pick slips: Fulfillment Chapter 4: Introducing Pick Slip Generation.
Evaluate Special Handling Charges by Order Line (D67)
Purpose: Use this screen to define whether to multiply special handling charges on orders by the number of order lines or by unit quantity.
MSR0052 CHANGE Change System Control Value 3/29/96 11:29:45
Description . : Evaluate Special Handling Charges by Order Line
Yes/No . . . . Y (Y,N) Narrative . . .
Application . : ALL Applic group . ALL Sequence# . . . 1
F3=Exit F12=Cancel |
Yes/No field: Enter Y in this field if you want to charge the customer for special handling based on the number of order lines regardless of unit quantity. For example, if you charged $5.00 for special handling on item A1000, special handling charges would be computed as:
Line 1: Item A1000 in blue, quantity 1: special handling charges = $5.00
Line 2: Item A1000 in red, quantity 5: special handling charges = $5.00
Total special handling charges = $10.00
Special handling charges displayed for order line: With this setting, the special handling charge displayed for the order line is the total charge for the line. If you use special handling charge breaks and the order line qualifies for a charge break for a quantity larger than 1, the special handling charge displayed for the order line is the total for the order line, not the unit charge. For example, if you set up a special handling charge break for a total charge of $50.00 for a quantity of 5, the special handling charge displayed is $50.00 rather than a calculated unit charge of $10.00 each.
Where are special handling charges displayed? Special handling charges are:
• displayed in order entry, order maintenance, and order inquiry.
• printed on the pick slip. If an order line with special handling splits across multiple pick slips (for example, a ship-alone item), the total special handling charge for the entire line prints on each pick slip.
Example: A total special handling charge of $45.00 applies to a line with 3 units of a ship-alone item. The system generates three separate pick slips, one for each unit, and the special handling charge of $45.00 prints on each pick slip.
Note: The one exception to displaying the total handling charges with this system control value selected is the Work with Special Handling Screen, used for standard special handling only; this screen always displays the calculated per-unit charge.
Enter N in this field if you want to charge the customer for special handling based on the total unit quantity. For example, on an order for item A1000, special handling charges would be computed as:
Line 1: Item A1000 in blue, quantity 5: special handling charges = $25.00
Line 2: Item A1000 in red, quantity 1: special handling charges = $5.00
Total special handling charges = $30.00
With this setting, the S/H charge stored on the Order Detail line is the unit charge amount. For example, the S/H charge amount for line 1 above would be the unit charge of $5.00, even though the total charge is $25.00 for the 5 units. This unit charge amount is also displayed on each screen listed above, and printed on the pick slip.
For more information: See Special Handling Overview for background.
Check User Class/Vendor Authority (D88)
Purpose: Use this screen to define whether to check a user's authority to vendors when the user works with certain menu options.
MSR0052 CHANGE Change System Control Value 7/16/96 9:59:33
Description . : Check User Class/Vendor Authority
Yes/No . . . . Y (Y,N) Narrative . . .
Application . : ALL Applic group . ALL Sequence# . . . 1
F3=Exit F12=Cancel |
Yes/No field: Enter Y in this field if you want the system to check which vendors the user has authority to when using certain functions. If the user does not have authority to a particular vendor, the system will not permit the user to display, change, or print any information related to that vendor. This option may be useful if you want to grant outside parties, such as individual vendors, limited access to your system.
Enter N if you do not want the system to check vendor authority for a user.
Defining vendor authority by user class: You define a user's vendor authority by assigning the user to a user class. The system allows you to set a user class's authority to *EXCLUDE for individual vendors. (You must define a default company for the user class so the system will know which company you want to restrict the class's access to.) The user then "inherits" the authorities defined for the user class. You cannot define alternate authority settings for an individual user.
The default authority for each vendor is always *ALLOW unless you change it; you define a user class's vendor authority by selecting which vendors it does not have access to.
Menu options affected by vendor authority restriction by user class:
Menu Option |
Fast Path |
For more information, see: |
Work with Item/SKUs |
MITM |
Chapter 3, Merchandising manual |
Inventory Inquiry |
DINI |
Chapter 12, Merchandising manual |
Enter/Maintain POs |
MPOE |
Chapters 7 and 8, Merchandising manual |
Purchase Order Inquiry |
MPOI |
Chapter 9, Merchandising manual |
Print Purchase Order |
MPRP |
Chapter 10, Merchandising manual |
Print PO and Receiving Worksheets |
PPWS |
Chapter 10, Merchandising manual |
Purchase Order Receipts |
PORC |
Chapter 6, Warehousing manual |
Work with Vendors |
WVEN |
Chapter 2, Merchandising manual |
Work with Vendor Item |
WVNI |
Chapter 2, Merchandising manual |
Work with Inventory Transactions/Batch |
WITB |
Chapter 2, Warehousing manual |
Work with Inventory Transactions/Immediate |
WITI |
Chapter 2, Warehousing manual |
Types of restrictions:
• the vendor record
• any purchase orders for the vendor
• any items that are assigned to this vendor by having the vendor number defined in the Item file
• any vendor items defined for the vendor (but not necessarily the item itself).
If you attempt to work with a record that you do not have authority to, the system displays an error message, such as:
Not authorized to purchase order.
Not authorized to vendor.
Not authorized to item/SKU.
When you scan in any of the affected menu options, the system simply disqualifies any restricted records from the scan. For example, when you scan on the Work with Items screen, any items that have a restricted vendor defined in the Item file do not display.
For more information: Chapter 3: Setting Up User Classes (WUCL), for information on defining vendor restrictions for a user class. See Chapter 4: Working with User Records (WUSR) for information on defining vendor restrictions for a user.
Purpose: Use this screen to define whether the system supports processing orders in multiple currencies.
MSR0052 CHANGE Change System Control Value 10/28/96 14:47:03
Description . : Multi Currency By Offer
Yes/No . . . . Y (Y,N) Narrative . . .
Application . : ALL Applic group . ALL Sequence# . . . 9999
F3=Exit F12=Cancel |
Yes/No field: Enter Y in this field if you want to take orders in more than one currency. The system will support your defining one or more foreign currencies for offers, and restrict each order to only one currency. The system will also track the currency conversion rates for each order at entry and billing, and convert order values to your local currency for tracking demand and posting to the general ledger.
Note: If you enter Y in this field, the Use Alternate Currency Pricing (H89) system control value must set to N. See Comparing Alternate Currency Pricing with Multiple Currency by Offer for a comparison.
Enter N in this field or leave it blank if you accept orders in your local currency only, use alternate currency pricing instead of multiple currency by offer, or do not want to enable multi-currency conversion and tracking.
Setting this field to Y will have these effects:
Currency of offer. The system will require that you define the currency of each offer. When a customer places an order, the system defaults the offer associated with the source code you enter on the order header to the order detail lines as usual. However, the system searches for an item price only among offers in the same currency. If the item is not available in an offer in that currency, the system displays a message:
Price (.00) cannot be zero for item (AA100).
In addition, the currency code associated with the offer displays on the order header screen in Order Entry, Order Maintenance and Order Inquiry.
Conversion of order values. The system converts the order values to your local currency (defined in the Local Currency Code (A55) system control value) when you enter the order (for prepaid orders) and when the order is billed. Order billing history for the customer is stored in your local currency, although the order itself remains on your system in the currency of the offer.
Cash receipts. The system requires that you define an entity and a bank when you enter cash receipts. This information tells the system which division is receiving the cash, which in turn indicates the source code and offer. As a result, the system identifies the currency of the receipts, and makes the necessary conversion to your local currency.
Shadow postings. The system requires you to define a shadow entity for each currency. The purpose of the shadow entity is to make a duplicate posting for each order-related transaction to the General Ledger Interface file: one in your local currency, and one in the currency on the order.
Currency fluctuation. You can specify a general ledger account number in the Division General Ledger file to record changes in order value between order entry and order billing due to fluctuations in the currency conversion rate for prepaid orders.
Processing refunds. The system generates refunds in the currency on the order, using the conversion rate currently in effect.
This chart demonstrates the relationships that must be in place for you to implement multi currency in your company.
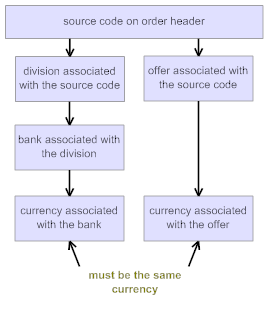
Setup requirements for each currency:
• Create a shadow entity (Working with Entities (WENT)).
• Assign the shadow entity to the currency (Working with Currency (WCUR)). Note: the shadow entity cannot be associated with a division.
• Select a bank for the currency (Working with Banks (WBNK)).
• Create a division for the currency (Working with Divisions (WDIV)), specifying the bank. Assign all general ledger account numbers, including the currency fluctuation account number.
• Create a chart of accounts (Working with Chart of Accounts (WCA)).
• Create offer(s) for the currency (Working with Offers (WOFR)).
• Create records of each item/offer or item/SKU/offer (See Merchandising Chapter 27: Assigning Items/SKUs to Offers).
• Create source code(s) for each offer(s) (Working with Offers (WOFR)). The offer and division must both point to the same currency.
• Create each foreign pay type and related general ledger account numbers (Working with Pay Types (WPAY)).
• Set the Track Invoice Currency (D68) system control value to Y.
Screen differences: You will notice these differences based on the value in this field:
Menu Option |
If field is set to Y |
If field is set to N or blank |
Work with Currency (fast path = WCUR) |
Shadow entity appears (required) |
Shadow entity does not appear |
Work with Offers (fast path = WOFR) |
Currency of offer appears (required) Conversion rate appears (display-only) |
Currency of offer and Conversion rate do not appear |
Work with Source Codes (fast path = WSRC) |
Division and Offer must point to the same currency |
No validation |
Work with Banks (fast path = WBNK) |
Currency code appears (required) |
Currency code does not appear |
Enter/Maintain Orders (fast path = OEOM) |
Currency code appears on order header or header/detail screen after you enter source code |
Currency code does not appear |
Order Inquiry (fast path = OIOM) |
Currency code appears on order header |
Currency code does not appear |
Report differences:
• Refund Due List by Order Number (fast path = MRDU): sorts by bank if the system control value is set to Y (the Refund Due List by Type sorts by bank regardless of how the system control value is set, although the final totals sort by bank only if the system control value is set to Y)
• Unredeemed Gift Certificate report (fast path = PUGC): currency code appears if the system control value is set to Y
• Gift Certificate Register (fast path = MPGC) includes the currency code if the system control value is set to Y
• Sales Journal (fast path = PDSJ) sorts and totals by currency if the system control value is set to Y
• Sales Journal by Pay Type (fast path = PSJP) sorts and totals by currency if the system control value is set to Y
• Cash Receipts Journal (fast path = PCRJ) includes totals by currency if the system control value is set to Y
For more information:
• working with entities, divisions, banks, general ledger accounts, pay types, and currencies, and on how shadow postings and currency fluctuation works: Accounts Payable Part A: Setting Up the Accounting Files.
• processing refunds: Customer Service Chapter 102: Processing Refunds (MREF).
• working with offers and source codes: Marketing Chapter 2: Working with Offers (WOFR).
Additional Charge Group Code for Shipping and Handling Analysis Report (E54)
Purpose: Use this screen to define the additional charge group to include on the Shipping and Handling Analysis Report.
MSR0051 CHANGE Change System Control Value 4/09/97 11:21:58
Description . : Additional Charge Group Code for S&H Analysis Report
Code . . . . . A D R
Narrative . . .
Application . : ALL Applic group . ALL Sequence# . . . 1
F3=Exit F12=Cancel |
Code field: Enter the group code representing the type(s) of additional charges you want to include on the Shipping and Handling Analysis Report. The code you enter must already have been assigned to one or more additional charge codes.
You use the Shipping and Handling Analysis Report to review your freight, handling, and miscellaneous charges on orders for a given period and evaluate your profitability in this area. See Customer Service Chapter 74: Order Status and Activity Reports for a report sample and more information.
You assign additional charge group codes through the Work with Additional Charges menu option. See Customer Service Chapter 3: Establishing Additional Charge Codes (WADC) for more information.
Leave this field blank if you do not use the Shipping and Handling Analysis Report, or do not intend to include additional charges.
External Validation for Phone Number (E64)
Purpose: Use this screen to define whether the system calls a user-defined program to validate phone numbers outside of CWDirect.
MSR0052 CHANGE Change System Control Value 4/09/97 14:35:19
Description . : External Validation for Phone Number
Yes/No . . . . (Y,N) Narrative . . .
Application . : ALL Applic group . ALL Sequence# . . . 1
F3=Exit F12=Cancel |
Yes/no field: Enter Y in this field to have the system call a user-defined program to validate phone numbers outside of CWDirect. You can define the validations that occur for phone numbers under the program MSR0912. The system provides a “hook” to the program when an operator presses Enter on a screen containing a phone number associated with a country.
This program can be used to validate phone number rules for a specific country, for example, if a phone number for a country should only contain 6 numbers and more than 6 numbers are entered, the program passes an error message back to CWDirect:
Invalid Phone Number Format
Once the program completes, CWDirect returns to normal processing.
Phone numbers that are not associated with a country, for example, phone numbers in the Bank, Salesman, Ship Via and Warehouse files, are not validated.
The program validates phone numbers based on these parameters:
• Company
• Country
• State
• City
• Phone Number
Enter N or leave this field blank if you do not want the system to call the user-defined program to validate phone numbers outside of CWDirect.
Number of Billing Async Jobs to Start (F08)
Purpose: Use this screen to define the number of billing async jobs to start when you start the background ASYNC jobs.
MSR0055 CHANGE Change System Control Value 3/03/98 16:49:38
Description . : # of Billing Async Jobs to Start
Quantity . . . Narrative . . .
Application . : ALL Applic group . ALL Sequence# . . . 100
F3=Exit F12=Cancel |
Number field: Enter the number of billing async jobs you wish to start when you start the background ASYNC jobs. The background ASYNC jobs are started when you enter 7 next to the Controlling ASYNC job. See System Operations Chapter 2: Working with the CNTL_ASYNC Job.
The system determines how many billing async jobs to start by searching across all companies and using the greatest value defined for this system control value. If the greatest value is 0, the system runs one billing async. The greatest number of billing asyncs that can run at one time is 9.
Leave this field blank or enter 0 or 1 to start one billing async when you start the background ASYNC jobs.
For more information: See System Operations Chapter 3: Working with the BILL_ASYNC Job.
Display Basic Install Values Only (F22)
Purpose: Use this screen to define whether the system displays basic system control values only when you enter 8 next to an application area in Work with System Values/Features.
MSR0052 CHANGE Change System Control Value 3/02/98 12:04:35
Description . : Display basic install values only
Yes/No . . . . (Y,N) Narrative . . .
Application . : ALL Applic group . ALL Sequence# . . . 99
F3=Exit F12=Cancel |
Yes/No field: Enter Y in this field if you want the system to display basic system control values only when you enter 8 next to an application area in Work with System Values/Features.
The system identifies system control values as basic if they contain a setup level of 3.
System control values contained in a higher group (for example, Use PC Manifesting (B80), contains 8 system control values) are defined as basic if the higher SCV (in the example, B80) is set up as basic regardless of how each of the system control values contained in the group is set up.
Enter N or leave this field blank if you want the system to display all system control values when you enter 8 next to an application area in Work with System Values/Features.
When you press F7 (SCV/Code) on the Work with System Values/Features screen, the system displays all system control values regardless of the value defined in Display Basic Install Values Only system control value.
For more information: See Installation Chapter 12: System Control File Components.
Unique Library Abbreviation (G57)
Purpose: Use this screen to define the 3 character abbreviation for the specific unique customer library you wish to automatically add to your library list when you advance to the menu driver or change companies.
MSR0051 CHANGE Change System Control Value 9/27/99 14:15:28
Description . : Unique Library Abbreviation
Code . . . . .
Narrative . . .
Application . : ALL Applic group . ALL Sequence# . . . 99
F3=Exit F12=Cancel |
Code field: Enter the 3-character abbreviation in this field that represents the specific unique customer library you wish to automatically add to your library list when you advance to the menu driver or change companies. Any customer specific files or programs located in your library are added before the base CWDirect data library.
You may use the 3-character unique library abbreviation if your unique library begins with the 3 characters UNQ and you are in the D, I, Q, or P environment. If your unique library does not begin with the 3 characters UNQ, CWDirect does not add the library to your library list.
Base CWDirect Library |
Unique Customer Library |
CWMxxPDTA (xx represents the CWDirect version number, P represents production environment) |
UNQxxxPDTA (xxx represents the customer's unique library abbreviation, P represents production environment) |
CWMxxQDTA |
UNQxxxQDTA |
CWMxxIDTA |
UNQxxxIDTA |
CWMxxDDTA |
UNQxxxDDTA |
Note: This system control value does not apply to unique models supported by MICROS. Unique libraries supported by MICROS are automatically added to your library list.
Leave this field blank if you do not want to define a 3-character abbreviation for the specific customer library you wish to automatically add to your library list.
If you leave this field blank and your company has a unique library for CWDirect, the system does not automatically add the unique library to your library list.
Purpose: Use this screen to control whether to capture information on activity in CWDirect for transfer to the CWData data warehouse.
MSR0052 CHANGE Change System Control Value 4/24/00 17:00:50
Description . : Use Data Warehouse
Yes/No . . . . N (Y,N) Narrative . . .
Application . : ALL Applic group . ALL Sequence# . . . 101
F3=Exit F12=Cancel |
Yes/No field: Enter Y in this field if you want the system to capture information for transfer to the CWData data warehouse.
Enter N if you are not using CWData.
About CWData: CWDirect retains comprehensive data on the transactions and other activities that make up your business. This wealth of data is essential to support a range of business processes, and it is structured in a way to facilitate extensive transaction processing; however, it can be cumbersome for you to select and analyze the information you need for strategic decision-making, especially if you need to consider the same body of information from multiple viewpoints. CWData provides a means to extract key information for your company, consolidating and transforming it so that you can perform powerful, efficient analysis, because it facilitates a multi-dimensional view of the data.
Example: The inquiries and reports available in CWDirect allow you to review the specifics of order activity for production purposes. You might use the data warehouse to monitor trends and tendencies in order activity because it enables you to view the same data from geographic, demographic, or seasonal perspectives.
Creating items/SKUs: When you create an item/SKU and the Use Data Warehouse (G94) system control value is set to Y, the system requires you to define a vendor number for the item/SKU.
For more information: See the CWData Overview.
Note: Contact your MICROS representative for information on purchasing CWData.
Data Warehouse Transaction Purge Days (H10)
Purpose: Use this screen to define the number of days to retain DW Transaction records before purging them.
MSR0054 CHANGE Change System Control Value 8/04/00 11:17:21
Description . : Data Warehouse Transaction Purge Days
Number . . . .
Narrative . . .
Application . : ALL Applic group . ALL Sequence# . . . 99
F3=Exit F12=Cancel |
Number field: Enter the number of days to retain records in the DW Transaction file before purging them. The Process DW Changes job performs the purge, deleting any records if:
Original process date is less than or equal to the current system date - the number of purge days
Example: Today is 8/14, and you have set this value to 5. Any record whose Original process date is 8/7 or earlier is purged.
You can set this job up as part of your periodic processing, or run it on demand; see the Process Data Warehouse Changes Window.
Leave this field blank if you do not want the Process DW Changes job to purge DW Transaction records, or if you are not using CWData.
About DW Transaction records: If the Use Data Warehouse (G94) system control value is selected, the system uses the DW Transaction file to track each transaction that should be downloaded to the data warehouse for CWData.
For more information: See the CWData Overview.
Source Code Auto Retrieval Value (H82)
Purpose: Use this screen to define the alphanumeric retrieval code that triggers a search of the Customer Source Finder file when you enter it in the Source code field in order entry; this file allows you to retrieve the customer’s most recent source code based on mail history, even if the customer does not know the source code.
MSR0051 CHANGE Change System Control Value 1/04/02 11:38:32
Description . : Source Code Auto retrieval Value
Code . . . . . *
Narrative . . .
Application . : ALL Applic group . ALL Sequence# . . . 99
F3=Exit F12=Cancel |
Code field: Use this field to specify the alphanumeric retrieval code to indicate that your entry in the Source code field in order entry does not represent an actual source code; instead, it indicates that your entry represents a search for a matching record in the Customer Source Finder file based on the offer code that you enter following the retrieval code. Using this file, you can default the customer’s most recent source code to the order based on mail history, even if the customer does not know the source code.
Important: Your alphanumeric retrieval code should be a single character, such as * or #. Also, make sure that you do not use a character that begins the name of any source code in your company.
About the Customer Source Finder file: You can use this file to keep a record of source codes for a customer, representing the customer’s recent mail history. If the customer does not know the correct source code while you are entering an order, you can enter the retrieval code plus the correct offer code, and the system will retrieve the most recent source code for the customer from the Customer Source Finder file.
Example: |
The alphanumeric retrieval code defined with this system control value is *. In order entry, the customer does not know the correct source code for the catalog, so you enter *OF1 in the Source code field, where OF1 represents the current offer code. There is a record in the Customer Source Finder file for this customer and source code SOURCE1. Since SOURCE1 is associated with OF1, this record represents a match, and the system defaults SOURCE1 to the Source code field in order entry. |
Defaulting the source code using the retrieval code works at the Work with Order Screen (header version of order entry), Work with Order/Detail Screen, the alternate format of the Work with Order Screen for entering foreign addresses, remote orders, and e-commerce orders.
How does a Customer Source Finder record match? In addition to being associated with the offer code you enter in order entry, the source code in the Customer Source Finder file must be unrestricted (the Restricted field must be set to N).
Source matching hierarchy: When determining which source code to retrieve in order entry, the system also uses the Default Miscellaneous Source Code for Existing Customers (H83) and the Default Miscellaneous Source Code for New Customers (H84) system control values, as follows:
Which Source to Use? |
Sample Message in Order Entry |
1. Use the record in the Customer Source Finder file that has the most recent Mail date that is not in the future, that matches the customer and the specified offer, and that includes a valid, unrestricted source; otherwise, |
Source Defaulted from Customer Source finder |
2. If there is not a qualifying record in the Customer Source Finder file, use the miscellaneous source code (the Type = U) associated with the specified offer, as long as it is not restricted; if there is more than one miscellaneous source code for the offer, use the first one alphanumerically; otherwise, |
Source Defaulted to Misc Source for offer OFR |
3. If there is not a miscellaneous source code for the offer and the customer is not new, use the Default Miscellaneous Source Code for Existing Customers (H83) if specified; otherwise, |
Source Code CCCS Defaulted for Existing Customer |
4. If there is not a miscellaneous source code for the offer and the customer is new, use the Default Miscellaneous Source Code for New Customers (H84) if specified; otherwise, |
Source Code DDDS Defaulted for New Customer |
5. No source code will default; you must enter a source code in order entry. |
Source code () is invalid, restricted or missing. |
You can vary the hierarchy by omitting certain levels, such as the Default Miscellaneous Source Code for Existing Customers (H83) and Default Miscellaneous Source Code for New Customers (H84); however, you must enter the source code auto retrieval code to use the source matching logic.
Searching without specifying an offer: You can also enter just the retrieval code without specifying an offer in order entry to simply retrieve the Default Miscellaneous Source Code for Existing Customers (H83) or the Default Miscellaneous Source Code for New Customers (H84), as appropriate. For example, if the retrieval code is #, you enter just # without including an offer code. However, if the appropriate default miscellaneous source code system control value is blank, then entering the retrieval code by itself will not work.
Maintaining the Customer Source Finder file: There is no menu option available to maintain the Customer Source Finder file, so you will need to find another means to create records in this file. When creating new records for the same customer, it is best to insert records with the most recent mail date first, to improve system efficiency when searching for a match in order entry.
Note: The system reads the Mail date field in the Customer Source Finder file in YYYMMDD format, so that a value of 1020124 indicates a date of January 24, 2002.
You can also create records in the Customer Source Finder file with mail dates that are in the future; the system will not select these records until the current system date is the same as or later than the mail date. For example, if you create a record with a mail date of February 28, 2002, the system will not select this record until it is February 28 or later.
Additional setup requirements: In addition to specifying a retrieval code with this system control value, you can set up the following:
• Miscellaneous source codes for each offer: Type = U and Restricted = N. If there is more than one qualifying miscellaneous source code for the offer, the system selects the first qualifying source code alphanumerically.
• Source codes: Make sure that none of the source codes in your company start with the retrieval code specified with this system control value. For example, if you use a retrieval code of *, you could not create a source code of *123. In this case, the * indicates to the system that the remaining characters you enter in the Source code field represent an offer rather than a source code.
• Additional system control values:
• Default Miscellaneous Source Code for Existing Customers (H83)
• Default Miscellaneous Source Code for New Customers (H84)
Leave this field blank if you are not using the Customer Source Finder file to retrieve the correct source codes for customers in order entry.
Default Miscellaneous Source Code for Existing Customers (H83)
Purpose: Use this screen to specify the miscellaneous source code to select for existing customers when you are using the source code retrieval option.
MSR0051 CHANGE Change System Control Value 1/04/02 13:15:58
Description . : Default Misc. Source Code for Existing Customers
Code . . . . .
Narrative . . .
Application . : ALL Applic group . ALL Sequence# . . . 99
F3=Exit F12=Cancel |
Code field: Enter the source code to assign to an order for an existing customer in order entry if you are using the Source Code Auto Retrieval Value (H82), if the system does not find a source code in the Customer Source Finder file, and there is no miscellaneous (Type = U) source code for the specified offer. See the description of the Source Code Auto Retrieval Value (H82) for a complete discussion and a description of the hierarchy the system uses to retrieve the correct source code.
Note: The default miscellaneous source code does not need to be associated with the offer that you specify when you search using the retrieval code in order entry.
Default Miscellaneous Source Code for New Customers (H84)
Purpose: Use this screen to specify the miscellaneous source code to select for new customers when you are using the source code retrieval option.
MSR0051 CHANGE Change System Control Value 1/04/02 13:32:09
Description . : Default Misc. Source Code for New Customers
Code . . . . .
Narrative . . .
Application . : ALL Applic group . ALL Sequence# . . . 99
F3=Exit F12=Cancel |
Code field: Enter the source code to assign to an order for a new customer in order entry if you are using the Source Code Auto Retrieval Value (H82), if the system does not find a source code in the Customer Source Finder file, and there is no miscellaneous (Type = U) source code for the specified offer. See the description of the Source Code Auto Retrieval Value (H82) for a complete discussion and a description of the hierarchy the system uses to retrieve the correct source code.
Note: The default miscellaneous source code does not need to be associated with the offer that you specify when you search using the retrieval code in order entry.
Use Alternate Currency Pricing (H89)
Purpose: Use this screen to define whether the system supports pricing offers in foreign currencies, requiring you to specify the currency and conversion rate for each offer.
MSR0052 CHANGE Change System Control Value 3/27/02 13:19:13
Description . : Use Alternate Currency Pricing
Yes/No . . . . (Y,N) Narrative . . .
Application . : ALL Applic group . ALL Sequence# . . . 99
F3=Exit F12=Cancel |
Yes/No field: Enter Y in this field if you want to price offers in a foreign currency. The system requires you to define a currency code and conversion rate for each foreign offer, and restricts each order to only one currency. The system also displays the alternate currency on customer related reports and forms.
Note: If you enter Y in this field, the Multi Currency by Offer (E03) system control value must set to N. See Comparing Alternate Currency Pricing with Multiple Currency by Offer for a comparison.
Enter N in if you do not want to price offers in a foreign currency or instead wish to use multiple currency by offer (the Multi Currency by Offer (E03) system control value is set to Y).
For more information: See Customer Service Chapter 12: Using Alternate Currency Pricing, for an overview on alternate currency pricing and required set up.
Threshold Monitor Interval (H90)
Purpose: Use this screen to define how often, in hour intervals, the Threshold Monitor Async submits the Batch Order Control job to update the Order Control Summary file, update the actual values in the Threshold Values file, and monitor for breached thresholds.
MSR0054 CHANGE Change System Control Value 5/22/02 14:06:53
Description . : Threshold Monitor Interval
Number . . . .
Narrative . . .
Application . : ALL Applic group . ALL Sequence# . . . 99
F3=Exit F12=Cancel |
Number: Enter the hour interval the Threshold Monitor Async uses to submit the Batch Order Control job.
The system stores the hour interval you define in this system control value for the Threshold Monitor Async in seconds. For example, if you enter 2 in this system control value, indicating the Threshold Monitor Async submits the Batch Order Control job in 2 hour intervals, the system stores the delay interval for the Threshold Monitor Async as 7200 seconds (2 hours x 60 minutes = 120 minutes; 60 seconds x 120 minutes = 7200 seconds).
The Threshold Monitor Async is started and ended when you start or end the Control Async; see System Operations Chapter 2: Working with the CNTL_ASYNC Job.
Important: The system uses the interval time defined for this system control value for the first company that has a value defined. For example, if company 4 has a 2 hour interval defined and company 555 has a 1 hour interval defined, the system uses the 2 hour interval for both companies.
The Batch Order Control job:
• updates the Order Control Summary file; see Updating Operations and Merchandising Summary Totals.
Note: When the Threshold Async submits the Batch Order Control job, it updates just the Order Control Summary file but does not update the Fulfillment Order Control Summary file. See the Fulfillment Order Type (J36) for more information on using this file to track Fulfillment orders separately.
• updates the actual values in the Threshold Values file and monitors for breached thresholds; see Updating Threshold Actual Values.
The system does not automatically run the Batch Order Control job for any company that does not have a value defined in this system control value.
Leave this field blank if you do not want to define an interval when the Batch Order Control job is automatically submitted by the Threshold Async.
You can submit the Batch Order Control job manually by:
• pressing F9 in the Reviewing Operations Control Summary (FLSH) menu option.
• submitting a periodic process that contains the Order Summary (ORDSUM) periodic function (program name PFR0062).
For more information: See Chapter 6: Working with Threshold Values (WTHR) for more information on system delivered thresholds and how to define your own thresholds.
Interface Staging Library (I07)
Purpose: Use this screen to specify the library to use when creating the Financial Sales Download file or the Inventory Extract file.
MSR0053 CHANGE Change System Control Value 3/07/03 11:11:36
Description . : Interface Staging Library
System name . . Narrative . . .
Application . : ALL Applic group . ALL Sequence# . . . 99
F3=Exit F12=Cancel |
System name: Enter the name of the library to use when generating the Financial Sales Download file or the Inventory Extract file.
Financial data extract: You can run a periodic function or run the program from the command line to generate the Financial Sales Download File (IXSLDL). If this system control value is blank, the system creates the file in the Data Base Library (A37). See Using the Financial Data Interface for more information.
Inventory extract: You can run a periodic function to create records in the Inventory Extract file for each item location in your company. If this system control value is blank, the system creates the file in the Data Base Library (A37). See Inventory Extract Periodic Function.
Suppress Customer Credit Card Information in Data Warehouse (I49)
Purpose: Use this screen to define whether the system downloads and stores customer credit card information in the CWData data warehouse.
MSR0052 CHANGE Change System Control Value 9/11/03 12:25:57
Description . : Suppress Customer Credit Card Information in Data Warehouse.
Yes/No . . . . N (Y,N) Narrative . . .
Application . : ALL Applic group . ALL Sequence# . . . 99
F3=Exit F12=Cancel |
Yes/No field: Enter Y in this field if you wish to prevent the system from downloading and storing customer credit card information in the CWData data warehouse.
When the system processes a data warehouse load and you suppress customer credit card information, the system does not populate the Last credit card and Last credit card expiration date fields in the DW Customer Sold To file. Because these fields are not populated, the last_credit_card and last_credit_card_expire fields in the Customer table in the data warehouse are not populated.
Enter N in or leave this field blank if you wish to download and store customer credit card information in the CWData data warehouse.
If you use credit card encryption and you do not prevent the system from downloading and storing customer credit card information in the CWData data warehouse, the system decrypts the credit card number before sending it the data warehouse. If you use credit card tokenization, the number downloaded may be a token rather than the actual credit card number.
For more information: See Working with the Data Warehouse Integration in CWDirect for more information on performing a data warehouse load.
Subtract Hidden Tax from CWData Order Line Price (J15)
Purpose: Use this screen to define whether the system passes the hidden tax amount included in the order line price for orders subject to Value Added Tax (VAT) as a separate amount to CWData.
MSR0052 CHANGE Change System Control Value 5/18/05 9:01:08
Description . : Subtract Hidden Tax from CWData Order Line Price
Yes/No . . . . (Y,N) Narrative . . .
Application . : ALL Applic group . ALL Sequence# . . . 99
F3=Exit F12=Cancel |
Yes/No field: Enter Y in this field if you want the system to pass the hidden tax amount included in the order line price for orders subject to Value Added Tax (VAT) as a separate amount to CWData.
The Tax Included in Price (E70) system control value defines whether you process orders to countries that are subject to Value Added Tax (VAT). On orders subject to VAT, tax does not accumulate in the Tax field; instead, the customer pays a tax-inclusive price for each item and the tax is “hidden” on the order detail line in the Hidden tax field.
Note: You can review the hidden tax amount for an item by entering 2 next to an item in order entry or maintenance, or by entering 5 next to an item in order inquiry. The hidden tax amount that displays is the per unit amount, not the extended amount.
If the Subtract Hidden Tax from CWData Order Line Price (J15) system control value is set to Y, and the order is subject to VAT:
• The hidden tax amount defined for the order line is passed to CWData in the Tax field in the DW Order Detail file.
• The merchandise amount defined for the order line is passed to CWData in the Price field in the DW Order Detail file and DW Order Detail Activity file.
If the Subtract Hidden Tax from CWData Order Line Price (J15) system control value is set to Y, and the order is not subject to VAT:
• A hidden tax amount is not defined for the order line; instead, the tax amount is accumulated in the Tax field on the order and is passed to CWData in the Tax field in the DW Order Detail file.
• The order line price (merchandise amount) is passed to CWData in the Price field in the DW Order Detail file and DW Order Detail Activity file.
Enter N or leave this field blank if you want the system to pass the hidden tax amount included in the order line price as part of the order line amount to CWData.
If the Subtract Hidden Tax from CWData Order Line Price (J15) system control value is set to N, and the order is subject to VAT:
• The hidden tax amount, along with the merchandise amount defined for the order line, is passed to CWData in the Price field in the DW Order Detail file and DW Order Detail Activity file.
• The Tax field in the DW Order Detail file remains blank.
If the Subtract Hidden Tax from CWData Order Line Price (J15) system control value is set to N, and the order is not subject to VAT:
• A hidden tax amount is not defined for the order line; instead, the tax amount is accumulated in the Tax field on the order and is passed to CWData in the Tax field in the DW Order Detail file.
• The order line price (merchandise amount) is passed to CWData in the Price field in the DW Order Detail file and DW Order Detail Activity file.
Summary: The chart below indicates how tax is passed to CWData, depending on if the order is subject to VAT.
Subtract Hidden Tax (J15) |
Order subject to VAT? |
Results |
Example |
N |
N |
The tax amount on the order is passed to CWData in the Tax field in the DW Order Detail file. The order line amount is passed to CWData in the Price field in the DW Order Detail file and DW Order Detail Activity file. |
Order line price = 10.00 line tax = 1.00 DW Order Detail Tax = 1.00 Price = 10.00 |
Y |
N |
The tax amount on the order is passed to CWData in the Tax field in the DW Order Detail file. The order line amount is passed to CWData in the Price field in the DW Order Detail file and DW Order Detail Activity file. |
Order line price = 10.00 line tax = 1.00 DW Order Detail Tax = 1.00 Price = 10.00 |
N |
Y |
The tax amount on the order is included in the order line amount and is passed to CWData in the Price field in the DW Order Detail file and DW Order Detail Activity file. The Tax field in the DW Order Detail file remains blank. |
Order line price = 11.00 (of which 1.00 is hidden tax) DW Order Detail Tax = blank Price = 11.00 |
Y |
Y |
The tax amount that is included in the order line amount on the order is passed to CWData in the Tax field in the DW Order Detail file. The merchandise amount on the order line is passed to CWData in the Price field in the DW Order Detail file and DW Order Detail Activity file. |
Order line price = 11.00 (of which 1.00 is hidden tax) DW Order Detail Tax = 1.00 Price = 10.00 |
Credit Card Retention Days (K65)
Purpose: Use this screen to define the number of days to retain credit card data in closed or cancelled orders.
MSR0054 CHANGE Change System Control Value 2/02/10 8:33:49
Description . : Credit Card Retention Days
Number . . . . 365
Narrative . . . Number of Days to Retain Credit Card Data on Closed Orders
Application . : ALL Applic group . ALL Sequence# . . . 99
F3=Exit F12=Cancel
|
Number field: Enter the number of days to retain credit card data in closed or cancelled orders. The credit card data is replaced by the Purge Security Risk Information (SECRISK) periodic function. See Security Risk Purge.
The SECRISK periodic function:
• Deactivates the pay type
• Removes the expiration date
• Replaces the first 12 digits of the credit card numbers with asterisks (*)
Note: The credit card masking preference is based on the format selected for the pay type. If no format is selected, the default masking is asterisks.
When are credit card numbers replaced? The SECRISK periodic function replaces the credit card number in the database only if:
• The order is Closed (X) or Cancelled (C).
• The pay type is a credit card.
• The most recent date recorded in the Order Transaction History record for an order with a transaction type of S (Shipment or Returned) is the same or greater than the number of days set for the Credit Card Retention Days (K65) system control value. Note: If the Order Transaction History record does not have a date for the order, then the system verifies the date in the Order Header record.
• There are no pending transactions for the order, such as:
• Unprocessed refund records with a status of N, H, or O. See Work with Refunds Screen.
• Pending or rejected credit card deposits. See Processing Auto Deposits (SDEP).
• Pending Return Authorizations exist for an order. See Selecting Orders for Return (WRTA).
• Pending picks or unapproved authorizations. See Authorization/Deposit Setup.
• Incomplete billing process. See Working with the BILL_ASYNC Job.
Processing a refund after pay type deactivation: To generate a refund against an order after the pay type is deactivated, the customer is required to provide a payment method so that credit can be issued.
When to schedule the SECRISK periodic function? The SECRISK periodic function can be included as part of your daily periodic processing. See Working with Periodic Functions (WPER) and Working with Periodic Processes (WPPR).
Which files are updated? The following files are updated by the Purge Security Risk Information process:
• Invoice Payment Method (CSINVP)
• Order Payment Method (OEPAYM)
• CC Deposit History (CCDPHI)
• Stored Value Card (OESVCD) – the cards that were activated only.
• Customer Membership (OECSMP) – removes the CC# from the CSM Credit card number field in completed or cancelled memberships, including those without an order number.
• On Line Authorization (CCOLAT) – clears processed records if the authorization date is older than the Credit Card Retention Days (K65) setting. Note: If there is no authorization date in the On Line Authorization record, the system deletes the record if the order is closed.
Leave this field blank if you do not want to replace credit card data.
For more information: See:
• Working with Pay Types (WPAY)
| Chapter 15: Setting Up Fulfillment Values | Contents | SCVs | Search | Glossary | Reports | XML | Index | Chapter 17: Setting Up Accounts Receivable Values |

IN03_05 CWDirect 18.0 August 2015 OTN