Chapter 91: Retail Integration Job Control (RIJC)

Retail integration (from an external system into CWDirect) background jobs monitor and process merchandise information received from an external merchandising system into CWDirect. As you enter information from your retail master system, MQSeries sends messages to the jobs for the retail integration from an external system into CWDirect. For example, to change to an existing item, the external system can send a message to the Item Upload Async. If this process is active, it updates the item you specified immediately, provided there are no errors in the message. If the process is not active when the message arrives, the item will be updated once the process is restarted. All messages are processed in the sequence in which they arrive at the message queue.
In this chapter:
• ASYNC Processes for the Retail Integration (from an External System into CWDirect)
• Work with Retail Integration Job Control Screen
• Changing the Number of Sessions
• Work with Retail Integration Queues Screen
• MQSeries Work with Messages Screen (Reviewing Messages)
• Create Item Message (CWCreateItem)
• Create Item Response Message (item_upload_response)
• Sample Create Item Response Messages
• Retail Price Change Upload Message (CWPriceChange)
ASYNC Processes for the Retail Integration (from an External System into CWDirect)
The retail integration ASYNC processes are:
• Item upload: CWDirect receives item information in the Create Item Message (CWCreateItem) sent from an external system, indicating whether to create, update, or delete an item or item-related record. The ITEM UPLOAD job then sends the Create Item Response Message (item_upload_response) back to the external system, indicating if the requested change, update, or delete was successful. See Item Upload using the CWCreateItem XML Message.
• Retail price change upload: CWDirect receives retail price changes in the Retail Price Change Upload Message (CWPriceChange) sent from an external system, allowing you to offer your customers the same merchandise pricing in your retail store, catalog, and online channels. See Retail Price Change Upload Processing through the CWPriceChange XML Message.
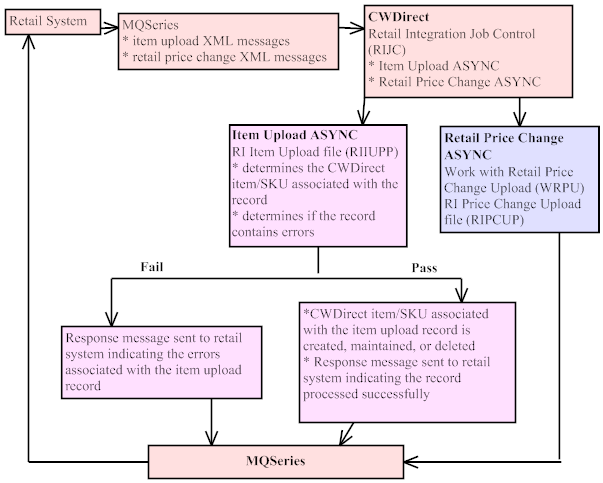
Process overview: This flowchart explains how XML messages from a retail system are sent to CWDirect using the retail integration ASYNC processes.
Item upload: For more information on the item upload:
• process overview: Item Upload using the CWCreateItem XML Message
• sample XML messages: Create Item Message (CWCreateItem) and Create Item Response Message (item_upload_response)
• contents of the Create Item Message: Retail Integration Item Upload File (RIIUPP)
• file updates made through the item upload: Files Updated by the Item Upload
• possible errors: Retail Item Upload Errors
Retail price change processing: For more information on the retail price change process, see:
• process overview: Working with Retail Price Change Upload (WRPU)
• sample XML message: Retail Price Change Upload Message (CWPriceChange)
• contents of the Retail Price Change Message: Retail Price Change Upload File
• working with retail price changes: Working with Retail Price Changes (WRPC)
• reviewing history: Reviewing Retail Price Change History
Work with Retail Integration Job Control Screen
How to display this screen: Enter RIJC in the Fast Path at the top of any menu or select Retail Integration Job Control from a menu.
Note: These processes are not restricted by company; when you work with or change a process, it affects all companies.
RIX0005 DISPLAY W/W Retail Integration Job Control 12/07/00 14:48:58
Type options, press Enter. 2=Change 7=Start 8=End 9=Work with Queues 10=View Local Queue Msgs 11=Change Status 14=Clear Queue
Opt Process Status # of Sessions RETAIL PRICE CHANGE UPLD STARTING 1 ITEM UPLOAD ACTIVE 1
F3=Exit F7=Start All F8=End All F12=Cancel |
Field |
Description |
Process |
The job that performs retail updates between CWDirect and your retail system. See ASYNC Processes for the Retail Integration (from an External System into CWDirect) for a description of each. Alphanumeric, 20 positions; display-only. |
Status |
The status of the process. Possible statuses are: • STARTED: The ASYNC is starting, but it not yet ACTIVE. • ACTIVE: The ASYNC is up and running. In order to process information, the ASYNC must be in an ACTIVE status. • ENDING: The ASYNC is in the process of ending, but it not yet INACTIVE. • INACTIVE: The ASYNC is not running. Alphanumeric, 9 positions; display-only. |
# of sessions |
The number of separate jobs to allocate to processing retail information. Just as you can set up the billing async job to run multiple instances, you can also set the number of each individual retail integration process you would like to run. See Changing the Number of Sessions. Numeric, 5 positions; display-only. |
Screen Option |
Procedure |
Change the number of sessions for a process |
Enter 2 next to a process to advance to the Change Retail Integration Job Control Pop-up Window. |
Start a process |
Enter 7 next to a process to start it. See Changing Process Status. |
End a process |
Enter 8 next to a process to end it. See Changing Process Status. |
Work with the local input queue and the remote queue, if any, for a process |
Enter 9 next to a process to advance to the Work with Retail Integration Queues Screen. |
Review messages in the queue for a process |
Enter 10 next to a process to advance to the MQSeries Work with Messages Screen (Reviewing Messages). |
Change the status of a process |
Enter 11 next to a process to advance to the Change Status Pop-up Window. |
Clear messages for a process |
Enter 14 next to a process to advance to the Queue Clear Warning Pop-up Window. |
Start all processes |
Press F7 to submit all of the processes. See Changing Process Status. |
End all processes |
Press F8 to end all of the processes. See Changing Process Status. |
Changing the Number of Sessions
Purpose: Use this pop-up window to change the number of sessions, or queues, available to a process. You might increase the number of sessions to improve response time if you are passing many records to CWDirect.
Change Retail Integration Job Control Pop-up Window
How to display this screen: Enter 2 next to a process at the Work with Retail Integration Job Control Screen. .
Change RI Job Control
# of Sessions . . 1
F12=Cancel
|
Number of sessions: Enter the number of sessions you would like to run.
Overview: You can start or stop the processes individually or as a group from the Work with Retail Integration Job Control Screen:
• Press F7 to start all processes
• Press F8 to end all processes
• Enter 7 next to a process to start it
• Enter 8 next to a process to end it
When you start one or more processes, their status changes from Inactive to Starting to Active. When you end one or more processes, their status changes from Active to Ending to Inactive.
Normally, you would leave these processes running except to perform backup, system maintenance, and so on.
Change status: You can also change the status of a process if it does not start or stop normally in a reasonable amount of time. Enter 11 next to a process to display the Change Status pop-up window:
Change status
Inactive . . . Active . . . .
F3=Exit |
At this window, enter 1 next to the desired status, Inactive or Active.
Important: Only security administrators (the Security administrator flag for the user is set to Y in Work with Users) can change the status of a process.
Work with Retail Integration Queues Screen
Purpose: Use this screen to review or change the MQSeries message queue(s) to use for one of the processes.
Each process has at least one queue so that it can receive messages from the retail system. Some processes also have response queues, so they can send messages back to the retail system.
How to display this screen: Enter 9 next to a process at the Work with Retail Integration Job Control Screen.
RIX0008 CHANGE Work with Retail Integration Queues 12/28/00 13:13:52
Enter queue definitions for ITEM UPLOAD
Local Queue:
Input Queue . . . . . . RI.ITEMUPLOAD.IN.50.Q
Response Queue:
Remote Queue Mgr . . . CWIAS400 Remote Queue . . . . . RI.ITEMUPLOAD.OUT.50.Q
F3=Exit F12=Cancel |
Field |
Description |
Local queue/input |
The MQSeries message queue, on the iSeries, from which this process receives messages originating from the retail system. Enter the name of the correct queue to change it. Alphanumeric, 48 positions; required. |
Response queue/remote queue manager |
The definition of the machine where the remote queue is located. Enter the name of the correct queue manager to change it. Alphanumeric, 48 positions; required. |
Response queue/remote queue |
The MQSeries message queue to which response messages should be sent from CWDirect for display on the retail system. The queue you specify here must match the name of the queue on the NT machine or other remote server. Enter the name of the correct queue to change it. Alphanumeric, 48 positions; required. |
Screen Option |
Procedure |
Change a message queue |
Enter the name of the queue to change it. |
MQSeries Work with Messages Screen (Reviewing Messages)
Purpose: Use this screen to review the messages in the queue for a particular process.
How to display this screen: Enter 10 next to a process at the Work with Retail Integration Job Control Screen.
MQSeries Work with Messages
Queue name . . . . . . . RI.ITEMUPLOAD.IN.50.Q
Type options, press Enter. 4=Delete 5=Display Description 8=Display Data
Opt Date Time Type UserId Format Size 20001226 18082420 DATAGRAM KBOTTGER MQSTR 1024+ 20001228 17052222 DATAGRAM KBOTTGER MQSTR 1024+
Bottom Command ===> F3=Exit F4=Prompt F5=Refresh F9=Retrieve F12=Cancel F16=Repeat position to F17=Position to F21=Print |
For more information: For more information on using MQSeries, including setup and message formats, see the IBM documentation on MQSeries, including redbooks, available at http://www.redbooks.ibm.com/.
Purpose: From the Work with Retail Integration Job Control Screen you can clear the messages from the queue for a particular process if it becomes necessary for any reason by entering 14 next to the process. The system displays the Queue Clear Warning pop-up window.
Queue Clear Warning Pop-up Window
Note: Only security administrators (the Security administrator flag for the user is set to Y in Work with Users) can clear the queue of a process.
Queue Clear Warning
Queue is about to be cleared. Press F9 to clear the queue, or F12 to return and not clear the queue.
F9=Accept Clear Request F12=Cancel |
To clear: Press F9 to clear the message queue.
Create Item Message (CWCreateItem)
The Create Item XML message contains the same information as the Retail Integration Item Upload file. See Retail Integration Item Upload File (RIIUPP) for a description of each element in this message.
For more information: See XML Messages for a table that provides links to the DTD, schema, and a sample XML layout for each XML message.
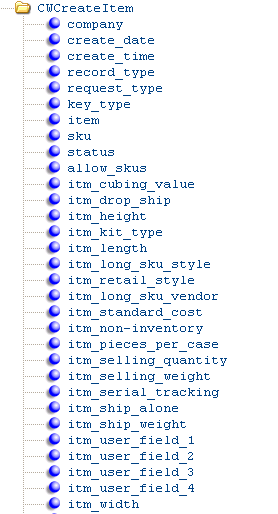
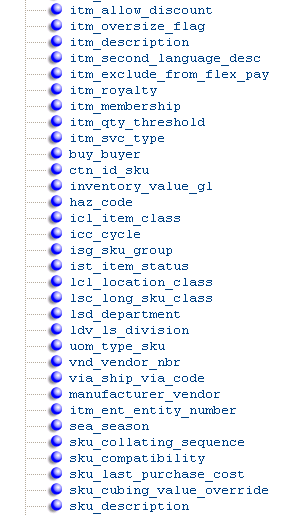
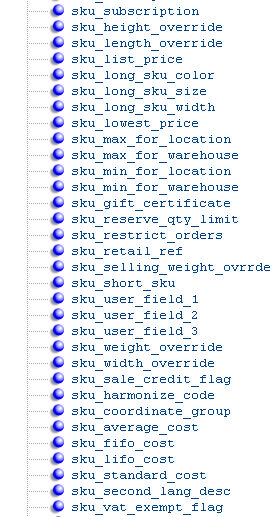
A sample of the Create Item Message (CWCreateItem) is presented below. This sample creates a non-SKU item. Depending on the <record_type>, the message includes different information.
<RICreateMessage>
<company>027</company>
<create_date>1050302</create_date>
<create_time>123456</create_time>
<record_type>01</record_type>
<request_type>A</request_type>
<key_type>IT</key_type>
<item>CE1234</item>
<allow_skus>N</allow_skus>
<itm_drop_ship>N</itm_drop_ship>
<itm_long_sku_style>445566</itm_long_sku_style>
<itm_retail_style>223344</itm_retail_style>
<itm_long_sku_vendor>100001</itm_long_sku_vendor>
<itm_standard_cost>10000</itm_standard_cost>
<itm_non-inventory>N</itm_non-inventory>
<itm_pieces_per_case>10</itm_pieces_per_case>
<itm_serial_tracking>N</itm_serial_tracking>
<itm_description>X3500 Cell Phone</itm_description>
<itm_exclude_from_flex_pay>N</itm_exclude_from_flex_pay>
<itm_royalty>N</itm_royalty>
<itm_membership>N</itm_membership>
<buy_buyer>HEB</buy_buyer>
<inventory_value_gl>10080100</inventory_value_gl>
<icl_item_class>OFC</icl_item_class>
<icc_cycle>02</icc_cycle>
<lcl_location_class>01</lcl_location_class>
<lsd_department>11</lsd_department>
<ldv_ls_division>234</ldv_ls_division>
<uom_type_sku>EA</uom_type_sku>
<vnd_vendor_nbr>0000012</vnd_vendor_nbr>
<via_ship_via_code>99</via_ship_via_code>
<sku_min_for_location>5</sku_min_for_location>
<sku_min_for_warehouse>10</sku_min_for_warehouse>
<sku_retail_ref>9876</sku_retail_ref>
<sku_projected_returns>2</sku_projected_returns>
<whs_warehouse>2</whs_warehouse>
<loc_location>PRIM3</loc_location>
</RICreateMessage>
Create Item Response Message (item_upload_response)
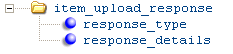
The system sends a response to the retail system for each Create Item message received, indicating whether the message passed or failed. The Create Item Response message contains the error code and description, if any, and the values that identify the item/SKU associated with the record. The message begins with the header marker <item_upload_response>.
Each response contains the following:
Response type: A code that indicates whether the Create Item Message (CWCreateItem) passed or failed validation.
Response details: Indicates the types of errors associated with the Create Item Message (CWCreateItem).
• Error code: Indicates the type of error associated with the Create Item Message (CWCreateItem). See Retail Item Upload Errors for a list of possible errors.
• Error message: A description of the error associated with the Create Item Message (CWCreateItem). See Retail Item Upload Errors.
• Key type: Indicates the values the system uses to identify the CWDirect item/SKU associated with the Create Item Message (CWCreateItem).
Note: The additional elements presented in the XML message structure below are not implemented.
For more information: See XML Messages for a table that provides links to the DTD, schema, and a sample XML layout for each XML message.
Sample Create Item Response Messages
A sample of a the Create Item Response Message (item_upload_response) indicating that the item upload failed:
<item_upload_response>
<response_type>FAIL</response_type>
<response_details>
<error_code>2N</error_code>
<error_message>Invalid Location code.</error_message>
<key_type>IT</key_type>
<item>ROSEBUNCH</item>
</response_details>
</item_upload_response>
A sample of a response message indicating that the item upload was successful:
<item_upload_response>
<response_type>PASS</response_type>
<response_details>
<key_type>IT</key_type>
<item>ROSEBUNCH</item>
</response_details>
</item_upload_response>
Retail Price Change Upload Message (CWPriceChange)
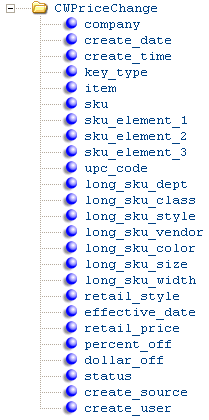
The Retail Price Change Upload XML message contains the same information as the Retail Price Change Upload file. A sample of the message is presented below.
See Retail Price Change Upload File for a description of each element in this message.
For more information: See XML Messages for a table that provides links to the DTD, schema, and a sample XML layout for each XML message.
| Chapter 90: Copying Retail Item Upload Records (CRIU) | Contents | SCVs | Search | Glossary | Reports | XML | Index | Chapter 92: Creating and Maintaining Long SKU Divisions (WLDV) |

ME13_04 CWDirect 18.0 August 2015 OTN