Chapter 88: Retail Integration (External System into CWDirect) Overview and Setup

Retail integration from an external system into CWDirect allows you to keep merchandise information in CWDirect in sync with merchandise information at your external merchandising system. Using this integration, you can provide your customers with a consistent shopping experience across your retail store, catalog, and online channels. You can carry the same merchandise and offer your customers the same merchandise pricing in your retail store, catalog, and online channels. This allows you to maintain the image and service levels customers have come to expect.
In this chapter:
• Uses for the Retail Integration from an External System into CWDirect
• Retail Price Change Overview
• Work with Retail Price Change Upload (WRPU)
• Work with Retail Price Changes (WRPC)
• Review Retail Price Change History
• Item Upload Batch Processing
• Item Upload using the CWCreateItem XML Message
• Setup for Retail Integration from External System into CWDirect
• Menu Options and Subfile Options
• Conversion Programs for Retail Integration from an External System into CWDirect
• Creating Default and Change Item/SKU Upload Values: **DFLT ITEM and **DFTCHG
• **DFTCHG
• **DFLT ITEM and **DFTCHG Item Upload Processing
• **DFLT ITEM and **DFTCHG Examples
• Creating the **DFLT ITEM Item/SKU
• Creating the **DFTCHG Item/SKU
Uses for the Retail Integration from an External System into CWDirect
Using this integration, you can:
• upload new or changed merchandise information located at your retail store to CWDirect, such as:
• item and SKU
• vendor items and vendor item additional charges
• item offer (including item alias) and SKU offer
• item prices and SKU prices
• item UPCs
• item coordinates
• SKU cross references
• item information
• match merchandise at your retail store to a CWDirect item and SKU using key types such as:
• item and SKU code
• item long SKU values
• UPC code
• retail style number
• create a hierarchy between a long SKU division, long SKU department, and retail class in CWDirect.
• upload price changes that occur at your retail store to CWDirect.
• track the history of price changes for an item and SKU.
• update open order lines in CWDirect with the most recent price change that occurred at your retail store.
Retail price change processing allows you to track retail prices at your retail store and keep a history of the price changes in CWDirect. You can also apply retail price changes to open order lines that contain items selling at a price other than the latest retail price.
Price change process: This flowchart explains how retail price changes are uploaded into CWDirect and how the system updates retail price change history.
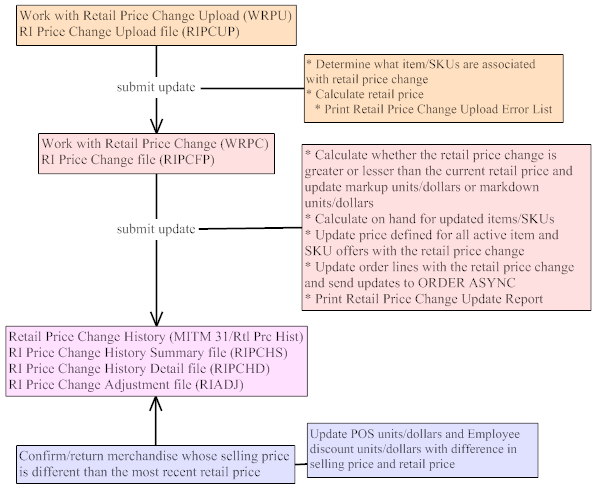
Work with Retail Price Change Upload (WRPU)
Use this menu option to upload retail price changes in the RI Price Change Upload file into the RI Price Change file. You can create records in the RI Price Change Upload file by:
• transferring records from another system into the file.
• creating a record at the Create Retail Price Change Upload Screen.
• receiving XML messages through the Retail Integration Job Control (RIJC).
Determining the item and SKU associated with a retail price change upload: Since you are receiving retail price changes from your retail store, the item and SKU at the retail store may not use the same item code and SKU code that is defined in CWDirect. Because of this, the system translates the information received from your retail store to determine the item and SKUs in CWDirect that are associated with the retail price change.
The system determines the CWDirect item and SKU associated with a retail price change upload record based on whether:
• the record contains an item code and optionally a SKU code that matches a CWDirect item code and SKU code.
• the record contains a UPC code associated with a CWDirect item or SKU.
• the record contains a long SKU department, long SKU class, and long SKU style, and optionally long SKU vendor, long SKU color, long SKU size, and long SKU width associated with a CWDirect item or SKU.
• the record contains a retail style number associated with a CWDirect item.
Key types are codes that define how the system identifies the CWDirect item or SKU associated with a retail price change upload record. The key type defined for the retail price change upload record defines what item identifier values the system uses to find the corresponding CWDirect item and SKU.
If the key type is... |
The item identifier values are... |
IT (item/SKU) |
item code optionally: SKU code (if the item contains SKUs and you are in a full SKU environment) SKU Element 1 (if the item contains SKUs and you are in a split SKU environment) SKU Element 2 (if the item contains SKUs and you are in a split SKU environment) SKU Element 3 (if the item contains SKUs and you are in a split SKU environment) |
LS (long SKU) |
long SKU department long SKU class long SKU style optionally: long SKU vendor long SKU color long SKU size long SKU width |
|
SKU level and item level long SKU values You can define the long SKU class, long SKU style, and long SKU vendor at the SKU level and item level. The system looks at the values defined at the SKU level before looking at the values defined at the item level when determining the item/SKU associated with a retail price change upload record. Note: If the Use Retail Integration (H26) system control value is set to Y, the system uses the Retail Class file instead of the Long SKU Class file to define long SKU class codes. |
RS (retail style number) |
retail style number |
UP (UPC number) |
UPC code |
See Determining the CWDirect Item/SKU for more information about how the system determines what CWDirect item and SKU is associated with a retail price change upload record.
Determining the new retail price change: A retail price change upload record must indicate the new retail price for the item/SKU. This can be done by providing:
• the new retail price
• the dollars to subtract from the most recent retail price
• the percentage to subtract from the most recent retail price
Once you process records in the Work with Retail Price Change Upload menu option, the system takes the records from the RI Price Change Upload file and creates records in the RI Price Change file. You can work with records in the RI Price Change file using the Work with Retail Price Changes (WRPC) menu option.
For more information: See Chapter 93: Working with Retail Price Change Upload (WRPU) for more information on working with retail price change uploads.
Work with Retail Price Changes (WRPC)
Use this menu option to upload retail price change records from the RI Price Change file to the RI Price Change History Detail file.
When you upload retail price change records, the system:
• creates a retail price change history record indicating the date the retail price was created, the retail price, and the date the retail price is effective.
• creates or updates a record in the Item Price file or SKU Price file for all active offers for the item and SKU associated with the retail price change. The price records are created for a quantity of 1.
Allow Retail Price Change Updates to Open Lines system control value: The Allow Retail Price Change Updates on Open Lines (H30) system control value defines whether the system updates open order lines with the most recent retail price change for the item/SKU.
For each order detail line updated with the latest retail price change, the system:
• defaults the code defined in the Price Override for Retail Price Change Lines (H32) system control value to the Price override reason field for the order detail lines that are updated.
• does not update order detail lines that already have a price override reason defined. In this case, the system assumes the price was already overridden for a reason.
• creates an order transaction history record for each order detail line whose price was updated to the new retail price: Retail Price Overridden on Ln 999.
• creates an order transaction history record indicating the system defaulted the price override reason code defined in the Price Override for Retail Price Change Lines (H32) system control value to each order detail line whose price was updated to the new retail price: User price override - Order line 999.
• submits the order detail lines that were updated to the ORDER ASYNC to process file updates, such as demand if the Update Demand for Order Maintenance Transactions (C72) system control value is set to Y. The system also creates a refund if the original price charged on the order reduced because of the retail price change. See ORDER ASYNC Updates for a list of files the system updates when the system updates order lines with the most recent retail price.
For more information: See Chapter 94: Working with Retail Price Changes (WRPC) for more information on working with retail price changes.
Review Retail Price Change History
Use this subfile option from the Work with Items Screen to review a history of retail price changes for a specific item and SKU and price differences between the selling price of an item and the most recent retail price.
When does the system update retail price change history? The system updates retail price change history for a specific item and SKU when you:
• create an item/SKU if the Use Retail Price Change Processing (H29) system control value is set to Y.
Note: The system does not create a retail price change history detail record when you manually create an item or SKU price record in CWDirect. If you create an item or SKU price change in CWDirect, the system assumes the price change is for a single offer and is an exception to the retail price.
• update a new retail price change record from the Working with Retail Price Changes (WRPC) menu option.
• ship and confirm an order containing an item whose selling price is different from the most recent retail price.
• ship and confirm an employee order containing an item whose selling price is different from the most recent retail price.
• return an item whose selling price was different from the most recent retail price.
• return an item on an employee order whose selling price was different from the most recent retail price.
• manually adjust the units and/or dollars associated with the retail price change at the Retail Price Change Adjustment Window.
Markup units and dollars: The system updates these fields if the new retail price change is higher than the last retail price.
Markdown units and dollars: The system updates these fields if the new retail price change is lower than the last retail price.
Point of sale units and dollars: The system updates these fields if the most recent retail price for an item/SKU is different from the selling price of the item/SKU and the Allow Retail Price Change Updates on Open Lines (H30) system control value is set to Y.
Employee discount units and dollars: The system updates these fields if the most recent retail price for an item/SKU is different from the selling price of the item/SKU on employee orders and the Allow Retail Price Change Updates on Open Lines (H30) system control value is set to Y.
Adjustment units and dollars: The system updates these fields if you manually adjust the units and/or dollars associated with a retail price change for a specific item/SKU.
The BILLING ASYNC updates the point of sale units, point of sale dollars, employee discount units, and employee discount dollars fields in the RI Price Change History Detail file and the RI Price Change History Summary file if the Use Retail Price Change Processing (H29) system control value is set to Y.
The system:
• compares the selling price of the item/SKU to the most recent RI Price Change History Detail record defined for the item/SKU.
• if the prices are the same, the system does not update the RI Price Change History Detail file and the RI Price Change History Summary file.
• if the prices are different, the system calculates the difference by subtracting the most recent retail price from the selling price. retail price - selling price = difference in price
• The system updates the current RI Price Change History Detail record and RI Price Change History Summary record for the item/SKU with the resulting difference in price.
• if the Employee discount field for the source code on the order header is set to N, the system updates the point of sale dollars with the difference in price and updates the point of sale units with the number of units sold at the price different from the retail price.
• if the Employee discount field for the source code on the order header is set to Y, the system updates the employee discount dollars with the difference in price and updates the employee discount units with the number of units sold at the price different from the retail price.
Returns: The system performs the same updates when you process a return for an item/SKU whose price is different from the most recent retail price.
“Do not affect” inventory transactions: The system performs the same updates when you process a transaction that does not affect inventory.
Issue and customer return transactions: Issue and customer return transactions use the current retail price at the time the item was shipped or returned instead of the selling price charged on the order. You can review the price posted to an issue or customer return in the Inventory Transaction History file. The system posts the difference between the retail price and the selling price to the point of sale units and point of sale dollars or employee discount units and employee discount dollars in the RI Price Change History Detail file and RI Price Change History Summary file.
General Ledger: Retail price change updates do not affect the general ledger.
For more information: See Chapter 95: Reviewing Retail Price Change History for more information on how the system tracks retail price changes.
You can use the retail integration item upload to create, maintain and delete item and SKU information in CWDirect that corresponds to your retail store merchandise. You can upload items and SKUs, item/SKU offers, item/SKU prices, item/SKU UPC codes, vendor items, vendor item additional charges, coordinate items, SKU cross references, item information, and optionally create many other supporting values using two methods:
• Item Upload Batch Processing
• Item Upload using the CWCreateItem XML Message
The Use Retail Integration (H26) system control value determines whether CWDirect changes certain file structures so that it can read records you upload from your retail system. When this system control value is set to Y, the system:
• uses long SKU class codes defined in the Retail Class file instead of long SKU class codes defined in the Long SKU Class file. This allows you to create a hierarchy of retail class within long SKU department. You can link retail classes to a long SKU department in Working with Long SKU Departments (WLSD).
• requires a value in the Long SKU department, Long SKU class (retail class), Long SKU style, and Long SKU vendor fields when you create or maintain a base item.
If you wish to selectively require certain long SKU values, you can enter Y in one or more of the following system control values:
• Require L/S Department (I92)
• Require L/S Style (I94) (This system control value also validates that the long SKU style code is not assigned to another item or SKU.)
The Create Supporting Files during Retail Item Upload (H27) system control value determines whether you can create certain supporting file values for items/SKUs through the item upload. When this system control value is set to N, you must use already existing values for the item upload record to successfully process. See Files Updated by the Item Upload for a listing of files that are considered primary files and secondary supporting files.
Batch processing overview: This flowchart summarizes the process of passing batch item upload records from your retail system to CWDirect.
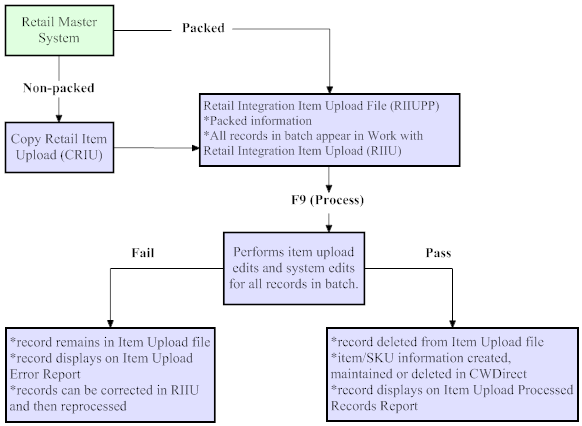
How do you upload retail merchandise information? If you send packed retail item upload records, you can directly upload retail merchandise information into the Retail Integration Item Upload file through a custom program. If your system sends unpacked records, you can use the Copying Retail Item Upload Records (CRIU) menu option to copy or ‘pack’ merchandise information from the unpacked file, such as the Retail Integration Item Upload Unpack file, to the Retail Integration Item Upload file.
Note: You can also use an XML message to upload these updates; see Item Upload using the CWCreateItem XML Message for more information.
How do you process records in the Retail Integration Item Upload file? Once you have passed item upload records from your retail master system to the Retail Integration Item Upload file, you can view all the records in the batch using the Working with Retail Integration Item Upload (RIIU) menu option. The next step is to process the file by pressing F9 at the Work with Retail Item Upload Screen. The system then checks all the records in the file for errors.
Records that pass all edits: The system deletes these records from the Retail Integration Item Upload file and the requested update (create, maintain, or delete) is made in CWDirect. All records that process successfully are printed on the Item Upload Processed Records Report.
Records that fail one or more of the edits: The system retains these records in the Retail Integration Item Upload file. You can review and correct the errors, or delete the record(s) using Working with Retail Integration Item Upload (RIIU). The system also copies the records into the Retail Integration Item Upload Error file, where they remain until you correct or delete the records. You can review item upload records in error on the:
• Item Upload Error Report: lists item upload records that are in error.
• Record Deleted from RI Item Upload Report: lists item upload records that you manually deleted at the Work with Retail Item Upload Screen.
Retail Item Upload email: If a valid email is defined in the Email address field for the user that submitted the RI Item Upload Program, the system sends a Retail Item Upload Email to the user’s email address when the job completes indicating whether all records were processed successfully or whether any records contain errors.
For more information: See Working with Retail Integration Item Upload (RIIU).
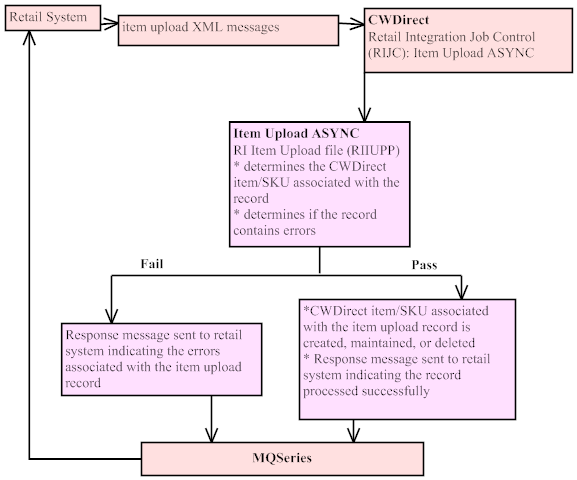
Item Upload using the CWCreateItem XML Message
Overview: You can also process item uploads containing the same information as the Retail Integration Item Upload file by sending an XML message (the Create Item Message (CWCreateItem)) from the external system using MQSeries. A background process in Retail Integration Job Control (RIJC) reads the message, processes it if there are no errors, and then sends a response message (the Create Item Response Message (item_upload_response)) back to the external system, indicating whether the item upload was successful.
Unlike the processing described above under Item Upload Batch Processing, you do not see these item updates on the Work with Retail Item Upload Screen, they are not listed on any of the reports generated through the Working with Retail Integration Item Upload (RIIU), and the system does not generate a Retail Item Upload Email.
Aside from the difference in processing steps, using the XML message enables you to pass the exact same information as populating the Retail Integration Item Upload file, and the resulting edits and file updates are the same as those described above under Item Upload Batch Processing.
For more information: See Item Upload Using the CWCreateItem XML Message for an overview.
Setup for Retail Integration from External System into CWDirect
Before you can use retail integration from an external system into CWDirect, you must perform the necessary setup. Information requiring creation and setup includes:
• Menu Options and Subfile Options
• Conversion Programs for Retail Integration from an External System into CWDirect
• Creating Default and Change Item/SKU Upload Values: **DFLT ITEM and **DFTCHG
This table contains the system control values you should set up to use retail integration from an external system into CWDirect.
System Control Value |
Description |
Enter Y in this field if you wish the system to: • use long SKU class codes defined in the Retail Class file instead of long SKU class codes defined in the Long SKU Class file. This allows you to create a hierarchy of retail class within long SKU department. You can link retail classes to a long SKU department in Working with Long SKU Departments (WLSD). • require a value in the Long SKU department, Long SKU class (retail class), Long SKU style, and Long SKU vendor fields when you create or maintain a base item. Enter N in or leave this field blank if you wish to use Retail Integration (external system to CWDirect) without requiring long SKU values for a base item or linking a long SKU class (retail class) to a long SKU department. |
|
Enter Y in this field if you want to require a value in the Long SKU department when you create or maintain a base item. |
|
Enter Y in this field if you want to require a value in the Long SKU class when you create or maintain a base item. |
|
Enter Y in this field if you want to require a value in the Long SKU style when you create or maintain a SKU. The system also validates that the long SKU style at the item level and SKU level is a unique value. |
|
Enter Y in this field if you want the system to automatically create records in the following files during item upload processing: • SKU Element 1 • SKU Element 2 • SKU Element 3 • Item Warehouse • Item Location • Item Class • Item Status • Buyer • L/S Department • L/S Division • L/S Class • Retail Class • Item Category • Prep Code |
|
Enter Y in this field if you wish to use retail price change processing. |
|
Enter Y in this field if you want the system to update open order lines with the most recent retail price change. |
|
Enter the percentage threshold you wish the system to use to automatically approve retail price change upload records which are within the percentage threshold. |
|
Enter the price override reason code you wish the system to default to open order lines updated with the most recent retail price. |
|
Enter Y in this field if you want the system to automatically create keywords for items uploaded. |
The Maintain Long SKU Values in MITM (B05) secured feature determines whether a user has authority to change long SKU values in Work with Item/SKUs.
Menu Options and Subfile Options
This table contains the menu options and subfile options you use for retail integration from external system into CWDirect.
Menu Option |
Purpose |
Use this menu option to create, modify, and upload retail price change upload records. The system uploads retail price change upload records into the RI Price Change file. |
|
Use this menu option to modify and upload retail price change records. The system uploads retail price change records into the RI Price Change History Detail file. |
|
Use this subfile option from the Work with Item/SKU menu option to review retail price change history records for a specific item and SKU. |
|
Use this menu option to process, review and correct batch item upload records passed to CWDirect from your retail master system. |
|
Working with Periodic Functions (WPER) and Working with Periodic Processes (WPPR) |
Use these menu options to create the RIITUPL periodic function (program PFR0087) and assign it to a periodic process in order to run the RI Item Upload Program to process records in the Retail Integration Item Upload File (RIIUPP) on a scheduled basis. |
Use this menu option to interactively receive item/SKU upload records and retail price change upload records. |
|
Enter values in these fields when you create or modify an item/SKU and you are using retail integration from an external system into CWDirect: • Long SKU department • Long SKU class • Long SKU style • Long SKU vendor optionally: • Retail style number • Original retail price • Long SKU color • Long SKU size • Long SKU width • UPC code Creating default item/SKU values You can create the item **DFLT ITEM item and SKU code NA to update blank fields in the item upload records with the values defined in the corresponding fields in the **DFLT ITEM. See Creating the **DFLT ITEM Item/SKU. |
|
|
Changing item/SKU values You can create the item **DFTCHG and SKU code NA to determine when the system updates the fields for an existing item/SKU with the values defined for a change item upload record. • If a value has been defined for a field in the **DFTCHG item, the system does not update the value defined for the existing item with the value defined in the change item upload record. • If a value has not been defined for a field in the **DTFCHG item, the system updates the value defined for the existing item with the value defined in the change item upload record. See Creating the **DFTCHG Item/SKU. |
Use this menu option to enter an email address for users that submit the Retail Item Upload job. When this job completes, the system sends a Retail Item Upload email to the email address of the user indicating whether the all records processed successfully or if any records contain errors. |
Conversion Programs for Retail Integration from an External System into CWDirect
You should run the following conversion programs to update existing records in CWDirect before you start using this integration.
To create an original retail price for existing items/SKUs: Run the following program at a command line to update the Original retail price field in the SKU file with the Price from the SKU Price file or Item Price file, where:
• 999 is the company where the original retail price update should occur.
• P indicates how the system should search for a price to default as the original retail price. O indicates the system pulls the price from the oldest (first) offer defined for the item/SKU. C indicates the system pulls the price from the most current active offer defined for the item/SKU. The system uses the price from the SKU Price file for a quantity of 1 with the most recent effective date. If a SKU Price does not exist, the system uses the price from the Item Price file for a quantity of 1 with the most recent effective date. If the system cannot find a SKU Price or Item Price, the system does not update the original retail price for that item/SKU.
• T indicates the offer type to exclude. The system will not pull the price from any offer assigned to this offer type.
CALL INR2043 PARM(‘’ X’999F’ P T)
Note: The system overwrites any existing price defined in the Original retail price field if the conversion program identifies a different price to default.
To create records in the RI Price Change History Summary file and RI Price Change History Detail file for existing items/SKUs: Enter this conversion program at a command line where 999 represents the company for which you wish to run this program. The Use Retail Price Change Processing (H29) system control value must be set to Y. CALL INR2009 PARM(‘’ X’999F’)
A message displays if the Use Retail Price Change Processing (H29) system control value is set to N or blank and you try to run this conversion program: SCV H29 (Use Retail Price Change Processing) must be set to ‘Y’.
Note: You should run the conversion program to create an original retail price for existing items/SKUs before running the conversion program to create RI Price Change History Summary and RI Price Change History Detail records for existing items/SKUs.
To create long SKU divisions based on long SKU departments for existing items/SKUs: Enter this conversion program at a command line where 999 represents the company for which you wish to run this program. This programs reads the Long SKU Department file and uses any value found in the L/S Division field to create long SKU division records in the Long SKU Division file. The program creates the long SKU division description using the numeric division code.
To populate the L/S Division file for one company: CALL CVR0628 PARM(‘’ X’999F’)
To populate L/S Division file for all companies: CALL CVR0629 PARM(‘’)
To create records in the Retail Class file based on long SKU department and long SKU class combinations defined for existing items/SKUs: Enter one of the following 2 conversion programs at a command line where 999 represents the company for which you wish to run this program. This program reads the Item and SKU files and populates the Retail Class file with every combination of long SKU department and long SKU class linked to an item. For SKUs, the system combines the long SKU class with the base item’s long SKU department. The system assigns the existing long SKU class description associated with the item or SKU as the new retail class description. You can run this program for one or all companies. The Use Retail Integration (H26) system control value must be set to Y.
To create retail classes for one company: CALL CVR0630 PARM(‘’ X’999F’)
To create retail classes for all companies: CALL CVR0631 PARM(‘’)
The retail integration (from an external system into CWDirect) background jobs monitor and process merchandise information received from a retail system into CWDirect.
• RETAIL PRICE CHANGE UPLD: processes retail price changes sent to CWDirect from a retail system; see Retail Integration Job Control (RIJC).
• ITEM UPLOAD: processes retail item uploads sent to CWDirect from a retail system; see Retail Integration Job Control (RIJC).
As you enter information from your retail master system, MQSeries sends messages to the retail integration jobs for processing. For example, if you send a change to an existing item, a message is sent to the ITEM UPLOAD process. If this process is active, it updates the item you specified immediately. If the process is not active when the message arrives, the item will be updated once the process is restarted. All messages are processed in the sequence in which they arrive at the message queue.
Note: The retail integration (from an external system into CWDirect) processes are not restricted by company; when you work with or change a process, it affects all companies.
Creating Default and Change Item/SKU Upload Values: **DFLT ITEM and **DFTCHG
You can create the following items in CWDirect for the system to consider when uploading item upload records for record type 01 (item/SKU information).
• **DFTCHG
Note: You are not required to create either of these items.
Create this item in CWDirect to define the values to default to add or change item upload records. This is helpful if there are certain values that are always the same for each item; instead of entering the value for each item upload record, you can have the value default. For example, if the buyer code for each item is always BTM, you can enter BTM as a default value to default to each of your item upload records.
The system defaults a value to the item upload record only if the current value for the item upload record is blank; if the field in the item upload record is not blank, the system does not default a value.
Example: If you enter A01 in the Location field for **DFLT ITEM, the system defaults location A01 when you upload an add or change item upload record and the Location field for the item upload record is blank. If the Location field for the item upload record is not blank, the system does not use the value in **DFLT ITEM.
Note: The system defaults values to add or change item upload records only for record type 01 (item/SKU information). You cannot default values for any other record type, such as item/offer or vendor item.
See Creating the **DFLT ITEM Item/SKU for instructions on how to create the **DFLT ITEM.
Create this item in CWDirect to determine when the system updates an existing item/SKU with the values defined in a change item upload record. This is helpful if you only want to enter values in the change item upload record for the fields you wish to change, not the fields you wish to keep the same. For example, if you wish to only change the buyer code for an existing item, you can upload an item upload record with a value in the Buyer field and all other optional fields blank; if a value is defined for the **DFTCHG item, the system knows that you do not want to update the other fields for the existing item/SKU to blank, but rather, keep the existing values. However, if the **DFTCHG item does not exist or a value is not defined for the **DFTCHG item, the system updates the other fields for the existing item/SKU to blank.
Example: If you enter A01 in the Location field for **DFTCHG, the system does not update the Location field for an existing item/SKU when you upload a change item upload record; if you do not enter a value in the Location field for **DFTCHG, the system updates the Location field for an existing item/SKU when you upload a change item upload record.
The system uses the **DFTCHG item only for record type 01 (item/SKU information) upload records in change mode. The system does not use **DFTCHG for any other record type, such as item/offer or vendor item, and does not use **DFTCHG for add mode or delete mode.
See Creating the **DFTCHG Item/SKU for instructions on how to create the **DFTCHG item.
**DFLT ITEM and **DFTCHG Item Upload Processing
The system uses the following steps when uploading an item upload record for record type 01 (item/SKU information).
Add item upload records: The system determines if the field in the item upload record contains a value.
• If the field in the item upload record contains a value, the system uses this value to update the field.
• If the field in the item upload record is blank, the system uses the setting defined for the **DFLT ITEM to update the field.
• If the field for the **DFLT ITEM is also blank, the system updates the field to blank.
Change item upload records:
1. The system determines if the **DFTCHG item exists. If this item exists, the system determines if the retail item upload record can update the field.
• If the field for the **DFTCHG contains a value, the system does not update the field, and instead, retains the existing value defined for the field.
• If the field for the **DFTCHG is blank, or the **DFTCHG item does not exist, the system continues to the next step.
2. The system determines if the field in the item upload record contains a value.
• If the field in the item upload record contains a value, the system uses this value to update the field.
• If the field in the item upload record is blank, the system uses the setting defined for the **DFLT ITEM to update the field.
• If the field for the **DFLT ITEM is also blank, the system updates the field to blank.
This table explains when the system updates the value defined for the item/SKU, based on the value defined for the **DFLT ITEM and item upload record.
This table assumes the **DFTCHG item does not exist; see **DFLT ITEM and **DFTCHG Examples to review a table that explains how the system updates the value defined for an item/SKU, based on the value defined for the **DFLT ITEM, **DFTCHG, and the upload record.
The Buyer field is set to: |
||
**DFLT ITEM |
Upload record |
Results |
blank |
blank |
The system updates the Buyer field for the item/SKU to blank. |
AAA |
blank |
The system updates the Buyer field for the item/SKU to AAA. |
blank |
AAA |
The system updates the Buyer field for the item/SKU to AAA. |
AAA |
BBB |
The system updates the Buyer field for the item/SKU to BBB. |
BBB |
blank |
The system updates the Buyer field for the item/SKU to BBB. |
blank |
BBB |
The system updates the Buyer field for the item/SKU to BBB. |
AAA |
BBB |
The system updates the Buyer field for the item/SKU to BBB. |
BBB |
CCC |
The system updates the Buyer field for the item/SKU to CCC. |
This table explains when the system updates the value defined for the existing item/SKU, based on the value defined for the existing item, **DFTCHG, and item upload record.
This table assumes the **DFLT ITEM item does not exist; see **DFLT ITEM and **DFTCHG Examples to review a table that explains how the system updates the value defined for an existing item/SKU, based on the value defined for the existing item, **DFLT ITEM, **DFTCHG, and the upload record.
The Buyer field value is set to: |
||
**DFTCHG |
Upload record |
Results |
The system does not update the Buyer field for the existing item/SKU in the following scenarios: |
||
AAA |
blank |
The system does not update the Buyer field for the existing item/SKU. |
AAA |
BBB |
The system does not update the Buyer field for the existing item/SKU. |
BBB |
blank |
The system does not update the Buyer field for the existing item/SKU. |
BBB |
CCC |
The system does not update the Buyer field for the existing item/SKU. |
The system updates the Buyer field in the following situation: |
||
blank |
blank |
The system updates the Buyer field for the existing item/SKU to blank. |
blank |
AAA |
The system updates the Buyer field for the existing item/SKU to AAA. |
blank |
BBB |
The system updates the Buyer field for the existing item/SKU to BBB. |
**DFLT ITEM and **DFTCHG Examples
This table explains when the system updates the value defined for the existing item/SKU, based on the value defined for the **DFLT ITEM, **DFTCHG, and item upload record.
The Buyer field value is: |
|||
**DFLT ITEM |
**DFTCHG |
Upload record |
Results |
blank |
blank |
blank |
The system updates the Buyer field for the existing item/SKU to blank. |
AAA |
blank |
blank |
The system updates the Buyer field for the existing item/SKU to AAA. |
blank |
AAA |
blank |
The system does not update the Buyer field for the existing item/SKU; the system retains the existing value. |
blank |
blank |
AAA |
The system updates the Buyer field for the existing item/SKU to AAA. |
blank |
AAA |
BBB |
The system does not update the Buyer field for the existing item/SKU; the system retains the existing value. |
AAA |
BBB |
blank |
The system does not update the Buyer field for the existing item/SKU; the system retains the existing value. |
AAA |
blank |
BBB |
The system updates the Buyer field for the existing item/SKU to BBB. |
AAA |
BBB |
CCC |
The system does not update the Buyer field for the existing item/SKU; the system retains the existing value. |
The following fields for item upload records for record type 01 (item/SKU information) do not follow the logic as outlined for **DFLT ITEM and **DFTCHG Item Upload Processing.
Field |
Item Upload Processing |
Allow SKUs |
Add item upload records: • If the field in the item upload record contains a value, the system uses this value to update the field. • If the field in the item upload record is blank, the system updates the field to N. Change item upload records: You cannot change the Allow SKUs flag for an item. |
Item description |
Add item upload records: • If the field in the item upload record contains a value, the system uses this value to update the field. • If the field in the item upload record is blank, the system places the item upload record in error. Change item upload records: If the field can be updated (based on the setting defined in the **DFTCHG item, or the **DFTCHG item does not exist): • If the field in the item upload record contains a value, the system uses this value to update the field. • If the field in the item upload record is blank, the system places the item upload record in error. |
SKU description |
Add item upload records: • If the field in the item upload record contains a value, the system uses this value to update the field. • If the field in the item upload record is blank, the system updates the field to blank. Change item upload records: If the field can be updated (based on the setting defined in the **DFTCHG item, or the **DFTCHG item does not exist): • If the field in the item upload record contains a value, the system uses this value to update the field. • If the field in the item upload record is blank, the system updates the field to blank. |
UOM (unit of measure) |
Add item upload records: • If the field in the item upload record contains a value, the system uses this value to update the field. • If the field in the item upload record is blank, the system uses the setting defined for the **DFLT ITEM to update the field. • If the field for the **DFLT ITEM is also blank, the system updates the field with the value defined in the Default Item Unit of Measure (B33) system control value. Change item upload records: If the field can be updated (based on the setting defined in the **DFTCHG item, or the **DFTCHG item does not exist): • If the field in the item upload record contains a value, the system uses this value to update the field. • If the field in the item upload record is blank, the system updates the field with the value defined in the Default Item Unit of Measure (B33) system control value. |
Whs |
Add item upload records: • If the field in the item upload record contains a value, the system uses this value to update the field. • If the field in the item upload record is blank, the system uses the setting defined for the **DFLT ITEM to update the field. • If the field for the **DFLT ITEM is also blank, the system updates the field with the value defined in the Default Warehouse (A04) system control value. Change item upload records: If the field can be updated (based on the setting defined in the **DFTCHG item, or the **DFTCHG item does not exist): • If the field in the item upload record contains a value, the system uses this value to update the field. • If the field in the item upload record is blank, the system updates the field with the value defined in the Default Warehouse (A04) system control value. |
Item drop ship |
Add item upload records: • If the field in the item upload record contains a value, the system uses this value to update the field. • If the field in the item upload record is blank, the system uses the setting defined for the **DFLT ITEM to update the field. • If the field for the **DFLT ITEM is also blank, the system updates the field to N. Change item upload records: If the field can be updated (based on the setting defined in the **DFTCHG item, or the **DFTCHG item does not exist): • If the field in the item upload record contains a value, the system uses this value to update the field. • If the field in the item upload record is blank, the system updates the field to N. |
Item non inventory |
|
Item serial # tracking |
|
Item oversize flag |
|
Item exclude from flex pay |
|
Item royalty |
|
item membership |
|
SKU subscription |
|
SKU gift certificate |
|
SKU restrict orders |
|
SKU sale credit flag |
Add item upload records: • If the field in the item upload record contains a value, the system uses this value to update the field. • If the field in the item upload record is blank, the system uses the setting defined for the **DFLT ITEM to update the field. • If the field for the **DFLT ITEM is also blank, the system updates the field to N. Change item upload records: If the field can be updated (based on the setting defined in the **DFTCHG item, or the **DFTCHG item does not exist): • If the field in the item upload record contains a value, the system uses this value to update the field. • If the field in the item upload record is blank, the system updates the field to N. |
SKU VAT exempt flag |
|
SKU returnable |
|
SKU excl store restock |
|
Item allow % disc |
Add item upload records: • If the field in the item upload record contains a value, the system uses this value to update the field. • If the field in the item upload record is blank, the system uses the setting defined for the **DFLT ITEM to update the field. • If the field for the **DFLT ITEM is also blank, the system updates the field to Y. Change item upload records: If the field can be updated (based on the setting defined in the **DFTCHG item, or the **DFTCHG item does not exist): • If the field in the item upload record contains a value, the system uses this value to update the field. • If the field in the item upload record is blank, the system updates the field to Y. |
Suppress B/O card |
Add item upload records: • If the field in the item upload record contains a value, the system uses this value to update the field. • If the field in the item upload record is blank, the system uses the setting defined for the **DFLT ITEM to update the field. • If the field for the **DFLT ITEM is also blank, the system updates the field to N. Change item upload records: If the field can be updated (based on the setting defined in the **DFTCHG item, or the **DFTCHG item does not exist): • If the field in the item upload record contains a value, the system uses this value to update the field. • If the field in the item upload record is blank, the system checks the setting of the Unconditional Suppression of Backorder Card (F19) system control value. If this system control value is set to Y or N, the system defaults this value to the field. • If the Unconditional Suppression of Backorder Card (F19) system control value is not Y or N, the system updates the field to N. |
Locate eligible |
This field is not in the item upload file. Add item upload records: All new items are created with this field set to Y, regardless of whether the **DFLT ITEM exists or has a setting in the Locate eligible field. Change item upload records: The current setting of the Locate eligible field is cleared unless a value is specified for the **DFTCHG item. |
Creating the **DFLT ITEM Item/SKU
Step-by-step instructions: Use the following steps to create the **DFLT ITEM.
1. Create the SKU element NA for SKU Element 1; see Merchandising Chapter 40: Working with SKU Elements (WSK1, WSK2, WSK3). You need to create the SKU element NA if you wish to default information at the SKU level.
2. Create the item **DFLT ITEM in the Item file; see Merchandising Chapter 24: Performing Initial Item Entry (MITM).
• Designate the item **DFLT ITEM to have SKUs by setting the SKUs (Stock keeping unit) field to Y.
• Populate the fields that you want to establish as company-wide item default values for any blank fields that you pass for an 01 item/SKU record type.
• Advance to the Create SKU 1 of 2 (With Overrides) Screen and enter NA in the first SKU element field.
• Populate the fields that you want to set up as SKU default values for any blank fields that you pass for an item/SKU record type.
• When you are finished entering the SKU default values, press Enter to start using these item and SKU default values for item uploads.
Note: When creating a new item, the program does not use the Locate elig (Locate eligible) setting from the **DFLT ITEM record; this field is always set to Y for a new item.
Creating the **DFTCHG Item/SKU
Step-by-step instructions:
1. Create the SKU element *DFT for SKU Element 1; see Merchandising Chapter 40: Working with SKU Elements (WSK1, WSK2, WSK3). You need to create the SKU element *DFT if you wish to determine change information at the SKU level.
2. Create the item **DFTCHG in the Item file; see Merchandising Chapter 24: Performing Initial Item Entry (MITM).
• Designate the item **DFTCHG to have SKUs by setting the SKUs (Stock keeping unit) field to Y.
• Populate the fields that you want to establish as company-wide item values that you do not wish to change for existing item/SKUs when you upload a change item/SKU upload record. Note: The values you enter in the fields are not important; the value only indicates that you do not wish to update this field for an existing item.
• Advance to the Create SKU 1 of 2 (With Overrides) Screen and enter *DFT in the first SKU element field.
• Populate the fields that you want to set up as SKU values that you do not wish to change for existing item/SKUs. Note: The values you enter in the fields are not important; the value only indicates that you do not wish to update this field for an existing SKU.
• When you are finished entering the SKU default values, press Enter to start using these item and SKU values for item uploads.
| Part M: Retail Integration (External System to CWDirect) | Contents | SCVs | Search | Glossary | Reports | XML | Index | Chapter 89: Working with Retail Integration Item Upload (RIIU) |

ME13_01 CWDirect 18.0 August 2015 OTN