Each community has its own portal pages. A default page is created when you create the community. You can redesign this page to suit the needs of that particular community. To edit an existing page:
As a Portal Administrator, log in to the Portal Administration and click on the Communities tab. Locate the community whose page you want to create, and click the edit link next to the community name. Or, as a Community Leader, click on the Administer link on the community’s home page.
The Community Settings Page opens.
Click on Community Pages in the top navigation bar.
The Community Pages page opens, displaying all of the portal pages that belong to the community.
Select the page that you want to edit and click edit.
The Edit page for that portal page opens.
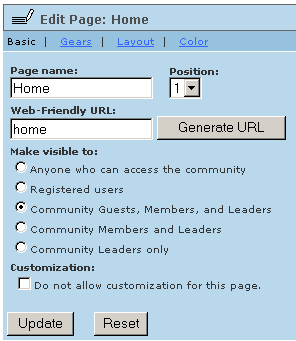
Use the Basics tab in the Edit Page to change the page’s name or URL, set the access permissions, and specify whether users are allowed to customize the page. Customization lets users modify the appearance of their view of the page. It can also let them delete from their view gears that the Community Leader wants them to see, however.
Use the Gears tab in the Edit Page to add and remove gears from the portal page. See Adding Gears to a Community Portal Page for more details.
Use the Layout tab in the Edit Page to specify a layout template and the placement of gears within the portal page. Click Update to apply your layout to the page.
Use the Color tab in the Edit Page to specify the color palette to use on the portal page. Click on a color theme to preview the color palette, then click Update to apply that palette to the page.
