8 Upgrading to STA 2.2.x
This chapter provides instructions for upgrading any previously released version of STA to STA 2.2.0 and subsequent STA 2.2.x versions. It includes the following sections:
If you are installing STA for the first time, you should perform a new base installation; see Chapter 3, "Installing STA" for instructions.
Appendix C includes worksheets you can use to organize your upgrade activities and record your settings.
Note:
The upgrade to STA 2.2.x is a post-installation upgrade, which is a manual process. See "Understanding Automatic and Post-installation Upgrades" for definitions of the upgrade types.Upgrade Paths
You can upgrade to STA 2.2.x from any of the following released STA versions. See "Verify Upgrade Prerequisites" to determine your current STA version.
-
STA 2.1.x:
-
STA 2.1.64.124
-
-
STA 2.0.x:
-
STA 2.0.0.83
-
STA 2.0.1.4
-
-
STA 1.0.x:
-
STA 1.0.0.99
-
STA 1.0.1.133
-
STA 1.0.2.24
Note:
If you are upgrading from STA 1.0.x, you must also install a new version of Linux before installing STA 2.2.x. See the STA Requirements Guide for details. -
Upgrade Process Overview
During an upgrade, your existing STA data is transformed from the current STA version to the new. Your existing STA database is not valid with the new version of STA until these transformations are done. After the upgrade, STA processes new data according to the new STA schema and analytic rules, and historical data is not reprocessed.
Preparing for the Upgrade
Before beginning the upgrade, read all instructions in this chapter, and be sure to allocate sufficient time for the entire process. Some upgrade preparation tasks may require you to coordinate with other groups at your site, such as network administration. You should have all preparation tasks done in advance so you can complete the upgrade itself in as little time as possible.
While you are performing the upgrade process, STA does not receive exchange information from the monitored libraries. Additionally, the new version of STA does not begin receiving information from the libraries until after you have completed all steps in the upgrade and tested the SNMP connection to each monitored library.
Understanding Automatic and Post-installation Upgrades
Depending on the new version of STA and your upgrade path, the upgrade may be either automatic or post-installation, as follows:
- Automatic upgrades
-
In an automatic upgrade, the STA installer takes a snapshot of your current data, installs the new version of STA, and then upgrades your data to the new version. All these activities are handled automatically by the STA upgrade installer.
Automatic upgrades are possible when the underlying operating system, database, and installation framework are consistent from one version of STA to the next. For example, the upgrades from STA 2.0 to STA 2.0.1 and from STA 1.0 to STA 1.0.2 are automatic upgrade.
- Post-installation upgrades
-
In a post-installation upgrade, you must take a snapshot of your existing data, then deinstall the current version of STA and install the new one, and then run a supplied script to upgrade your data to the new version. You must perform these activities manually and in the proper sequence. Depending on the new STA version, you may also need to install a new version of Linux on the STA server before installing STA.
Post-installation upgrades are necessary in the following situations:
-
The new version of STA requires a new version of Linux. For example, STA 1.0.x requires Linux 5, while STA 2.0 and subsequent versions require Linux 6; therefore, to upgrade to STA 2.0 or higher from STA 1.0.x, a new version of Linux must be installed, which requires a post-installation upgrade.
-
The STA installation framework has changed significantly. For example, the installer for STA 2.1.0 and subsequent versions use the Oracle Universal Installer framework; therefore, upgrading to STA 2.1.x or STA 2.2.x from any previous version of STA requires a post-installation upgrade.
-
Post-installation Upgrades: Choosing Whether to Use One Server or Two
For post-installation upgrades, you can choose to use either one server or two, depending on your goals and available resources. Automatic upgrades are by nature always done on one server.
The upgrade tasks are largely the same for the two methods, but the tasks are performed in different orders. The two methods are discussed in the following sections:
Single-server Upgrade Method
Using the single-server method, you must deinstall STA before you install the new version and upgrade the database on the same server. STA is not monitoring libraries while you perform this process.
This method offers the advantage of not requiring an additional dedicated server for the upgrade. If you are upgrading from STA 2.0 or higher, you do not need to install a new version of Linux, so this method may be sufficient for your needs.
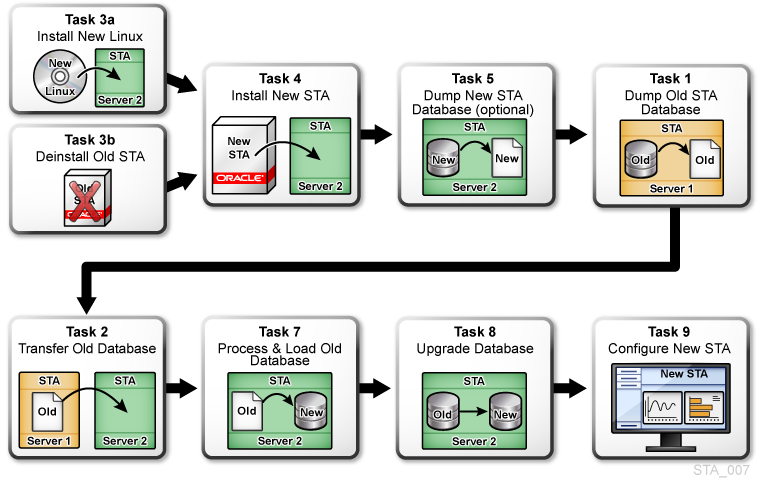
Figure 8-1 illustrates the single-server method. You perform Task 1 through Task 9 in sequential order. In summary:
-
Dump the current database and transfer it to a backup server for safekeeping (Task 1 and Task 2).
-
Depending on your current version of STA, either install Linux 6.x (Task 3a) or Deinstall STA 2.0.x (Task 3b).
-
Install STA 2.2.x, and as a precaution, dump the new database (Task 4 and Task 5).
-
Transfer the dump of the old database from the backup server, and then load and upgrade it to the new STA version (Task 6 through Task 8).
-
Reestablish connections to the monitored libraries and perform necessary manual configuration tasks (Task 9). Because the old version of STA must be deinstalled before you install STA 2.2.x, you must reenter some user configuration data manually.
Figure 8-1 Single-server Upgrade Task Overview

Description of ''Figure 8-1 Single-server Upgrade Task Overview''
Two-server Upgrade Method
The two-server upgrade method requires a second dedicated STA server, but it offers the advantage of reduced STA application downtime. This method is especially useful if you are upgrading from STA 1.0.x, as the old version of STA can continue to monitor libraries on the old server while both Linux and the new version of STA are installed on the new server.
Even with this method, however, STA is not monitoring libraries while you upgrade the current database to the new STA version. The length of downtime depends on the size of your current database.
Figure 8-2 illustrates the two-server method. You must complete the tasks in the order shown—they are not done in sequential order, and Task 6 is omitted. Note that you do not dump the current STA database until after you install the new version of STA on the new server. In summary:
-
Depending on whether the second server is currently running a version of STA, either install Linux 6.x (Task 3a) or deinstall the old version of STA (Task 3b).
-
Install STA 2.2.x on the new server, and as a precaution, dump the new database (Task 4 and Task 5).
-
Dump the current database on the old server and transfer it to the new server (Task 1 and Task 2).
-
Load and upgrade the current database to the new STA version (Task 7 and Task 8).
-
Reestablish connections to the monitored libraries and perform necessary manual configuration tasks (Task 9).
Figure 8-2 Two-server Upgrade Task Overview
Description of ''Figure 8-2 Two-server Upgrade Task Overview''
Environment Changes
Review the following environment changes as part of your upgrade planning. Some or all of these changes may apply to your upgrade, depending on the version of STA you are currently running.
Linux Version
Note:
This change was introduced in STA 2.1.0.Linux 6.3 or higher is required for STA 2.1.0 and higher (see the STA Requirements Guide for details). You may need to install a new version of Linux as part of the STA upgrade process, as follows:
-
If you are upgrading from STA 1.0.x, you must install Linux 6.3 or higher before installing STA 2.2.x. Linux does not support an in-place upgrade from Linux 5.x to Linux 6.x; instead, you must perform a new Linux 6.x installation on the STA server.
-
If you are upgrading from STA 2.0.x, you are already running Linux 6.3 or higher, so you do not need to install a new version of Linux; however, you must deinstall the current version of STA before installing STA 2.2.x. You may also need to install or update the required Linux RPM packages—as part of the upgrade preparation, you will ensure that all required RPM package levels are installed, and as a final check, the STA installer will also notify you if any packages are missing.
Default WebLogic Port Numbers
Note:
This change was introduced in STA 2.1.0.Changes to the default WebLogic Administration console port numbers were introduced in STA 2.1.0. If you are currently using the old default port numbers, you may want to change to the new default values. The new and old default port numbers are as follows:
-
New defaults for STA 2.1.0 and higher—7019 (HTTP) and 7020 (HTTPS)
-
Old defaults (STA 1.0.x and STA 2.0.x)—7001 (HTTP) and 7002 (HTTPS)
Note:
The WebLogic Administration console ports are external. Your network administrator may need to configure firewalls and routers to open communication between the STA server and the clients accessing the WebLogic Administration interface.Username and Password Requirements
Note:
This change was introduced in STA 2.1.0. Additional special characters were made illegal in STA 2.2.0.Following are the username and password requirements for STA and MySQL. You may need to coordinate these requirements with any internal requirements at your site.
Username requirements are as follows:
-
Must be 1–16 characters in length
-
All usernames must be unique
Password requirements are as follows:
-
Must be 8–32 characters in length
-
Must include at least one uppercase letter and one number
-
Must not include spaces or tabs
-
Must not include any of the following special characters:
% & ' ( ) < > ? { } * \ ' " ; , + = #
Required Ports for STA
Note:
This change was introduced in STA 2.0.0.New dedicated STA ports were added for the StaUi and StaEngine managed servers in STA 2.0.0. The default STA managed server port numbers STA 2.0.x and later are as follows:
-
StaUi—7021 (HTTP) and 7022 (HTTPS)
-
StaEngine—7023 (HTTP) and 7024 (HTTPS)
-
StaAdapter—7025 (HTTP) and 7026 (HTTPS)
Note:
The StaUi ports are external. Your network administrator may need to configure firewalls and routers to open communication between the STA server and the clients accessing the STA user interface.Preparation Tasks for All Upgrades
Perform the following tasks before starting the STA upgrade. Most of these tasks are optional, and Table 8-1 provides guidelines on when to use each one.
Table 8-1 Guidelines for When to Perform Upgrade Preparation Tasks
| Task | When to Perform It |
|---|---|
|
All upgrades |
|
|
You want to retain service logs from the current version of STA. |
|
|
"Record Current STA User and Configuration Settings (optional)" |
You want to retain current STA usernames and configuration settings. |
|
You have custom templates with names prefixed "STA–". |
|
|
You want to retain the ownership and visibility settings for existing custom templates. |
|
|
You want to retain the ownership settings for existing Executive Report policies. |
Verify Your Site is Ready for the Upgrade
Use this procedure to review the upgrade requirements and verify that your site is ready.
Verify Upgrade Prerequisites
Use this procedure to ensure that your environment meets all STA 2.2.x prerequisites.
-
Display your current STA version. Some upgrade tasks vary depending on the version of STA from which you are upgrading.
-
Log in to STA using an STA administrator username.
-
Click About in the Status Bar.
-
Verify you are running a currently released version of STA. See "Upgrade Paths" for details.
-
-
Choose whether you will be using the single-server or two-server upgrade method. See "Upgrade Process Overview" for details.
-
Verify that your site and the target server meet STA 2.2.x requirements. See the STA Requirements Guide for details.
-
Determine whether the /tmp filesystem on the target STA server has sufficient space for the upgrade. The size of /tmp should be at least as large as the size of your existing uncompressed STA database; a minimum of 4 GB is required, and for large databases, Oracle recommends you increase the size of /tmp to 32 GB, at minimum.
If you determine you must increase the size of /tmp, you can do this just before you run the upgrade script; see "Task 8: Upgrade the Old Database" for instructions.
-
Review the environment changes relevant to your upgrade path, and make any necessary adjustments to your plan or environment. See "Environment Changes" for details.
-
Ensure that all required RPM packages are installed on the STA server. See "Install Required Linux Packages" for instructions. As a final check, the STA installer will also notify you if any packages are missing.
-
Review the file system structure on the STA server and verify that the required users and groups have proper access to the locations used by the STA installer. See "Recommended File System Layout" and "Users, Groups, and Locations Used by the STA Installer".
Verify Current STA Activity
Use this procedure to verify that your current STA environment is functioning normally.
-
Use the following steps to verify that the current version of STA has had recent, successful communication with each monitored library.
-
Log in to STA as an STA administrator user.
-
From the Setup & Administration tab, select SNMP Connections.
-
Verify the following values in the Monitored Libraries table:
-
Recent SNMP Trap Communication Status—GOOD
-
Last Connection Status—SUCCESS
-
-
-
Use the following steps to verify that STA is processing exchanges across all libraries.
-
From the Tape System Activity tab, select Exchanges – Overview.
-
Select the Filter icon and filter for Exchange End (No. Days) Less Than 1.
-
In the Table Toolbar, select View, then select Sort, then select Advanced. Sort by Drive Library Name, Drive Serial Number.
-
Verify that all libraries have exchange activity.
-
Save Existing Logs (optional)
Existing application and service logs are not retained after the upgrade because you must deinstall the current version of STA or install a new version of Linux before installing STA 2.2.x. Use this procedure to save any logs you want to keep.
-
Locate any installation and database logs you want to retain, and move them to a safe place. Logs that may be of interest are located in the STA logs location you have defined for your installation. See "Review STA File System Layout" for details.
-
Use the following steps to perform a service log snapshot on the current STA installation. This step is optional but recommended, as Oracle Support can use the logs to troubleshoot any issues that may have existed before the upgrade.
-
Log in to STA as an STA Administrator user.
-
From the Setup & Administration tab, select Logs.
-
On the Service – Logs screen, click the Create New Log Bundle icon.
-
In the Create New Log Bundle dialog box, assign a bundle name and click Save. It may take several minutes for the process to complete.
-
-
Use the following steps to download the service log bundle you just created, as well as any others you want to retain. You must download the bundles one at a time.
-
On the Service – Logs screen, select the bundle you want to download.
-
Click the Download Selected Log Bundle icon.
-
In the dialog box, specify the destination location and save the log bundle.
-
Record Current STA User and Configuration Settings (optional)
This section applies only if you want to retain current STA usernames and configuration settings in STA 2.2.x. Use these procedures to display and record the current values so you can reenter them for STA 2.2.x. You will reenter most of these values after the upgrade; see "Post-upgrade Tasks for All Upgrades" for details.
Record MySQL Usernames
Use this procedure to display and record existing MySQL usernames used to access the STA database. The STA installer will prompt you for these values. You cannot retrieve the passwords.
-
Open a terminal session on the current STA server, and log in as the system root user.
-
Display all STA database usernames by issuing the following query. Enter the database root user password when prompted. For example:
$ mysql -uroot -p -e "select distinct(user) from user order by user ;" mysql
Enter password: password
+--------+
| user   |
+--------+
| root   |
| staapp |
| stadba |
| starpt |
+--------+
-
Record the usernames.
Record STA SNMP Client Settings
Use this procedure to display and record SNMP client settings for STA. You will reenter these values after the upgrade.
Note:
In the new version of STA, the SNMP values must match what is specified on the monitored libraries.-
Log in to STA using an STA administrator username.
-
From the Setup & Administration tab, select SNMP Connections.
The Client Attributes table displays configuration settings for the STA SNMP client.

Description of the illustration ''snmp_clientupgrade.png''
-
Record the values from the following columns:
-
SNMP Username
-
User Community
-
Trap Community
-
Record WebLogic Usernames—Upgrades from STA 1.0.x Only
For upgrades from STA 1.0.x, use this procedure to display and record existing WebLogic usernames used to log in to STA. You will reenter these values after the upgrade. You cannot retrieve the passwords.
Note:
Starting with STA 2.0, usernames are created and maintained through the STA user interface; see "Record STA Usernames—Upgrades From STA 2.0.x and Higher" for instructions.-
Start a supported Web browser on your computer and enter the URL of the WebLogic administration console.
http(s)://STA_host_name:port_number/console/
Where:
-
host_name is the hostname of the STA server.
-
port_number is the STA port number of the WebLogic administration console in the current STA version.
-
STA must be uppercase.
For example:
https://staserver.example.com:7002/console/ -
-
Log in using the WebLogic administration console username and password.
-
In the Domain Structure navigation tree, click Security Realms.
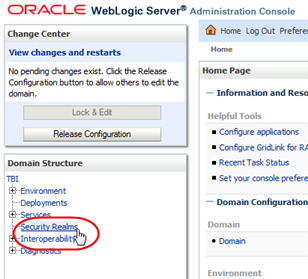
Description of the illustration ''wl_secrealm.png''
The Summary of Security Realms screen appears.
-
In the Name column, select the myrealm active link (do not select the check box).
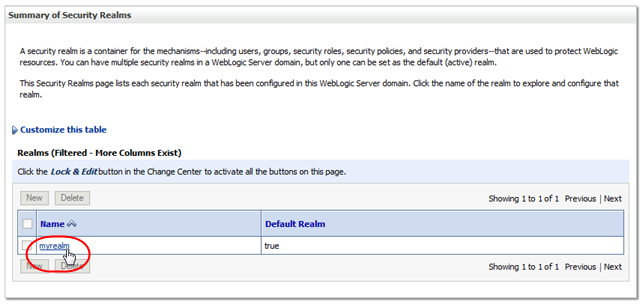
Description of the illustration ''wl_myrealm.png''
The Settings for myrealm screen appears.
-
Select the Users and Groups tab.
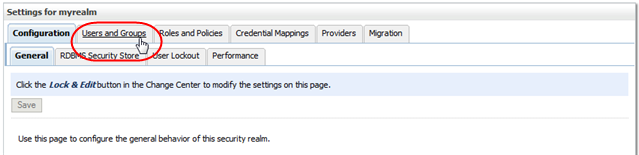
Description of the illustration ''wl_checkusers.png''
The Users table lists the available usernames.
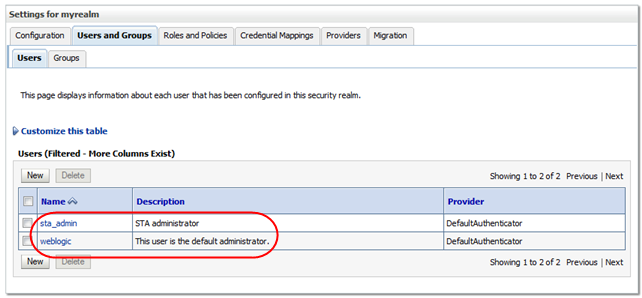
Description of the illustration ''wl_userstable.png''
-
Record the usernames you want to retain.
Record STA Usernames—Upgrades From STA 2.0.x and Higher
For upgrades from STA 2.0.x and higher, use this procedure to display and record usernames used to log in to STA. You will reenter this information after the upgrade. You cannot retrieve the passwords.
Note:
For STA 1.0.x, usernames were created and maintained through the WebLogic administration console; see "Record WebLogic Usernames—Upgrades from STA 1.0.x Only" for instructions.-
Log in to STA using an STA administrator username.
-
From the Setup & Administration tab, select Users.
The Configuration – Users screen displays all STA usernames and their roles.
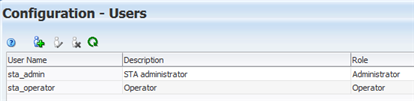
Description of the illustration ''upgrade_users.png''
-
Record the usernames and roles you want to retain.
Record STA Email Server Settings
Use this procedure to display and record the STA email protocol and, if the email server requires authentication, the account username. You will reenter these values after the upgrade. You cannot display the password.
-
Log in to STA using an STA administrator username.
-
From the Setup & Administration tab, select Email.
-
In the SMTP Server Settings table, select the StorageTek Tape Analytics Alerts record, then click the Edit Selected SMTP Server icon.
The Define SMTP Server Details dialog box appears.
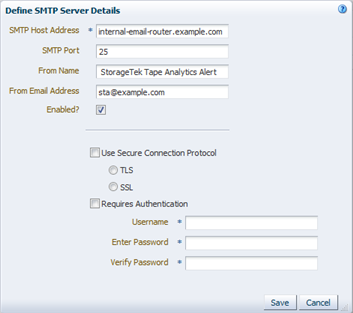
Description of the illustration ''email_smtpserverd.png''
-
Record the values from the following fields:
-
Use Secure Connection Protocol
-
Username
-
Rename Custom Templates With STA– Prefix (optional)
This procedure applies only if you have custom templates with names prefixed "STA-". During STA 2.2.x installation, all templates with the "STA–" prefix are deleted and replaced by new STA predefined templates.
Use this procedure to assign new names to the templates so they will be preserved during the upgrade.
Note:
STA predefined templates are prefixed "STA–"; therefore Oracle recommends that you not use this prefix when naming custom templates.-
Log in to STA with an administrator username.
-
From the Setup & Administration tab, select Templates Management.
-
Sort the table by date Created/Updated, to focus on templates that have been modified since the STA installation date.
-
Select the text link of a custom template with name prefixed "STA-".
You are taken to the screen with the selected template applied.
-
Click Save Template in the Templates Toolbar.
The Save Template dialog box appears.
-
In the Template Name field assign a new name not prefixed "STA-". Your entry must be unique.
-
Click Save.
The template is saved.
Record Current Custom Template Settings (optional)
This section applies only if you have custom templates. The upgrade preserves custom templates, but after the upgrade all custom templates are owned by STA with public visibility.
Use this procedure to record the current ownership and visibility settings for all custom templates so you can restore them after the upgrade, if necessary. You can skip this procedure if template ownership and visibility are not critical to your implementation.
-
Log in to STA with an administrator username.
-
From the Setup & Administration tab, select Templates Management.
-
Select the Filter icon and filter the screen to show only templates not owned by STA—this will display custom templates only.

Description of the illustration ''upgrade_filternotsta.png''
-
Record the current Owner and Public Visibility settings for each custom template. If you have many templates, you may want to take a screen shot.
Record Executive Report Policy Settings (optional)
This section applies only if you have privately owned Executive Report policies. The upgrade preserves all Executive Report policies, but after the upgrade all private policies are assigned public ownership.
Use this procedure to record the current ownership settings for all private policies so you can restore them after the upgrade, if necessary. You can skip this procedure if Executive Report policy ownership is not critical to your implementation.
-
Log in to STA using an STA administrator username.
-
From the Setup & Administration tab, select Executive Reports Policies.
-
Select the Filter icon and filter the screen to show only policies not owned by STA—this will display private policies only.
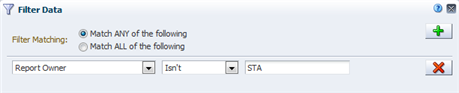
Description of the illustration ''upgrade_rptnotsta.png''
-
Record the current Report Owner for each policy. If you have many policies, you may want to take a screen shot.
Post-installation Upgrade Tasks
Caution:
Only a Linux administrator and STA administrator should perform the upgrade. All tasks are required and must be performed precisely as written in the order specified, or data loss could result.If you are using the single-server upgrade method, you perform the tasks in sequential order; see Figure 8-1, "Single-server Upgrade Task Overview" for details.
If you are using the two-server upgrade method, you do not perform the tasks in sequential order and Task 6 is omitted; see Figure 8-2, "Two-server Upgrade Task Overview" for the task order.
-
"Task 3a: Install the New Linux Version—Upgrades From STA 1.0.x"
-
"Task 3b: Deinstall the Old STA Version—Upgrades From STA 2.0.x or Higher"
Task 1: Dump the Old STA Database
Use this procedure to perform a full dump of the old (current) STA database.
-
Use the following steps to display the size of your current STA database.
-
Log in to STA using an STA administrator username.
-
Click About in the Status Bar.
-
In the About dialog box, scroll down to where the Database Current Size is displayed, and record the value.
-
-
Use the following steps to verify that the location where you want to dump the database has sufficient space.
-
Open a terminal session on the STA server and log in as the system root user.
-
Display the space available in the database dump destination, and verify it is sufficient for the dump file. For example:
# df -h /dbdumpfiles
Filesystem            Size  Used Avail Use% Mounted on
/dev/mapper/sta_server-STA_DbVol
                      200G   53G   243G  27% /dbdumpfiles
-
-
Stop all STA services.
# STA stop all -
Start the MySQL service.
# service mysql start -
Dump the STA database into a single file. Enter the database root user password when prompted.
# mysqldump -uroot -p --opt --add-drop-database --comments --complete-insert --dump-date --events --flush-logs --routines --single-transaction --triggers --databases stadb > /dumpfile_path/dumpfile_name.sql
Enter password: mysql_root_password
Note:
The optional –v parameter (for verbose output) is not recommended, as a large number of messages are displayed in the terminal window and it can significantly slow down the command process for large databases.In Example 8-1, the STA 1.0.x database is dumped into the /dbdumpfiles folder on the STA server with filename Dec14_dump.sql.
# mysqldump -uroot -p --opt --add-drop-database --comments --complete-insert --dump-date --events --flush-logs --routines --single-transaction --triggers --databases stadb > /dbdumpfiles/Dec14_dump.sql

Enter password: mysql_root_password
...
-- Retrieving view structure for table v_library_complex_io...
...
-- Retrieving view structure for table v_library_summary_averages...
-- It's base table, skipped
...
-- Retrieving table structure for table v_mdv_status_codes...-- It's a view, create dummy table for view
...
-- Disconnecting from localhost...
-
To reduce the dump file size by approximately 50 percent, gzip the file.
# cd /path_to_dump_file/
# gzip dump_file_name.sql
Task 2: Transfer the Old Database Dump
Use this procedure to transfer the compressed dump of the old STA database to either an off-platform backup server (single-server method) or the new STA 2.2.x server (two-server method).
Caution:
If you are upgrading from STA 1.0.x with the single-server method, you must back up the STA database to another server. Do not back up the database to a filesystem on the current STA server, as the Linux 6.x installation in "Task 3a: Install the New Linux Version—Upgrades From STA 1.0.x" will destroy all data on the server.-
If you have not done so already, stop all STA services.
# STA stop all -
Perform a checksum before transferring the file to the backup server.
# cksum dump_file_name.sql.gz
The output includes a checksum value and byte count. Record the checksum value; you will use it to verify the file integrity after transferring the file to the backup server.
-
Transfer the file to the target server using a transfer utility such as SCP. The –p option preserves timestamp values.
# scp -p dump_file_name.sql.gz target_host:/path/
In Example 8-2, SCP is used to transfer the compressed database dump file Dec14_dump.sql.gz to the /dbdumpfiles folder on backup host backup1.The /dbdumpfiles folder already exists on the backup host.
Example 8-2 Old Database Transfer to Backup Server (Single-server Method)
# cd /dbdumpfiles
# scp -p Dec14_dump.sql.gz backup1:/dbdumpfiles
In Example 8-3, SCP is used to transfer the compressed database dump file Dec14_dump.sql.gz to the /dbdumpfiles folder on STA 2.2.x host sta_new.
-
On the target server, perform a checksum of the transferred file. Verify that the checksum values match.
# cd /path_to_dump_file/
# cksum dump_file_name.sql.gz
Task 3a: Install the New Linux Version—Upgrades From STA 1.0.x
Caution:
This activity destroys all data on the server. If you are using the single-server upgrade method, use this procedure only after you have performed "Task 1: Dump the Old STA Database" and "Task 2: Transfer the Old Database Dump".This procedure applies only to upgrades from STA 1.0.x. Install Linux 6.3 or higher on the STA server; see Chapter 2, "Installing Linux" for instructions.
Task 3b: Deinstall the Old STA Version—Upgrades From STA 2.0.x or Higher
Caution:
This activity destroys all STA data on the server. If you are using the single-server upgrade method, use this procedure only after you have performed "Task 1: Dump the Old STA Database" and "Task 2: Transfer the Old Database Dump".This procedure applies only to upgrades from STA 2.0.x or higher. Deinstall the current version of STA, as follows. The location of the deinstaller varies depending on the version of STA.
-
For upgrades from STA 2.1.x and higher, see "Deinstall STA" and "Verify Successful Deinstallation" for instructions.
-
For upgrades from STA 2.0.x, use the following steps.
-
Log in as the system root user.
-
Change to the STA installation directory.
# cd /Oracle/StorageTek_Tape_Analytics_install -
Launch the STA deinstaller with one of the following commands:
-
To use the STA graphical deinstaller:
# ./Uninstall_StorageTek_Tape_AnalyticsThis mode requires an X11 display. See "STA Graphical Installer and Deinstaller Screen Reference" for instructions.
-
To use the STA console deinstaller:
# ./Uninstall_StorageTek_Tape_Analytics -i console
-
-
Task 4: Install the New STA Version
Use this procedure to install STA 2.2.x.
-
Install STA 2.2.x; see "Installing STA" for instructions.
-
To verify STA is working properly and complete the STA Administrator setup in WebLogic, log in to the STA application.
The Dashboard is displayed.
Note:
Because the upgrade process is not yet complete, the Dashboard portlets display the message "No data to display"; this is normal. The library data will be displayed correctly after you upgrade the database and configure the new STA version. -
Log out of STA.
-
Open a terminal session on the STA server and log in as the system root user.
-
Stop all STA services.
# STA stop all -
This step applies only if you want STA to monitor the libraries using SNMP v2c (see Appendix F, "Configuring SNMP v2c Mode" for details). Starting with STA 2.0, SNMP v2c is enabled by default. Use the following steps to confirm that it is enabled.
-
Change to the STA configuration files directory.
# cd /Oracle_storage_home/Middleware/user_projects/domains/TBI
-
Display the SNMP version properties file and verify that the V2c parameter is set to true.
# cat TbiSnmpVersionSupport.properties V2c=true Verbal=false -
If the parameter is not set to true, see "Enable SNMP v2c Mode for STA" for instructions on how to change it.
-
Task 5: Dump the New STA Database (optional)
This procedure is optional but recommended. Use this procedure to dump the empty STA 2.2.x database as a safeguard. If the database upgrade (Task 8: Upgrade the Old Database) cannot be completed, you can restore the empty database to recover STA 2.2.x to a state in which it can be configured to run as if it were newly installed with no data; see Recover a Failed Database Upgrade (optional) for details on the recovery process.
-
Open a terminal session on the STA server and log in as the system root user.
-
If you have not done so already, stop all STA services.
# STA stop all -
Start the MySQL service.
# STA start mysql -
Create the database backup file. Enter the database root user password when prompted.
# mysqldump -uroot -p --opt --add-drop-database --comments --complete-insert --dump-date --events --flush-logs --routines --single-transaction --triggers --databases stadb > /dumpfile_path/dumpfile_name.sql
Note:
The optional –v parameter (for verbose output) is not recommended, as a large number of messages are displayed in the terminal window and it can significantly slow down the command process for large databases.In Example 8-4, the STA 2.2.x database is dumped to the /dbdumpfiles folder on the STA server with filename STA_FRESH_INSTALL_BACKUP.sql.
# mysqldump -uroot -p --opt --add-drop-database --comments --complete-insert --dump-date --events --flush-logs --routines --single-transaction --triggers --databases stadb >  /dbdumpfiles/STA_FRESH_INSTALL_BACKUP.sql
Enter password: mysql_root_password
...
-- Retrieving view structure for table v_mdv_request_states...
-- Retrieving view structure for table version_info...
...
-- Disconnecting from localhost...
Note:
If you see the message, "Can't connect to local MySQL server," the MySQL server is not running. Make sure you have started MySQL (Step 3).
Task 6: Transfer the Old STA Database to the STA Server
Note:
This procedure applies to the single-server method only.Use this procedure to transfer the backup of the old database to the STA 2.2.x server.
-
If you have not done so already, stop all STA services.
# STA stop all -
Transfer the database. The –p option on for SCP preserves timestamp values.
# scp -p backup_host:/path_to_dump_file/dump_file_name.sql.gz /local_path
In Example 8-5, SCP is used to transfer the compressed database dump file Dec14_dump.sql.gz from /dbdumpfiles on host backup1 to the /dbdumpfiles folder on the STA 2.2.x server.
-
Perform a checksum of the transferred file. Verify the checksum value matches the one you received in "Task 1: Dump the Old STA Database".
# cd /path_to_dump_file/
# cksum dump_file_name.sql.gz
Task 7: Process and Load the Old STA Database
Use this procedure to decompress the old database and reinstate it on the STA 2.2.x server. The decompressed database may require 10 to 15 times as much space as the compressed database.
-
If you have not done so already, stop all STA services.
# STA stop all -
Decompress the backup file.
# gunzip dump_file_name.sql.gz
-
Use the following steps to purge the STA database of obsolete data, such as processed SNMP records and empty analytics records.
Note:
A permanent record of purgerecs command activity is saved in the STA database. Starting with STA 2.0, database purging also occurs automatically at runtime. Periodically, the MySQL Event Scheduler purges records from various tables to attenuate database growth.-
Change to the STA database updates directory.
# cd /Oracle_storage_home/StorageTek_Tape_Analytics/db/updates
-
Initiate the purge.
# ./purgerecs /path_to_dump_file/dump_file_name.sql /path_to_dump_file/dump_file_name_PURGED.sql
Note:
For help with the purgerecs command, type the following command:# ./purgerecs -h
In Example 8-6, the purgerecs utility processes the MySQL dump file Dec14_dump.sql in /dbdumpfiles. The output is directed to a new file named Dec14_dump_PURGED.sql in /dbdumpfiles. A progress dot appears for each 200 records processed.
Example 8-6 Purge Obsolete Data From the Old Database Backup
# cd /Oracle/StorageTek_Tape_Analytics/db/updates
# ./purgerecs /dbdumpfiles/Dec14_dump.sql /dbdumpfiles/Dec14_dump_PURGED.sql
................................................
          STA v1.0.2, Schema 33.02
Processed 11,689 lines from '20130711_dump.sql':
------------------------------------------------
snmp_storage_cells........1,614,255
snmp_media................110,205
...
media_summaries...........254
transform_logs............0
================================================
Records Processed:........13,143,283
Records Purged:...........2,857,623
Records Remaining:........10,285,660
Elapsed Time:.............00:00:11
-
-
This step is optional. Determine the database file size and estimate the load process time.
# ls -s -h dump_file_name_PURGED.sql
-
Start the MySQL server.
# STA start mysql -
Load the old STA database. Enter the database root user password when prompted. Unless you specify the –v (verbose) option (not recommended), there is no command output as the process runs.
Note:
The optional –v parameter (for verbose output) is not recommended, as a large number of messages are displayed in the terminal window and it can significantly slow down the command process for large databases.# mysql -uroot -p -e "SET SESSION SQL_LOG_BIN=0; SOURCE /path_to_dump_file/dump_file_name_PURGED.sql;" Password: mysql_root_password
Where:
-
–p—Prompts for the database root password established during STA installation.
-
–e—Execute the following quote-enclosed statements:
-
SET SESSION SQL_LOG_BIN=0;—Turns off unnecessary binary logging, speeding up the load.
-
SOURCE /path_to_dump_file/dump_file_name_PURGED.sql—Loads the dump file into the DB.
-
If the command is successful, you are returned to the command prompt once the process completes.
-
Task 8: Upgrade the Old Database
Use this procedure to upgrade the old STA database to the new STA 2.2.x schema.
-
If you have not done so already, stop all STA services.
# STA stop all -
If you determined in "Verify Upgrade Prerequisites" that the size of /tmp is not sufficient for the upgrade, increase the size of /tmp as necessary.
If this is not possible, use the following steps to set an environment variable for MySQL to use an alternate temp location:
-
Create an alternate temp location and assign open permissions to it. For example:
# mkdir /dbbackup/tmp
# chmod 777 /dbbackup/tmp
-
Stop MySQL.
# STA stop mysql -
Edit the MySQL configuration file. For example:
# vi /etc/my.cnf -
In the mysqld section of the file, add a line defining the alternate temp location, which is identified by the tmpdir variable. Following is an example of the file after this line has been added.
[mysqld]
#----- mysqld MySQL Server Options -------------------------

tmpdir                          = /dbbackup/tmp
server-id                       = 1
...
-
Restart MySQL.
# STA start mysql
-
-
Change to the database updates directory.
# cd /Oracle_storage_home/StorageTek_Tape_Analytics/db/updates
-
Start the upgrade script, and enter the database root user password when prompted. For security reasons, the password is not displayed on the screen.
# ./upgradedb.shNote:
You can perform this step as either the system root user or the Oracle install user.Following is an example of the screen display.
# ./upgradedb.sh

DB Root Password:
+-------------------------------------------------------------+
| STA DATABASE UPGRADE                                        |
| Upgrading DB schema from 58.00r0 to 59.00r0                 |
| Started: 2014-12-12 15:14:45                                |
+-------------------------------------------------------------+
STA database is 5.15 GB and contains approximately 12,636,002 records.
Checking if current database v58.00 is a valid upgrade candidate...
...DB v58.00 is a valid upgrade candidate...
+-------------------------------------------------------------+
==> You may ABORT using CTRL-C within 7 seconds
==> .....6.....5.....4.....3.....2.....1
==> CTRL-C disabled!
+-------------------------------------------------------------+
Starting upgrade...
When the process is complete, a banner similar to the following is displayed.
Caution:
Wait until you see this banner before proceeding.+-------------------------------------------------------------+ | Started.................2014-12-12 15:14:45 | | Finished................2014-12-12 17:07:11 | | Elapsed Time............01:52:26 | | Starting Version........58.00r0 | | Final Schema Version....59.00r0 | | Schema Release Date.....2014-12-12 11:00:00 | | Records (approximate)...12,636,002 | +-------------------------------------------------------------+
-
If in "Task 8: Upgrade the Old Database" you increased the size of /tmp or created an alternate temp location, restore it to its normal size and location.
-
Start all STA services.
# STA start all -
This step is optional. Delete the STA_FRESH_INSTALL_BACKUP.sql file to free up disk space on the STA database backup volume.
Recover a Failed Database Upgrade (optional)
Caution:
Perform this procedure only under the direction of your Oracle support representative.Use this procedure only if the database upgrade in "Task 8: Upgrade the Old Database" does not complete successfully and attempts to repeat the upgrade have also failed.
-
Repeat "Task 7: Process and Load the Old STA Database", Step 6, through "Task 8: Upgrade the Old Database".
If the upgrade fails again, the database is in an unknown, possibly damaged state and you should restore the database to its original, freshly installed state. Proceed to the next step.
-
Delete the damaged upgraded database.
# mysql -uroot -p -e "drop database stadb;" -
Change to the STA database backup location and load the new installation database dump file you created in "Task 5: Dump the New STA Database (optional)".
For example:
# cd /dbbackup
# mysql -uroot -p -e < /home/oracle/STA_FRESH_INSTALL_BACKUP.sql
-
Perform "Task 8: Upgrade the Old Database".
-
Configure STA as a new installation. See the following sections for details:
Post-upgrade Tasks for All Upgrades
Use these procedures to configure the libraries and STA 2.2.x so STA can begin monitoring library activity.
Update the STA Trap Recipient on the Libraries
Two new trap levels, 13 (Test Trap) and 14 (Health Trap), were introduced in STA 2.0. Proceed as follows depending on your upgrade path:
-
If you are using the two-server upgrade method, add the new STA 2.2.x server as a trap recipient on each monitored library, and be sure to include the new trap levels in the definition. See "Create the STA SNMP v3 Trap Recipient" or "Create the STA SNMP v2c Trap Recipient on the Library".
-
If you are using the single-server method to upgrade from STA 2.0.x or higher, the STA trap recipient and new trap levels are already defined on each monitored library, so you do not need to make any additional modifications. Proceed to "Configure SNMP Settings in STA".
-
If you are using the single-server method to upgrade from STA 1.0.x, the STA trap recipient is already defined on each monitored library, but you must add the new trap levels to the definition. Use the appropriate steps for each library model.
Note:
For all library models except SL150, to modify a trap recipient, you must delete the existing definition and then add a new one.
All libraries except SL150
-
Log in to the library CLI.
-
Display all existing trap recipients, and note the index number of the STA recipient.
snmp listTrapRecipients -
Delete the STA trap recipient.
snmp deleteTrapRecipient id index
Where:
-
index is the index number of the STA trap recipient.
-
-
Re-add the STA trap recipient and include the new trap levels in the trap level list. See "Create the STA SNMP v3 Trap Recipient" or "Create the STA SNMP v2c Trap Recipient on the Library" for instructions.
SL150 libraries
-
Log in to the browser-based user interface.
-
From the SNMP menu, select SNMP Trap Recipients.
-
Select the STA trap recipient from the list.
-
Select Modify Trap Recipient.
-
Add the new trap levels to the trap level list, and then click Save.
Configure SNMP Settings in STA
Perform these steps for all upgrades. These steps are performed in STA.
-
Log in to STA as an STA administrator user.
-
Reenter the configuration settings for the STA SNMP client, using the values you recorded before the upgrade; see "Record Current STA User and Configuration Settings (optional)". These values must match what is configured on the monitored libraries. See "Configure SNMP Client Settings for STA" for instructions.
-
To restore SNMP communication between STA and the libraries, test the connection to each monitored library. See "Test a Library SNMP Connection" for instructions.
Note:
Once this step has completed successfully, STA begins receiving and processing data from each monitored library.You may notice incomplete exchanges on the Exchanges Overview screen from exchanges in process either when STA was stopped or when the library connections were restored. See the STA User's Guide for details about incomplete exchanges.
-
Get the latest SNMP library configuration data from each library. See "Perform a Manual Data Collection" for instructions.
Configure STA Services and User Information
Perform these steps for all upgrades.These steps are performed on the STA server.
If you want to retain settings from the previous STA version, use the values you recorded before the upgrade; see "Record Current STA User and Configuration Settings (optional)".
Note:
After the upgrade, all logical groups are owned by STA. Logical group ownership is not critical to STA functioning, and any STA user with Operator or Administrator privileges can modify logical groups.-
Configure the STA Backup service and STA Resource Monitor service utilities. See Chapter 7, "Configuring STA Services" for details.
-
Create STA usernames and passwords; see the STA User's Guide for instructions. You may also want to do the following:
-
Notify users of the new password requirements for STA 2.2.x.
-
Direct users to reenter their custom user preferences, if applicable.
-
-
If the STA email server requires authentication, you must enter the email account username and password; see the STA User's Guide for instructions.
-
Restore original ownership to custom templates, as applicable; see the STA User's Guide for instructions.
-
Restore original ownership to private Executive Report policies, as applicable; see the STA User's Guide for instructions.
Decommission the Old STA Server (optional)
This procedure applies only if you used the two-server post-installation upgrade method. You can use this procedure after verifying that the new STA server is functioning as expected.
-
Remove the old STA server as a trap recipient from each library's SNMP configuration. See the STA User's Guide for instructions.
-
Decommission the old STA server.