Work with Return By Item (WRBI)
Purpose: The Work with Return By Item (WRBI) menu option allows you to create and process a return by scanning the barcode for the order that contains the item(s) to return and then scanning the barcode for each item to return.
Return By Item involves the following steps:
1. Identifying the order that contains the items to return. To identify the order, you can scan or enter the information for the order barcode on the pick slip. This information consists of the company code, order number, and the ship to number.
2. Scanning or entering each unit that you are returning. You can scan each item on the pick slip one unit at a time.
3. Optionally, entering order-level messages.
4. Optionally, adding additional charges incurred based on the return.
5. Optionally, printing an item UPC label.
6. Accepting your entries. When you have completed the return, the system processes the return, including:
• creating and processing a return authorization automatically since entering a return through Return By Item indicates that you have physically received the item being returned.
• returning the item to active or inactive inventory.
• crediting the customer for the returned item (the refund is created and ready for processing).
These processes all take place "behind the scenes" when you process a return in Return By Item.
Authority: You must have complete authority to create, receive, and credit a return in order to use Return By Item for returns processing. Returns authority is controlled by these secured features:
• Enter Return Authorization (A28)
• Receive Return Authorization (A29)
• Credit Return Authorization (A34)
Return By Item does not support:
• Exchanging an item.
• Creating a mis-ship return.
• Processing a return against a store pickup order. See Store Pickup Orders for an overview.
• If the item is flagged to require serial number entry (the Serial number flag for the item is selected), Return By Item does not provide the ability to enter the affected serial number for each unit of the item returned.
• Sending return authorization information for drop ship items to CWCollaborate. To send return authorization information to CWCollaborate, you must process the return in order maintenance or Work with Return Authorizations (WRTA). See CWCollaborate Return Processing. Note: Because Return By Item does not send return authorization information to CWCollaborate, the system allows you to process a return against multiple CWCollaborate drop ship items that are for different vendors.
Retail pickup or delivery orders: If the Suppress Returns for Retail Pickup/Delivery (L88) system control value is:
• selected, you cannot process a return against a retail pickup or delivery order.
• unselected, you can process a return against a retail pickup or delivery order; however, shipping the order deactivates the Order Broker Payment Type (K98) applied to these orders, so you would need to enter a new payment method before entering the return in Return By Item. The system does not send a status update to the Order Broker when you process a return against a retail pickup or delivery order.
See Retail Pickup or Delivery Orders for an overview.
Ship-to-store orders: You can process a return for a ship-to-store order as long as the Payment at POS for Ship to Store (L60) system control value is not selected. See Ship-to-Store Orders for background.
Other return options: You can also post returns using the following methods.
• Work with Return Authorizations (WRTA): The Use Streamlined Return Authorizations (F44) system control value controls whether you must perform the create, receipt, and credit as separate steps, or whether the return is automatically processed as far as your authority extends. See Introducing Return Authorizations (WRTA).
• Order Entry: You can post a return in order entry by entering an order line with a negative quantity for the number of units of the item being returned. See Posting a Return or Exchange Through Order Entry for an overview and instructions.
• Order API: You can post a return through the Order API by entering an order line with a negative quantity for the number of units of the item being returned. See Processing a Return in the Generic Order Interface (Order API) for an overview and instructions.
• Order Maintenance: You can post a return in order maintenance by selecting Return for an order line (to return an individual item) or by selecting Return Order for the order (to return the entire order). See Returning and Exchanging Items in Order Maintenance for an overview and instructions.
• E-Commerce Interface: You can use the e-commerce interface to enable customers to create return authorizations at the web storefront if the storefront supports it. See Creating Return Authorizations from the Web Storefront.
• Inbound Return API: You can use the Inbound Return API to create and process a return against an order detail line, based on a Return Request Message (CWReturnIn) received from an external system. See Inbound Return API for an overview and instructions.
• CWCollaborate: If you use the CWCollaborate interface, you can receive returns from CWCollaborate. See Returning CWCollaborate Drop Ship Orders.
In this topic:
• Setup Required for RA Return Item
• Scan Order for Return Screen
• Scan Items for Return Screen
• Edit Item Return Disposition Values Window
• Enter Additional Charges Window in Return By Item
• Accepting and Processing the Return
Setup Required for RA Return Item
System Control Value |
Description |
Indicates whether the entry format at the Scan Items for Return Screen defaults to the short SKU code from the SKU table, or a UPC code with a length of 8, 12, 13, or 14 positions. If you do not specify a default with this system control value, the system requires a short SKU code. Once you advance to the screen, you can switch to item/SKU entry format if you would like to enter the item and SKU code rather than scanning a label. This system control value also controls the entry format at the Print Labels Window. In order to print item UPC labels correctly, the setting of this system control value should be a UPC format. |
|
Defines the return reason code to default in Work with Return By Item (WRBI). If you do not specify a default with this system control value, you must define a return reason code on the Change Defaults Window or as you enter each return line. |
|
Indicates whether the entry format at the Scan Order for Return Screen defaults to an order barcode format of: • 111-22222222-33, where 111 is the company code, 22222222 is the order number, and 33 is the ship to number. Each number should be zero-filled (for example, enter 007 rather than 7 for the company code). • 22222222 or 22222222-33, where 22222222 is the order number and 33 is the ship to number. You can enter the order number and ship to number with or without leading zeros (for example, you can enter 00004686-01 or 4686-1). If you do not define a ship to number, the system assumes ship to number 1. The order and ship to number must be a valid order/ship to combination in the current company. |
|
Defines the return disposition code to default in Return By Item. If you do not specify a default with this system control value, you must define a return disposition code on the Change Defaults Window or as you enter each return line. |
|
Defines the freight setting to default in Return By Item. |
|
Defines the additional charge setting to default in Return By Item. |
|
Defines the handling setting to default in Return By Item. |
|
Defines the duty setting to default in Return By Item. |
|
Regardless of the setting of this system control value, the system does not display the Apply Credit Balance Pop-Up Window in Return By Item. In addition, for an Accounts Receivable order: If this system control value is selected, the system: • creates an A/R credit refund (WREF) in a processed (P) status. • creates a credit open item against the bill-to account associated with the customer who placed the order. • automatically allocates and applies the credit open item against the open A/R invoices for the order. • If there are no invoice open items for the order, the system creates the credit open item and does not apply it to any other invoice open items for the bill to customer. If this system control value is unselected, the system: • creates an A/R credit refund (WREF) in an open (O) status. • does not create a credit open item against the bill-to account associated with the customer who placed the order. |
|
Set this system control value to a UPC format in order to print an item UPC label using the Print Labels Window. If this system control value is blank, the Item Label option does not display on the Scan Items for Return Screen. |
Secured Feature |
Description |
Users must have authority to these secured features to use Work with Return By Item (WRBI). |
|
Users must have authority to this secured feature to add additional charges; see Enter Additional Charges Window in Return By Item. |
Menu Option |
Description |
Create a return reason code to default in Work with Return By Item (WRBI). Enter this return reason code in the Default Scan Return Reason Code (L81) system control value. |
|
Create a return disposition code to default in Work with Return By Item (WRBI). Enter this return disposition code in the Default Disposition Code (C18) system control value. Use this menu option to also define authority to process a return for a specific return disposition value at the user or user class level. This can be a blanket authority for all disposition values, or can be specific to individual codes. |
The ORDER_BARCODE_IMAGE value for the pick settings (such as the settings for PICKG or PICKDBG to print the graphical pick slip and PICK or PICKDB to print the non-graphical pick slip) in Working with Customer Properties (PROP) control whether the system prints an order barcode on the pick slip. Set this value to Code39. Note: This value is case-sensitive.
Purpose: Use this screen to scan the identifying information for an order. The information consists of the company, order number, and ship to number.
How to display this screen: Enter WRBI in the Fast Path field on any menu screen or select Work with Return By Item from a menu.
Field |
Description |
Last 3 Order #s Worked |
Lists the last three orders associated with returns accepted by the current user in the current session, in the following format: 111-22222222-33, where 111 is the company code, 22222222 is the order number, and 33 is the ship to number. Each number is zero-filled (for example, 007 displays rather than 7 for the company code). Which orders are listed? The list includes only returned orders whose entry was accepted at completion by the current user in the current Return by Item session. If there are not at least three orders meeting this criteria, only the orders that meet the criteria are listed. The list can include the same order more than once if you accept a return for the order and then reenter the order and accept another return for the order. The list does not include an order whose return entries you rejected or an order that you were returning when the session ended abnormally (that is, if the browser window closed before you accepted or rejected your entries). Numeric, three 8-position fields; display-only. |
A unique number to identify an order and the shipping address. Format: The setting of the Format for Order Barcode for Item Returns (L87) system control value defines the format of the order barcode. Valid values are BASE and blank. Order Barcode Format = BASE If the Format for Order Barcode for Item Returns (L87) system control value is set to BASE, the information consists of the company, order number, and ship to number, in the following format: 111-22222222-33, where 111 is the company code, 22222222 is the order number, and 33 is the ship to number. Each number should be zero-filled (for example, enter 007 rather than 7 for the company code). • Company numbers are defined in and validated against the Company table. • Order numbers are defined in and validated against the Order Header table. • Ship to numbers are defined in and validated against the Order Ship To table. If scanning: Scan the order barcode that includes the company code, order number, and ship to number, such as in the following sample.
In this situation, you advance immediately to the Scan Items for Return Screen. It is not necessary to select OK or press Enter. If using the keyboard: You can also enter the identifying information using the keyboard by entering the information required for the order barcode. The information is broken out into three numeric fields separated by hyphens, such as 007-00004669-01, where: • The first 3 positions (007) is the company code. • The next 8 positions (00004686) is the order number. • The last 2 positions (01) is the ship to number. In this situation, you advance immediately to the Scan Items for Return Screen. It is not necessary to select OK or press Enter. |
|
|
Order Barcode Format = blank If the Format for Order Barcode for Item Returns (L87) system control value is left blank, the information consists of the order number and optionally, ship to number. You can enter the order number and ship to number with or without leading zeros (for example, you can enter 00004686-01 or 4686-1). If you do not define a ship to number, the system assumes ship to number 1. The order and ship to number must be a valid order/ship to combination in the current company. • Order numbers are defined in and validated against the Order Header table. • Ship to numbers are defined in and validated against the Order Ship To table. Using the keyboard: You can enter the identifying information using the keyboard by: • entering the order number only with or without leading zeros, such as 00004686 or 4686. In this situation, the system validates the order number against the company you are currently in and assumes an order ship to of 1. You must select OK or press Enter to advance to the Scan Items for Return Screen. • entering the order number and ship to number with or without leading zeros, such as 00004686-01 or 4686-1. In this situation, the system validates the order number and ship to number against the company you are currently in. You must select OK or press Enter to advance to the Scan Items for Return Screen. Eligible for return? The order you enter must have order lines that are eligible for return (the Quantity shipped for at least one line on the order is greater than 0 and the Quantity returned for the line). |
|
Cross-company scan: The company code you scan or enter does not need to be the company where you are currently working. You can still process a return using Return By Item, provided your user ID has authority to that company and complete authority to create, receive, and credit a return in that company. • If you do not have authority to the company, the system displays an error message: Not authorized to company 999. • If you do not have complete authority to create, receive, and credit a return in the company, the system displays an error message: User is not authorized to enter RAs in company 999. Note: The return defaults on the Change Defaults Window and Scan Items for Return Screen for the Return By Item session are for the company you were in when you advanced to Return By Item and not for the company that is part of the order barcode you scan. However, once you enter an item to return, the return defaults on the Edit Item Return Disposition Values Window are for the company that is part of the order barcode you scan. Pay type validation: The system verifies whether the pay type(s) on the order are active. If you select an order whose pay type(s) were deactivated, the system displays an error window with the following error message: All pay types on order are deactivated. Please enter a valid pay type in Order Maintenance. Note: The system does not prevent a return if the credit card on the order is expired. Order lock: Once you select an order to return against, the system locks the order so that another user cannot perform any transactions against the order. If your session ends abnormally (that is, your session times out or the browser window closes before you accept or reject your returns, the system does not perform any returns against the order; however, in this situation, you must unlock the order; see Unlocking a Stranded Order or Batch (MULO). Company number: Numeric, 3 positions; required. Order number: Numeric, 8 positions; required. Ship-to number: Numeric, 3 positions; required. |

Screen Option |
Procedure |
Override the return code, disposition code, warehouse, location, refund freight setting, refund additional charges setting, refund handling setting, and refund duty setting for all returns entered in this session |
Select Change Defaults to advance to the Change Defaults Window. |
Advance to Order Inquiry |
Select Order Inquiry to advance to the Order Inquiry Scan Screen. |
Scan or enter each item that you are returning |
Use the Enter Order # to Return field to scan an order barcode or enter the identifying information using the keyboard to advance to the Scan Items for Return Screen. |
Purpose: Use this window to define a default for the return code, return disposition code, warehouse, location, refund freight setting, refund additional charges setting, refund handling setting, and refund duty setting for returns entered in this session.
The defaults you enter here apply to all items you enter for return using the Scan Items for Return Screen. Once you add the return line, you can change its return information using the Edit Item Return Disposition Values Window.
How to display this screen: Select Change Defaults on the Scan Order for Return Screen.
Note: If you change the Return By Item defaults, the system retains these defaults as long as you remain in the current Return By Item session, including advancing to and returning from Order Inquiry. Once you leave the Return By Item session, the system reverts back to the system defaults.
Field |
Description |
Return Code |
The reason that the customer is returning the item or items. A return reason code indicates whether returned items are defective, and is used for reporting purposes. Default: The return reason code defaults from the Default Scan Return Reason Code (L81) system control value, but you can override it. If you do not define a return reason code at this window, the system requires a return reason code when you enter a return on the Scan Items for Return Screen. Return reason codes are defined in and validated against the Return Reason table; see Establishing Return Reason Codes (WRTR). Return reason code: Numeric, 3 positions; optional. Return reason description: Alphanumeric, 30 positions; display-only. |
A code that identifies how a returned item will be handled by the system, in terms of whether the return updates inventory and the warehouse and location to which the item will be returned. Default: The return disposition code defaults from the Default Disposition Code (C18) system control value, but you can override it. If you do not define a return disposition code at this window, the system requires a return disposition code when you enter a return on the Scan Items for Return Screen. Authority: You can set up authority to process a return for a specific return disposition value at the user or user class level. This can be a blanket authority for all disposition values, or can be specific to individual codes. An error message indicates if you do not have authority to the return disposition code specified: User Does not have authority to return disposition code. Return disposition codes are defined in and validated against the Return Disposition Values table. See Establishing Return Disposition Values (WRDV). Return disposition code: Alphanumeric, 2 positions; required if a warehouse and location are defined; otherwise, optional. Return disposition description: Alphanumeric, 30 positions; display-only. |
|
The code representing the warehouse where the item(s) are being returned. Default: The warehouse defaults from the specified return disposition code, but you can override it. If you do not define a warehouse code at this window, the system requires a warehouse code when you enter a return on the Scan Items for Return Screen. If the Use primary location field for the specified return disposition is selected, the system will default the warehouse defined in the SKU table for the item being returned. Warehouse codes are defined in and validated against the Warehouse table; see Creating and Maintaining Warehouses (WWHS). Warehouse code: Numeric, 3 positions; optional. Warehouse description: Alphanumeric, 30 positions; display-only. |
|
The code representing the location within the warehouse where the item(s) is being returned. Defaults: The location defaults from the specified return disposition code, but you can override it. An error message displays if the location is frozen: Location frozen. If you do not define a location code at this window, the system requires a location code when you enter a return on the Scan Items for Return Screen. If the Use primary location field for the specified return disposition is selected, the system will default the location defined in the SKU table for the item being returned. Location codes are defined in and validated against the Location table; see Creating and Maintaining Locations (WLOC). Location code: Alphanumeric, 7 positions; optional. |
|
Refund Freight |
Indicates whether to refund freight to the customer. Valid values are: • Selected = Refund freight. If a Freight override amount is defined for the order, the system advances you to the Enter Freight Refund Window when you accept the return. • Unselected = Do not refund freight. Default: The refund freight setting defaults from the Refund Freight Default for Inbound Returns (H59) system control value, but you can override it. |
Refund Add’l Charges |
Indicates whether to refund any additional charges on the order to the customer. If there were negative additional charges billed on the order, refunding them results in adding positive additional charges, or decreasing the net amount of any refund. Valid values are: • Selected = Refund all additional charges on the order when crediting this return. • Unselected = Do not refund additional charges. Default: The refund additional charges setting defaults from the Refund Additional Charge Default for Inbound Returns (H60) system control value, but you can override it. |
Refund Handling |
Indicates whether to refund handling charges to the customer. Only handling charges related to the item(s) or units of the item(s) being returned are refunded. If the Evaluate Special Handling Charges by Order Line (D67) system control value is selected, handling charges are refunded only if you process a return against all units of the item on the order line. Valid values are: • Selected = Refund handling charges. • Unselected = Do not refund handling charges. Default: The refund handling setting defaults from the Refund Handling Default for Inbound Returns (H61) system control value, but you can override it. |
Refund Duty |
Indicates whether to refund any duty charges for the returned item(s) or units to the customer. Valid values are: • Selected = Refund duty charges. • Unselected = Do not refund duty charges. Default: The refund duty setting defaults from the Refund Duty Default for Inbound Returns (H62) system control value, but you can override it. |
Purpose: Use this screen to scan or enter each item that you are returning.
Which item scan/entry formats are available? The setting of the Default Scan Method for Item Returns (L80) system control value defines the type of barcode you scan. You can scan the short SKU barcode or UPC code of different formats or lengths as part of Return By Item. If a barcode is not available for an item, you can toggle to item format entry, and use the keyboard to enter an item and SKU.
How to display this screen: Complete the Scan Order for Return Screen by scanning or entering an order barcode.
Field |
Description |
Disposition Code |
A code that identifies how a returned item will be handled by the system, in terms of whether the return updates inventory and the warehouse and location to which the item will be returned. Default: The return disposition code defaults from the Default Disposition Code (C18) system control value, unless you defined an override on the Change Defaults Window. If this field is blank, the system advances you to the Edit Item Return Disposition Values Window when you scan or enter an item to return. Return disposition codes are defined in and validated against the Return Disposition Values table. See Establishing Return Disposition Values (WRDV). Return disposition code: Alphanumeric, 2 positions; display-only. Return disposition description: Alphanumeric, 30 positions; display-only. |
Warehouse |
The code representing the warehouse where the item(s) are being returned. The warehouse defaults from the specified return disposition code; if this field is blank, the system advances you to the Edit Item Return Disposition Values Window when you scan or enter an item to return. Warehouse codes are defined in and validated against the Warehouse table; see Creating and Maintaining Warehouses (WWHS). Warehouse code: Numeric, 3 positions; display-only. Warehouse description: Alphanumeric, 30 positions; display-only. |
Location |
The code representing the location within the warehouse where the item(s) are being returned. The location defaults from the specified return disposition code; if this field is blank, the system advances you to the Edit Item Return Disposition Values Window when you scan or enter an item to return. Location codes are defined in and validated against the Location table; see Creating and Maintaining Locations (WLOC). Alphanumeric, 7 positions; display-only. |
Freight |
Indicates whether to refund freight to the customer. Valid values are: • Y = Refund freight. If a Freight override amount is defined for the order, the system advances you to the Enter Freight Refund Window when you accept the return. • N = Do not refund freight. Default: The freight setting defaults from the Refund Freight Default for Inbound Returns (H59) system control value, unless you defined an override on the Change Defaults Window. Alphanumeric, 1 position; display-only. |
Add’l Chgs |
Indicates whether to refund any additional charges on the order to the customer. If there were negative additional charges billed on the order, refunding them results in adding positive additional charges, or decreasing the net amount of any refund. Valid values are: • Y = Refund all additional charges on the order when crediting this return. • N = Do not refund additional charges. Default: The freight setting defaults from the Refund Additional Charge Default for Inbound Returns (H60) system control value, unless you defined an override on the Change Defaults Window. Alphanumeric, 1 position; display-only. |
Handling |
Indicates whether to refund handling charges to the customer. Only handling charges related to the item(s) or units of the item(s) being returned are refunded. If the Evaluate Special Handling Charges by Order Line (D67) system control value is selected, handling charges are refunded only if you process a return against all units of the item on the order line. Valid values are: • Y = Refund handling charges. • N = Do not refund handling charges. Default: The freight setting defaults from the Refund Handling Default for Inbound Returns (H61) system control value, unless you defined an override on the Change Defaults Window. Alphanumeric, 1 position; display-only. |
Duty |
Indicates whether to refund any duty charges for the returned item(s) or units to the customer. Valid values are: • Y = Refund duty charges. • N = Do not refund duty charges. Default: The freight setting defaults from the Refund Duty Default for Inbound Returns (H62) system control value, unless you defined an override on the Change Defaults Window. Alphanumeric, 1 position; display-only. |
Last 3 Order #s Worked |
Lists the last three orders associated with returns accepted by the current user in the current session, in the following format: 111-22222222-33, where 111 is the company code, 22222222 is the order number, and 33 is the ship to number. Each number is zero-filled (for example, 007 displays rather than 7 for the company code). Which orders are listed? The list includes only returned orders whose entry was accepted at completion by the current user in the current Return by Item session. If there are not at least three orders meeting these criteria, only the orders that meet the criteria are listed. The list can include the same order more than once if you accept a return for the order and then reenter the order and accept another return for the order. The list does not include an order whose return entries you rejected or an order that you were returning when the session ended abnormally (that is, if the browser window closed before you accepted or rejected your packing entries). Numeric, three 8-position fields; display-only. |
Order # |
The order number and ship to number that contains the item(s) to return. This is the order number and ship to number associated with the order barcode you scanned or entered on the Scan Order for Return Screen. Order #: Numeric, 8 positions; display-only. Ship to #: Numeric, 2 positions; display-only. |
Charge Added |
The amount of charges added to the order using the Enter Additional Charges window; see Enter Additional Charges Window in Return By Item. This field does not display if there are no additional charges on the return. Numeric, 7 positions with a 2-place decimal; display-only. |
Sold To # |
The number identifying the sold to customer who placed the order. Numeric, 9 positions; display-only. |
Sold To name unlabeled field to the right of the sold-to number) |
The customer’s first and last name, if any; otherwise, the name of the customer’s company. First name: alphanumeric, 15 positions; display-only. Last name: alphanumeric, 25 positions; display-only. Company: alphanumeric, 30 positions; display-only. |
Item to Return When you successfully scan or enter an item/SKU to return, the system creates the return line for a quantity of 1 on the bottom half of the screen. If you scan or enter the same item/SKU for return: • The system increments the quantity for the existing return line until the quantity to return for the associated order line is reached. • Once the quantity to return for the order line reached, if another order line exists for the same item/SKU, the system creates a new return line for a quantity of 1 on the bottom half of the screen. As you scan the item/SKU, the system continues to increment the quantity for the return line until the quantity to return for the order line is reached. • The return reason associated with the first time you scanned the item/SKU defaults to the return line. See Scanning Items for Return for more information. |
|
Use this field to scan or enter each item that you are returning. The default format depends on the setting of the Default Scan Method for Item Returns (L80) system control value. If this value is set to SHORTSKU or is blank, then this field defaults to Short Sku. Otherwise, this field defaults to UPC. Select Item Format to change the format of these fields so that you can enter an item and SKU code, if any. See Scanning Items for Return for more information. Error messages: The Returns Item Error window opens if your entry is invalid; see Item/SKU Scanning Errors for a list of errors. Short SKU codes are defined in and validated against the SKU table. UPC codes are defined in and validated against the Item UPC table. Item codes are defined in and validated against the Item table. SKU codes are defined in and validated against the SKU table. Auto advance: When you scan the Short SKU or UPC barcode, the system automatically processes your entry once the required number of positions is scanned. The length of the short SKU is 7 positions, while the length of the UPC code varies depending on the setting of the Default Scan Method for Item Returns (L80) system control value. • If a return reason is not defined, the system places the cursor in the Reason field. You must enter a return reason before you can create the return line. • If additional return information must be defined, the system advances you to the Edit Item Return Disposition Values Window. You must enter the required return information before you can create the return line. • If all of the required return information is defined, the system automatically adds the return line to the bottom half of the screen. It is not necessary to select OK or press Enter. UPC: Alphanumeric; 8, 12, 13, or 14 positions (based on the Default Scan Method for Item Returns (L80) system control value); required. Short SKU: Numeric, 7 positions; required. Item/SKU: Alphanumeric; one 12-position field (item) and three 4-position fields (SKU); required. |
|
Reason |
The code and description of the reason that the customer is returning the item or items. A return reason code indicates whether returned items are defective, and is used for reporting purposes. The return reason code defaults from the Default Scan Return Reason Code (L81) system control value, unless you defined an override on the Change Defaults Window. Auto advance: When you scan or enter a return reason code, the system automatically processes your entry once the required number of positions is scanned. The length of the return reason code is 3 positions. Return reason codes are defined in and validated against the Return Reason table; see Establishing Return Reason Codes (WRTR). Return reason code: Numeric, 3 positions; required. Return reason description: Alphanumeric, 30 positions; display-only. |
Items Returned Each time you successfully scan or enter a unit of an item, the bottom area of the screen displays verifying information. |
|
Item |
The item code of the previously scanned unit. Alphanumeric, 12 positions; display-only. |
SKU |
The unique characteristics, such as color or size, of the previously scanned unit. Included only if the item has SKU’s. Alphanumeric, three 4-position fields; display-only. |
Description |
The description of the previously scanned unit. Alphanumeric, 40 positions; display-only. |
Reason |
The code and description of the return reason assigned to the previously scanned unit. If you scan the same item/SKU more than one time, the return reason associated with the first time you scanned the item/SKU defaults. Return reason code: Numeric, 3 positions; required. Return reason description: Alphanumeric, 30 positions; display-only. |
Qty |
The quantity scanned for the item/SKU. Each time you scan or enter the same item/SKU for return: • The system increments the quantity for the existing return line until the quantity to return for the associated order line is reached. • Once the quantity to return for the order line reached, if another order line exists for the same item/SKU, the system creates a new return line for a quantity of 1 on the bottom half of the screen. As you scan the item/SKU, the system continues to increment the quantity for the return line until the quantity to return for the order line is reached. Numeric, 5 positions; display-only. |
Screen Option |
Procedure |
Scan or enter an item to return |
|
Change the quantity, return code, disposition code, warehouse, location, refund freight setting, refund additional charges setting, refund handling setting, and/or refund duty setting for the return line |
Click the icon ( |
Delete a return line |
Click the icon ( |
Accept your entries |
Select Accept to complete return by item and process the return. See Accepting and Processing the Return. |
Reject your entries |
Select Reject if you are not completing Return By Item at this time. At the confirmation window, select OK to reject the returns entered for the order; otherwise, select Cancel. Note: When you reject the returns entered for the order, the system does not save any return information entered on the Scan Items for Return Screen, including any order messages you created for the order using the Order Messages Window. |
Change item entry format |
Select Item Format to toggle between scanning items in the format indicated by the Default Scan Method for Item Returns (L80) system control value or by entering an item and SKU code. |
Review, change, and create order messages |
Select Order Messages to advance to the Order Messages Window. |
Work with additional charges |
Select Additional Charges to advance to the Enter Additional Charges window; see Enter Additional Charges Window in Return By Item. Note: This option is available only if you have authority to the Additional Charges Access (A24) secured feature. |
Print an item label |
Select Item Label to advance to the Print Labels Window. Note: This option is available only if the Default Scan Method for Pick Pack Verification (K30) system control value contains a value. |
 ) in the
 One unit at a time: To indicate that you are returning an item on the order, you scan or enter each unit one at a time at the Scan Items for Return Screen, regardless of the quantity of the item you wish to return. As you scan each unit, the bottom area of the screen displays the item, SKU, description, return reason code, and return quantity scanned.
If you scan or enter the same item/SKU for return:
• The system increments the quantity for the existing return line until the quantity to return for the associated order line is reached.
• Once the quantity to return for the order line is reached, if another order line exists for the same item/SKU, the system creates a new return line for a quantity of 1 on the bottom half of the screen. As you scan the item/SKU, the system continues to increment the quantity for the return line until the quantity to return for the order line is reached.
• The return reason associated with the first time you scanned the item/SKU defaults to the return line.
Scan Format
The Default Scan Method for Item Returns (L80) system control value defines the barcode format and validation for scanning. If this system control value specifies a:
• Short SKU or blank: you enter or scan the Short SKU code from the SKU table. This is a system-assigned code.
• UPC code of 8, 9, 13, or 14 positions: you enter an EAN or UPC barcode you have set up for the item/SKU at the Work with UPC Codes Screen. If you have defined multiple UPC codes for a single item/SKU, the screen accepts any of the valid UPC codes. Note: Include any leading zeros. For example, if the UPC code is 06012011, enter 06012011 and not 6012011.
Automatic entry based on length: When you scan the Short SKU or UPC barcode, the system automatically processes your entry once the required number of positions is scanned. The length of the short SKU is 7 positions, while the length of the UPC code varies depending on the setting of the Default Scan Method for Item Returns (L80) system control value.
• If a return reason is not defined, the system places the cursor in the Reason field. You must enter a return reason before you can create the return line.
• If additional return information is required, the system advances you to the Edit Item Return Disposition Values Window. You must enter the required return information before you can create the return line.
• If all of the required return information is defined, the system automatically adds the return line to the bottom half of the screen. It is not necessary to select OK or press Enter.
Entering an item and SKU code: Optionally, you can select Item Format to toggle between barcode (short SKU or UPC) entry or scanning and entry of an item/SKU code. Item/SKU entry might be useful if the barcode is unreadable or invalid. Select Item Format again to toggle back to the default entry format specified in the Default Scan Method for Item Returns (L80) system control value.
The Returns Item Error window opens if your entry is invalid. Errors include:
• Short SKU is invalid: The short SKU code scanned does not exist in the SKU table.
• UPC is invalid: The UPC code scanned does not exist in the Item UPC table.
• Item SKU is invalid: The item number and/or SKU code entered do not exist in the Item table and/or SKU table.
• Item Scanned is Not on Order: Your entry does not match an existing item/SKU on the order.
• Item Scanned is Not Eligible for Return on this Order: The item scanned is on the order, but is not returnable.
• Quantity Scanned is Greater Than Quantity To Return: The item/SKU is on the order, but you have already scanned the quantity that is available for return.
• Return Reason is Required: A return reason code is not defined for the item to return.
• Return Reason is Invalid: The return reason defined is not a valid reason in the Return Reason table.
Important: Do not enter the UPC or short SKU too quickly. If you do so, the scan function may become disabled. If this occurs, reject your entries for the current order and start over at the Scan Order for Return Screen.
Edit Item Return Disposition Values Window
Purpose: Use this window to define the quantity, return code, disposition code, warehouse, location, refund freight setting, refund additional charges setting, refund handling setting, and refund duty setting for a return line.
How to display this screen:
• Click the icon (![]() ) in the Edit column for a return line on the Scan Items for Return
Screen to change the return information for a specific
return line.
) in the Edit column for a return line on the Scan Items for Return
Screen to change the return information for a specific
return line.
• Scan or enter an item to return on the Scan Items for Return Screen that does not have all of the required return information defined. This occurs when:
• A Return Disposition is not defined.
• A Return Disposition is defined, but the user does not have authority to use the disposition code.
• A Warehouse is not defined and cannot be determined from the item.
• A Location is not defined and cannot be determined from the item.
Field |
Description |
Item |
The code for the item being returned. Alphanumeric, 12 positions; display-only. |
SKU |
The code for the SKU of the item being returned. Alphanumeric, three 4-position fields; display-only. |
Item Description |
A description of the item being returned. Alphanumeric, 30 positions; display-only. |
Qty |
The quantity of the item/SKU to return. Select Change Qty to update the quantity. You cannot enter a negative quantity. You can increment the quantity for the existing return line up to the shipped quantity; if you enter a quantity greater than the shipped quantity for the line, the system displays an error message: Quantity greater than returnable quantity. Numeric, 5 positions; display-only unless you select Change Qty, then it is required. |
Return Code |
The reason that the customer is returning the item. A return reason code indicates whether returned items are defective, and is used for reporting purposes. Default: The return reason code defaults from the Default Scan Return Reason Code (L81) system control value, unless you defined a different default on the Change Defaults Window. Return reason codes are defined in and validated against the Return Reason table; see Establishing Return Reason Codes (WRTR). Return reason code: Numeric, 3 positions. required. Return reason description: Alphanumeric, 30 positions; display-only. |
Return Disposition |
A code that identifies how a returned item will be handled by the system, in terms of whether the return updates inventory and the warehouse and location to which the item will be returned. Default: The return disposition code defaults from the Default Disposition Code (C18) system control value, unless you defined an override on the Change Defaults Window. Affect inventory? The Affect inventory flag for the return disposition code indicates whether the item will be returned into active inventory and update the on-hand quantity in the specified location. If this flag is selected: • and the Use primary location field for the return disposition code is unselected, the system requires the warehouse and location where the item will be returned. The warehouse and location default from the specified return disposition code; however, you can override these values. • and the Use primary location field for the return disposition code is selected, the system defaults the primary primary location for the item/SKU to the return line. If a primary primary location is not defined for the item/SKU: • and a warehouse and location are defined for the return disposition code, the system receives the return in the warehouse and location defined in the Return Disposition record. If the item location does not exist, the system creates the record in the Item Location table automatically. • and a warehouse and location are not defined for the return disposition code, the system requires you to enter a warehouse and location. Authority: You can set up authority to process a return for a specific return disposition value at the user or user class level. This can be a blanket authority for all disposition values, or can be specific to individual codes. An error message indicates if you do not have authority to the return disposition code specified: User Does not have authority to return disposition code. Return disposition codes are defined in and validated against the Return Disposition Values table. See Establishing Return Disposition Values (WRDV). Alphanumeric, 2 positions; required. |
Warehouse |
The code representing the warehouse where the item(s) are being returned. Default: The warehouse defaults from: • the warehouse you defined on the Change Defaults Window. • the warehouse defined for the specified return disposition code. • the warehouse defined in the SKU table if the Use primary location field for the specified return disposition is selected. Warehouse codes are defined in and validated against the Warehouse table; see Creating and Maintaining Warehouses (WWHS). Numeric, 3 positions; required if the Use primary location flag for the return disposition is unselected. |
Location |
The code representing the location within the warehouse where the item(s) is being returned. Default: The location defaults from: • the location you defined on the Change Defaults Window. • the location defined for the specified return disposition code. • the location defined in the SKU table if the Use primary location field for the specified return disposition is selected. An error message displays if the location is frozen: Location frozen. Location codes are defined in and validated against the Location table; see Creating and Maintaining Locations (WLOC). Alphanumeric, 7 positions; required if the Affect inventory flag for the return disposition is selected. |
Refund Freight |
Indicates whether to refund freight to the customer. Valid values are: • Selected = Refund freight. If a Freight override amount is defined for the order, the system advances you to the Enter Freight Refund Window when you accept the return. • Unselected = Do not refund freight. Default: The refund freight setting defaults from the Refund Freight Default for Inbound Returns (H59) system control value, unless you defined an override on the Change Defaults Window. |
Refund Add’l Charges |
Indicates whether to refund any additional charges on the order to the customer. If there were negative additional charges billed on the order, refunding them results in adding positive additional charges, or decreasing the net amount of any refund. Valid values are: • Selected = Refund all additional charges on the order when crediting this return. • Unselected = Do not refund additional charges. Default: The refund additional charges setting defaults from the Refund Additional Charge Default for Inbound Returns (H60) system control value, unless you defined an override on the Change Defaults Window. |
Refund Handling |
Indicates whether to refund handling charges to the customer. Only handling charges related to the item(s) or units of the item(s) being returned are refunded. If the Evaluate Special Handling Charges by Order Line (D67) system control value is selected, handling charges are refunded only if you process a return against all units of the item on the order line. Valid values are: • Selected = Refund handling charges. • Unselected = Do not refund handling charges. Default: The refund handling setting defaults from the Refund Handling Default for Inbound Returns (H61) system control value, unless you defined an override on the Change Defaults Window. |
Refund Duty |
Indicates whether to refund any duty charges for the returned item(s) or units to the customer. Valid values are: • Selected = Refund duty charges. • Unselected = Do not refund duty charges. Default: The refund duty setting defaults from the Refund Duty Default for Inbound Returns (H62) system control value, unless you defined an override on the Change Defaults Window. |
Purpose: Use this window to review or work with free-formatted order-level messages. These are the same messages you can work with at the Work with Order Messages Screen.
See Adding Order Messages for background on working with order messages, including the print requirements and limitations of including messages on different forms; however, important differences between the Work with Order Messages screen and the Order Messages window are:
• Default messages: At the Work with Order Messages Screen, you can apply a message set up through Working with Default Messages (WMSG); however, this option is not available through Work with Return By Item (WRBI).
• Message sequence: At the Work with Order Messages Screen, you can select whether to display the messages in LIFO or FIFO sequence; however, in Work with Return By Item (WRBI), messages are always listed in FIFO sequence.
Change or delete existing messages? The Modify Existing Messages (A30) secured feature controls the ability to change or delete an existing order message.
Note: If you reject the returns entered for the order, any order messages you created for the order using this window will be deleted.
How to display this window: Select Order Messages on the Scan Items for Return Screen.
Field |
Description |
Entering new message lines Optionally, use the upper part of the window to enter new order messages.
|
|
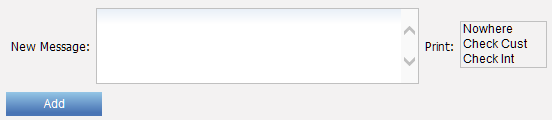
New message |
Use this field to enter new free-form text messages. If your entry exceeds 60 positions and you do not press Enter to start a new line, the system splits the text into separate lines of up to 60 positions each, using the last occurring blank space before position 60 as a line break. |
Highlight the print option to the right of the New message field. Available options are: • Check Cust = Print on refund check only • Nowhere (default) = Do not print • Check Int = Print on detachable area of refund check not visible to the customer |
|
Click Add when you are done. |
|
Working with existing message lines The lower part of the window displays existing order messages. You can review, change, or delete these messages. To change: • Position your cursor in the message line and double-click. • Edit the text as needed and press Enter. You can also change the Print option next to a message line. Note: • The Modify Existing Messages (A30) secured feature controls the ability to change or delete an existing order message. • See the discussion under More Print Flag Information for background before changing existing message lines. |
|
Message |
A message related to the order. Alphanumeric, 60 positions. |
Available options are: • Both = Print on both invoice and pick slip • Check Cust = Print on refund check only • Gift Msg = Gift message • Invoices = Print on invoice only • Nowhere = Do not print • Picks = Print on pick slip only • Quote = Print on the Quote form • Check Int = Print on detachable area of refund check not visible to the customer • User = Print on the document defined by the user, such as a custom pick slip |
|
Date |
The date when the message was written. Numeric, 6 positions (MM/DD/YY format). |
Time |
The time when the message was written. Numeric, 6 positions (HH:MM:SS format). |
User |
The user ID identifying the person who wrote the message. Alphanumeric, 10 positions. |
Depending on your screen resolution, if there are multiple message lines the Exit button might not be visible. In this case, press F12 to exit the window and return to the Scan Items for Return Screen.
Enter Additional Charges Window in Return By Item
Purpose: Use the Enter Additional Charges window to add additional charges incurred based on the return. This window displays additional charges added during the Return By Item session; any additional charges that already exist on the order do not display.
Additional charges are user-defined types of charges that you can add to an order for any reason. You can establish standard additional charge codes to charge the customer, such as a restocking fee.You can establish standard credit types of additional charge codes to reimburse the customer, such as for long-distance telephone calls or postage fees.
The additional charges you enter on the Enter Additional Charges Window are order-level additional charges, and are not associated with any particular item. The additional charges you enter for an item (for special handling, gift wrapping, etc.) do not appear at this window.
Additional charge codes are defined in the Additional Charges table. See Establishing Additional Charge Codes (WADC).
Secured feature: Access to the Enter Additional Charges Window is controlled by the Additional Charges Access (A24) secured feature.
Negative additional charge limit: You can limit the total amount of negative additional charges applied to an order by entering a dollar value in the Negative Additional Charge Limit (E49) system control value.
You can override the dollar limit for negative additional charges applied to an order if you have authority to the Override Negative Additional Charge Limit (A60) secured feature.
A message indicates if the total value of negative additional charges exceeds the dollar value and you do not have authority:
Negative additional charge exceeds the limit for this order.
Bills when? The additional charge does not bill until the order goes through billing, such as when you process the return. Any additional charges added in Return By Item are not processed unless you also return an item. Also, if you enter more than one additional charge, for example, you enter a negative additional charge of 1.50 and a positive additional charge of 2.00, the additional charge amount applied to the invoice is the sum of the additional charges. In this example, the additional charge amount applied to the invoice is .50.
Order totals: Additional charges or discounts are added to or subtracted from the order total, but are broken out from the order totals in the Chg field.
Charge or credit? When an additional charge represents a credit use Field Minus or - when you enter the dollar value in the Amount field to identify the additional charge as a credit and back this amount out of the order total.
Entering a Credit: For example, you are crediting a customer for postage fees.
Use these steps:
1. Enter the appropriate additional charge code.
2. Enter the amount in the Amount field.
3. Press - to make this a negative value.
4. Select OK.
Entering a Charge: For example, you are charging a customer a restocking fee.
Use these steps:
1. Enter the appropriate additional charge code.
2. Enter the amount in the Amount field.
3. Select OK.
You can use the Restrict Additional Charge Amount if Default Charge (F43) system control value and the Enter Amount for Order Additional Charge Code (A80) secured feature to control which operators can add additional charges to an order.
These fields affect only the Enter Additional Charges Window and the Change Additional Charges Screen.
These two values work in combination:
|
Restrict Additional Charge Amount if Default Charge (F43) system control value is selected |
Restrict Additional Charge Amount if Default Charge (F43) system control value is unselected |
Enter Amount for Order Additional Charge Code (A80) authority is set to *ALLOW |
The Amount field at the Enter Additional Charges Window is enterable only if there is not a Default charge amount for the additional charge code. If the additional charge code has a default amount specified, this amount defaults and you must use the Change Additional Charges Screen to override it. The Amount field at the Change Additional Charges screen is always enterable. |
The Amount field is always enterable at the Enter Additional Charges Window or at the Change Additional Charges Screen. If you enter just the additional charge code for a code that has a default amount specified, this amount defaults. However, if you enter the additional charge code but enter an override amount, the override amount is added to the order. |
Enter Amount for Order Additional Charge Code (A80) authority is set to *EXCLUDE |
The Amount field is never enterable at the Enter Additional Charges Window or at the Change Additional Charges Screen. |
|
This table describes the error messages the screen might display when you enter an additional charge, and their reasons:
Error Message |
Displayed when? |
Description/More Information |
Negative additional charge exceeds the limit for this order. |
you enter a negative additional charge |
You have attempted to add a negative additional charge that would bring the total negative additional charges on the order over the limit specified in the Negative Additional Charge Limit (E49) system control value, and if you do not have authority to exceed this limit. This authority is controlled by the Override Negative Additional Charge Limit (A60) secured feature, and applies to miscellaneous additional charges only. Note: Negative additional charges that are added by the system are not included in the negative additional charge total; also, the total is not decreased by positive additional charges. |
Charge amt is restricted because there is a default defined. |
you enter a charge code and an amount |
This message displays if the Restrict Additional Charge Amount if Default Charge (F43) system control value is selected, and you have authority to enter an amount under the Enter Amount for Order Additional Charge Code (A80) secured feature (otherwise the Amount field would not have been enterable; see About Default Charges) |
Entering additional charges during order entry/maintenance: See Adding Miscellaneous Charges or Credits in Order Entry.
Enter Additional Charges Window
How to display this screen: Select Additional Charges at the Scan Items for Return Screen.
Field |
Description |
Order # |
A number assigned by the system to identify an order. Numeric, 8 positions; display-only, assigned by the system. |
Ship-to number (Unlabeled field to the right of the order number) |
A number to identify the shipping address on the order Numeric, 3 positions; display-only, assigned by the system. |
Sold To (Sold-to customer number) |
A number to identify the customer. Numeric, 9 positions; display-only, assigned by the system. |
Customer name (Unlabeled field to the right of the sold-to number) |
The customer's last name, first name, and initial. Alphanumeric, 41 positions; display-only. |
Addl Chg (Additional charge code) |
A code for a type of charge or credit applied to the order. Additional charge codes are defined in and validated against the Additional Charge table. See Establishing Additional Charge Codes (WADC). Additional Charge Fees You can define additional charge codes for any reason, such as store restocking fees. Additional Charge Credits You can define additional charge codes for any reason to credit the customer's order, such as long-distance telephone charges, no charge for freight, etc. Use Field Minus in the Amount field to enter a negative dollar amount and credit the customer. You can limit the total amount of negative additional charges applied to an order by entering a dollar value in the Negative Additional Charge Limit (E49) system control value. See Error Messages. Alphanumeric, 2 positions; required. |
Amount |
The dollar amount of the charge or credit. Press - to make this value a negative value. Default charge amount If you have set up a default charge amount for the additional charge code, this amount will default. Is this field enterable? Not enterable if: • the Restrict Additional Charge Amount if Default Charge (F43) system control value is selected (regardless of your authority level) and there is a default charge specified for the code you entered, or • you do not have the authority to enter an amount. Do you have authority to enter an amount? Authority to enter a charge amount is based on the Enter Amount for Order Additional Charge Code (A80) secured feature. If selected: You can change the charge amount by selecting Change for the additional charge code once you have added it and entering a different amount at the Change Additional Charges Screen. If unselected: You will be able to enter additional charge codes only if they have default charge amounts defined. Numeric, 7 positions with a 2-place decimal; required or display-only. |
Description |
The description of the additional charge code. Alphanumeric, 30 positions; display-only. |
Screen Option |
Procedure |
Enter an additional charge |
Complete the additional charge code field and, depending on your settings and authority, the amount, and select OK. |
Change an additional charge |
Select Change for an additional charge. See Change Additional Charges Screen. |
Delete an additional charge |
Select Delete for an additional charge to display the confirm delete pop-up window. |
Purpose: Use this window to print a barcoded item UPC label. Each item label prints the UPC barcode, item, SKU, item description, and SKU description. The barcode contents are based on the setting of the Default Scan Method for Pick Pack Verification (K30) system control value.
Note: In order to print item labels from Return By Item (WRBI) correctly, the Default Scan Method for Item Returns (L80) system control values should be set to a UPC format.
Completing the Print Labels window: This window includes the following fields:
• UPC: Enter the UPC assigned to the item whose label you would like to print. When you scan the UPC barcode, the system automatically processes your entry once the required number of positions is scanned. The length of the UPC code varies depending on the setting of the Default Scan Method for Item Returns (L80) system control value. Note: If the Default Scan Method for Item Returns (L80) system control value is blank or set to SHORTSKU, this field does not display and you must enter the item and SKU.
• Item and SKU: If you did not enter a UPC, enter the item and SKU whose label you would like to print. SKU is required only if the item has SKUs.
• Item and SKU Desc: Once you define a UPC or item and SKU and press Enter, the item description and SKU description defaults. Display-only.
• Number of labels: The number of labels to print defaults to 1. Optionally, enter a higher number if you would like to print multiple labels.
Select Print to print the label(s). The system displays the message Label sent to printer.
Label contents: The item label includes the:
• UPC barcode
• item code
• SKU code, if the item has SKU’s
• item description
• SKU description, if the item has SKU’s
Prints where? The system sends the label automatically to the printer specified for the PPI Label type for your user profile through Working with User Records (WUSR) or through Work with User Label Printers (WULP). Otherwise, it uses the printer specified in the Printer for Pick/Pack Item Labels (K47) system control value.
How to display this screen: Select Item Label at the Scan Items for Return Screen.
Field |
Description |
UPC |
The UPC code assigned to the item for which you are printing item labels. This field displays only if a UPC format is defined in the Default Scan Method for Item Returns (L80) system control value. When you scan the UPC barcode, the system automatically processes your entry once the required number of positions is scanned. The length of the UPC code varies depending on the setting of the Default Scan Method for Item Returns (L80) system control value. UPC: Alphanumeric; 8, 12, 13, or 14 positions (based on the Default Scan Method for Item Returns (L80) system control value); required. |
Item |
The item for which you are printing item labels. Alphanumeric, 12 positions; required. |
Desc |
A description of the item. The item description displays after you enter the UPC or item and SKU and press Enter. Alphanumeric, 30 positions; display-only. |
SKU |
The item’s unique characteristics, such as its color or size. Alphanumeric, three -4-position fields; required if the item has SKU’s. |
SKU Desc |
A description of the SKU. The SKU description displays after you enter the UPC or item and SKU and press Enter. Alphanumeric, 30 positions; display-only. |
Number labels |
The number of labels to print. 1 defaults, but you can override it. Numeric, 5 positions; required. |
Accepting and Processing the Return
Select Accept to accept and process the return. The system performs the following updates.
• Create a Return Authorization
• Receive the Return Authorization
• Credit the Return Authorization
• Process A/R Credits Immediately
• Create an Order History Message
• Creates an Order Line History Message
• Create Order Header Messages
• Generate Return Confirmation Email
Use this window to enter the freight amount to refund.
How to display this screen: This window displays if the Refund freight field is selected for a return line and a Freight override amount is defined for the order.
Field |
Description |
Current freight amt |
The current freight amount for the order, based on the Freight override amount on the Display Order Properties Screen. Numeric, 7 positions with a 2-place decimal; display-only. |
Freight Refund |
The amount of freight to refund. Freight tax override: If a Freight tax override is defined for the order, the system uses the Freight tax rate to calculate the amount of tax on freight to refund. Numeric, 7 positions with a 2-place decimal; required. |
Instructions:
1. Enter the amount of freight to refund in the Freight Refund field.
2. Select OK. The system subtracts the freight refund amount from the current freight amount and updates the Freight override amount on the Display Order Properties Screen with the new Freight override amount. If a Freight tax override is defined for the order, the system uses the Freight tax rate to determine the new freight tax amount.
Note: If you select Exit at this window, the system returns you to the Scan Items for Return Screen and does not accept and process the return.
Example: You return a line on an order whose freight override amount is $10.00 and freight tax override amount is $2.50. The freight tax rate is 25%. At the Enter Freight Refund window, you enter $4.00 as the freight refund amount. Based on the freight refund amount, the system:
• Refunds $4.00 freight and $1.00 freight on tax.
• Updates the freight override amount to $6.00.
• Updates the freight tax override amount to $1.50.
CWSerenade updates the Tax override field for an order line to Selected if the order was received from an external system and a tax, GST, or PST amount was defined, indicating the tax amount from the external system should be retained on the order line.
If the Tax override field for the order line you are returning is selected, the system does not call the regular tax routine to recalculate the amount of tax remaining on the order line and how much tax to include on the credit invoice. Likewise, if you use Vertex to calculate tax, the system does not call Vertex to recalculate the tax amount.
Instead, the system prorates the tax override amount across the units ordered on the order line to determine the new tax override amount and the tax amount to return.
Determining the new tax override amount: The system uses the following calculations to determine the new tax override amount assigned to the order line:
Original order quantity - Cumulative return quantity = Net order quantity
Net order quantity / Original order quantity = Return ratio
Return ratio x Original tax override amount = New tax override amount
Example:
Order Line (tax override = Y) |
Results |
|
quantity ordered: |
3 |
Net order quantity: 3 - 1 = 2 Return ratio: 2 / 3 =.66666 New tax override amount:.67 x 3.00 = 1.99998 The new tax override amount (2.00) displays in the Tax field for the order line on the Display Order Detail screen. |
tax override amount: |
3.00 |
|
return quantity: |
1 |
|
Determining the tax amount to return: The system uses the following calculations to determine the tax amount to include on the credit invoice created for the return:
Current return quantity / Original order quantity = Return ratio
Return ratio x Original tax override amount = Returned tax amount
Example:
Order Line (tax override = Y) |
Results |
|
quantity ordered: |
3 |
Return ratio: 1 / 3 =.33333 Returned tax amount:.33333 x 3.00 =.99999 The returned tax amount (1.00) displays in the Tax field for the credit invoice on the Display Invoice Detail screen. |
tax override amount: |
3.00 |
|
return quantity: |
1 |
|
The system creates a record in the following tables for the return authorization.
RA Header table |
Creates a record in the RA Header table for the posted return. The RA is entered, received, and credited. |
RA Detail table |
Creates a record for each order line returned in the RA Detail table. The RA detail is returned and credited. |
WRTA |
Displays the RA and RA lines in the Work with Return Authorizations (WRTA) menu option. The RA is entered, received, and credited. If the Use Streamlined Return Authorizations (F44) system control value is selected, the RA displays only if there are remaining lines on the order that are eligible for return. In addition, you cannot view the RA lines. |
RAD Trigger |
Creates a Add and Change return authorization download (RAD) trigger for each order line returned if the Create Return Download Triggers (K28) system control value is selected. |
Receive the Return Authorization
The system receives the return automatically when you select Accept during Return By Item to process the return.
The system checks the return disposition code for the return line to determine:
• Whether to increase the on-hand quantity of the item when adding the item back into inventory.
• The warehouse and location to which the item is being returned. The system creates the item warehouse and item location if they do not already exist.
The system performs the necessary inventory transaction automatically to move the item to the warehouse and location specified in the RA Detail table. Note: If the billing async is up from the previous day, the system posts the inventory transaction to that date and not the current date.
The system also updates the Qty returned for the order line in the Order Detail table.
Credit the Return Authorization
Credits are processed through the ORDR_ASYNC and BILL_ASYNC jobs, which update:
• The Qty credited for the order line in the Order Detail table.
• Creating the credit invoice and refund, if appropriate. Note: If the billing async is up from the previous day, the system creates the credit invoice using that date and not the current date.
• The return reason history for the offer.
• The return authorization header, deleting the detail record.
The system automatically adds a record to the Refund table when you accept a return transaction in Return By Item.
Steps: There are a series of steps you can follow to issue a refund to the customer for a return. Briefly listed, they include:
1. Printing the Refund Due List to determine which customers are eligible for refunds.
2. Selecting the Working with Refunds, Writeoffs and Balances Due (WREF) menu option to update information for a pending refund.
3. Selecting the Processing Refunds (MREF) menu option to issue the refund in the form of a refund check, merchandise credit, etc.
4. Optionally, using the Reprint Refunds Screen (MREP) if you encountered a problem printing the refund checks.
5. Selecting the Reconciling Checks (MREC) menu option when you receive the canceled refund checks from the bank.
Normally, this completes the refund process, unless you Process A/R Credits Immediately. See Issuing Refunds for more information on refund processing.
Process A/R Credits Immediately
The Process A/R Credits Immediately (E80) system control value controls whether the system processes A/R refunds automatically and creates A/R open items without the need for you to use the Processing Refunds (MREF) option.
Regardless of the setting of this system control value, the system does not display the Apply Credit Balance Pop-Up Window in Return By Item. In addition, for an Accounts Receivable order:
If this system control value is selected, the system:
• creates an A/R credit refund (WREF) in a processed (P) status.
• creates a credit open item against the bill-to account associated with the customer who placed the order.
• automatically allocates and applies the credit open item against the open A/R invoices for the order.
• If there are no invoice open items for the order, the system creates the credit open item and does not apply it to any other invoice open items for the bill to customer.
If this system control value is unselected, the system:
• creates an A/R credit refund (WREF) in an open (O) status. You can use Processing Refunds (MREF) to process the refund.
• does not create a credit open item against the bill-to account associated with the customer who placed the order.
Create an Order History Message
The system creates an order history message similar to the following:
Type |
Transaction Note |
Amount |
User |
RTN AUTH |
RA Credit pending processing |
12.99 |
SFLYE |
SHIPMENT |
CREDIT BILLED ON INVOICE# 9999999. |
12.99- |
SFLYE |
Note: The system creates the credit invoice once the return is processed through the Billing Async.
Creates an Order Line History Message
The system creates an order line history message similar to the following:
Activity |
Qty |
Rtn |
User |
Return |
1 |
777 |
SFLYE |
The system updates the Order Message table with any order header messages you created or changed on the Create Order Header Messages window.
If you have completed RF Return Label Setup, the system prints an RF Return label for each unit returned.
Note: The system does not print an RF return label if the return does not affect inventory.
Customer return labels print automatically when you process and accept a return through Return By Item.
The customer return label identifies the date the return was created, item, SKU code (if any), item description, user ID, the code for the location to put away the item, and optionally, the UPC barcode defined for the item. You apply the customer return label to the item so that it can be put away in the warehouse. A separate label (in a separate document) prints for each unit returned.
Customer return labels print only if:
• there is a print program defined in the Customer Return Label Print Program (D35) system control value.
• the Affect inventory field for the disposition code used on the return is selected.
The return disposition code identifies how to handle the returned item (whether to add the item back into inventory, the location in which to return the item, etc.).
Generate Return Confirmation Email
If the order qualifies, the system generates a return confirmation email to send to the sold to customer on the order. See Return Confirmation Email Sample and Contents for a sample email and see Shipment and Return Confirmation Emails for more information on how to generate a return confirmation.
| Inbound Return API | Contents | SCVs | Search | Glossary | Reports | Solutions | XML | Index | Issuing Refunds |

WRBI OROMS 5.0 2018 OTN