Routing Applicants
This topic provides an overview of applicant routing and discusses how to manage routings
|
Page Name |
Definition Name |
Usage |
|---|---|---|
|
HRS_GACT_APP_RTE |
Route an applicant to a recipient who is expected to provide a recommendation regarding the next step in the recruiting process. |
|
|
HRS_RTEATT_TYP_SEC |
Choose which types of attachments to include with a routing request. |
|
|
HRS_RTE_PRVW_SEC |
Preview a routing notification |
|
|
HRS_APP_RTE_SUM |
Review and manage existing routings, including sending reminder notifications to routing recipients. This page is nearly identical to the Manage Application Page: Route Tab. |
|
|
HRS_GACT_APP_RTE |
Update an existing routing and enter routing responses on behalf of recipients. |
|
|
HRS_RTE_RESCMT_SEC |
View comments from a routing recipient or enter comments on the recipient’s behalf. |
|
|
HRS_RSPN_RMNDR |
Schedule reminder notifications for routing recipients and to specify when (relative to the response due date) to send those reminders. |
Routing is the action of sending applicant information to recipients who are asked to provide input on the next step to take for the applicant. The term Routing refers to the action of sending the request and to the request itself.
The Route Applicant Action
The Route Applicant action is available from several pages, including the Manage Job Opening page, Manage Applicant page, Manage Application page, and Search Applications page.
The Route Applicant action provides access to two pages:
The Route Applicant Page appears when you perform the Route Applicant action for an application that does not already have a routing or if you perform a group action on multiple applications.
Use this page to create and send a new routing.
The Manage Routings Page appears when you perform the Route Applicant action for a single application that already has at least one routing.
Recruiters use this page to view summary information about an applicant’s routing. Although the page is mostly read-only, users can update the overall routing status and send reminders to recipients who have not yet responded. This page is similar to the Manage Application Page: Route Tab, except that the Manage Routings page lets you update the overall routing status directly on the page rather than requiring you to access a separate editable page.
The Route Applicant action is also available as a group action. When a routing includes multiple applicants, you can choose whether recipients receive separate emails for each applicant or just one consolidated email that lists all applicants.
Note: If a job opening is governed by a flexible recruiting process, that process controls the availability of the Route Applicant action. Availability can vary depending on the user’s role and the applicant’s current disposition.
Routing Statuses
Routings have their own status, separate from the applicant's disposition. When you create a routing request, you can assign the initial routing status. The delivered default routing status is Routed, indicating that you have sent the routing and you are in the process of collecting responses.
The other delivered routing statuses describe the possible decisions you can make for the applicant. You select the appropriate status after you receive feedback from routing recipients.
These are the delivered status values for the Route status area:
Routed indicates that the applicant has entered the routing phase and that you are seeking recommendations for further applicant processing.
Invite for Interview indicates that you intend to proceed to the next step in the recruiting process by inviting the applicant to interview.
Hold indicates that you do not intend to make a decision yet.
Reject indicates that you are not interested in the applicant.
Withdrawn indicates that the applicant is no longer available for the job opening. This disposition is assigned by the Withdraw from Hire action.
Withdrawn Application indicates that the application was withdrawn from consideration. This disposition is assigned by the Withdraw Application action. It is also assigned when an applicant uses Candidate Gateway self-service to withdraw the application.
Changes to the routing status can trigger status change effects that update the applicant's disposition. For example, the creation of a new routing record with the status Routed changes the applicant’s disposition to Routed (depending on the original disposition at the time of the routing). Changing the routing status to Reject will change the applicant’s disposition to Reject.
Routing Responses
The notification that the system sends to routing recipients includes a link to the self-service Routing Response page, where the user can review a list of routing requests and access a detail page to supply a response for a specific routing. The response options are the same status values that are used for the overall routing status.
After a routing has been sent, a recruiting user can enter a response on behalf of a routing recipient. The original recipient can still access the routing request and change the response.
After a recipient submits a response using the self-service Routing Response page, the response is read-only. Neither the recipient nor the recruiter can make further changes.
Notifications and Templates
Routing notifications are sent to the email address from the recipient’s personal data record. The following table lists the templates that are used during the routing process:
|
Template Name and Description |
When Used |
|---|---|
|
HRS_APP_CONS_RTE Consolidated Route Email |
To notify a routing recipient of a routing for multiple applicants. This template is used when the “Consolidated all applicants in one email” check box is selected (that is, recipients receive a single email for all routed applicants rather than a separate email for each applicant.). |
|
HRS_APP_RTE Applicants Route Notification |
To notify a routing recipient of a routing for a single application when the application is associated with a job opening. |
|
HRS_APP_RTE_NOJOB Application Route - No Job |
To notify a routing recipient of a routing for a single application when the application is not associated with a job opening. |
|
HRS_RTE_RSPN Route Response Notification. |
To notify the person who created a routing that a response has been entered in the self-service Routing Response page. |
|
HRS_RTE_RSPNS_RMNDR Route Response Reminder Email |
To remind a routing recipient of a routing when the routed application is associated with a job opening. |
|
HRS_RTE_RSPN_NOJOB Route Response Notification. |
To remind a routing recipient of a routing when the routed application is not associated with a job opening. |
Note: The reminder notifications can be triggered several ways. User can run a batch reminder process from the Route Response Reminder Page, or they can manually click a Send Reminder link on the Manage Routings Page or the Manage Application Page: Route Tab.
Batch Routing Notifications
The Route Applicant action sends email notifications in real-time as long as the number of notifications does not exceed the Batch Action Threshold specified on the Recruiting Installation - Applicants Page. When the number of notifications exceeds the threshold, the Group Action Notification (HRS_ACT_MAIL) Application Engine process sends the notifications in batch.
The Batch Action Threshold refers to the number of email notifications to be sent, not the number of applicants being processed. For example, if five applicants are selected for routing, and they are routed to five recipients (without consolidating applicants into one email per recipient), the transaction involves 25 notifications.
If the batch process does not successfully send all notifications, the user who performed the route action receives a failure notification. The notification, which uses the PeopleTools Workflow HRS_BATCH_NOTIFY template, advises the user to contact a system administrator, who can restart the batch process. Because the batch process tracks notifications as they are sent, no duplicate notifications are sent if the process is re-started.
Regardless of whether notifications are sent in real-time or in batch, the routing record is saved as soon as the routing is submitted, and all related online changes are immediately visible. In particular, the routing requests are immediately visible on the self-service Routing Response page even if the email notifications are delayed.
Use the Route Applicant page (HRS_GACT_APP_RTE) to route an applicant to a recipient who is expected to provide a recommendation regarding the next step in the recruiting process.
Navigation
Click the Route icon for an applicant who does not yet have any routings, or select from the Group actions menu. You can perform the routing action on any of these pages:
Manage Job Opening page: Applicant tab
Manage Applicant page: Applicant Activity tab: Current Status section
Search Applications
Manage Application (group action not available)
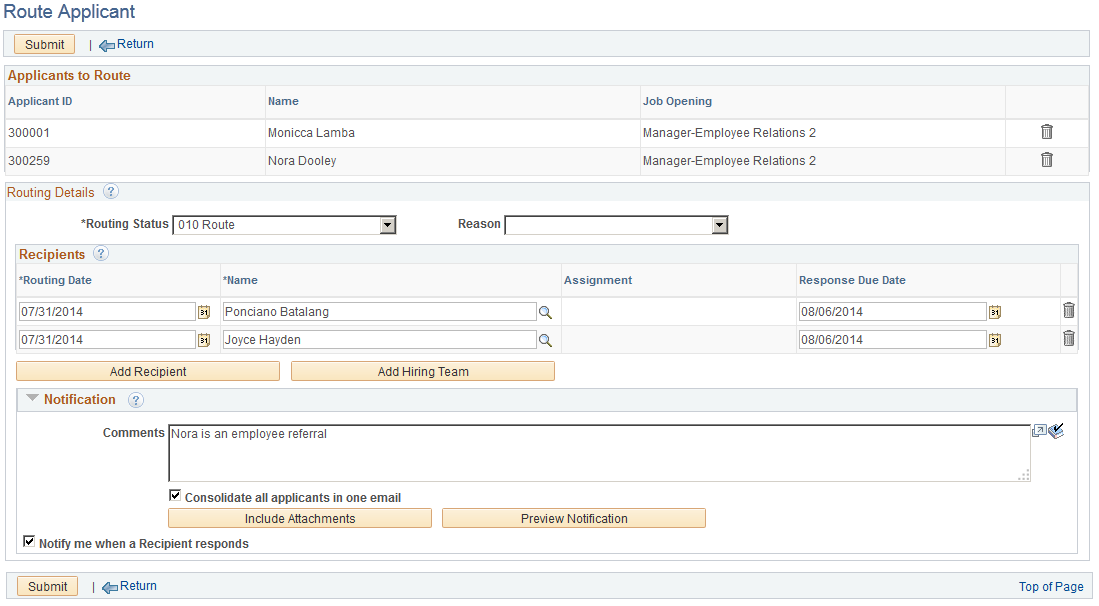
Image: Route Applicant page
This example illustrates the Route Applicant page.
Toolbar
|
Field or Control |
Definition |
|---|---|
| Submit |
Click to finalize the routing information. When you submit, The system emails a routing notifications to all recipients. The email includes a link to the self-service Routing Response page, where the recipient can view and respond to the routing request. Submitting a new routing record also triggers status change effects. As delivered, a new routing record with the default status of 010 Route causes applicants who started in the Review, Linked, Applied, Screen, or Hold dispositions to be put into the 050 Route. |
| Return |
Click to return to the page where you initiated the Route Applicant action. A routing that has not been submitted is not saved for later, so the user is prompted to confirm the return action if any data has been entered on the page. |
Applicants to Route
This grid lists the names and IDs of the applicants that you are routing, along with the job openings for which they are being considered.
If you used a group action to create a routing for multiple applicants, you can remove applicants from the list until just one applicant remains. You cannot, however, add additional applicants. Instead, return to the page where you initiated the routing action and route any additional applicants from there.
Routing Details
|
Field or Control |
Definition |
|---|---|
| Routing Status |
The values in this drop-down list box are the statuses configured for the Route status area on the Statuses and Reasons Page. When initiating a routing request, choose routing status that indicates that the routing has been sent and is in progress. As delivered, the default status in this area is 010 Route. The other values for this field are used to indicate the next step to take for the applicant. You will select one of these values after gathering responses from routing recipients. The delivered options include 020 Invite for Interview, 100 Hold, 110 Reject, 120 Withdrawn, and 130 Withdrawn Application. |
| Reason |
Optionally select a reason for assigning the selected routing status. Values depend on your status configuration. If the selected routing status does not have any associated reasons, then the Reason drop-down list box does not have any values. |
Recipients
Use the Recipients grid to identify the people whose feedback you are requesting. If the routing request is for a single job opening, the primary hiring manager is the default recipient unless the hiring manager is the person sending the routing request.
Note: You cannot use the Route Applicant page to enter routing responses on behalf of a recipient because the routing must be sent before responses can be entered. However, on the Edit Routing Page (an editable version of the Route Application page), this grid includes additional fields for entering routing responses.
|
Field or Control |
Definition |
|---|---|
| Routing Date |
Displays the date that the routing was sent to this recipient. The default value is the current date. Routing notifications are sent immediately when you submit the routing, so you normally should not modify the default date. However, if you previously routed the applicant manually, you can enter the date of the manual routing for historical purposes. |
| Name |
Enter the name of the person to whom you are routing the applicant. If the person’s personal data record does not have an email address, a warning message will appears when you submit routing. |
| Assignment |
If the routing request is for a single job opening, this field displays the recipient’s association to the job opening. Approver/Reviewer, Interviewer, Interested Party, Manager, Originator, Recruiter, or Screening Team. This field remains blank for recipients who do not have any of these associations with the job opening. |
| Response Due Date |
Enter a date by which the recipient should respond with a recommendation regarding the applicant. When you add a new row, the due date from the previous row is the default value. The batch process that sends reminders to routing recipients uses this date to determine when to send reminders. The batch process does not send reminders to recipients who do not have a due date. The system does not look this date when a user manually sends reminders from the Manage Routings Page or the Manage Application Page: Route Tab. |
| Add Recipient |
Click to add another recipient to the routing. |
| Add Hiring Team |
This button is visible only if the routing request is for a single job opening. Click the button to add all of the hiring team members as routing recipients. Hiring team members are the people identified in any of the assignment-related sections of the job opening. The job opening originator is not considered a hiring team member and is not added to the routing request. Because it does not make sense to route an applicant to yourself, the current user is not added to the grid even if the user is a member of the hiring team. |
Notification
|
Field or Control |
Definition |
|---|---|
| Comments |
Enter comments to be included in the routing request email notification. If you later return to this routing request to add more recipients, you can use original comments or edit them for any new notifications. Comments are used only in the notification email. They do not appear on the self-service Routing Response Details Page or on the Manage Application Page: Route Tab . |
| Consolidate all applicants in one email |
This check box is visible only if the routing includes multiple applicants. Select this check box to send a single email to each recipient. That email will list all of the applicants who are being routed. If the check box is not selected, the recipient receives a separate email notification for each applicant in the routing. |
| Include Attachments |
Click to access the Include Attachments Page, where you choose which applicant attachments types to associated with the routing. Associated attachments are always visible on the self-service routing response page, and you can optionally attach them to the notification email as well. By default, resumes and cover letters are included with the routing, but other attachment types are not. |
| Preview Notification |
Click to access the Preview Notification Page page, where you can preview the email notification that will be sent to the recipient. You can also modify the default notification subject on the Preview Notification page. |
| Notify me when a Recipient responds. |
Select this check box if you want to receive notifications when recipients submit their responses using the self-service routing response page. |
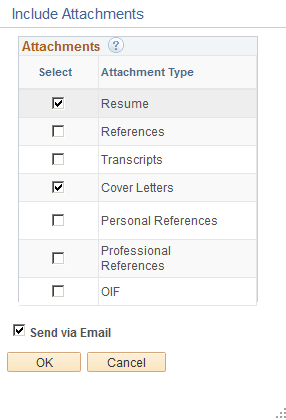
Use the Include Attachments page (HRS_RTEATT_TYP_SEC) to choose which types of attachments to include with a routing request.
Navigation
Click the Include Attachments button on the Route Applicant page or the Edit Routing page.
Image: Include Attachments page
This example illustrates the Include Attachments page.
Applicant attachments are classified using attachment types that you configure on the Attachment Type Setup Page.
When applicants upload attachments in Candidate Gateway, they must indicate the attachment type. When recruiters upload attachments on the Application Details page, they can optionally indicate the attachment type, but attachments without an attachment type cannot be included in a routing.
|
Field or Control |
Definition |
|---|---|
| Attachments |
Select the types of attachments to include in the routing. The selection grid includes all active attachment types from the Attachment Type Setup Page. By default, the Resumes and Cover Letter attachments types are selected. Resumes that were entered into the system as text (rather than being uploaded as attachments), are attached to the email notification as a .html file. If the Cover Letters check box is selected and there is a cover letter associated with the job opening, the routing includes only that cover letter. Applicant-level cover letters are not included in the routing unless there is not an application-specific cover letter. For other attachment types, both applicant-level attachments and application-level attachments are included with the routing when the attachment type is selected. If attachments of the selected types are added or removed from the original application after a routing is sent, the self-service routing page automatically reflects these changes. When you send a new routing, Inactive attachment types are not listed on this page. However, previously active attachment types that were included in a routing are shown read-only if you access this page for the old routing. |
| Send via Email |
Select this check box to include the selected attachments in the email notifications that the routing process sends. The self-service Routing Response page always provides recipients with access to the selected attachments, regardless of whether you also include the attachments in the email notification. This check box applies to all applicants in the routing and to all selected attachment types. You cannot email a subset of the attachments except by creating multiple routings with different attachment settings. Attaching files to the email notification may be convenient for the recipient, but it also causes the email size to increase dramatically. Important! Consider your organization's email policies and practices before sending large attachments or a high volume of attachments with your routing notifications. |
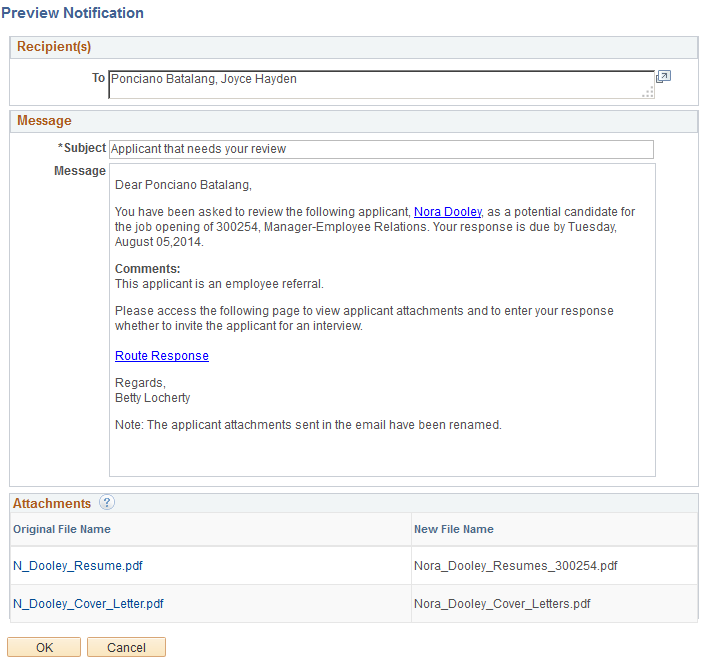
Use the Preview Notification page (HRS_RTE_PRVW_SEC) to preview a routing notification.
Navigation
Click the Preview Notification button on the Route Applicant page or the Edit Routing page.
Image: Preview Notification
This example illustrates the Preview Notification page.
|
Field or Control |
Definition |
|---|---|
| To |
Displays the names of all notification recipients. When you initially send a routing, all routing recipients receive notifications. If you edit a routing, the recipient list on the Edit Routing page includes a Notify check box so that you can select a subset of recipients for the notification. |
| Subject |
Enter a subject for the notification. This is the only editable field on this page. The default subject from the HRS_APP_RTE template is Applicant that needs your review or Applicants that need your review. |
| Message |
Displays the text of the routing notification. The message is not editable. The template-based text varies according to context, but in general the message includes:
|
| Attachments |
If you selected the Send Via Email check box on the Include Attachments Page, this grid lists the email attachments. If there are multiple applicants in the routing, the grid lists only the attachments for the first applicant, even if you’ve chosen to send a consolidated email that lists all of the applicants. Click an attachment to view it. If the attachment is for a resume that was pasted into an application (rather than uploaded), clicking the attachment name opens the Resume Text Page rather than opening a file. However, when the email notification is sent, the pasted resume is a regular file attachment. You cannot add or remove attachments from this grid. To change attachments, modify the settings on the Include Attachments page. Because the original files names of the attachments might not be self-explanatory, the system renames all emailed attachments using the format LastName_FirstName_AttachmentType. The job opening ID is appended to the file name if an applicant is being routed for more than one job opening. A sequence number is appended to the file name if an application includes more than one file of a particular file type. |
| OK |
Click to save any changes to the Subject field and return to the previous page. |
| Cancel |
Click to discard any changes to the Subject field and return to the previous page. |
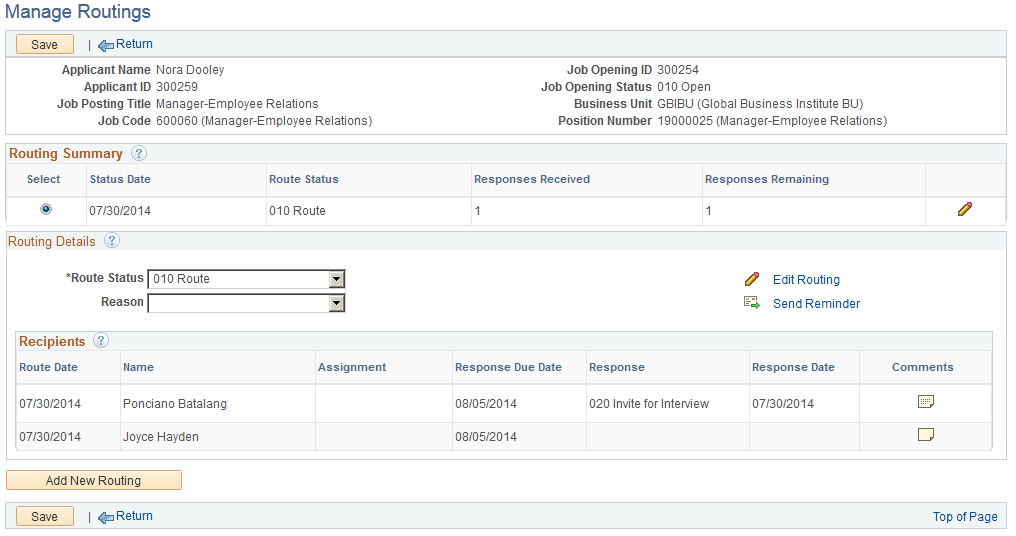
Use the Manage Routings page (HRS_APP_RTE_SUM) to review and manage existing routings, including sending reminder notifications to routing recipients.
Navigation
Perform the Route Applicant action on an application that already has at least one routing. To perform the action, click the Route icon on any of these pages:
Manage Job Opening page: Applicant tab
Manage Applicant page: Applicant Activity page: Current Status section
Search Applications
Manage Application
Note: If the application does not yet have a routing, or if you use a group action, the system displays the Route Applicant page instead of the Manage Routings page.
Image: Manage Routings page
This example illustrates the Manage Routings page.
Toolbar
|
Field or Control |
Definition |
|---|---|
| Save |
Click to save changes to the Route Status and Reason fields. |
| Return |
Click to return to the page where you initiated the Route Applicant action. |
Header
The header area of this page displays identifying information about the applicant and about the job opening for which the applicant is being routed. This page requires the context of a single applicant and a single job opening (or an application without a job opening).
Routing Summary
This grid lists all of the applicant’s routings for the specified job opening. Routings are listed in reverse chronological order, with the most recent routing listed first.
|
Field or Control |
Definition |
|---|---|
| Select |
Select the routing to be displayed in the Routing Details section of the page. |
| Status Date |
Displays the date that the overall Route Status was last updated. |
| Route Status |
Displays the current overall Route Status. |
| Responses Received |
Displays the number of recipients who have supplied a response. It doesn’t matter whether the recipient entered the response through self-service or a recruiter entered a response on behalf of the recipient. |
| Responses Remaining |
Displays the number of recipients who have not supplied a response. |
 Edit Edit |
Click to access the Edit Routing page to make changes to the routing. |
Routing Details
|
Field or Control |
Definition |
|---|---|
| Route Status |
Displays an overall status of the routing. The delivered default status for a new routing is Routed, indicating that a request for feedback has been sent. Other delivered statuses describe the next step to be taken based on feedback from the routing recipients. |
| Reason |
Displays the reason for the current routing status. |
| Edit Routing |
Click to access the Edit Routing page to make changes to the routing. |
| Send Reminder |
Click to send a notification to the recipients who have not yet supplied a response. The system sends the notification immediately (regardless of the response due date). This reminder uses the HRS_RTE_RSPNS_RMNDR notification template. This link is disabled if all recipients have supplied responses. |
| Recipients |
This grid displays summary information about the routing recipients, including their responses. To access any response comments, click the Comments icon. Information in this grid is read-only. To enter response information on behalf of a recipient, or otherwise modify recipient information, click either the Edit Routing link (in the Routing Details section) or the Edit icon (in the Routing Summary grid). |
Add New Routing
|
Field or Control |
Definition |
|---|---|
| Add New Routing |
Click to add an additional routing for the same applicants that are listed in the current routing. If you simply want to add new recipients to an in-progress routing, you can add the recipients to the existing routing instead. However creating a new routing is appropriate if the previous routing is finalized, or if you want to enter different comment text for the new recipients. |
Use the Edit Routing page (HRS_GACT_APP_RTE) to update an existing routing and to enter routing responses on behalf of recipients.
Navigation
On the Manage Routings page or on the Route tab of the Manage Application page, click either the Edit Routing link or icon.
Image: Edit Routing page
This example illustrates the Edit Routing page.
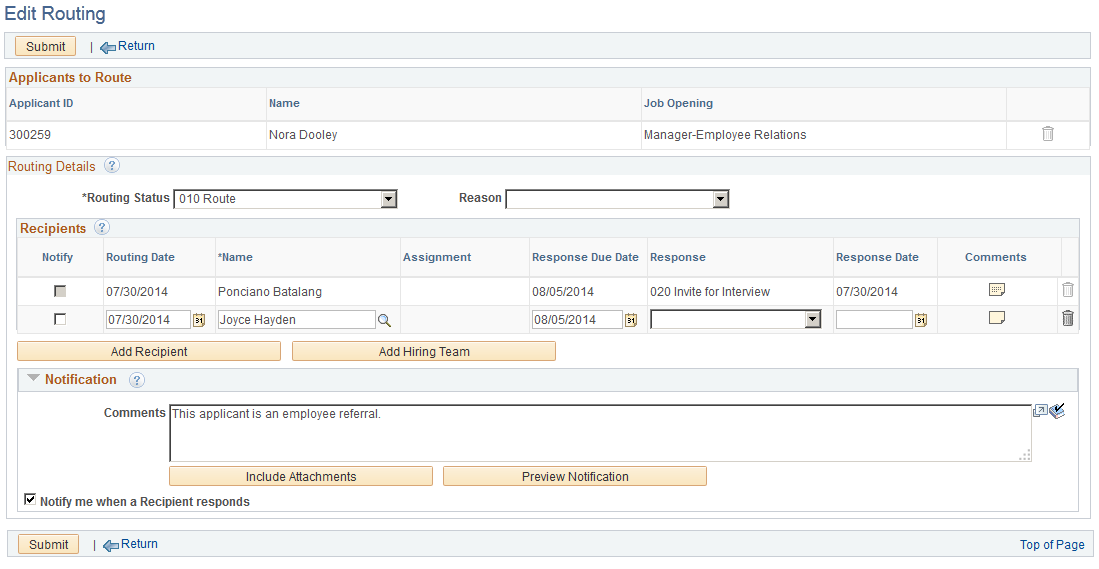
The Edit Routing page is a version of the Route Applicant Page page with additional options that are relevant only for a routing that has already been sent. The documentation that follows describes only these additional options.
Note: On the Edit Recipient page, you cannot edit information for recipients who supplied a response using the self-service Routing Response page. Neither recruiters nor routing recipients can modify responses that were submitted using self-service.
Recipients
|
Field or Control |
Definition |
|---|---|
| Notify |
Select this check box to identify recipients who should receive a routing notification when you submit your changes to the routing. This check box is always selected for any newly added recipients. You can select the check box for existing recipients as long as they have not yet submitted a response via self-service. Reasons for re-sending a notification to an existing recipient might include a new response due date or new comments. If the Notify check box is selected for at least one recipient, the system sends the notification when you submit the page. |
| Response |
This field shows the recommendation from the routing recipient. This field (like the entire row) is read-only if the applicant submitted the response using self-service. If the recipient has not submitted a response, you can enter a response on the applicant’s behalf. The response remains editable unless the applicant subsequently saves the response (changed or unchanged) on the self-service Routing Response page. |
| Response Date |
Displays the date that the response was supplied. If the response was supplied in the self-service Routing Response page, the system enters the date, and the field is read-only. If you enter a response on the Edit Routing page, you should manually enter a response date because the system does not provide a default value. A response date that is entered on the Edit Routing page remains editable unless the applicant subsequently saves the response (changed or unchanged) on the self-service Routing Response page. |
 Comments Comments |
Click to access the Routing Response Comments Page. The icon appearance changes if comments are present. When there are no comments, the icon is a solid color. When comments exist, the icon has dots representing text on a page. |
Use the Routing Response Comments page (HRS_RTE_RESCMT_SEC) to view comments from a routing recipient or to enter comments on the recipient's behalf.
You can only enter comments if you access the page from the Edit Routing page. You can also access this page in read-only mode from the Manage Routings page and from the Route tab of the Manage Application page.
Navigation
Click the Comments icon on the Edit Routings page, the Manage Routings page, or the Route tab of the Manage Application page.
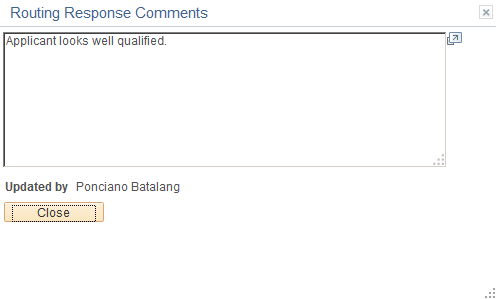
Image: Routing Response Comments page
This example illustrates the Routing Response Comments page.
|
Field or Control |
Definition |
|---|---|
| Comments |
Displays comments related to the routing response. If the recipient entered the response using self-service, the comments are read-only. If the recipient has not submitted a response, and if you accessed the page from the Edit Routing page, you can enter a response on the applicant’s behalf. Comments entered on this page remain editable unless the recipient subsequently submits them using self-service. |
| Updated By |
Displays the name of the person who last saved the comments. If the comments were submitted using self-service, no further changes can be made. |
| OK |
If the page is editable, click this button to save your changes and return to the previous page. |
| Cancel |
If the page is editable, click this button to discard changes and return to the previous page. |
| Close |
If the page is not editable, click this button to return to the previous page. |
Use the Route Response Reminder page (HRS_RSPN_RMNDR) to schedule reminder notifications for routing recipients and to specify when (relative to the response due date) to send those reminders.
Reminders are sent only when no response has been received for a routing with a response due date.
Navigation
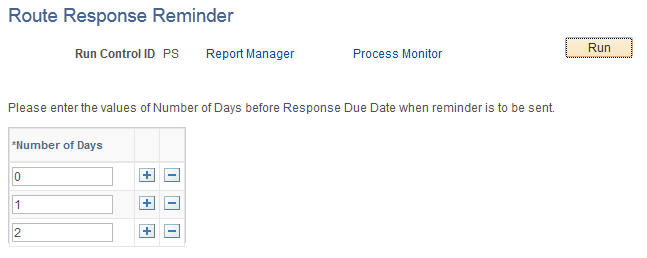
Image: Route Response Reminder page
This example illustrates the Route Response Reminder page.
|
Field or Control |
Definition |
|---|---|
| Number of Days |
Enter a number to indicate how many days before the due date to send the reminder. Recipients without a due date do not receive a reminder. If a recipient has multiple routing responses that are due on the same date, the system consolidates the reminders into a single email notification. You can add rows to this grid to schedule multiple reminders. For example, to send daily reminders starting two days before the due date, create three grid rows with the values 2, 1, and 0. The 0 means that the process sends a reminder on the response due date. This process never sends reminders after the due date has passed, but you can use the Send Reminder link on the Manage Routings page to manually send reminders. |
| Run |
Click to access the PeopleSoft Process Scheduler Request page, where you schedule the Route Response Reminder (HRS_RTE_RMND) process. The best practice is to set up the request so that the reminder process runs daily. |