Setting Up Direct Deposits
|
Page Name |
Definition Name |
Usage |
|---|---|---|
|
DIRECT_DEPOSIT |
(USA, USF) Enter the information to enable the direct deposit of employee pay to checking or savings bank accounts. |
|
|
DIRECT_DEPOSIT_CAN |
(CAN) Enter the information to enable the direct deposit of employee pay to chequing or savings bank accounts. |
|
|
US Bank Additional Data Page or Canada Bank Additional Data Page |
SRC_BANK_PY_SP |
Specify check and advice form ID and medium for transferring data to banks. (USA) Specify the number of days in the prenote wait period. (CAN) Specify the bank routing number format. See (CAN and USA) Canada Bank Additional Data or US Bank Additional Data Pages in your PeopleSoft HCM Application Fundamentals documentation. |
|
Payroll for NA Installation Page |
INSTALLATION_PY |
Control masking of direct deposit account numbers on employee and administrator direct deposit pages and on PDF or non-PDF wage statements (paychecks and payslips). |
|
DIR_DEP_CNTRLS |
(USA, USF, CAN) Control email notifications, push notifications (alerts) and validation of (USA, USF) bank ID (bank routing transit number) or (CAN) bank ID and branch ID when employees set up direct deposit in self-service. |
|
|
Direct Deposit Prenote Memo Page |
RUNCTL_PAYINIT2 |
(USA, USF) Run the Direct Deposit Prenote Memo report (DDP006). The report produces a memo to each employee who has added a new direct deposit. The memo lists the direct deposit information for verification. |
|
Direct Deposit Prenotification Page |
RUNCTL_PAYINIT2 |
(USA, USF) Run the Direct Deposit Prenotification report (DDP005). The report lists direct deposit information for employees who will have their pay deposited directly into their bank account for the first time. |
In Payroll for North America, direct deposit distributions are performed during the Pay Confirmation process. Enter employee direct deposit distribution data on the Request Direct Deposit page.
Note: Employees can add or change their own direct deposit information from the self-service Direct Deposit page. See Setting Up and Viewing Direct Deposit in your PeopleSoft ePay product documentation.
For USA and USF, self-service direct deposit add or edit changes are limited to one transaction per day. Employees can add or edit information for multiple direct deposit accounts in a singe self-service transaction, but once they save the changes and exit the page, they cannot make additional changes on the same day. If they attempt to make additional changes, a message appears from the Direct Deposit page saying that multiple direct deposit changes are not allowed on the same day. The once-a-day add or change limitation applies only to Classic Self Service.
There are slight variations in the functionality if you are using Fluid Direct Deposit feature. For more information on fluid direct deposit, see Using the PeopleSoft Fluid User Interface to Add and Modify Direct Deposit Accounts.
Multiple Direct Deposit Distributions
Each direct deposit can be stated as either a percent of net pay or a dollar amount. For example, suppose that an employee wants 100 CAD deposited to a savings account, a 200 CAD check for pocket money, and 100 percent of the remaining net pay deposited to a checking account. To do this, you set up three rows of distribution data:
|
Objective |
Priority |
Account Type |
Amount |
|---|---|---|---|
|
100 CAD to Savings |
300 |
Savings |
100 CAD |
|
200 CAD Check |
350 |
Issue Check |
200 CAD |
|
Deposit remainder in Checking |
400 |
Checking |
100% Net Pay |
In this case, make sure that you assign the savings and separate check entries lower priority numbers than the checking account direct deposit; this ensures that they are taken out first. Otherwise, 100 percent of the employee's net pay goes into checking before the system checks the other direct deposit guidelines.
Designate one direct deposit account to receive the remaining funds after all of the other direct deposits are made. To designate an account to receive remaining funds, select Balance as the deposit type. If you do not do this, the remaining balance is issued through a check.
Changing or Discontinuing Direct Deposit
To change or discontinue direct deposits, set up the appropriate effective-dated rows on the Request Direct Deposit page.
Note: You can stop direct deposits for a single paycheck by selecting the Disable Direct Deposit check box on an employee's paysheet. This causes the system to produce an actual paycheck for the employee, rather than a direct deposit.
The prenote process is an optional, but strongly recommended, test run for direct deposits to verify that bank IDs and employee account numbers are valid.
Payroll for North America provides these reports that you can use to notify employees of new direct deposit requests so that they can verify the information:
|
Report Name |
Report ID |
Description |
|---|---|---|
|
Direct Deposit Prenotification |
DDP005 |
For each company and pay period, this reports lists employees that you have added to the direct deposit instructions since the last pay period. It includes Employee ID, priority of the types of deposits, account type, bank ID, and account number. |
|
Direct Deposit Prenote Memo |
DDP006 |
This report prints a memo on your company stationery or memo forms. The text of the memo informs the employee of the direct deposit and lists bank ID, account number, account type, and deposit instructions. |
If you're running the DDP Prenotification report (DDP005) and DDP Prenote Memo report (DDP006), you must run them prior to running the Create Direct Deposit Transmit SQR Report process (DDP001).
Prenote Wait Period
Here is how you manage the prenotification wait period to enable employees to verify new direct deposit information:
On the US Bank Additional Data page, define the number of days required for a prenotification wait period (one-time setup).
Specify the start date of the prenote wait period in the Prenote Date field when you run the Create Direct Deposit Transmit process (DDP001).
U.S. employees who request a new direct deposit continue to receive checks until the prenote period has passed. For example, if the prenote wait period is 10 days and you're running a weekly payroll, employees might receive two paychecks before direct deposit starts.
This table describes the prenotification data that the system enters on the Request Direct Deposit page during creation and processing of new direct deposits:
|
Processing Step |
Prenotification Status |
Prenote Date |
|---|---|---|
|
Save new direct deposit record. |
Not Submtd (not submitted) |
Blank |
|
Run the Create Direct Deposit Transmit process (DDP001). |
Submitted |
The date entered in DDP001 process run parameters (blank if no date entered). |
|
Prenote wait period ends. |
Completed |
Remains the same as the value entered in DDP001 process run parameters. |
An example of prenoting might be that on January 14 you confirm the payroll for period January 1 to January 14. You run DDP001 on the same day and enter a prenote date of January 14. Ten working days from that date (assuming that is the Wait Days value entered on the the US Source Bank table), the system changes the prenotification status from Submitted to Completed and direct deposits go into effect on the next payroll.
Prenotification of Changed Direct Deposit Data
To change direct deposits, set up the appropriate effective-dated rows on the Request Direct Deposit page. When you insert a new data row, all values of the previous row are carried over to the new row as default values. You can update most values, but the availability of the Prenotification Reqd (prenotification required) check box depends upon the type of data updated. In addition, the Prenote Date and Prenotification Status values are always system-generated.
This table describes the results of updating and saving the direct deposit record when the Prenotification Reqd check box is selected on the employee's previous data row and the prenotification status of the previous row is Completed:
|
Description of Change |
Prenotification Reqd |
Prenote Date |
Prenotification Status |
|---|---|---|---|
|
Changed bank ID or account information. |
Selected and unavailable for change upon saving. To update the check box, exit the page and re-enter in Correction mode. The check box is now selected and available for change. |
Blank |
Not Submitted |
|
Changed percent, amount, or priority with no change in bank ID or account information. |
Selected and unavailable for change. You cannot update this check box if the bank ID or account information has not changed. |
Same as the previous row |
Completed |
|
Changed account type to Issue Check and deleted bank ID and account information. |
Deselected upon saving. If you do not deselect the check box, the system deselects it when you save. |
Blank |
Not Submitted |
(USA, USF) Use the Request Direct Deposit page (DIRECT_DEPOSIT) to enter the information to enable the direct deposit of employee pay to checking or savings bank accounts.
Navigation
(CAN) Use the Request Direct Deposit page (DIRECT_DEPOSIT_CAN) to enter the information to enable the direct deposit of employee pay to chequing or savings bank accounts.
Navigation
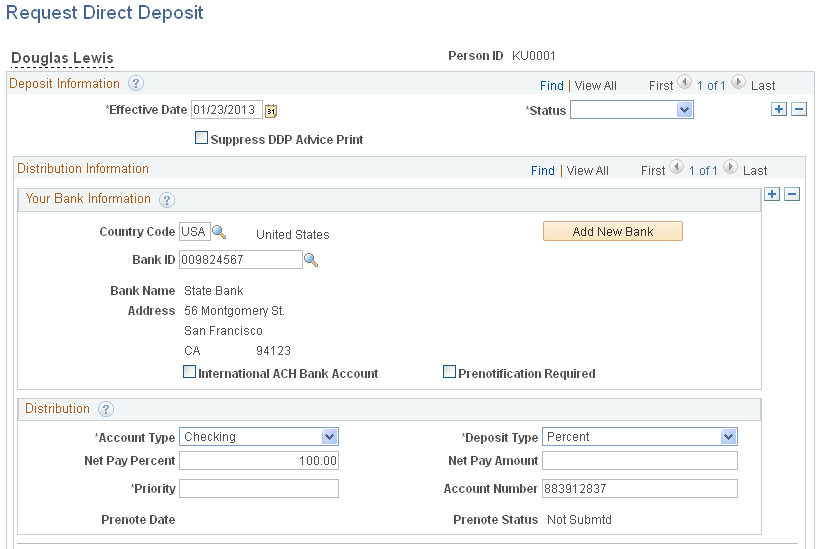
Image: Request Direct Deposit page
This example illustrates the fields and controls on the Request Direct Deposit page.
|
Field or Control |
Definition |
|---|---|
| Suppress DDP Advice Print (suppress direct deposit advice print) |
Select this check box to indicate that the employee has elected to receive their pay advice electronically, through the ePay self-service transaction, rather than in print. If part of an employee's check is direct deposited and part is issued in a live check, the live check would also show the direct deposit information. |
(USA) Your Bank Information
|
Field or Control |
Definition |
|---|---|
| Country Code |
Enter the country of the bank where the direct deposit is to be sent. |
| Bank ID |
Enter the identifier for the bank where the direct deposit is to be sent. When you select a bank, its name and address appear. |
| Add New Bank |
If the employee's bank has not yet been set up in the system, select the Add New Bank button to add the bank to the bank table. Note: If the system is not set up to validate the Bank ID (for US) or the Bank ID and Branch ID (for CAN), then the administrator does not need to set up the banking information in the Bank table. The setup is only required if validations are turned on in the Direct Deposit Control table. |
| International ACH Bank Account (international automated clearing house bank account) |
If the bank is in the United States, select this check box to indicate that funds are actually going to a non-US bank. This information is included in the direct deposit file that you create with the Direct Deposit Create File process (DDP001). If the bank is not in the United States, the system selects this check box and makes it read-only. |
| Prenotification Required |
Select this check box if prenotification is required. By default, the check box is deselected. You must select it if prenotification is required. Note: The Prenotification Required check box is available for entry when you make a change to the Bank ID or Account Number fields and only after you save the page and re-enter with Correct History selected. Prenoting is the process of verifying routing numbers and account number information for an electronic transfer through a zero-dollar transaction. During the prenote period (wait days set for each bank on the US Additional Bank Data page [SRC_BANK_PY_SP] page), a zero-dollar deposit is sent to the payee's bank account, and the employer typically pays the payee with a check instead of a deposit. Direct deposits do not go into effect until after the end of the prenote wait period. This way, if the payee entered an invalid transit or account number the bank can reject the transaction, deposit into an incorrect account may be avoided, but the payee is still paid on time. The prenote process is optional, but strongly recommended. When using prenoting, you will also want to run the Direct Deposit Prenotification (DDP005) and Direct Deposit Prenote Memo (DDP006) reports prior to running the Create Direct Deposit Transmit SQR Report (DDP001) process. An example of prenoting might be that on January 31 you confirm the payroll for period January 1 to January 31. You run DDP001 on the same day and enter a prenote date of January 31. Ten working days from that date (assuming that’s the Wait Days value entered on the US Source Bank table), the system changes the prenotification status from Submitted to Completed and direct deposits go into effect. Note: If you change direct deposits by setting up a new effective-dated row on the Request Direct Deposit (DIRECT_DEPOSIT_CAN) page, all values of the previous row carry over to the new row. You can update most values, but the availability of the Prenotification Required check box depends on the type of data you that you update. The Prenote Date and Prenotification Status values (in the Distribution group box) are always system generated. |
Distribution
Note: For CAN, the group box title is Distribution Information.
|
Field or Control |
Definition |
|---|---|
| Account Type |
Select the applicable value to indicate a direct deposit to a checking or savings account, or if the system will issue a check: Checking, Savings, and Issue Check. |
| Deposit Type |
Select Amount if the employee wants a fixed dollar amount to be deposited in this account type. Select Balance if the balance of an employee's pay is to be deposited in this account type. Select Percent if the employee wants a specific percentage of his net pay to be deposited in this account type. |
| Net Pay Percent and Net Pay Amount |
Enter a specific dollar amount if you selected Amount in the Deposit Type field. Enter a percent if you selected Percent in the Deposit Type field. |
| Bank ID and Branch ID |
(CAN) The Bank ID and Branch ID fields appear in the Distribution group box for Canada only. Enter the three-digit bank ID, and enter the five-digit branch ID. Note: You must enter a bank ID and account number for each account type. |
| Priority |
Enter a priority number for this distribution. During direct deposit processing, distributions are made to accounts in order of their priority number―the lower the priority number, the higher the priority. Priority becomes important when an employee's net pay isn't enough to cover all direct deposits―in this case, only the higher priority deposits are made. Note: You should not enter a value greater than 900 if you are a user with Fluid Direct Deposit feature uptake. |
| Account Number (account number) |
Enter the employee's account number. The account number represents the employee's checking or savings account into which the money should be deposited.
If direct deposit account masking is turned on and configured, the system masks all but the last four digits of a direct deposit account number. Depending on the configuration, masking occurs on direct deposit pages for employees, direct deposit pages for administrators, and PDF and non-PDF wage statements (paychecks and payslips). Note: When the direct deposit account number is masked for Employee Direct Deposit pages, the data behind the account number is not encrypted so that the payroll administrator can access the account number in the event of an issue with the direct deposit request. If you select to mask direct deposit account numbers on Administrator Direct Deposit Pages, then administrators will need to run SQL to view the employee’s complete account numbers. When masking is selected for Wage Statements, direct deposit account numbers are masked on statements created with PAY003.SQR, PAY003CN.SQR, DDP003,SQR, and DDP003CN.SQR are masked and in PeopleSoft Fluid User Interface mobile paychecks. Masking is optional, but strongly recommended. You can turn direct deposit account masking on for direct deposit pages and wage statements in the Mask Direct Deposit Account Nbrs group box on the Payroll for NA Installation page (INSTALLATION_PY). See Defining System Settings for Payroll for North America. |
| (USA) Prenote Date |
The system enters here the prenote date that you enter in the run parameters for the Create Direct Deposit Transmit process (DDP001). |
| (USA) Prenote Status |
The system enters a value to indicate the status of the prenotification process:
Note: (CAN) The prenotification process does not apply to Canada. |
Note: On uptaking the Fluid Direct Deposit feature, Nickname field will be auto populated as account type appended with priority number, when an administrator creates/add a new account. This field will only be visible in the Employee Self Service Direct Deposit page. The user can modify the auto populated Nickname in Self Service. For more information, seeUsing the PeopleSoft Fluid User Interface to Add and Modify Direct Deposit Accounts in your PeopleSoft ePay product documentation for more information.
Last Updated Page Elements
|
Field or Control |
Definition |
|---|---|
| This data was last updated by |
Each time direct deposit data is updated, the system indicates whether an online user or a self-service web user made the update, and it displays the date of the most recent update. Online users can make updates online using the Request Direct Deposit page. The employee, also known as the web user, can make updates using the Direct Deposit transaction in the ePay self-service application. |
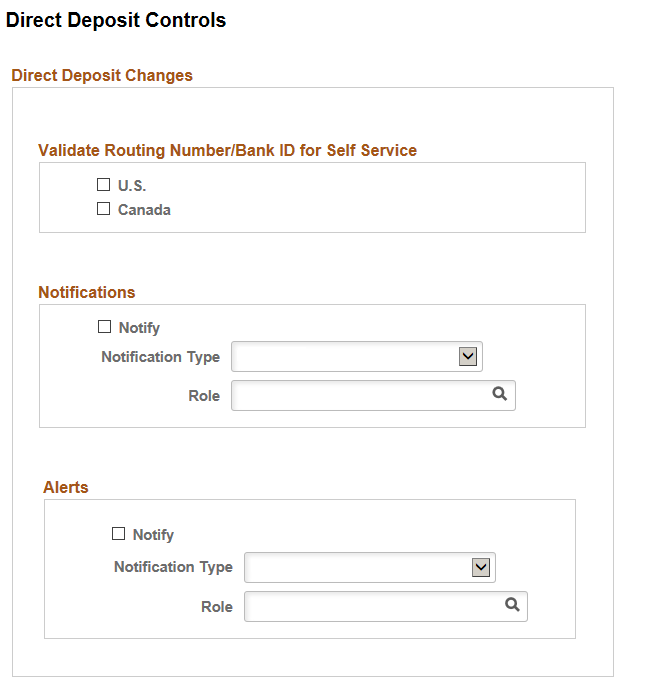
(USA, USF, CAN) Use the Direct Deposit Controls page (DIR_DEP_CNTRLS) to control email notifications, push notification (alerts) and validation of (USA, USF) Bank ID (bank routing transit number) or (CAN) Bank ID and Branch ID when employees set up direct deposit in self-service.
Navigation
Image: Direct Deposit Controls page
This example illustrates the fields and controls on the Direct Deposit Controls page.
|
Field or Control |
Definition |
|---|---|
| Validate Routing Number/Bank ID for Self Service |
Select the appropriate check box to turn on bank validations for direct deposit accounts that are entered or updated for that country. When U.S. is selected, the system validates the bank ID (bank routing transit number) against the Bank Table (BANK_EC) page. When Canada is selected, the system validates the Bank ID against the Bank Table (BANK_EC) page, and if the Bank ID is validated, the system also validates the Branch ID against the Branch Table (BANK_BRANCH_EC) page. Note: If the (USA) routing number or (CAN) bank ID does not exist on the Bank ID table, the system issues an error message and the employee cannot save the direct deposit transaction. See Setting Up Banks and Bank Branches in your PeopleSoft HCM Application Fundamentals product documentation. |
| Notifications |
Select the Notify check box to turn on automatic direct deposit email notifications. When selected, you must also select the Notification Type (Administrator, EE and Admin, or Employee) to receive the predefined email notification that the system sends when an employee’s direct deposit data is entered or updated. If the Notification Type includes an administrator, specify the administrator role to use, for example, Payroll Administrator. The email shows the date and time, based on the system date and time, when the action took place. The email is sent to the address that is associated with the recipient’s User ID, not the email address from the personal data record. If no User ID email address exists for the employee, the employee notification is not sent, but the direct deposit changes are still saved and completed. Note: When multiple rows are added or updated for the same effective date, the system sends an email notification to the employee and the administrator. |
| Alerts |
Select the Notify check box to turn on automatic direct deposit push notifications. When selected, you must also select the Notification Type(Administrator, EE and Admin, or Employee) to receive the predefined push notification that the system sends when an employee’s direct deposit data is entered or updated. If the Notification Type includes an administrator, specify the administrator role to use. Note: Alert functionality is available only for customers who have taken Direct Deposit Fluid Feature. |