3 Setting Up SPMS .NET Secure Server
The SPMS Secure Server is a Microsoft IIS host machine that hosts the Microsoft SOAP-based SPMS web services, developed to manage login credentials and encryption keys. It is comparable to a password management application.
To set up the SPMS Secure Server, install the SPMS Secure Service, which is one of the SPMS web services developed using the .NET framework and distributed as part of the SPMS Package.
SPMS .NET Secure Server Prerequisites
-
Microsoft IIS is installed on the target machine.
-
Microsoft .NET Framework 2.0, 3.5 and 4.7.2 features are enabled on the target machine.
-
Oracle 12c Database client with ODAC is installed on the target machine. See topic Oracle Database Client and ODAC Installation.
-
SPMS Package is downloaded and available in the target machine. See topic SPMS Package File for download instructions.
-
SPMS Application Client installed. See topic Setting Up SPMS Desktop Application Clients.
Note:
Do not uninstall the SPMS Application Client from the machine hosting the Secure Server. The SPMS Application Client installation distributes libraries required by the Secure Server.
Important:
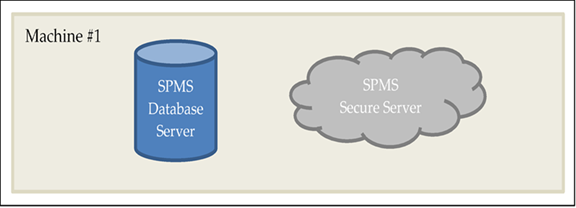
Figure 3-1 SPMS DB Server and SPMS Secure Server in the same machine

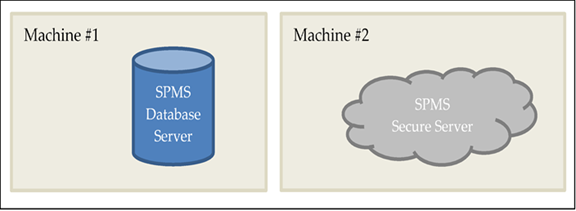
Figure 3-2 SPMS DB Server and SPMS Secure Server in different machine

-
The SPMS Secure Server must be reachable by all SPMS Application Clients and SPMS Web Server as it manages the Database user credential, which will require an established SPMS-Database connection.
-
The SPMS Secure Server must be able to connect to the SPMS Database as it will need to verify the Database connection before it can store the Database user credentials.
SPMS .NET Secure Server Installation Steps
-
See topic Installing SPMS Secure Service.
-
See topic Verifying Hosting of SPMS Secure Service.
-
See topic Setting Up SPMS Secure Service Database Connection .
Installing SPMS Secure Service
The SPMS Secure Server hosts the SPMS Secure Service. As SPMS Secure Service is distributed as part of the SPMS web services of the SPMS Package, the steps to install SPMS Secure Service are similar to the SPMS web services installation. See Installing SPMS Web Services for the step by step installation instructions.
Note:
When installing SPMS Secure Service using the install.bat file provided, select option “1 – Install OHCTransactionsService” to install the SPMS Secure Service required by SPMS Secure Server.
Verifying Hosting of SPMS Secure Service
After the successful installation of the SPMS Secure Service, verify if the SPMS Secure Service is hosted correctly. If done properly, you can reach the SPMS Secure Service over the web browser using the HTTPS communication protocol.
-
From the same SPMS Secure Server machine, launch a web browser.
-
Type the URL shown below
https://localhost/OHCTransactionsService/OHCSecurity.asmx -
If the SPMS Secure Service is hosted correctly, you will see the web page as shown below.
Figure 3-3 SPMS Secure Service Web Page Hosted on the SPMS Secure Server

Note:
It is important to know that successful hosting of the SPMS Secure Service does not guarantee a successful SPMS Database connection, which is required for the SPMS operation. Therefore, it is important to configure the SPMS Secure Server connection to the SPMS Database.
Setting Up SPMS Secure Service Database Connection
Once you have verified that the SPMS Secure Service is hosted correctly and reachable through the web browser, you can configure the SPMS Secure Service so that it knows which Database TNS it should connect to. This configuration resides in the web.config file.
-
In the installed Oracle Client home folder, ensure there is a correct Database TNS entry in the Oracle tnsnames.ora file. You will need the Database TNS Name entry created in the tnsnames.ora file so that SPMS can locate the correct Database when it references the Database TNS.
-
The installed Oracle Client folder for SPMS is
C:/Oracle/product. You may choose to install it in a different folder.Figure 3-4 Tnsnames.ora File Location in Oracle Client

- You will need to create a Database TNS entry in the tnsnames.ora file so that the SPMS Secure Service can locate the Database TNS and subsequently, be able to establish a connection to the SPMS Database.
Table 3-1 User Defined Parameters In Tnsnames.ora file
Tnsnames Parameters Description <DB_TNS_NAME>
Oracle Database TNS name. By design, SPMS applications or web services refers to the Database using the TNS name.
<DB_ADDRESS>
Address of the Oracle Database. It can be an IP address (for example, 127.0.0.1) or the machine name.
<DB_PORT>
Listener port of the Oracle Database. The port is used by the Database Server to listen for a connection.
<DB_NAME>
Oracle Database Service name. This is the name used by the Oracle Database Server to identify the Oracle Database instance.
For example:<DB_TNS_NAME> = ( DESCRIPTION = ( ADDRESS_LIST = ( ADDRESS = (PROTOCOL = TCP) (HOST = <DB_ADDRESS>) (PORT = <DB_PORT>) ) ) (CONNECT_DATA = (SERVICE_NAME = <DB_NAME>) ) ) -
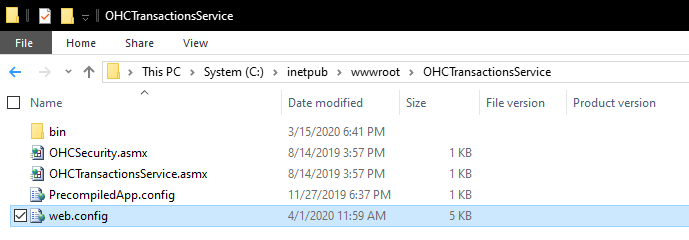
You will need to set up the SPMS Secure Service Database connection. This step is required so that the SPMS Secure Service knows which Database TNS it connect to. You can do that by editing the web.config file in
C:\inetpub\wwwroot\OHCTransactionsServicefolder.Figure 3-5 SPMS Secure Service Installed Folder

-
Under the
<appSettings>section, set the SPMS Database TNS name.Example:
<appSettings> <add key="Server" value="<DB_TNS_NAME>" /> </appSettings> -
Restart the SPMS Secure Service. You can restart the SPMS Secure Service from the IIS Manager.
Note:
After setting up the Database TNS connection for the SPMS Secure Service, the SPMS Secure Service is now able to locate the SPMS Database using the Database TNS. Note that connection to the SPMS Database is not possible yet. It needs the Database Password to be able to connect to it. To connect to the SPMS Database, the SPMS Secure Service requires the SPMS Database password, which is stored in the local DPAPI protected OHCSecurity.par file on the SPMS Secure Server
To create the local DPAPI protected OHCSecurity.par file on the SPMS Secure Server, you are required to perform either the steps to upgrade or migrate the SPMS Database using the OHC Tools as described in Setting Up Database from SPMS 20.1 Seed Database.
Troubleshooting
The troubleshooting guide for the SPMS Secure Server is the same as for SPMS web services. See Common errors in SPMS .NET Web Server Installation.