5 Setting Up SPMS .NET Web Server
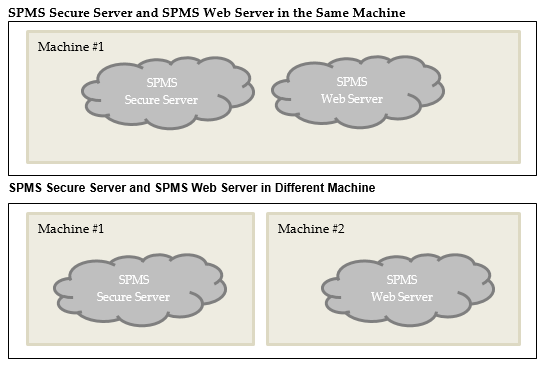
Figure 5-1 SPMS Secure Server and Web Server Options
Prerequisites
-
Microsoft IIS is installed on the target machine.
-
Microsoft .NET Framework 2.0, 3.5 and 4.7.2 features are enabled on the target machine.
-
Oracle 12c Database client with ODAC is installed on the target machine. See topic Oracle Database Client and ODAC Installation.
-
SPMS Package is downloaded and available on the target machine. See topic SPMS Package File for download instructions.
-
SPMS Application Client installed. See topic Setting Up SPMS Desktop Application Clients.
Important:
Do not uninstall the SPMS Application Client from the machine hosting the Web Server. The SPMS Application Client installation distributes libraries required by the Web Server.
SPMS .NET Web Server Installation Steps
-
See topic Installing SPMS Web Services.
-
See topic Verifying Hosting of SPMS WebServices.
Installing SPMS Web Services
Follow the instructions listed below to install the SPMS web services.
-
If a previous installation of the SPMS 7.0 / 7.3 web services exists, you are required to uninstall by removing the FCTransactionsService and FCWebServices folders from the
C:\inetpub\wwwrootfolder. -
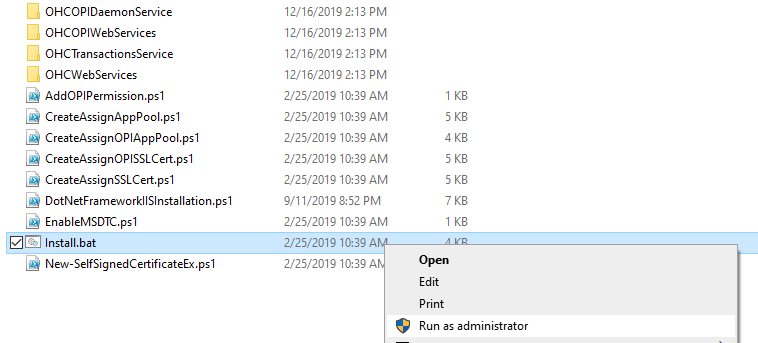
From the download SPMS Page, navigate to the Net Setup folder. See Figure 1-5
-
Open the folder and copy the WebServer folder to the
C:\tempfolder.Figure 5-2 SPMS WebServer Folder
-
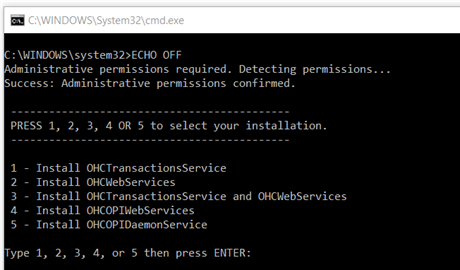
From the
C:\temp\WebServerfolder, right-click Install.bat and select Run as Administrator to launch the Microsoft Windows command screen.Figure 5-3 Webservices Install.bat Options
-
Select:
-
Option 1 – Install OHCTransactionsService, to install the SPMS Secure Service required by SPMS Secure Server. Choosing this option also install the SPMS TransactionsService as they are packaged together.
-
Option 2 – Install OHCWebServices, to install the SPMS WebServices.
-
Option 3 – Install OHCTransactionsService and OHCWebServices, to install both the SPMS TransactionsService and WebServices.
-
Option 4 – Install OHCOPIWebServices, to install the SPMS OPI WebServices.
-
Option 5 – Install OHCOPIDaemonService, to install the SPMS OPI Daemon Service.
-
-
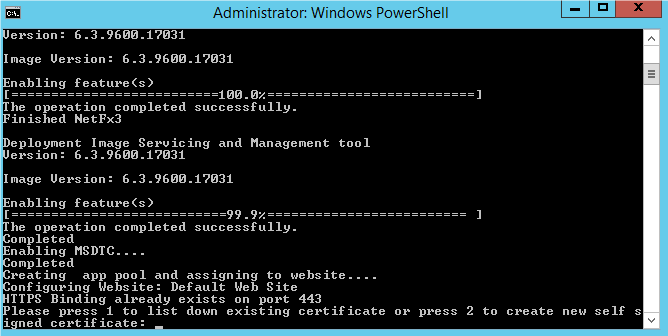
You are prompt to install a digital certificate for SPMS Secure Service identification.
Figure 5-4 Required Webservices Digital Certificate ID
-
Key in ‘1’, to list the existing digital certificates installed on the machine. When the digital certificates are listed, there is a prompt message “Please key in the subject name you want to bind”. Type the Subject name to bind the selected digital certificate to the SPMS Secure Service.
-
Key in ‘2’ to create a new self-signed digital certificate. After that, type the domain name or IP of the SPMS Secure Server to bind the new self-signed digital certificate to the SPMS Secure Service.
Figure 5-5 Option 1–Digital Certificate Available in Webservices
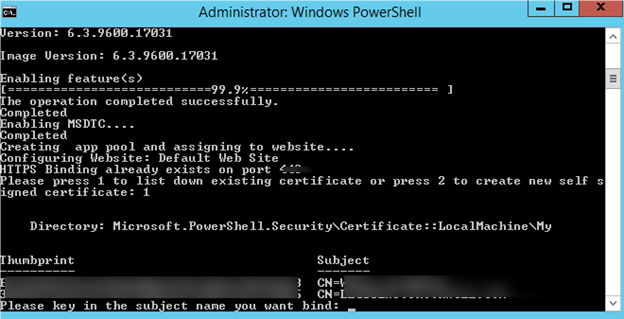
Figure 5-6 Option 2 – Required Domain Name or IP Address
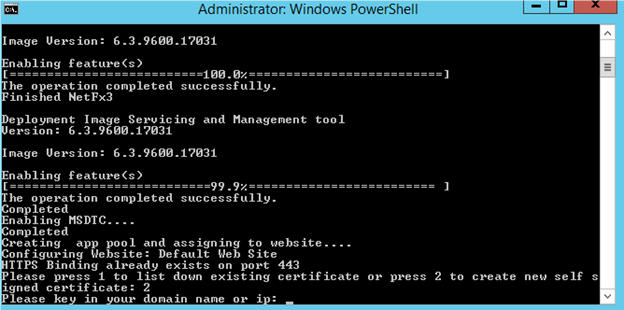
-
-
If an older SPMS 8.0 / 20.1 Secure Service installation exists, you are prompted to override the files. Continue by selecting All.
-
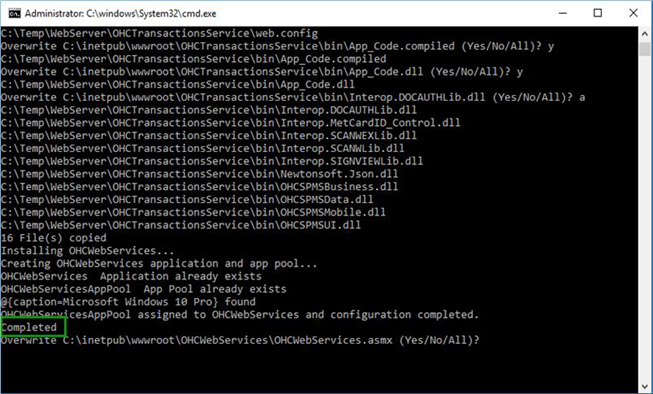
When the installation completes, press any key to close the command prompt.
Figure 5-7 Webservices Install Complete
Verifying Hosting of SPMS WebServices
After the successful installation of the SPMS web services, verify that the SPMS web services are hosted correctly. If done correctly you should be able to reach the SPMS web services over the web browser using the HTTPS communication protocol.
-
Launch a web browser.
-
Type the URL shown below in the browser search bar.
-
SPMS Secure ASP.NET Web Service: The SPMS Secure Service is the web service that manages the database user credentials. Clients that require database connection will interact with the Secure Server to obtain the database user credential. It is typically deployed at
https://[URL]/OHCTransactionsService/OHCSecurity.asmx. -
SPMS OHCTransactionsService ASP.NET Web Service: The SPMS OHCTransactionsService is the web service that serves the internal client requests. It is typically deployed at
https://[URL]/OHCTransactionsService/OHCTransactionsService.asmx -
SPMS OHCWebServices ASP.NET Web Service: The SPMS OHCWebServices is the web service that serves the external client requests. It is typically deployed at
https://[URL]/OHCWebServices/OHCWebServices.asmx
-
-
If the SPMS web services are hosted successfully, you will see the web page as shown in Figure 3-5.
Note:
It is important to know that successful hosting of the SPMS web services does not guarantee a successful SPMS Database connection, which is required for SPMS operation. Therefore, it is important to configure the SPMS web services connection to the SPMS Database.
Configuring SPMS WebServices Database Connection
Once you have verified that the SPMS web services are hosted correctly and reachable through the web browser, you can then proceed to configure the SPMS web services so that it knows which Database TNS it connect to. Like most web services, this configuration resides in the usual web.config file.
-
From the installed Oracle Client home folder, ensure there is a correct Database TNS entry in the Oracle TNSNames.ora file for SPMS to locate the correct Database when it references to the Database TNS.
- If the Database TNS entry is not in the TNSNames.ora file, you can create it using the below example. See Table 3-1. For example:
<DB_TNS_NAME> = ( DESCRIPTION = ( ADDRESS_LIST = ( ADDRESS = (PROTOCOL = TCP) (HOST = <DB_ADDRESS>) (PORT = <DB_PORT>) ) ) (CONNECT_DATA = (SERVICE_NAME = <DB_NAME>) ) ) -
The commonly installed Oracle Client folder for SPMS is C:/Oracle/product. However, you may choose to install it in a different folder.
-
After that, you set up the SPMS web services Database connection. This step is required so that the SPMS web services knows which Database TNS it should connect to. You can do that by editing the web.config file.
-
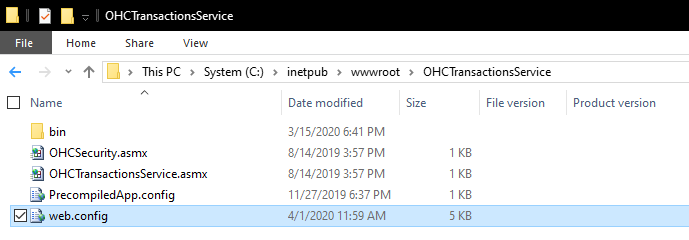
The web.config file for SPMS OHCTransactionsService resides at
C:\inetpub\wwwroot\OHCTransactionsServiceFigure 5-8 TransactionsServices Installed Folder
-
The web.config file for SPMS OHCWebServices resides at
C:\inetpub\wwwroot\OHCWebServicesfolder.Figure 5-9 WebServices Installed Folder

-
-
Under the <appSettings> section of the web.config file, set the SPMS Database TNS name.
For example:<appSettings> <add key="Server" value="<DB_TNS_NAME>" /> </appSettings>Note:
After setting up the Database TNS connection for SPMS web services, the SPMS web services is now able to locate the SPMS Database using the Database TNS. Note that the connection to the SPMS Database is not possible yet. It needs the Database Password to be able to connect to it. To connect to the SPMS Database, the SPMS web services requires the SPMS Database password, which is stored in the local DPAPI protected OHCSecurity.par file on the SPMS Web Server.
To create the local DPAPI protected OHCSecurity.par file on the SPMS Web Server, you are required to connect to the SPMS Secure Server which can be configured from the same web.config file
-
Under the
<appSettings>section of the web.config file, set the SPMS Secure Server IP address or the machine name.Table 5-1 User Definable Value in Web.Config File
Web.Config File Value Description <SECURE_SERVER_NAME>
A User defined SPMS Secure Server IP address or the machine name if it is resolvable by the DNS server.
For example:<appSettings> <add key=" SecureLogin" value="<SECURE_SERVER_NAME>" /> </appSettings> -
Restart the SPMS web services. You can restart the SPMS Secure Service from the IIS Manager.
Configuring SPMS OPI WebServices Database Connection for OPI Handling
C:\inetpub\OHCOPIWebServices and to define the SPMS database server name <SOURCE>, password<PASSWORD> and User ID <DBUSER> under <connectionStrings>.
<connectionStrings> <add name="OHCEntities" connectionString="metadata=<a target="_blank" href="res://*/OHCModel.csdl|res://*/OHCModel.ssdl|res://*/OHCModel.msl;provider=Oracle.ManagedDataAccess.Client;provider">res://*/OHCModel.csdl|res://*/OHCModel.ssdl|res://*/OHCModel.msl;provider=Oracle.ManagedDataAccess.Client;provider</a> connection string="DATA SOURCE=[SOURCE];PASSWORD=[PASSWORD];PERSIST SECURITY INFO=True;USER ID=<USER ID>"" providerName="System.Data.EntityClient" /> </connectionStrings>
<connectionStrings> <add name="OHCEntities" connectionString="metadata=<a target="_blank" href="res://*/OHCModel.csdl|res://*/OHCModel.ssdl|res://*/OHCModel.msl;provider=Oracle.ManagedDataAccess.Client;provider">res://*/OHCModel.csdl|res://*/OHCModel.ssdl|res://*/OHCModel.msl;provider=Oracle.ManagedDataAccess.Client;provider</a> connection string="DATA SOURCE=<IP Address>:<Port No>/<Service Name>;PASSWORD=[PASSWORD];PERSIST SECURITY INFO=True;USER ID=<User ID>"" providerName="System.Data.
Troubleshooting