Configuring Employee Snapshot
The Employee Snapshot shows managers and administrators a variety of human resources and talent-related information about an employee. The PeopleSoft system enables administrators to determine what items and date ranges to display these items.
These videos demonstrate configuration features for Fluid Employee Snapshot for the talent administrator:
Video: Image Highlights, PeopleSoft HCM Update Image 24: Employee Snapshot Configuration Enhancements
Video: Image Highlights, PeopleSoft HCM Update Image 31: Development Documents for Employee Snapshot
Video: Image Highlights, PeopleSoft HCM Update Image 32: Configurable Profile Content in Employee Snapshot
To set up the Employee Snapshot, use the Configure Employee Snapshot (HCTS_ESNAP_CFG_FL) component.
Note: When you apply the new configuration pages and component, an AE conversion will run as part of the change package and copy the configuration setup you have defined on the Talent Summary Setup - Other Pagelets Page. After the initial run of the AE process, you can update the Configure Employee Snapshot pages to override the values that came from the Talent Summary Setup component. These setup tables are now unique to their own business processes and updating one will not update the other.
These topics provide an overview of how to display content on configuration profile tiles or pages, discuss the Configure Employee Snapshot page layout, and how to set up Employee Snapshot configuration options.
|
Page Name |
Definition Name |
Usage |
|---|---|---|
|
HC_HCTS_ESNAP_CFG_FL_GBL (cref of the tile) |
Access the configuration pages for Employee Snapshot. |
|
|
N/A |
The Configure Employee Snapshot pages appear in a multi-panel layout. When using a large form factor like a desktop or tablet, the left panel lists the page category items and the main panel displays the content related to that item. When using a small form factor, such as a phone, the page category items will display by default when you select the Configure Employee Snapshot tile. Select a page list item to access that page. |
|
|
HCTS_CFG_COMP_FL |
Identify the number of years to display competencies for the evaluation types you have defined on this page. |
|
|
Configure Employee Snapshot - Licenses and Certifications Page |
HCTS_CFG_LICRT_FL |
Determine if you want to compare the competencies held by a person to their job profile and when to alert a manager of expiring items. |
|
HCTS_CFG_PRJCT_FL |
Enter the number of years to display special projects assigned to the employee. |
|
|
HCTS_CFG_PERF_FL |
Identify performance and development document types and the number of reviews to display. |
|
|
Configure Employee Snapshot - Performance versus Potential Page |
HCTS_CFG_PP_BOX_FL |
Set up the Performance versus Potential ratings box for the Employee Impact tile. |
|
HCTS_CFG_RATE2_SCF |
Map a performance rating axis value to each rating within a rating model. |
|
|
HCTS_CFG_RL_BOX_FL |
Set up the Risk versus Loss ratings box for the Employee Impact tile. |
|
|
HCTS_CFG_SUCC_FL |
Select which of the employee’s succession plans should display on the Succession Plans tile and page based on the plan’s status. |
|
|
HCTS_CFG_CAT_FL |
View or add new profile-related tiles to the Employee Snapshot dashboards. |
|
|
HCTS_TILE_TBL_SCF HCTS_TILE_TBL2_SCF |
Define the attributes and publish profile-related tiles to the Employee Snapshot dashboards. |
|
|
HCTS_DASHBOARD_SCF |
View tile publish statuses. |
While PeopleSoft eProfile Manager Desktop delivers multiple tiles that appear on the various Employee Snapshot dashboards, the system also enables talent administrators to add configurable profile-related tiles. With this functionality, your organization can display profile data that is not already on a delivered tile, as well as show profile information that you have created yourself. Administrators can easily configure this additional profile content to:
Display on one or many dashboards.
Select the order the tiles should appear on a dashboard.
Indicate whether to display a ratings bar for profile items that may contain ratings data for the employee.
You will use the Tile Attributes Page to configure and publish this information to the designated dashboards.
Administrators use the Configure Employee Snapshot tile to access the configuration pages for Employee Snapshot.
Navigation:
The Configure Employee Snapshot tile is delivered as part of the Talent Administrator home page, but the location can change if you change the delivered home pages or if administrators personalize their home pages.
This example illustrates the Configure Employee Snapshot tile.
Click the Configure Employee Snapshot tile to access the various pages for defining Employee Snapshot configuration options.
The PeopleSoft HCM enables you to configure the Employee Snapshot business process using these pages:
Like many fluid pages, the Configure Employee Snapshot pages appear in a multi-panel layout. When using a large form factor like a desktop or tablet, the left panel lists the page category items and the main panel displays the content related to that item. Select a page item from the left panel to change the page content view. Click the slider tab when using a large form factor device to hide or display the left panel list.
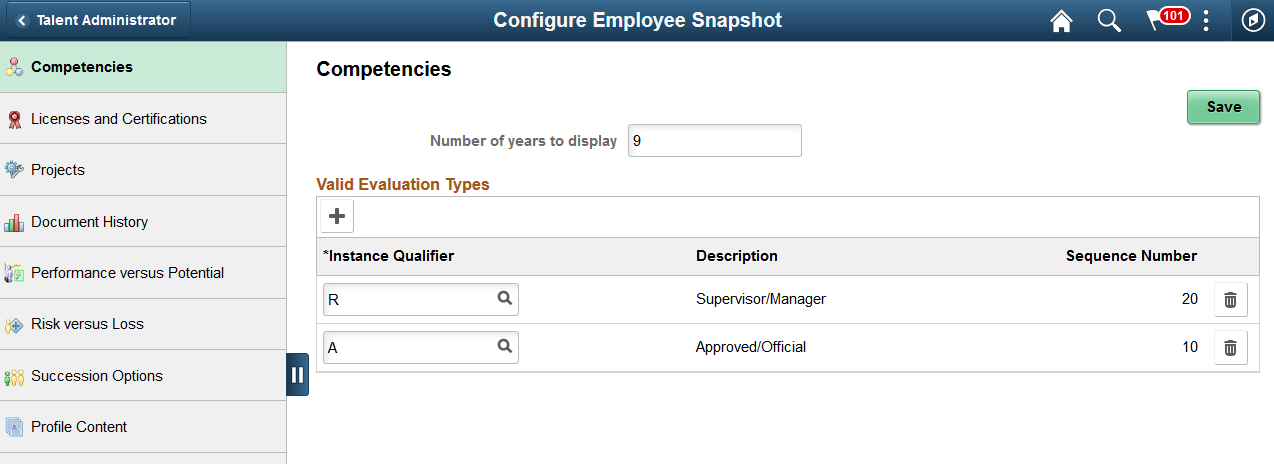
This example illustrates the Configure Employee Snapshot page layout using a large form factor.
When using a small form factor, such as a phone, the page category items will display by default when you select the Configure Employee Snapshot tile. Select a page list item to access that page. To change to another configuration page, click the page Back button in the banner to view the page category items again and select another page.
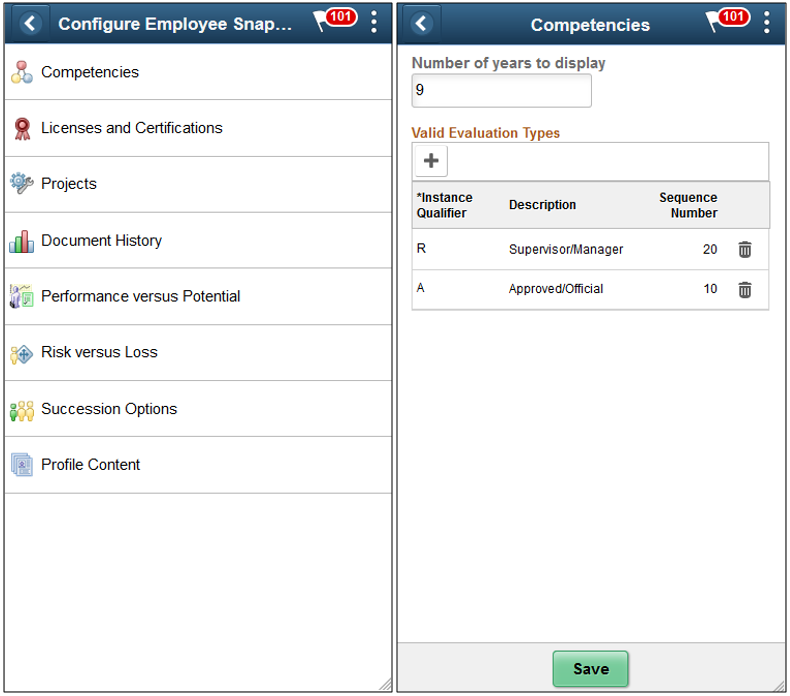
This example illustrates the Configure Employee Snapshot pages on a small form factor device. In the first image, the page displays the page list items. The second image displays the page item you have selected without the list panel showing. Click the Back arrow button to return to the list items for Configure Employee Snapshot.
Use the Configure Employee Snapshot - Competencies page (HCTS_CFG_COMP_FL) to identify the number of years to display competencies for the evaluation types you have defined on this page.
Navigation:
Select Fluid Home under the main menu. On the page that appears, select Talent Administrator. The Configure Employee Snapshot tile is available on the Talent Administrator fluid home page.
This example illustrates the fields and controls on the Configure Employee Snapshot - Competencies page.

Field or Control |
Description |
|---|---|
Number of years to display |
Enter the number of years the system should show rated competencies. The competency-related tiles and pages for the Employee Snapshot will display competencies within the years entered here. Note: Regardless of the number of years you enter, the tiles and pages display only the most current competency ratings. Limiting the number of years to display data eliminates old data that may no longer be relevant. |
Valid Evaluation Types
Use this section to identify which evaluation types (instance qualifiers) should appear in the competency tiles and pages.
Field or Control |
Description |
|---|---|
|
Click to include additional evaluation types that can appear on the competency tiles and pages. Important! When you do not identify valid evaluation types, the Job Competency tiles and page will display a message that you need to contact the system administrator to configure this view. |
Instance Qualifier and Description |
Enter instance qualifiers to identify which evaluation types should appear on the competency-related tiles and pages. |
Sequence Number |
Displays the sequence number for the evaluation type (instance qualifier). These are defined under the COMPETENCY content type on the Manage Profiles Instance Qualifiers Page. Note: When more than one evaluation type exists for an employee, the system will use the evaluation type with the lowest sequence number. For example, if an employee has both an Approved/Official evaluation, which has a sequence number of 10, and a Supervisor/Manager evaluation, which has a sequence number of 20, the system will display the Approved/Official evaluation on the Employee Snapshot pages, since it has the lowest sequence number of 10. |
 Add
icon button
Add
icon buttonUse the Configure Employee Snapshot - Competencies page (HCTS_CFG_LICRT_FL) to determine if you want to compare the competencies held by a person to their job profile and when to alert a manager of expiring items.
Navigation:
Select Fluid Home under the main menu. On the page that appears, select Talent Administrator. The Configure Employee Snapshot tile is available on the Talent Administrator fluid home page.
Select the Licenses and Certifications category item from the left panel.
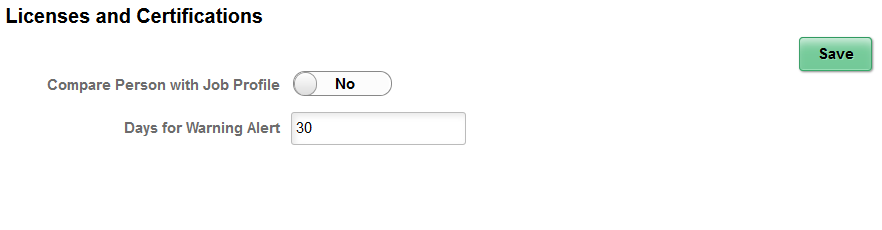
This example illustrates the fields and controls on the Configure Employee Snapshot - Licenses and Certifications page.
Field or Control |
Description |
|---|---|
Compare Person with Job Profile |
Set this option to Yes to have the Licenses and Certifications tiles and pages identify which items held by the employee are required by the job versus those that are not required by the job. When enabled, the:
Set this option to No to have all licenses and certifications held by the employee grouped together and not separated by those required by the job. The tiles will show a current and expiring count as well as a count for expired items. The page will display all licenses and certifications held by the employee on one page. Missing items will not be identified on the tiles or pages. |
Days for Warning Alert |
Enter the number of days before a transaction is to expire to indicate that the system should display an expiration warning to the manager. For example, if you entered 60 in this field, and an employee’s CPR certification expires on October 30, then from September 1 until the expiration date the system will display an Expiring Soon warning alert icon next to this employee's certification. After this date the icon will switch to an Expired alert icon instead. Expiration dates for licenses and certifications are defined on the Person Profile: Qualifications tab. Note: When the Compare Person with Job Profile option is enabled on this page, the Licenses and Certifications Tile will list the number count of required-for-job items that have expired or that are expiring soon. It will not list the number count of additional items that are expired or are expiring soon. Click the <number count> Additional Items box on the tile to view expiring soon or expired items that are not required by the job. However, the Licenses and Certifications (Summary) Tile does not separate out the required versus non-required items, even when the Compare Person with Job Profile option is set to Yes. |
Use the Configure Employee Snapshot - Projects page (HCTS_CFG_PRJCT_FL) to enter the number of years to display special projects assigned to the employee.
Navigation:
Select Fluid Home under the main menu. On the page that appears, select Talent Administrator. The Configure Employee Snapshot tile is available on the Talent Administrator fluid home page.
Select the Projects category item from the left panel.
This example illustrates the fields and controls on the Configure Employee Snapshot - Projects page.
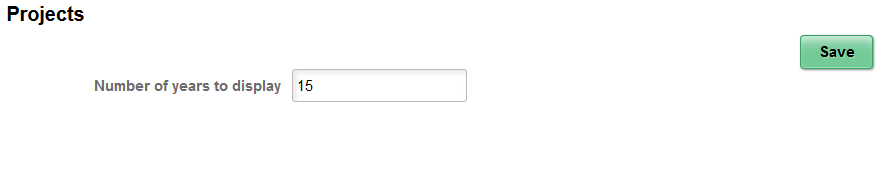
The information you enter here impacts which projects will appear on the Special Projects Tile and Special Projects Page. Only those that fall within the number of years specified here will appear on these tiles and pages.
Use the Configure Employee Snapshot - Document History page (HCTS_CFG_PERF_FL) to identify performance and development document types and the number of reviews to display.
Navigation:
Select Fluid Home under the main menu. On the page that appears, select Talent Administrator. The Configure Employee Snapshot tile is available on the Talent Administrator fluid home page.
Select the Document History category item from the left panel.
This example illustrates the fields and controls on the Configure Employee Snapshot - Document History page.
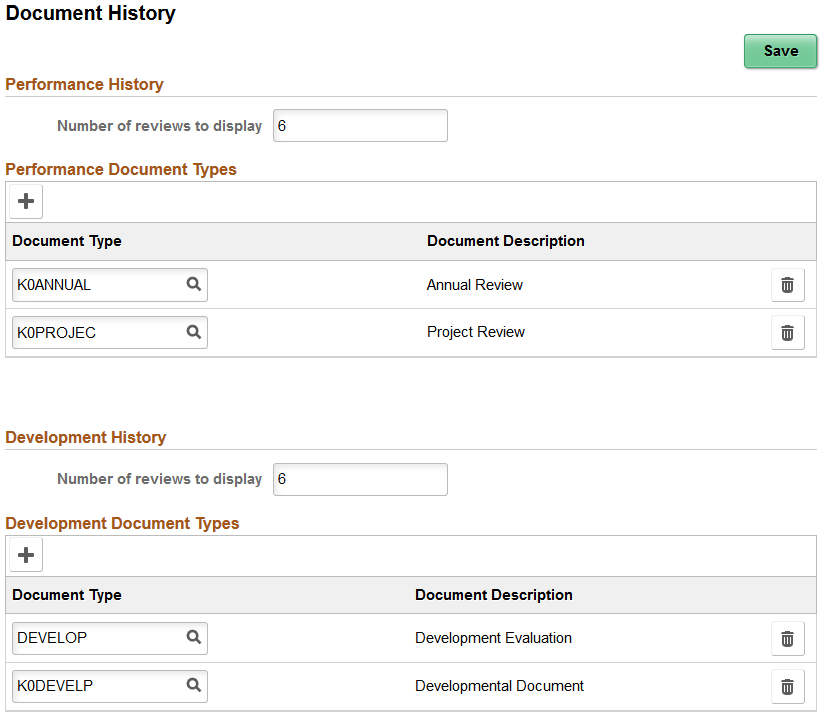
Performance History
Field or Control |
Description |
|---|---|
Number of reviews to display |
Enter the maximum number of completed performance reviews the Employee Snapshot tiles and pages should display for an employee. |
Performance Document Types
Use this section to identify which performance document types should appear on the performance tiles and pages. The performance tiles and page will display all the document types that an employee holds that meet the criteria specified on this page. More than one document type can appear for an employee.
Field or Control |
Description |
|---|---|
|
Click to include additional performance document types that can appear on the Performance History tiles and pages. |
Document Type |
Select the performance document types that should be used for the overall performance rating for the performance tiles and pages. These values are defined on the Document Types Page. |
Important! When you do not identify valid document types, the Performance History tiles and pages will display a message that you need to contact the system administrator to configure this view.
Development History
Field or Control |
Description |
|---|---|
Number of reviews to display |
Enter the maximum number of completed development reviews the Employee Snapshot tiles and pages should display for an employee. |
Development Document Types
Use this section to identify which development document types should appear on the development tiles and pages. The development tiles and page will display the most recent development document type that an employee holds that meet the criteria specified on this page. More than one document type can appear for an employee on the Development History Page if he or she meets the criteria specified on this page and the page is accessed from the non-summary tile.
Field or Control |
Description |
|---|---|
|
Click to include development document types that can appear on the Development History tiles and pages. |
Document Type |
Select the development document types that should be used to display on the development tiles and pages. The tiles and pages will show the completed development documents for the employee. Document types are defined on the Document Types Page. |
Important! When you do not identify valid document types, the Development tiles and pages will display a message that you need to contact the system administrator to configure this view.
Use the Configure Employee Snapshot - Performance versus Potential page (HCTS_CFG_PP_BOX_FL) to set up the Performance versus Potential ratings box for the Employee Impact tile.
Navigation:
Select Fluid Home under the main menu. On the page that appears, select Talent Administrator. The Configure Employee Snapshot tile is available on the Talent Administrator fluid home page.
Select the Performance versus Potential category item from the left panel.
This example illustrates the fields and controls on the Configure Employee Snapshot - Performance versus Potential page.
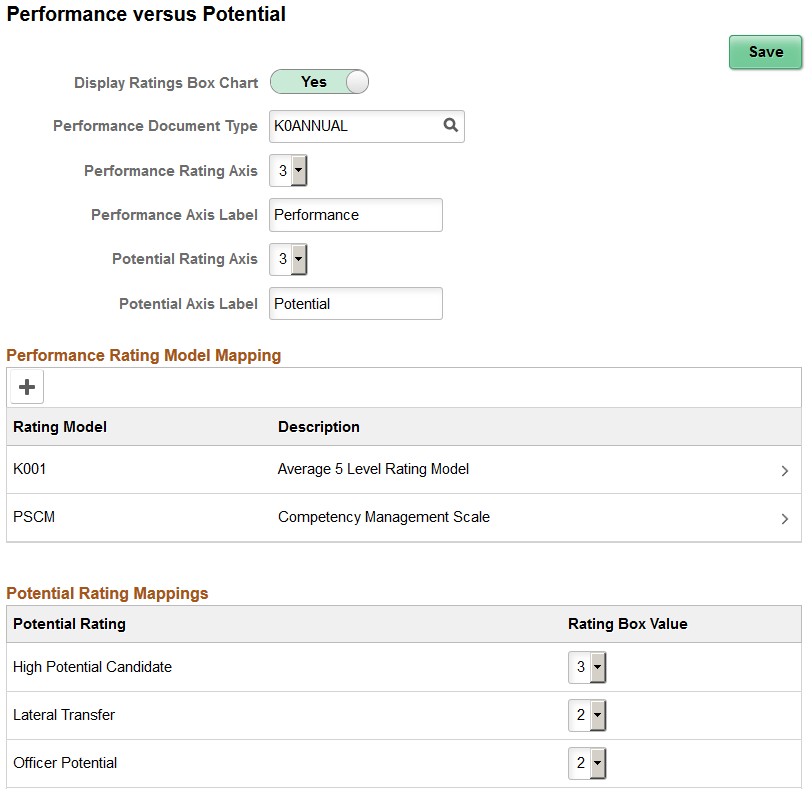
Use this page to configure the Performance versus Potential Ratings box for Employee Snapshot. The Performance versus Potential Ratings box displays the performance rating from the most recently completed performance document and the potential rating from career planning.
Field or Control |
Description |
|---|---|
Display Performance Versus Potential Ratings Box |
Swipe to Yes if you want this ratings box to appear on the Employee Impact Tile. If you select NO, this ratings box will not appear on the tile and the employee’s evaluation for performance and potential will not be viewable on the Employee Impact Page as well. Note: If this option and the Display Risk of Leaving Versus Impact of Loss Box option on the Configure Employee Snapshot - Risk versus Loss Page are set to NO, the tile will display a message to contact to administrator to configure the view. This also prevents the manager from viewing any of the employee’s ratings. |
Performance Document Type |
Select the performance document type that should be used for the Overall Performance Rating for the Performance versus Potential ratings box. These values are defined in the Document Types Page. |
Performance Rating Axis |
Select an option in this field to configure the maximum value for the x-axis. The values in this drop-down are 1-5. This number defines the ratings box size, along with the y-axis. |
Performance Axis Label |
Specify the label for the performance x-axis. |
Potential Rating Axis |
Select an option in this field to configure the maximum value for the y-axis. The values in this drop down are 1-5. |
Potential Axis Label |
Specify the label for the performance y-axis. |
Performance Rating Model Mapping
Use this group box to map one or more rating models to the performance ratings axis defined at the top of this page. To standardize performance ratings you use within your organization, which can potentially have different rating values, map each rating model to line up with the values for the performance rating axis.
Field or Control |
Description |
|---|---|
Rating Model |
Identifies the rating models you wish to use in the performance rating axis. Rating models are managed on the Rating Model Page. Click the Add (+) button or select a row to access the Rating Model Information Page and add, view, or manage rating model mappings. |
Potential Rating Mappings
Field or Control |
Description |
|---|---|
Potential Rating |
Map a rating box value to each potential rating type. The system uses this information to determine where a person’s potential rating should display in the ratings box on the Employee Impact Tile. The values run from 1 to the value defined in the Potential Rating Axis field. |
Use the Rating Model Information page (HCTS_CFG_RATE2_SCF) to map a performance rating axis value to each rating within a rating model.
Navigation:
Select the Add (+) button or select a row from the Performance Rating Model Mapping grid on the Configure Employee Snapshot - Performance versus Potential Page.
This example illustrates the fields and controls on the Rating Model Information page.
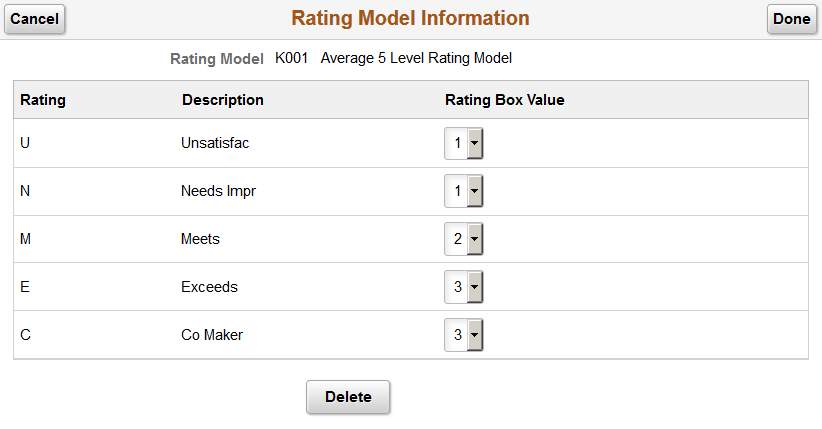
Map a rating box value to the performance rating for this ratings model. The system uses this information to determine where a person’s performance rating should display in the ratings box on Employee Impact Tile when a rating model may not match the performance rating axis values defined on this page. The values run from 1 to the value defined in the Performance Rating Axis field on the Configure Employee Snapshot - Performance versus Potential Page.
Use the Configure Employee Snapshot - Risk versus Loss page (HCTS_CFG_RL_BOX_FL) to set up the Risk versus Loss ratings box for the Employee Impact tile.
Navigation:
Select Fluid Home under the main menu. On the page that appears, select Talent Administrator. The Configure Employee Snapshot tile is available on the Talent Administrator fluid home page.
Select the Risk versus Loss category item from the left panel.
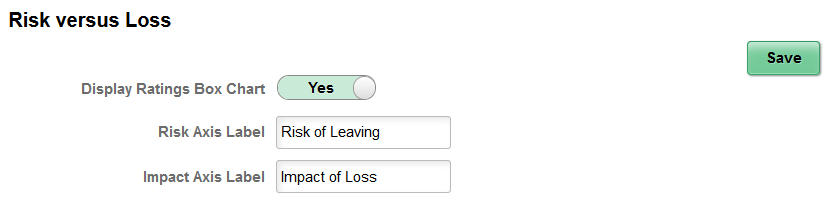
This example illustrates the fields and controls on the Configure Employee Snapshot - Risk versus Loss page.
Field or Control |
Description |
|---|---|
Display Risk of Leaving Versus Impact of Loss Box |
Swipe to Yes if you want this ratings box to appear on the Employee Impact Tile. When no data is available for the ratings box, the box will not appear. If you select NO, this ratings box will not appear on the tile and the employee’s evaluation for risk of leaving and impact of loss will not be viewable on the Employee Impact Page as well. Note: If this option and the Display Performance Versus Potential Ratings Box option on the Configure Employee Snapshot - Performance versus Potential Page are set to NO, the tile will display a message to contact to administrator to configure the view. This also prevents the manager from viewing any of the employee’s ratings. |
Risk Axis Label |
Specify a label for the risk of leaving x-axis. |
Impact Axis Label |
Specify a label for the impact of leaving y-axis. |
Use the Configure Employee Snapshot - Succession Options page (HCTS_CFG_SUCC_FL) to select which of the employee’s succession plans should display on the Succession Plans tile and page based on the plan’s status.
Navigation:
Select Fluid Home under the main menu. On the page that appears, select Talent Administrator. The Configure Employee Snapshot tile is available on the Talent Administrator fluid home page.
Select the Succession Options category item from the left panel.
This example illustrates the fields and controls on the Configure Employee Snapshot - Succession Options page.
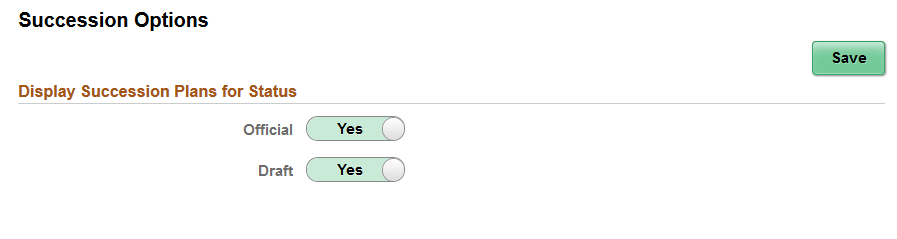
The information you select here determines which succession plans the manager will see for the employee on the Succession Plans Tile and Succession Plans Page. If both options are set to NO, then the tile will display a message to contact the administrator to configure the view.
Note: These settings are for the manager only, they do not apply to the administrator view of the employee’s succession plan data.
Use the Configure Employee Snapshot - Profile Content page (HCTS_CFG_CAT_FL) to view or add new profile-related tiles to the Employee Snapshot dashboards.
Navigation:
Select Fluid Home under the main menu. On the page that appears, select Talent Administrator. The Configure Employee Snapshot tile is available on the Talent Administrator fluid home page.
Select the Profile Content category item from the left panel.
This example illustrates the fields and controls on the Configure Employee Snapshot - Profile Content page.
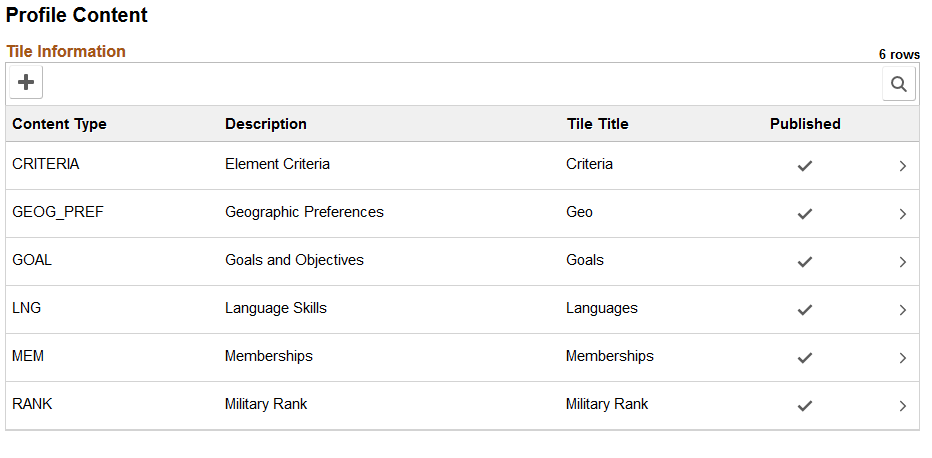
Use this page to view a list of profile tiles that you have created for the Employee Snapshot.
Field or Control |
Description |
|---|---|
|
Click to access the Tile Attributes Page and configure a new profile tile for any of the Employee Snapshot dashboards. |
Content Type and Description |
Displays the type of content that will be available on the tile and pages. This information comes from Profile Management. |
Tile Title |
Displays the content name of the tile and page that will display to the user within Employee Snapshot. Note: This name is represented as <Content Type> or <Content Item> throughout this documentation. |
Published |
Indicates if a tile has been published to an Employee Snapshot dashboard. Note: Although a content type may indicate that it has been publish, it may not be published to all dashboards you have configured for this content type. The tile only need be published to one dashboard to indicate that it has been published. To view the dashboard or dashboards to which this tile has been published, click the row to access the Tile Attributes Page. If this field is blank, the tile has not been published and therefore not accessible from any of the Employee Snapshot dashboards. |
 Add Content Type button or
 Click a row to access the Tile Attributes Page to view details, update information, or delete a profile tile.
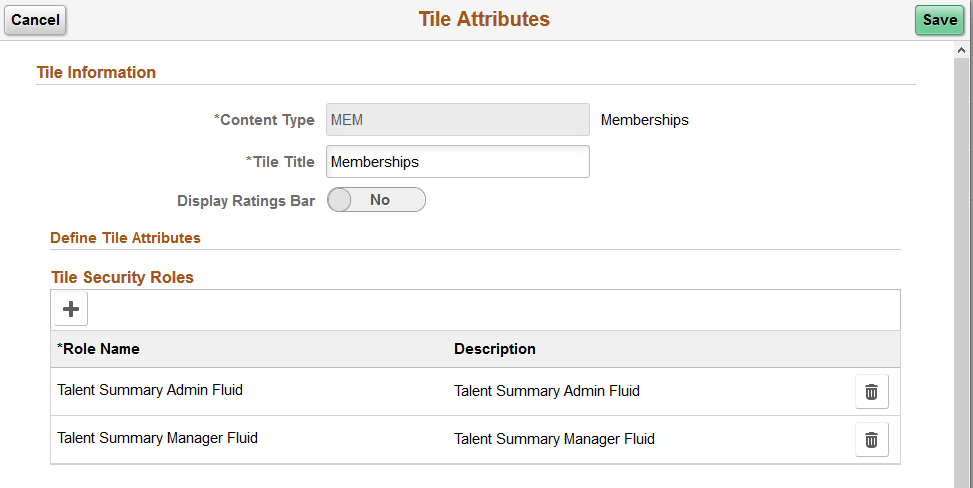
Use the Tile Attributes page (HCTS_TILE_TBL_SCF or HCTS_TILE_TBL2_SCF) to define the attributes and publish profile-related tiles to the Employee Snapshot dashboards.
Navigation:
Select the Add Content Type button, Add (+) button, or select a row on the Configure Employee Snapshot - Profile Content Page.
This example illustrates the fields and controls on the Tile Attributes page (1 of 2).
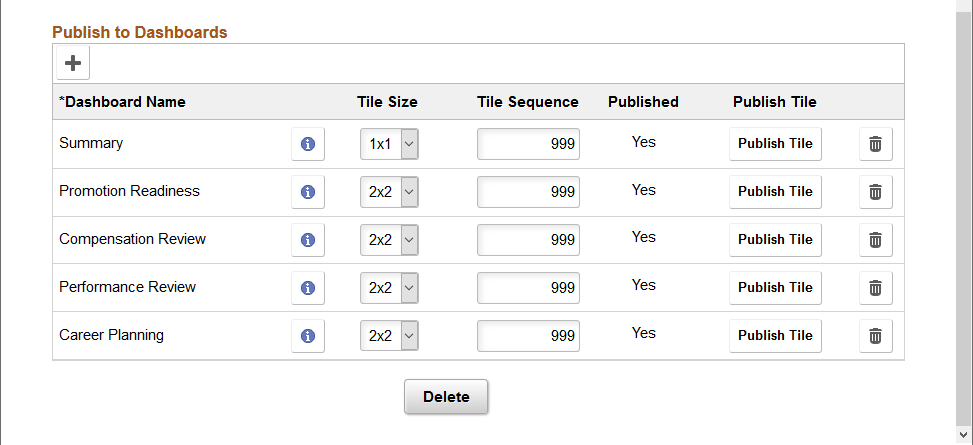
This example illustrates the fields and controls on the Tile Attributes page (2 of 2).
Use this page to add and publish profile-related tiles to the Employee Snapshot dashboards. This page enables you to create and display profile data you have created for your organization as well as profile data that may not be part of the delivered tiles. For a list of delivered tiles, see those items marked with an asterisk (*) on the Understanding the Employee Snapshot Content and Layout section of this documentation.
Field or Control |
Description |
|---|---|
Content Type |
Select a content type, which identifies the type of information that will appear on the tile and pages. Content types are defined in Profile Management on the Content Types Page. Only those content types that do not already have a tile on any of the Employee Snapshot dashboards will be available for selection. |
Tile Title |
Indicate the name that should appear on the tile and pages. You can enter up to 30 characters. Note: This name is represented as <Content Type> or <Content Item> throughout this documentation. |
Display Ratings Bar |
This field is available when the content type you have selected is associated with ratings. Yes is provided by default when a content type is associated with a rating. Enabled, the tile and pages will display a ratings bar. For example, if this is a Yes and you are viewing language profile information, the tile will show the employee’s proficiency on a graphical bar. However, a content type like travel preferences is not associated with ratings and therefore this option would not be available for selection. Swipe to No to hide the ratings bar and show only text. |
Ratings bars appear differently based on the dashboard you select and the page you are viewing, as shown in this table:
|
Tile |
<Content Type> Page |
|
|---|---|---|
|
Summary Dashboard |
Does not show a ratings bar |
Displays:
|
|
Non-Summary Dashboards
|
Displays the first (1) ratings bar only |
Displays:
|
Tile Security Roles
Use this section to identify which PeopleTools roles the user should have to access this tile and sub-pages. Insert additional roles by selecting the Add (+) button at the top of the grid or delete roles by selecting the delete (trash can) button.
Note: When identifying roles, consider if you will be granting access to both the manager ( tile) and administrator ( tile) pages. The PeopleSoft application delivers the Talent Summary Manager Fluid and Talent Summary Admin Fluid roles respectively, or you can use roles you have created.
Publish to Dashboards
Use this section to configure a tile for one or many dashboards. The fields in this section become available when you select a dashboard in the Dashboard Name field.
Field or Control |
Description |
|---|---|
|
Select this button to select a new dashboard name and configure the tile. |
Dashboard Name |
Select the dashboard on which this tile should appear. Valid dashboard values include:
You cannot publish a tile to the same dashboard more than once. After you have selected a dashboard for a content type, that dashboard option will no longer appear in the list. |
|
Click this icon button to access the Dashboard Information Page and view all the tiles that have been published to this dashboard. This is useful to help visualize the dashboard layout and order tiles by size. |
Tile Size |
Select the size of the tile as it should appear on the selected dashboard. The system will provide a default tile size, based on the dashboard and content items available for the content type. You can change this value for non-summary type tiles. Valid values for the following dashboards include:
Although you can save this page without having a tile size selected, you must select a tile size in order to publish the tile. To view the order and sizing of other tiles on the dashboard, click the Dashboard Information icon button. |
Tile Sequence |
Enter the priority order in which the tile should appear on the dashboard, smallest to largest. The system provides 999 by default, making it appear at the end of the tile list, but you can change this. If you have more than one tile with the same sequence number, the dashboard will display those tiles alphabetically. To view the current order of the tiles on the dashboard, click the Dashboard Information icon button. |
Published |
Displays No by default, indicating that the tile has not yet been published to the indicated dashboard. You must click the Publish Tile button to publish this tile. Saving the page will not publish the tile. After you have published the tile, the column displays a Yes to indicate that this tile has been published to the dashboard. |
|
Click this button to publish the tile to the indicated dashboard. Review the Published field on this page or the Configure Employee Snapshot - Profile Content Page to see if a tile is published. Note: By default the Talent Summary Admin Fluid role is given access to all new tiles. This gives the administrator user access to add, update, and delete the tiles as needed. Note: You can make changes to tile without having to republish the tile. |
|
Click this button to remove the tile from the indicated dashboard. |
 Dashboard Information icon button
 Delete button
Other Page Controls
The page may also contains these other standard buttons.
Field or Control |
Description |
|---|---|
Cancel |
Click to cancel any changes you have made to this content type. |
Delete |
This button is available when you are updating an existing content type. Select to remove this content type from your configurable profile content list. Note: You cannot delete a content type if there are tiles that have been published to any dashboard. You must first delete the published tiles from the dashboards before you can delete a content type. |
Save |
Click to save your information and have it appear in the configurable profile content list. If you have published a tile, you will need to save your information before you can view the tile on the dashboard. |
Use the Dashboard Information page (HCTS_DASHBOARD_SCF) to view tile publish statuses.
Navigation:
Select the Dashboard Information button for select a row on the Tile Attributes Page.
This example illustrates the fields and controls on the Dashboard Information page.
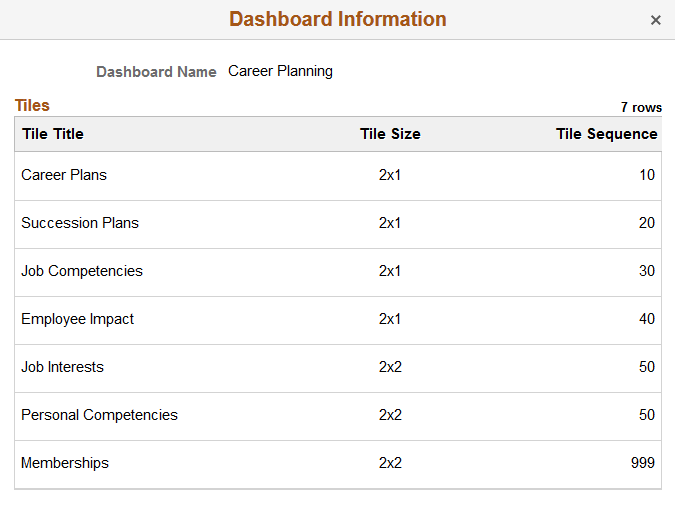
Use this page to view the sequence order of tiles and their sizes. By viewing the order and size, you are more easily able to align tiles on the dashboard with those of similar sizes.