Setting Up eSocial
This topic discusses how to set up eSocial in Global Payroll for Brazil.
|
Page Name |
Definition Name |
Usage |
|---|---|---|
|
GPBR_ESOCIAL_PARAM |
Activate the eSocial functionality on your PeopleSoft system. |
|
|
ES_RC_REGN_BRA |
Populate eSocial registration numbers for employees. |
|
|
GPBR_ESOC_ASO |
Update employee record numbers on ASO exam results. |
|
|
GPBR_RC_EVT_HIST |
Load data that was accepted by the Government into the PeopleSoft system. |
|
|
GPBR_XMLBATCH_GRP |
Define XML batch groups and subgroups. |
|
|
GPBR_EVENT_SETUP |
Specify basic setup information for event layouts to be included in eSocial reporting. |
|
|
GPBR_EVNT_ACTIVTN |
Activate events to be processed by PeopleSoft HCM Global Payroll for Brazil. |
|
|
GPBR_EVENT_SEQNO_B |
Specify the order in which basic table events are transmitted to eSocial. |
|
|
GPBR_EVENT_SEQNO_N |
Specify the order in which non-periodic events are transmitted to eSocial. |
|
|
GPBR_EVENT_SEQNO_P |
Specify the order in which periodic events are transmitted to eSocial. |
|
|
GPBR_COMP_PARAM |
Activate companies for eSocial reporting. |
|
|
GPBR_SETID_GROUP |
Associate companies with setIDs for basic table event processing. |
|
|
GPBR_COMP_PARAM2 |
Specify XML file options for companies. |
|
|
GPBR_SOFTW_PROV |
Define software providers and contact information. |
|
|
GPBR_ADDR_TYPE |
Map PeopleSoft and eSocial address types. |
|
|
GPBR_ADDR_FMT |
Map PeopleSoft and eSocial address terms. |
|
|
GPBR_TIMECARD_CODE |
Map PeopleSoft and eSocial timecard types. |
|
|
GPBR_DEP_INF_CODE |
Map PeopleSoft and eSocial dependent types. |
|
|
GPBR_ETHNIC_GROUP |
Map PeopleSoft and eSocial ethnic group codes. |
|
|
GPBR_EDUCATIO_CODE |
Map PeopleSoft and eSocial education levels. |
|
|
GPBR_MARITAL_CODE |
Map PeopleSoft and eSocial marital statuses. |
|
|
GPBR_VISA_CODE |
Map PeopleSoft and eSocial visa or permit types. |
|
|
GPBR_LBR_CAT_CODE |
Define labor category legal codes. |
|
|
GPBR_LABOR_REGIME |
Associate employee classifications with labor-specific codes and information. |
|
|
GPBR_TERM_CODE |
Define eSocial termination codes. |
|
|
GPBR_HIR_ACT_REA |
Identify all hiring actions and reasons, and corresponding events to be used to report to the eSocial system. |
|
|
GPBR_TER_ACT_REA |
Identify all termination actions and reasons, and corresponding events to be used to report to the eSocial system. |
|
|
GPBR_OTH_ACT_REA |
Identify all actions and reasons related to contract changes that need to be reported to the eSocial system. |
|
|
GPBR_ABS_CODE |
Define eSocial absence codes. |
|
|
GPBR_ABS_TAKE_REA |
Map PeopleSoft and eSocial absence codes. |
|
|
ES_COUNTRY_TBL_BRA |
Map country codes with RFB and RAIS nationality codes. |
|
|
GPBR_SOC_PREV_CD |
Define INSS tax codes. |
|
|
GPBR_INC_TAX_CD |
Define income tax codes. |
|
|
GPBR_WAGE_CODE |
Define wage type codes. |
|
|
GPBR_WAGE_TYPE |
Assign wage type as well as other incidence codes to accumulator elements for use in eSocial reporting. |
|
|
GPBR_RUN_TYPE |
Specify run types, eSocial events, and other needed information for corresponding payroll elements. |
|
|
GPBR_SPEC_WAGE |
Enter information regarding alimony beneficiaries. |
|
|
GPBR_HLTH_WAGE |
Specify health plan setup for payroll event reporting. |
|
|
GPBR_PROCEED_DT |
Define the wage type proceeding details for companies. |
|
|
GPBR_CMP_PENS_FUND |
Enter information regarding Complementary Pension Fund. |
|
|
GPBR_ESOC_CODE |
Define diagnostic procedure codes. |
|
|
HAZ_AGENT_TBL_BRA |
Define hazard agent codes. |
|
|
HAZARD_FACTOR_BRA |
Define codes. |
|
|
ACTIVITIES_BRA |
Define special activity codes. |
|
|
GPBR_REVENUE_CODE |
Define revenue codes. |
Important! The setID and company mapping logic is no longer used as a result of the inactivation of S-1030 and S-1050 reports in the S1.0 version.
Businesses in Brazil are required to report data to the eSocial system by company. This mechanism works fine with periodic and non-periodic events, but not with events for basic tables (for example, Job Code Table and Work Shift Code), which are keyed by setID in PeopleSoft HCM.
To bridge the gap between setID-based data and the company-based reporting requirement, and ensure that basic table data can be transmitted to eSocial properly, the system provides the SetID Group Page to map between setIDs and companies. When a basic table change occurs, the system uses this mapping information to identify the companies that this change impacts, and generates appropriate events for impacted companies for eSocial processing.
SetID and Company Mapping Example
This example describes how the PeopleSoft system determines what (and for which companies) data gets submitted to the eSocial environment, when a job code is updated in PeopleSoft.
In this imaginary PeopleSoft HCM system, there are three different setIDs, four business units, and three companies. This diagram illustrates how they are linked together to support business processes of the companies:
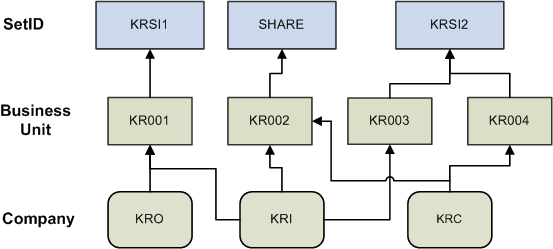
Job codes are keyed by setID in the Job Code Table (JOB_CODE_TBL); they are available in all three setIDs:
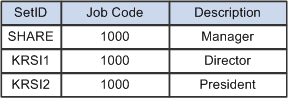
Suppose that job code 1000 is used in all three setIDs to represent different job positions, as illustrated in this table:
If a user updates job code 1000, the PeopleSoft system needs to identify to which companies this job code change applies based on the setID, and send the correct job code information to eSocial accordingly.
As an implementer, you establish the association between companies and setIDs on the SetID Group Page. When a setID-keyed basic table data is updated, the system can find out from the mapping on this page a list of companies to which the update pertains.
Back to the job code example, suppose that the mapping is already defined on the SetID Group page based on the setID and company mapping diagram, and a user has updated job code 1000 for the SHARE setID. The system accesses the setID and company mapping page and concludes that this job code update needs to submitted for two companies: KRI and KRC. When the staging table loading application engine process (GPBR_ES_XML) runs, this event is split and loaded to staging tables for both KRI and KRC.
In the information that is sent to eSocial, the corresponding setID is added to the job code as prefix to avoid duplicate keys, as illustrated in this table:
|
Company |
eSocial Job Code |
eSocial Description |
|---|---|---|
|
KRI |
SHARE.1000 |
Manager I |
|
KRC |
SHARE.1000 |
Manager I |
As mentioned earlier in this example, the KRC company is associated with two setIDs: SHARE and KRSI2, each of which is linked to job code 1000 but with different job descriptions. If a change is made to the description of job code 1000 for both setIDs, the corresponding setID is added to the job code as prefix in each data row that is sent to eSocial to avoid duplicate keys, as illustrated in this table:
|
Company |
eSocial Job Code |
eSocial Job Description |
|---|---|---|
|
KRC |
SHARE.1000 |
Manager II |
|
KRC |
KRSI2.1000 |
President II |
The Job Data component is where hiring, terminations, and other contract-related updates take place. When the component is saved, a trigger is run to identify information that may have to be reported to eSocial. PeopleSoft provides the eSocial Actions and Reasons component for customers to identify the actions that need to be submitted to eSocial, according to their business processes.
Use this component to provide the specifics for each action, so that the trigger can determine whether a job data change has to be sent to eSocial, or which event to use based on the individual (employee or non-employee) on whom the action performed. For example, when a hiring action is saved, the S-2200 event that is invoked for hiring an employee is different from the one (S-2300) for hiring a non-employee.
Any actions pertaining to hiring, terminations, and contract-related updates must be set up properly in the eSocial Actions and Reasons component to be included for eSocial processing.
Setting up eSocial includes steps to activate the eSocial functionality, activate events for eSocial reporting, identify companies to be included in the program, and map various PeopleSoft and eSocial legal codes. These steps can be roughly categorized into these groups:
Installation setup
One time setup.
Main setup
Legal code setup
Installation Setup
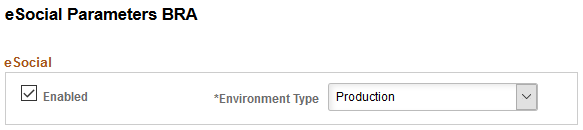
Activate the eSocial functionality on the eSocial Parameters BRA Page.
Activate the Administrative and Legal Proceedings functionality for S-1070 event reporting on the Adm/Legal Proceedings Parameters BRA Page. This is required if you wish to process S-1070 reports in Global Payroll for Brazil.
One Time Setup
Populate eSocial registration numbers for employees on the eSocial Register Number BRA Page
Update employee record numbers on ASO exam results on the ASO Exam Procedure Page. This is required for S-2220 event reporting.
Populate legal proceeding information that has already been submitted to the Government on the Import Historical Data BRA Page, before the activation of the S-1070 event in the PeopleSoft system. This is required for S-1070 event reporting.
Main Setup
Define XML batch groups and subgroups on the XML Batch Group Definition Page.
Define eSocial events on the Events Setup Page.
Activate events to be processed by PeopleSoft HCM Global Payroll for Brazil on the Events Activation Page.
Categorize eSocial events and sequence them on the Basic Table Events Page, Non Periodic Events Page, and Periodic Events Page.
Activate companies for eSocial reporting and override system-level defaults (if applicable) for companies on the Company Parameters Page.
Associate companies with setIDs for basic table event processing on the SetID Group Page.
Set up company’s XML options on the XML Options Page.
Define software providers on the Software Providers Page.
Legal Code Setup
Map PeopleSoft and eSocial address terms on the Address Type Page and Address Format Page.
Map PeopleSoft and eSocial timecard types on the Timecard Type Page.
Map PeopleSoft and eSocial dependent types on the Dependents Page.
Map PeopleSoft and eSocial ethnic group codes on the Ethnic Groups Page.
Map PeopleSoft and eSocial education levels on the Education Level Page.
Map PeopleSoft and eSocial marital statuses on the Marital Status Page.
Map PeopleSoft and eSocial visa or permit types on the Visa and Permits Page.
Define labor category legal codes on the Labor Category Legal Codes Page.
Associate employee classifications with labor-specific codes and information on the Labor Regime Page.
Define termination legal codes on the Termination Legal Codes Page.
Identify all hiring, termination, and other contract-related actions and reasons, and corresponding events to be used to report to the eSocial system on the Hire Action/Reason Page, Termination Action/Reason Page, and Other Action/Reason Page.
Define absence legal codes on the Absence Legal Codes Page.
Map PeopleSoft and eSocial absence codes on the Absence Take and Reason Page.
Map country codes with RFB and RAIS nationality codes on the Country and Nationality Cd Bra Page.
Set up wage types tables on the INSS Tax Incidence Code Page, Income Tax Incidence Code Page, Wage Type Code Page, Wage Types Table Page, Run Types Page, Health Data Page, and Exemption Proceedings Page.
Use the eSocial Parameters BRA page (GPBR_ESOCIAL_PARAM) to activate the eSocial functionality on your PeopleSoft system.
Navigation:
This example illustrates the fields and controls on the eSocial Parameters BRA page.
|
Field or Control |
Description |
|---|---|
|
Enabled |
Select to activate the eSocial functionality in your PeopleSoft installation. If selected, eSocial events can be launched in several mapped HCM components. eSocial events will not be launched if this field is not selected. |
|
Environment Type |
Select the type (test or production) of environment on which eSocial is running. Values are: Production Restrict Production Important! It is strongly recommended that you use the Production option on production environments. The selected environment type is used the value of the <tpAmb> tag, which is required for XML files that are created for eSocial events. |
Use the eSocial Register Number BRA page (ES_RC_REGN_BRA) to populate eSocial registration numbers for employees.
Navigation:
This example illustrates the fields and controls on the eSocial Register Number BRA page.
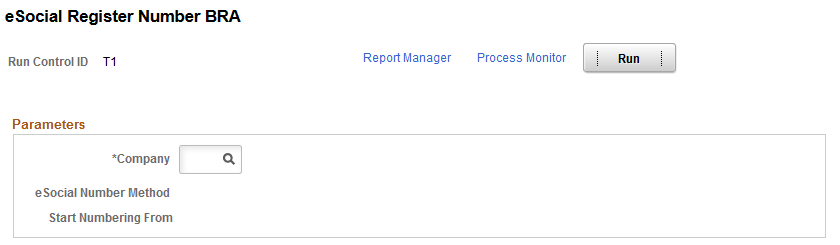
Run the eSocial Register Number BRA application engine (ES_RNUM_BRA) to populate eSocial registration numbers for employees on the (BRA) Additional Information BRA Page before the initial data loading processes.
|
Field or Control |
Description |
|---|---|
|
Company |
Select a company to assign eSocial register numbers to their employees. Note: Only companies with DRT Number as the selected eSocial number method on the (BRA) Company Details BRA Page are available for selection. |
|
eSocial Number Method |
Displays the company’s selected eSocial number method, which is DRT Number. |
|
Start Numbering From |
This field is left blank. |
Use the ASO Exam Procedure page (GPBR_ESOC_ASO) to update employee record numbers on ASO exam results.
Navigation:
This example illustrates the fields and controls on the ASO Exam Procedure page.
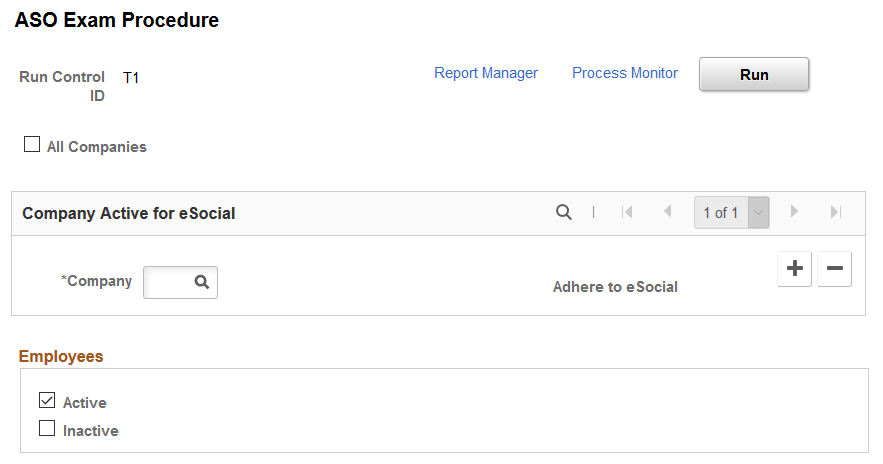
Companies use the ASO exam results BRA component to record employees’ medical exam results and track their occupational health. Prior to implementing the S-2220 event in eSocial to report employees’ occupational health information to the Government, you need to run a one-time process to update employee record numbers in exam results as needed, so that the exam information can be processed properly.
The Employee Record process checks to make sure that, for each company that is included on the run control page, each ASO exam result created for the company's employee is associated with the correct employee record number, and update as necessary. If the employee of an ASO exam result has more than one employee record, a duplicate ASO exam result will be created for each of his or her additional employee record number. Suppose that the employee has two employee records and is associated with three exam results. When the process runs, it generates a duplicate for each of the three exam results for the additional employee record, and populates the corresponding employee record number on all six exam results. It is the company’s responsibility to review and clean up these exam result records before the go-live date of the health and safety events.
Note: Run the Employee Record process only once for companies that implement the S-2220 event. Nothing happens when you rerun the process for the same company.
|
Field or Control |
Description |
|---|---|
|
All Companies or Company |
Click to include all companies that are enabled for eSocial reporting on the Company Parameters Page in the employee record process. Alternatively, you can add one or more companies manually by inserting rows to this page. Only eSocial-enabled companies are available for selection. |
|
Active |
Select to include active employees in the process. |
|
Inactive and From |
Select to include inactive employees (whose HR status is set to Inactive, for example, terminated employees) in the process. When selected, specify the date from when employees, who became Inactive, will be included in the process. |
Use the Import Historical Data BRA page (GPBR_RC_EVT_HIST) to load data that was accepted by the Government into the PeopleSoft system.
Navigation:
This example illustrates the fields and controls on the Import Historical Data BRA page.
Running the Load Historical Data Process
Global Payroll for Brazil delivers support for the S-1070 event (Administrative and Legal Proceedings) after the initial eSocial implementation in PeopleSoft. For customers who wish to switch the reporting of S-1070 events from their current systems over to Global Payroll for Brazil, they need to first import the proceeding information (that is, the historical data that was already sent and accepted by the Government in the legacy system) to the PeopleSoft system before activating the S-1070 event.
Run the Load eSocial Event Historical (GPBR_EVT_HST) process to load the historical data of companies from text files into the PeopleSoft system. This process inserts rows of Government-accepted proceeding information to driver and cross-reference tables. After the data import is completed, activate the S-1070 event to begin reporting of administrative and legal proceeding information using the PeopleSoft system.
Load eSocial Event Historical is a two-part process: Process Data (prepare and load data into the staging table) and Finalize (load final data into the driver and cross-reference tables). Here are the high-level steps for importing historical proceeding data for a company:
Select the Process Data option and Add action on the Import Historical Data BRA page to insert data rows from the specified text file to the staging table for the selected company and the S-1070 event. Run the data import process.
Review the process result.
Click the View Log/Trace link on the Process Detail page for the process instance to locate the log file. The log shows the total number of processed rows, the numbers of valid and invalid rows identified, and error details pertaining to invalid rows. Correct the issues reported and run the process again. You can select the Process option and Override action to replace rows of a specific batch code in the staging table. If data rows were added by mistake, use the Delete action to remove them.
Repeat steps 1 and 2 until all historical data rows are added to the staging table successfully (all batch codes are valid).
Select the Finalize option for the company and the S-1070 event. Run the process to insert all rows of valid batch codes to the driver and cross-reference tables.
After the Finalize option is run successfully, the run control page becomes read-only and the data import process is considered done for the company. The system prevents you from running the process again for the same company and event using a new run control ID.
Generated S-1070 events are available for review on the eSocial Events Monitor Page.
Refer to the S-1070 - Administrative and Legal Proceedings topic for more information about enabling the S-1070 event reporting in PeopleSoft.
Example of Text File Layout for S-1070 Data Import
The GPBR_EVT_HST process loads historical data from a text file to the PeopleSoft system. Enter a row in the text file for each proceeding that the Government already accepted and provided a receipt number. This table lists the required values (and their lengths) that the process expects in a data row:
|
Required Field Value |
Value Length |
|---|---|
|
Proceeding Type |
1 (For example, 1 for Administrative, 2 for Judicial, 3 for Benefit Number - INSS, and 4 for FAP – Process before 2019 |
|
Proceeding Number |
Up to 21 |
|
Action |
3 (For example, ADD, UPD, or DEL) |
|
Status |
Enter GSUC as the value |
|
Receipt Number |
Up to 40 |
|
Date |
8 (Format: DDMMYYYY) |
Here is the format of a historical data row:
X,NNNNNNNNNNNNNNNNNNNNN,ADD,GSUC,NNNNNNNNNNNN,DDMMYYYY
This example demonstrates the format of the text file that is expected from the Import Historical Data process.

Considerations for the historical data text file:
Each row of data (for example, proceeding type, proceeding number, and date) you entered in the text file must match its record on the Administrative/Legal Proceedings BRA Page and is the same data that was accepted by the Government.
Enter rows preferably in chronological order.
The date should be equal to or later than the eSocial on PeopleSoft date that is specified for the associated company.
Do not enter more than one row for the same proceeding number with the ADD action in a given year and month period.
For each row with the DEL action, another row for the same proceeding number and period with either the ADD or UPD action must also exist in the text file.
Do not enter duplicate rows; they invalidate the data import process.
Do not enter rows for the same proceeding number and period in multiple text files.
Parameters
|
Field or Control |
Description |
|---|---|
|
Run |
Click to initiate the GPBR_EVT_HST process to prepare or finalize the loading of Government-accepted proceeding data into the PeopleSoft system. |
|
Processing Option |
Select what you like to do with your data in batch files. Values are: Finalize: Select to load data of valid batch codes from the staging table into driver and cross-reference tables. The system checks to make sure that all batch codes are in fact valid before finalizing the process. If invalid batch codes are identified for the selected company and event, the data import process cannot run until the batch files are fixed and validated. Note: After the Finalize option has completed successfully, the data import process cannot be run again for the same company and event. Process Data: Select to process data of the specified batch code with the selected action type. |
|
Action Type |
Select the process action. This field appears if the selected processing option is Process Data. Values are: Add: Select to add rows from the text file to the staging table. When selected, enter a batch code to be used to identify the group of rows to be added. Delete: Select to remove previously uploaded rows from the staging table. When selected, specify a batch code in the Batch Code field to identify the group of rows to be removed. Override: Select to replace previously uploaded rows in the staging table with rows from the text file. When selected, specify a batch code in the Batch Code field to identify the rows to be replaced with the rows in the uploaded text file. Use this option if you fixed issues reported in the previous run and want to import updated data. |
|
Company |
Select the company for which historical data will be loaded into the PeopleSoft system. After all batch codes of a company and event code have been finalized successfully, you can no longer select the same company and event code combination in a new run control. |
|
Event Code |
Select the S-1070 event, which is currently the only event enabled for the data import process. Only events that have the Import Historical Data option selected on the Events Setup Page are available for selection. After all batch codes of a company and event code have been finalized successfully, you can no longer select the same company and event code combination in a new run control. |
|
Load Status |
Displays the data loading status of the specified batch code. The field appears when the specified action type is Override or Delete. |
|
Batch Code |
This field appears if the selected processing option is Process Data. (For the Add action) Enter a code (maximum of 15 characters) that will be used to identify the batch of historical data to be added to the PeopleSoft system. (For the Override or Delete action) Specify the code to identify the batch of historical data to be overridden or removed. Deleted batch codes can be reused. |
|
Select File and File Name |
Click the Select File button to select and upload a text file that includes rows of historical data to be loaded into the system. The file extension must be .txt. The name of the uploaded file is displayed in the File Name field. Both fields appear if the selected action type is Add or Override. |
Batch Codes to Finalize
This section appears if the processing option is set to Finalize, and at least one batch file has been processed. It lists the batch codes that are associated with the specified company and event code, and their data load information.
|
Field or Control |
Description |
|---|---|
|
Batch Code |
A company can have multiple batch codes if it has a large quantity of historical data and prefers to manage the import in batches. |
|
Load Status |
Displays the data load status of the corresponding batch code. Values are: Valid: all rows of the batch code were loaded into the staging table, and were validated successfully. Invalid: all rows of the batch code were loaded into the staging table, but at least one row failed the validation. Finalized: all rows of the batch code were loaded into the driver and cross-reference tables successfully. |
|
Total Rows Valid and Total Rows Invalid |
Displays the total counts of rows that passed and failed the validation. |
Use the XML Batch Group Definition page (GPBR_XMLBATCH_GRP) to define XML batch groups and subgroups.
Navigation:
This example illustrates the fields and controls on the XML Batch Group Definition page.
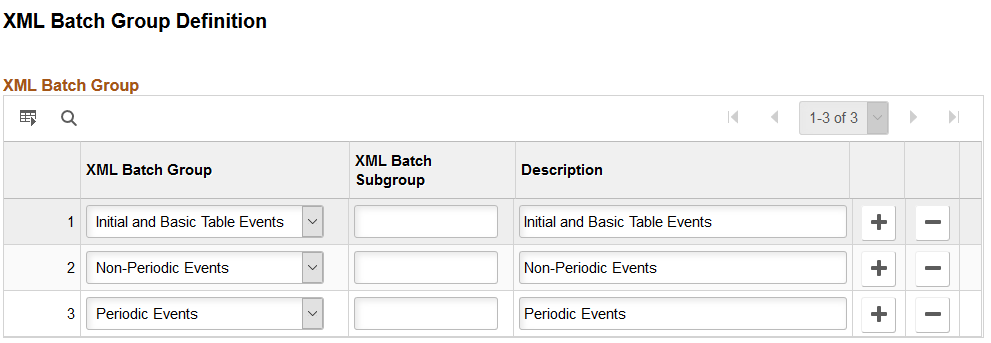
Use this page to define subgroups for XML batch groups that are provided by the PeopleSoft system. Each event is associated with an XML batch group and subgroup for delivery purposes.
Use the Events Setup page (GPBR_EVENT_SETUP) to specify basic setup information for event layouts to be included in eSocial reporting.
Navigation:
This example illustrates the fields and controls on the Events Setup page.
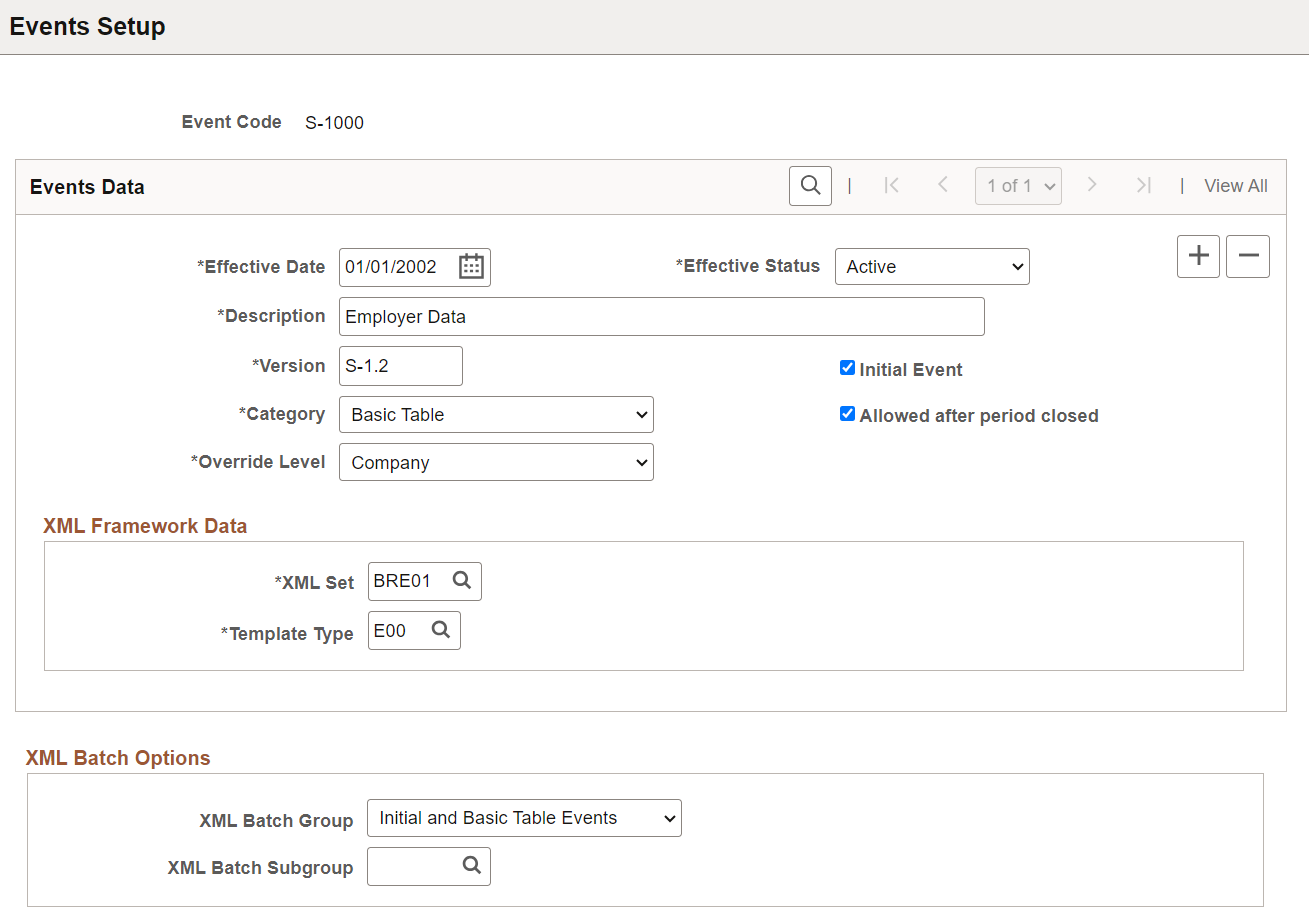
The Brazilian government has published a set of event layouts for use in eSocial reporting. These event layouts are delivered and grouped into four categories on this page. In addition to category grouping and the override level allowed, some of these layouts are selected to be included in the initial data loading process. The event setup also contains parameters to be used for generating XML outputs in the XML Report Framework, and packaging them for delivery.
Events Data
|
Field or Control |
Description |
|---|---|
|
Event Code |
Displays the code of the event layout. |
|
Effective Date |
Displays the effective date of the event. In the future, if the government makes updates to an event, for example, inactivate an event or change the release version, PeopleSoft delivers the update with a new effective-dated row for the corresponding event. |
|
Effective Status |
Select the effective status for the event layout. Most PeopleSoft-delivered events are set as Active. Only active events are available for further setup on the Events Activation Page. |
|
Version |
Enter the version for the event. This value is used in XML as a namespace. |
|
Category |
Select the category to which this event layout belongs. Values are: Basic Table Non Periodic Periodic Termination Totaling |
|
Override Level |
Select the override level supported by this event setup. Values are Company and Establishment. Events can be configured further at the company or establishment level on the Company Parameters Page. |
|
Initial Event |
Select to classify this event as an initial event and include it in the initial data loading process. |
|
Allowed after period closed |
Select to allow the transmission of data that is identified by this event to the government even after the pertinent period has been closed (which is indicated by the submission of the S-1299 - Closing Periodic Events event). |
|
Import Historical Data |
Select to allow driver history to be loaded for the corresponding event on the Import Historical Data BRA Page, before the activation of the event. Note: This option is currently applicable to the S-1070 event only. It appears when the event status is set to Inactive. |
XML Framework Data
|
Field or Control |
Description |
|---|---|
|
XML Set |
Enter the name of the XML set table in the XML Report Framework for this event layout version. |
|
Template Type |
Enter the template that is used to fill out the layout in the XML Report Framework. |
|
Exclusion Template Type |
Enter the template that is used to generate exclusions for this event layout. This field appears if the selected event category is Periodic. |
XML Batch Options
Use this section to link the event with a batch group and subgroup. When XML outputs are generated, PeopleSoft packages them in batches and deliver them to the third-party system using web services. A batch can contain up to 50 (predefined by the government) XML outputs of the same group type for any given company.
|
Field or Control |
Description |
|---|---|
|
XML Batch Group |
Select a batch group type for the event. Values are: Initial and Basic Tables Events Non-Periodic Events Periodic Events |
|
XML Batch Subgroup |
Specify a batch subgroup for the event. Subgroups for XML batch groups are defined on the XML Batch Group Definition Page. |
Use the Events Activation page (GPBR_EVNT_ACTIVTN) to activate events to be processed by PeopleSoft HCM Global Payroll for Brazil.
Navigation:
This example illustrates the fields and controls on the Events Activation page.

Customers may choose to process eSocial events using more than one system, for example, sending employer data from an ERP Financials system, and Payroll-related information from various Payroll systems. Use this page to activate events to be submitted to the eSocial environment through PeopleSoft HCM Global Payroll for Brazil.
The system prepopulates on this page all active events that are defined on the Events Setup Page. You can update the information as necessary. Events and statuses specified here are system-level defaults for all companies that are enabled for eSocial; you can override them at the company-level for individual companies on the Company Parameters Page.
Important! It is the customer’s responsibility to add an effective-dated row for the new version and remove eSocial events that are no longer supported from the Events Activation page.
|
Field or Control |
Description |
|---|---|
|
Event Code and Description |
Enter the code of an event to be activated. Active events that are defined on the Events Setup page are available for selection. The corresponding event description is displayed after an event code is selected. |
|
Event Status |
Select Active to include the event in eSocial reporting using PeopleSoft. Select Inactive to exclude it from eSocial reporting using PeopleSoft. |
Use the Basic Table Events page (GPBR_EVENT_SEQNO_B) to specify the order in which basic table events are transmitted to eSocial.
Navigation:
This example illustrates the fields and controls on the Basic Table Events page.
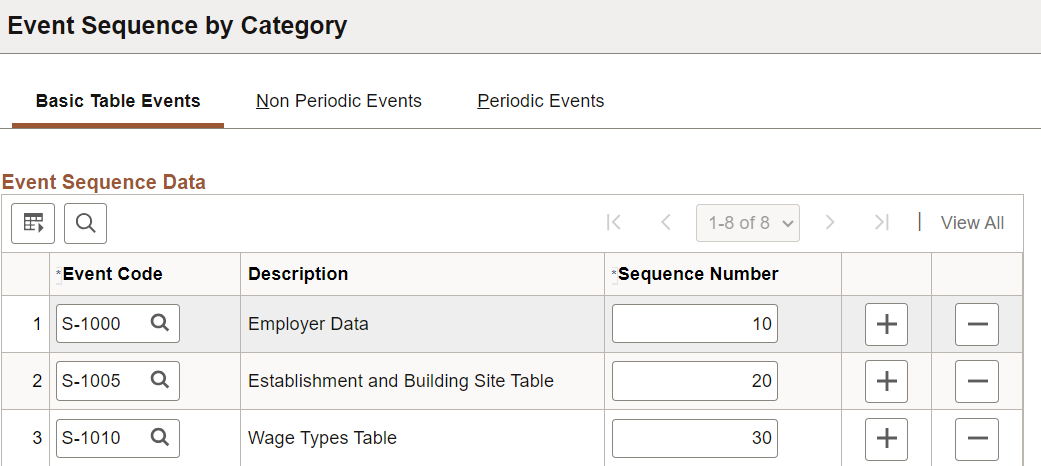
Note: Events are submitted to the eSocial system by category in this order: Basic Table, Non Periodic, and Periodic. For each category, events are assigned a sequence number to indicate the order in which they are sent. If there are two events to be submitted in the same batch, the event with a smaller sequence number has to be sent before the event with a larger number.
The system prepopulates on this page all basic table events that are defined on the Events Setup Page. You can update the information as necessary.
|
Field or Control |
Description |
|---|---|
|
Event Code and Description |
Enter the code of an event to be included in the Basic Table category. Active events that belong to the Basic Table category are available for selection. The corresponding event description is displayed after an event code is selected. |
|
Sequence Number |
Enter the sequence number for the event, which is used in the batch processing logic. The smaller the number, the higher priority the event has in the event submission sequence within its category. |
Use the Non Periodic Events page (GPBR_EVENT_SEQNO_N) to specify the order in which non-periodic events are transmitted to eSocial.
Navigation:
This example illustrates the fields and controls on the Non Periodic Events page.
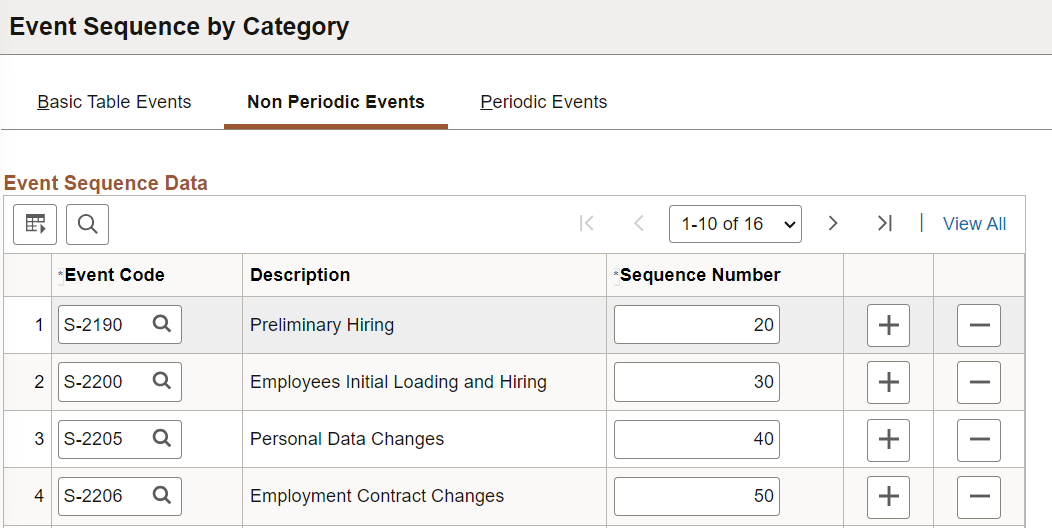
Non Periodic is the second category to be submitted to eSocial.
The system prepopulates on this page all non-periodic events that are defined on the Events Setup Page. You can update the information as necessary.
|
Field or Control |
Description |
|---|---|
|
Event Code and Description |
Enter the code of an event to be included in the Non Periodic category. Active events that belong to the Non Periodic or Termination category are available for selection. The corresponding event description is displayed after an event code is selected. |
|
Sequence Number |
Enter the sequence number for the event, which is used in the batch processing logic. The smaller the number, the higher priority the event has in the event submission sequence within its category. |
Use the Periodic Events page (GPBR_EVENT_SEQNO_P) to specify the order in which periodic events are transmitted to eSocial.
Navigation:
This example illustrates the fields and controls on the Periodic Events page.
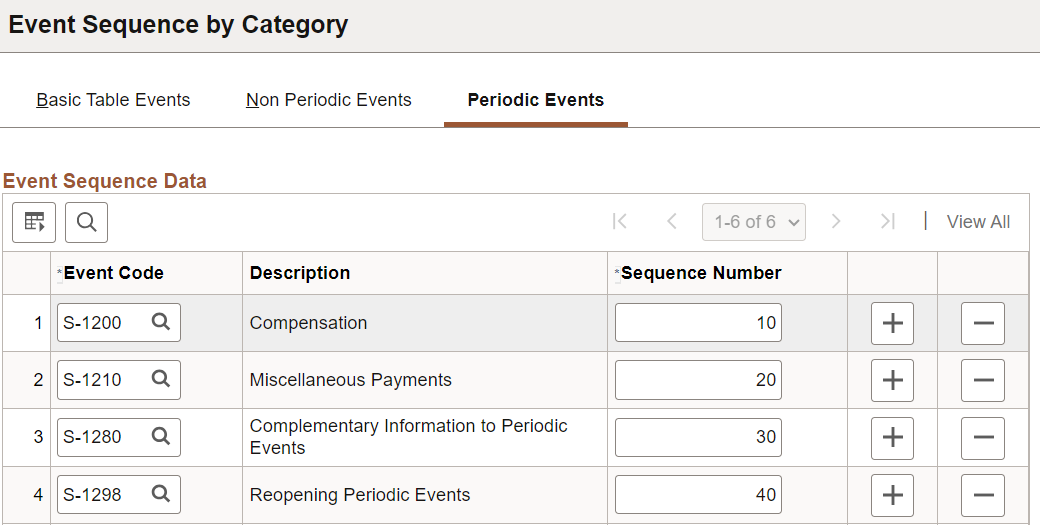
Periodic is the third category to be submitted to eSocial.
The system prepopulates on this page all periodic events that are defined on the Events Setup Page. You can update the information as necessary.
|
Field or Control |
Description |
|---|---|
|
Event Code and Description |
Enter the code of an event to be included in the Periodic category. Active events that belong to the Periodic category are available for selection. The corresponding event description is displayed after an event code is selected. |
|
Sequence Number |
Enter the sequence number for the event, which is used in the batch processing logic. The smaller the number, the higher priority the event has in the event submission sequence within its category. |
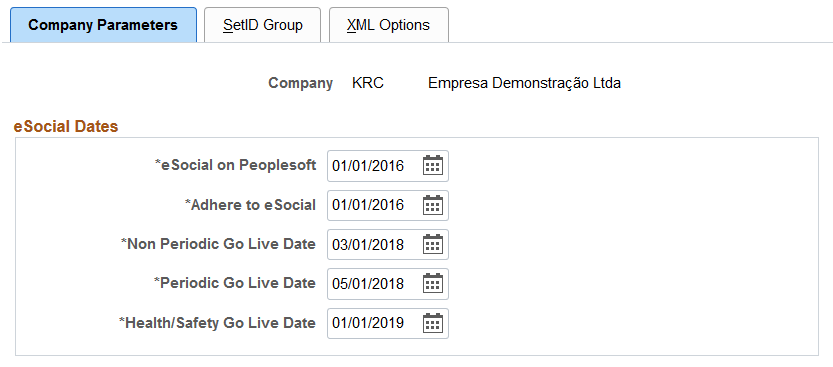
Use the Company Parameters page (GPBR_COMP_PARAM) to activate companies for eSocial reporting.
Navigation:
This example illustrates the fields and controls on the Company Parameters page (1 of 2).
This example illustrates the fields and controls on the Company Parameters page (2 of 2).
Use this page to activate all companies that have to report data to the eSocial environment. If a company takes the default setup that is defined on the Events Activation Page, you only need to set the company status to Enabled and specify both eSocial on PeopleSoft and Adhere to eSocial dates.
Note: In addition to the company setup performed in the Company Parameters component, be sure to also verify that only one establishment is selected as the headquarters unit for each company that is enabled for eSocial reporting.
See Also Establishment Address Page
|
Field or Control |
Description |
|---|---|
|
Company |
Displays the company to which the eSocial dates and event rules applies. |
|
eSocial on PeopleSoft |
Enter the date the company began to report data to eSocial using PeopleSoft. This date cannot be updated after the initial data loading process has run. The implementation of eSocial is done in phases.
The eSocial on PeopleSoft date is also used as the
go-live date for basic table events, which is set to January 1,
2018 as delivered.
Note: The eSocial on PeopleSoft date and Adhere to eSocial date are the same for customers who implement eSocial reporting on their existing PeopleSoft HCM Global Payroll for Brazil system. For new customers, these dates can be different. The eSocial on PeopleSoft date is the date when eSocial processing begins and events are being reported. It is an important date as it is used to control the eSocial historical data regarding rectification events. |
|
Adhere to eSocial |
Enter the date the company is required to report data to eSocial (using PeopleSoft or not). This date is either earlier than or equal to the eSocial on PeopleSoft date. This date cannot be updated after the initial data loading process has run. |
|
Non Periodic Go Live Date |
Enter the date that the company begins the creation and submission of non-periodic events to the government. The implementation of eSocial is done in phases. The current go-live date for non-periodic events is set to March 1, 2018. |
|
Periodic Go Live Date |
Enter the date that the company begins the creation and submission of periodic events to the government. The implementation of eSocial is done in phases. The current go live date for periodic events is set to May 1, 2018. |
|
Health/Safety Go Live Date |
Enter the date that the company begins the creation and submission of health and safety events to the government. These events are currently not supported in Global Payroll for Brazil; they are scheduled to be released in future images. The implementation of eSocial is done in phases. The proposed go-live date for health and safety events is set to July 1, 2019. |
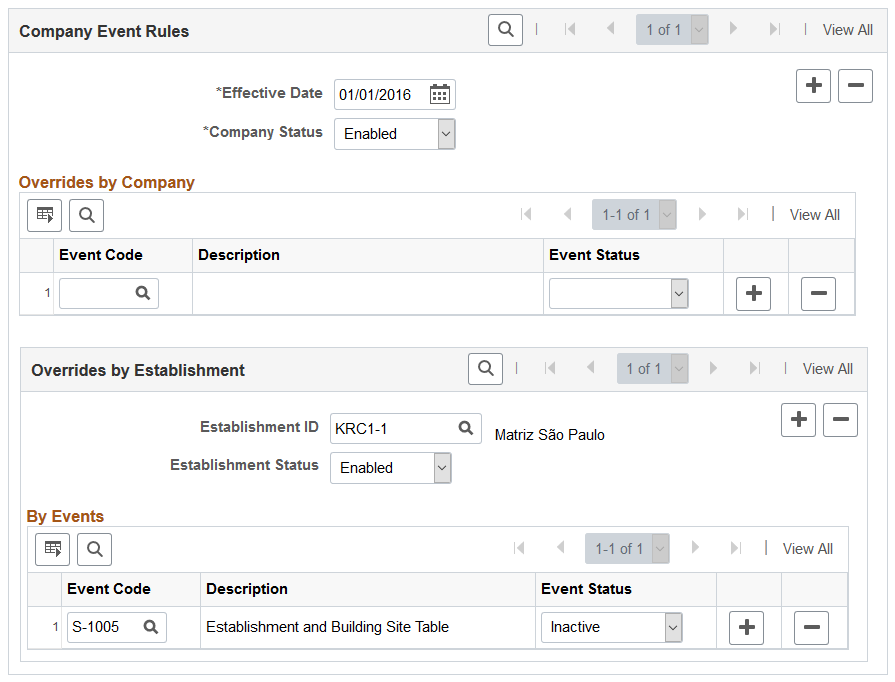
Company Event Rules
|
Field or Control |
Description |
|---|---|
|
Effective Date and Company Status |
Enter the effective date of the company status that is selected on the Company Status field. The default value for the effective date is today's date. The effective date should be earlier than the eSocial on PeopleSoft date and the Adhere to eSocial date. |
Overrides by Company
Use this section to enter, if available, any event exceptions for the company listed. For example, if the company decides to not use the PeopleSoft HCM system to submit employer data (which is currently an active event at the system level), enter the S-1000 Employer Data event here and set its status to Inactive.
If the company takes the system-level defaults that are specified on the Events Activation Page without exceptions, do not fill out this section.
Overrides by Establishment
Use this section to enter, if available, any event exceptions for the establishment listed. For example, the company may use the PeopleSoft HCM system to submit wage type data for most of its establishments, and a legacy system for a couple other establishments from previous acquisitions. In this case, add a row for each establishment with the exception. Enter the S-1010 Wage Types Table event here and set its status to Inactive. Furthermore, if the company has an establishment that does not use the PeopleSoft HCM system for eSocial reporting, add a row for this establishment and disable it in this section.
If all company establishments take the system-level defaults that are specified on the Events Activation Page without exceptions, do not fill out this section.
Note that establishment overrides do not apply to all events. For example, they are not applicable to S-1280, S-1298, and S-1299 events, which are company-based.
Use the SetID Group page (GPBR_SETID_GROUP) to associate companies with setIDs for basic table event processing.
Navigation:
This example illustrates the fields and controls on the SetID Group page.
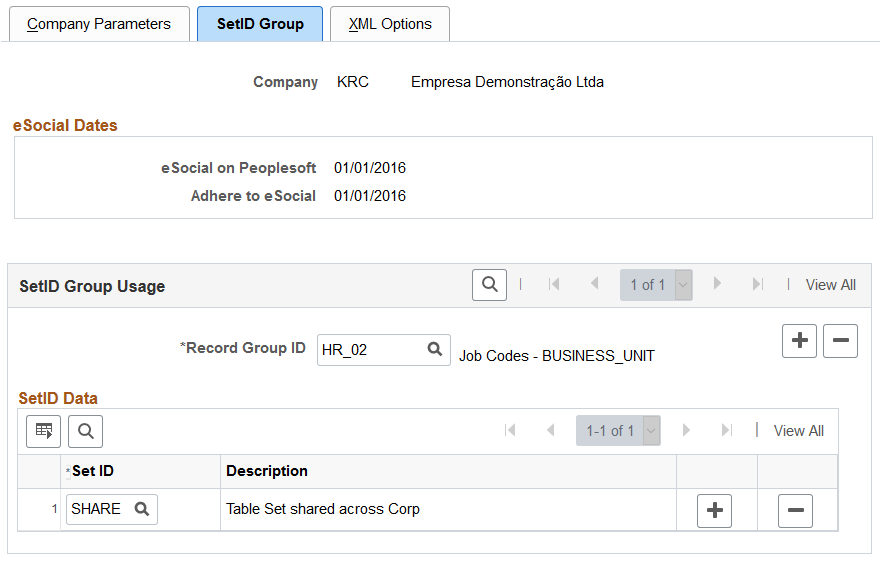
Important! This page is not used. The setID and company mapping is no longer required as a result of the inactivation of S-1030 and S-1050 reports in the S1.0 version.
Use this page to associate companies with setIDs. The mapping is needed when PeopleSoft submits basic table data to eSocial, some of which is keyed by SetID.
Information entered on the SetID Group page pertains to basic table events only.
|
Field or Control |
Description |
|---|---|
|
Record Group ID |
Enter the record group ID for the basic table data that is keyed by SetID. A record group is a set of control tables and views for a given setup data, for example, job codes and work shift codes. |
SetID Data
Use this section to specify the setIDs with which the company associates to access the basic table data specified in the Record Group ID field.
Use the XML Options page (GPBR_COMP_PARAM2) to specify XML file options for companies.
Navigation:
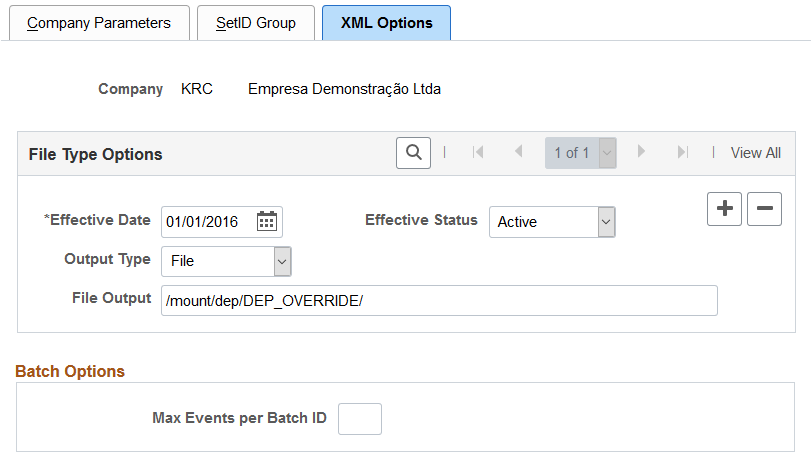
File Type Options
|
Field or Control |
Description |
|---|---|
|
Output Type |
Select the output type of XML files (for archiving in a database or specific directory). If String is selected, XML output (in the form of string) is generated and inserted into the XMLGF_STRNG_TBL record. If File is selected, XML output (in the form of file) is generated and stored in the specified file output directory. |
|
File Output |
Specify the directory where generated XML files are stored. This directory needs to have the right permission for file storage, and is required if the selected output type is File. This directory path needs to end with either “\” or “/”. |
Batch Options
|
Field or Control |
Description |
|---|---|
|
Max Events per Batch ID (maximum events per batch ID) |
Enter the maximum number of XML outputs that can be included in a batch to be delivered to the eSocial system. Based on the document provided by the government, this number is 50. You can modify this limit to anything under 50 if necessary. |
Use the Software Providers page (GPBR_SOFTW_PROV) to define eSocial software providers and contact information.
Navigation:
This example illustrates the fields and controls on the Software Providers page.
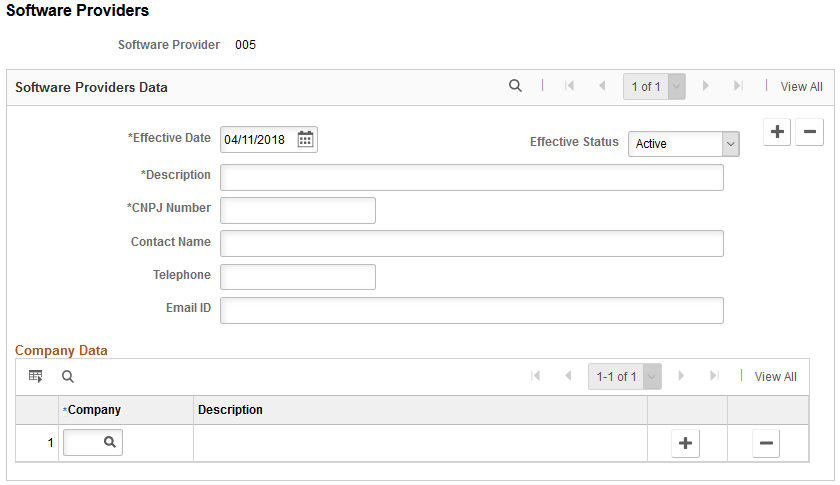
Use this page to enter the contact information of your eSocial software vendors, in case they need to be contacted, for example, as a result of eSocial event layout changes from the government.
|
Field or Control |
Description |
|---|---|
|
Software Provider |
Displays the 3-digit code for the software provider. |
|
Description |
Enter the software provider name. |
|
CNPJ Number |
Enter the CNPJ (national ID) for the software provider. |
|
Contact Name, Telephone, and Email ID |
Enter the name, phone number and email address of the contact person for the software provider. |
Company Data
Use this section to enter all companies that use products of the software provider.
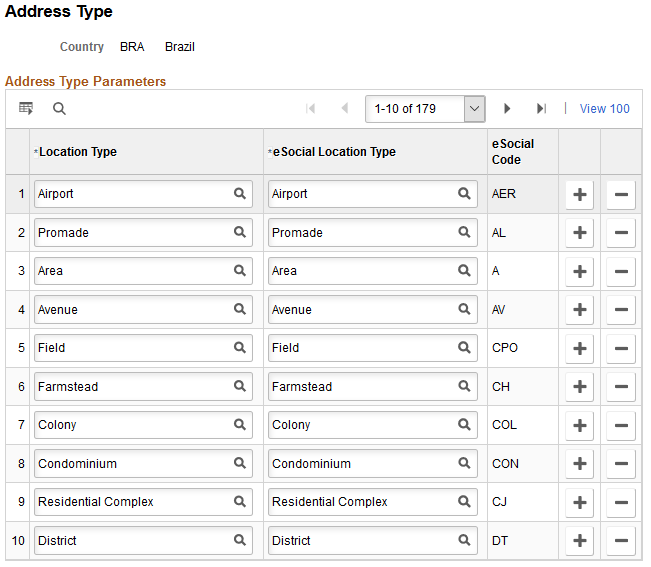
Use the Address Type page (GPBR_ADDR_TYPE) to map PeopleSoft and eSocial address types.
Navigation:
This example illustrates the fields and controls on the Address Type page.
Use the Address Format page (GPBR_ADDR_FMT) to map PeopleSoft and eSocial address terms.
Navigation:
This example illustrates the fields and controls on the Address Format page.

|
Field or Control |
Description |
|---|---|
|
Address Edit Page |
Defaults to EO_ADDR_BRA_SEC page, which is the delivered secondary page used to enter person’s address information for the country of Brazil. |
|
Field Name |
Displays a field that is used to store address information. |
|
eSocial Address Tags |
Select the xml tag name under which the address field value will be reported to the eSocial system. |
Use the Timecard Type page (GPBR_TIMECARD_CODE) to map PeopleSoft and eSocial timecard types.
Navigation:
This example illustrates the fields and controls on the Timecard Type page.
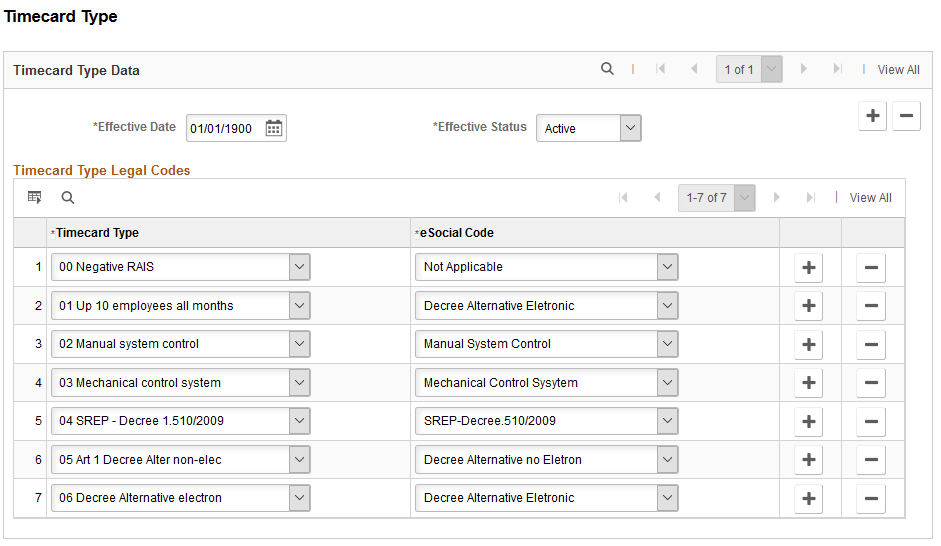
Use this page to map timecard types that the eSocial system expects with the ones that are maintained in PeopleSoft.
|
Field or Control |
Description |
|---|---|
|
Timecard Type |
Select a timecard type that is used in PeopleSoft. |
|
eSocial Code |
Select the corresponding eSocial code to map to the selected PeopleSoft timecard type. |
These codes are referenced on the Additional Info - Brazil Page.
Use the Dependents page (GPBR_DEP_INF_CODE) to map PeopleSoft and eSocial dependent types.
Navigation:
This example illustrates the fields and controls on the Dependents page.
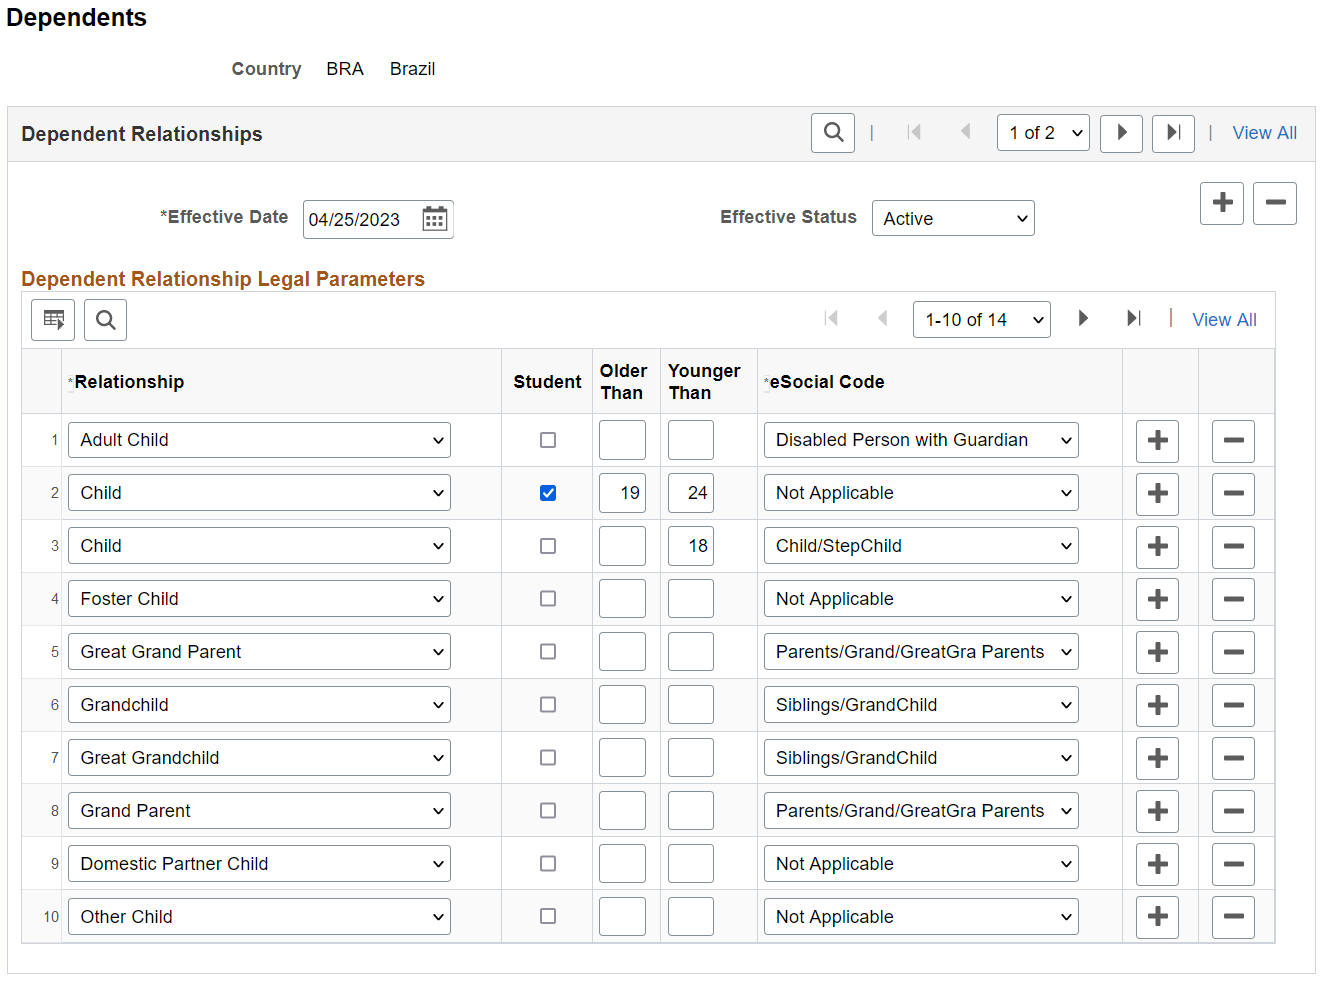
Use this page to map dependent relationship codes that the eSocial system expects with the ones that are maintained in PeopleSoft. eSocial codes are more descriptive than PeopleSoft ones. On this page, specify applicable attributes to “modify” PeopleSoft codes if necessary, and pair them with matching eSocial codes.
|
Field or Control |
Description |
|---|---|
|
Relationship |
Select a dependent relationship value (relationship to employee) that is used in PeopleSoft. |
|
Student |
Select to add the student
attribute to the dependent relationship selected in this
row.
|
|
Older Than and Younger Than |
Enter, if applicable, the age limit attribute for the selected dependent relationship selected in this row. |
|
eSocial Code |
Select the
corresponding eSocial relationship to map to the selected
dependent relationship along with any added
attributes.
|
Use the Ethnic Groups page (GPBR_ETHNIC_GROUP) to map PeopleSoft and eSocial ethnic group codes.
Navigation:
This example illustrates the fields and controls on the Ethnic Groups page.
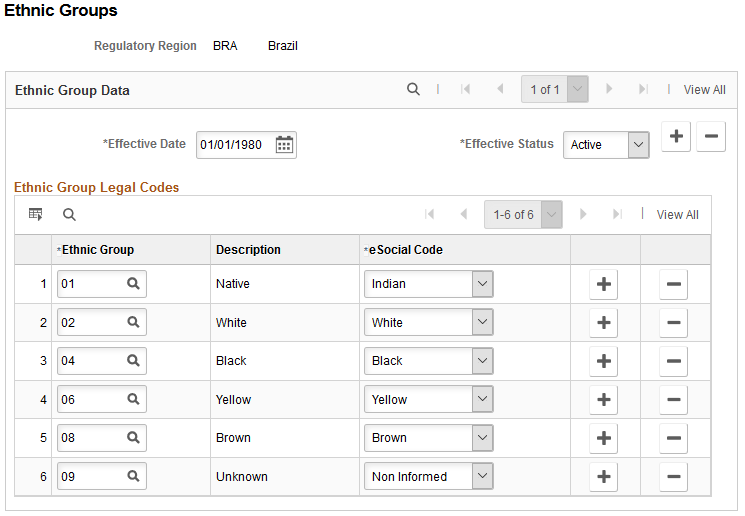
|
Field or Control |
Description |
|---|---|
|
Ethnic Group |
Specify an ethnic group code that is available under the selected regulatory region in PeopleSoft. The corresponding ethnic group description is displayed after a code is selected. |
|
eSocial Code |
Select the corresponding eSocial code to map to the selected ethnic group. |
Use the Education Level page (GPBR_EDUCATIO_CODE) to map PeopleSoft and eSocial education levels.
Navigation:
This example illustrates the fields and controls on the Education Level page.

|
Field or Control |
Description |
|---|---|
|
Education Level |
Select an education level in PeopleSoft. |
|
eSocial Code |
Select the corresponding eSocial code to map to the selected education level. |
|
GRRF Education Code |
Select the code that is currently used in legal reports provided by PeopleSoft HCM to map to the selected education level. |
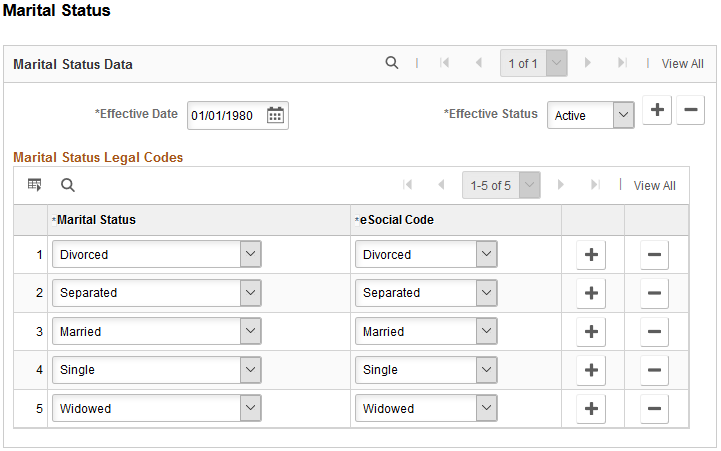
Use the Marital Status page (GPBR_MARITAL_CODE) to map PeopleSoft and eSocial marital statuses.
Navigation:
This example illustrates the fields and controls on the Marital Status page.
|
Field or Control |
Description |
|---|---|
|
Marital Status |
Select a marital status in PeopleSoft. |
|
eSocial Code |
Select the corresponding eSocial code to map to the selected marital status. |
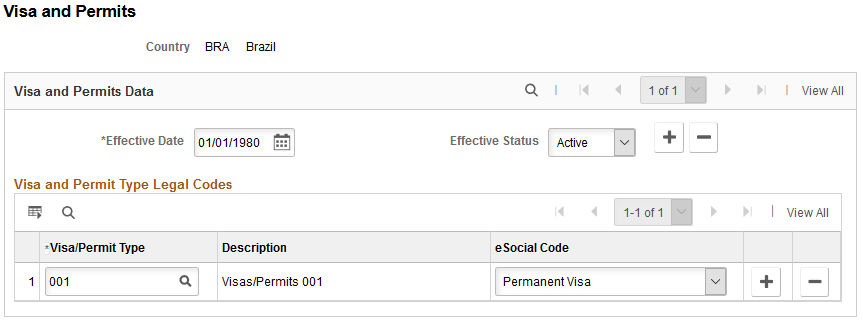
Use the Visa and Permits page (GPBR_VISA_CODE) to map PeopleSoft and eSocial visa or permit types.
Navigation:
This example illustrates the fields and controls on the Visa and Permits page.
|
Field or Control |
Description |
|---|---|
|
Visa/Permit Type |
Specify a visa or permit type that is available under the selected regulatory region in PeopleSoft. The corresponding description is displayed after a code is selected. |
|
eSocial Code |
Select the corresponding eSocial code to map to the selected visa or permit type. |
Use the Labor Category Legal Codes page (GPBR_LBR_CAT_CODE) to define labor category legal codes.
Labor category legal codes need to be associated with employee classifications for eSocial processing.
Navigation:
This example illustrates the fields and controls on the Labor Category Legal Codes page.
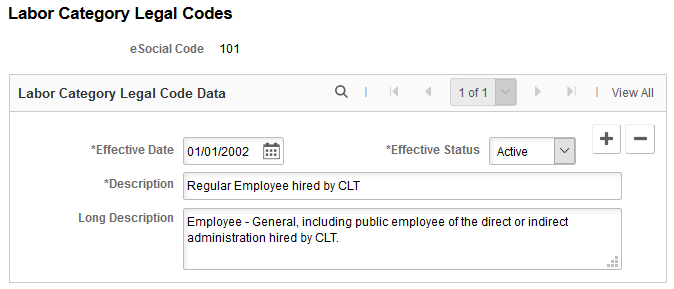
Use the page to define labor category legal codes that are expected by eSocial.
|
Field or Control |
Description |
|---|---|
|
Description and Long Description |
Enter the short and long descriptions for the listed labor category legal code. |
Use the Labor Regime page (GPBR_LABOR_REGIME) to associate employee classifications with labor-specific codes and information.
Navigation:
This example illustrates the fields and controls on the Labor Regime page.
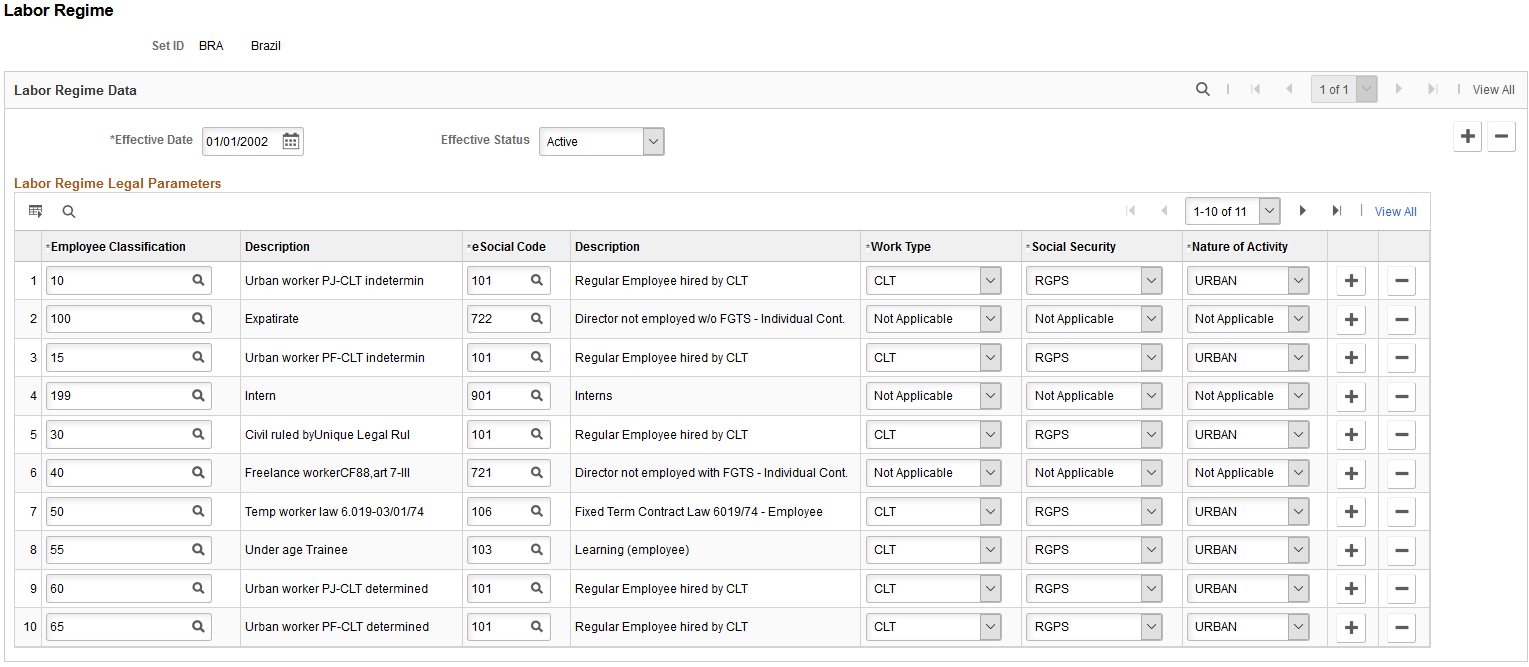
Use this page to associate labor category codes with employee classifications. This information is used to identify the appropriate events to be submitted in regards to employer-employee relationships, as well as other specific attributes.
|
Field or Control |
Description |
|---|---|
|
Employee Classification |
Select an employee classification to be included in eSocial processing. Employee classes that are created for the BRA setID on the Employee Class page are available for selection. See Also Defining Additional Employment Setup Data In order for employees to be included in eSocial reporting, their employee classifications must be set up on this page. |
|
eSocial Code |
Select a labor category legal code to associate with the selected employee classification. Labor category legal codes are defined on the Labor Category Legal Codes Page. |
|
Work Type |
Select an applicable labor law for the selected employee classification. Values are CLT, Not Available, and RJP. The value is used to identify if the employee classification is for employees (if CLT or RJP is selected) or non-employees (if Not Applicable is selected). |
|
Social Security |
Select, if applicable, a social security type for the selected employee classification. Values are Not Applicable, RGPS, RPPS, and RPSE. |
|
Nature of Activity |
Select if the selected employee classification applies to URBAN or RURAL employees, or Not Applicable. |
Use the Termination Legal Codes page (GPBR_TERM_CODE) to define eSocial termination codes.
Navigation:
This example illustrates the fields and controls on the Termination Legal Codes page.
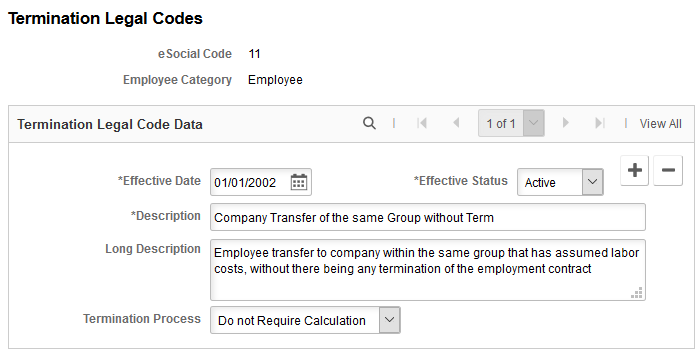
|
Field or Control |
Description |
|---|---|
|
eSocial Code |
Displays the eSocial code of the termination mentioned in the descriptions. Define termination codes on this page in accordance with the termination reasons that are available on Table 19 from the Brazilian Government. |
|
Employee Category |
Displays whether the termination legal code is defined for Employee or Non-Employee. |
|
Termination Process |
Select whether or not payment calculation is required for the termination legal code. For terminations with payment calculation, the termination payment amount is included in each of their termination events to be submitted to the government. See Also eSocial Termination Events Page |
Use the Hire Action/Reason page (GPBR_HIR_ACT_REA) to identify all hiring actions and reasons, and corresponding events to be used to report to the eSocial system.
Navigation:
This example illustrates the fields and controls on the Hire Action/Reason page.

Use this page to specify the list of hiring actions and reasons that need to be submitted for eSocial processing, and corresponding events to be used based on employment relationship types, and whether or not the reported employment is the first job for the hired individual.
Any hiring actions and reasons that are not set up on this page are excluded from eSocial reporting.
|
Field or Control |
Description |
|---|---|
|
Action |
Select a hiring action in PeopleSoft. Typical values are HIR (Hire), XFR (Transfer), and REH (Rehire). |
|
Reason Code |
Select a reason for the selected action. If no reason is specified, the setup for this row applies to all reasons for the selected action. |
|
Employee Indicator |
Select if the setup for this row applies to employees with employment relationship, as specified on the Labor Regime BRA page. Clear this option if it applies to non-employees. |
|
eSocial Code |
Select the corresponding eSocial code to map to the selected action and reason. |
|
First Job |
Select Y if the setup for this row applies to the first employment of hired individuals. If not, select N. |
|
Event Code and Description |
Select an event to be used to submit hiring transactions of the corresponding setup to the eSocial system. |
Use the Termination Action/Reason page (GPBR_TER_ACT_REA) to identify all termination actions and reasons, and corresponding events to be used to report to the eSocial system.
Navigation:
This example illustrates the fields and controls on the Termination Action/Reason page.

According to the government’s requirements, terminations have to be reported by the seventh day of the month following the termination date, by the termination payment date, or before the triggering of payroll events, depending on information such as the nature of employment (employees and non-employees), termination reason and employment relationship. Use this page to specify all termination actions and reasons that need to be submitted to the eSocial system for employees and non-employees, and the corresponding events to be invoked to handle those terminations. Any actions and reasons that are not set up on this page are excluded from eSocial reporting.
|
Field or Control |
Description |
|---|---|
|
Action |
Select a termination action in PeopleSoft. Typical values are TER (Termination), and XFR (Transfer). |
|
Reason Code |
Select a reason for the selected action. If no reason is specified, the setup for this row applies to all reasons for the selected action. |
|
Employee Indicator |
Select if the setup for this row applies to employees with employment relationship. Clear this option if it applies to non-employees (for example, trainees or apprentices). |
|
eSocial Code |
Select, if applicable, the corresponding eSocial termination code to map to the selected action and reason. This code is used by the system to identify if the event should be generated online (by saving an HCM component), or through a batch process when the termination amount paid to the employee is a required information for the event. See Also Termination Legal Codes Page. |
|
Event Code and Description |
Select an event to be used to submit termination transactions of the corresponding setup to the eSocial system. |
Use the Other Action/Reason page (GPBR_OTH_ACT_REA) to identify all actions and reasons related to contract changes that need to be reported to the eSocial system.
Navigation:
This example illustrates the fields and controls on the Other Action/Reason page.

Some contract changes, such as salary increase, promotions, transfers between establishments, work shifts, and so on must to be reported to the eSocial system before the triggering of payroll events or before absence and termination events, depending on the nature of employment (employees and non-employees). Use this page to specify all contract-related actions and reasons that need to be submitted to the eSocial system for employees and non-employees, and the corresponding events to be invoked to handle those transactions. Any actions and reasons that are not set up on this page are excluded from eSocial reporting.
|
Field or Control |
Description |
|---|---|
|
Action |
Select an action in PeopleSoft. Typical values are DTA (Data Change), PAY (Pay Rate Change) and XFR (Transfer). |
|
Reason Code |
Select a reason for the selected action. If no reason is specified, the setup for this row applies to all reasons for the selected action. |
|
Employee Indicator |
Select this option if the setup for this row applies to employees with employment relationship. Clear this option if it applies to non-employees. |
|
Collective Agreement Indicator |
Select this option to use the setup for this row to generate events to inform the Government of retroactive supplementary salary amounts, which result from salary increases caused by one of these reasons: collective agreement, collective dispute, collective convention or law enforcement. This option becomes editable on a row when an action, a reason code, and the Employee Indicator field are selected. Note that this option can only be selected for one row on this page. |
|
Event Code and Event Description |
Select an event to be used to submit transactions of the corresponding setup to the eSocial system. |
Use the Absence Legal Codes page (GPBR_ABS_CODE) to define eSocial absence codes.
Navigation:
This example illustrates the fields and controls on the Absence Legal Codes page.
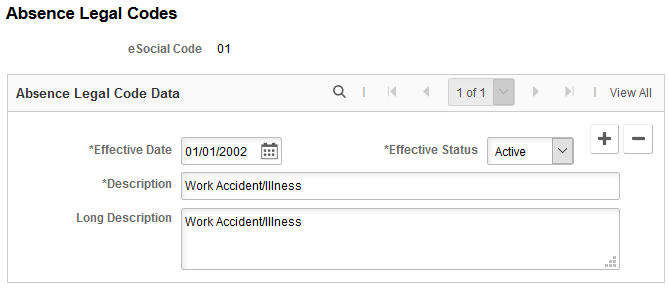
These codes are referenced on the Absence Take and Reason Page.
Use the Absence Take and Reason page (GPBR_ABS_TAKE_REA) to map PeopleSoft and eSocial absence codes and specify reporting requirements for temporary absence types.
Navigation:
This example illustrates the fields and controls on the Absence Take and Reason page.
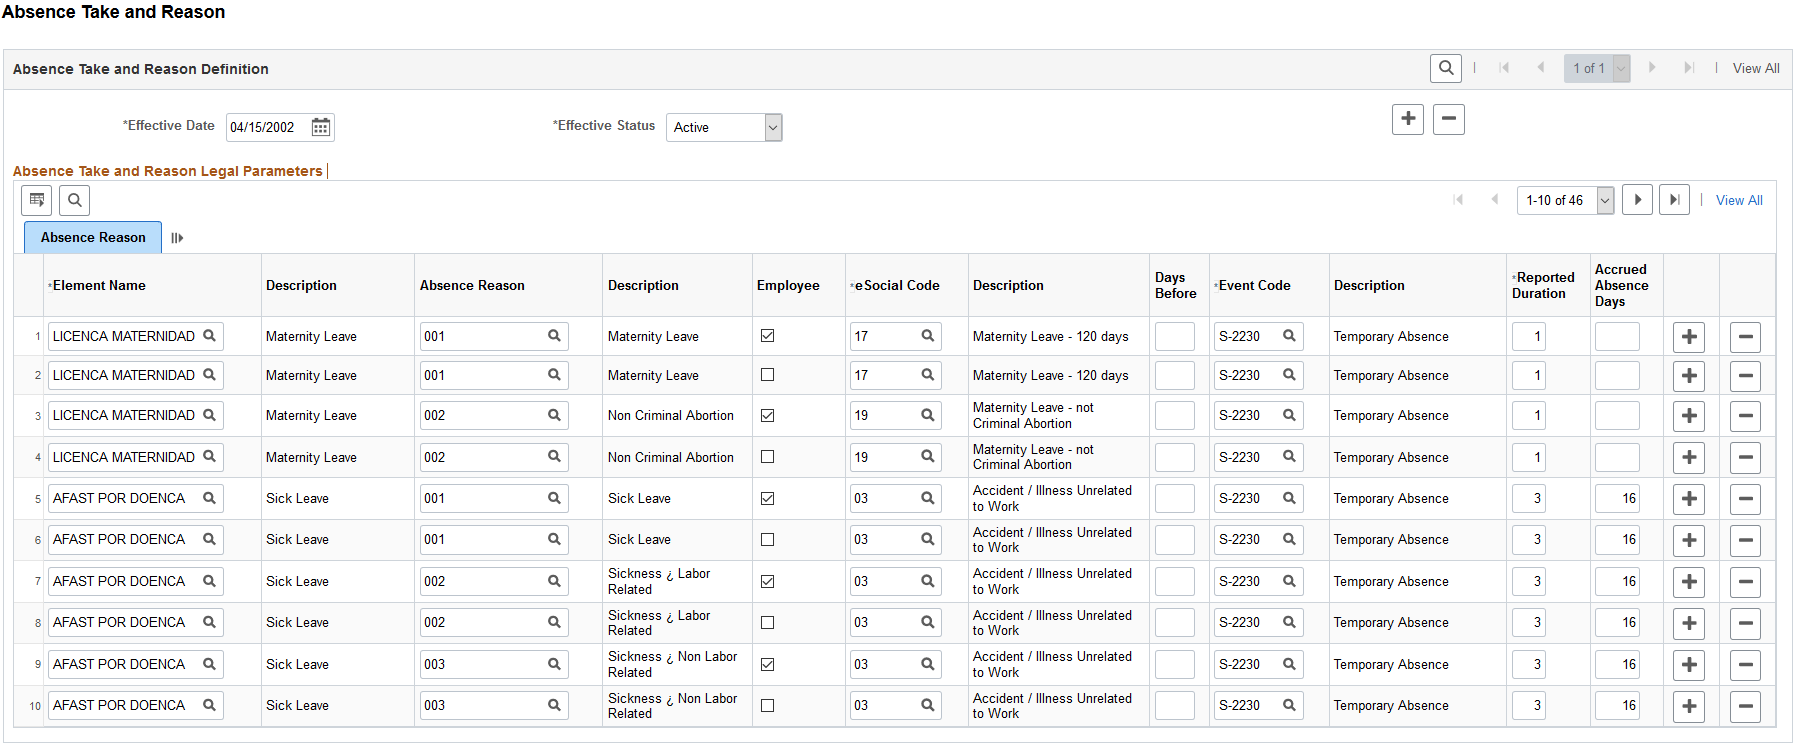
Note: Absence codes can change in different eSocial versions. It is the customer’s responsibility to update the mapping on the Absence Take and Reason page as they see fit.
The Brazilian government requires that several types of absences be reported when they occur. When these absences are entered or updated using the Absence Event BRA component or the Vacation Leave BRA component, they are expected to be submitted to eSocial before the triggering of payroll events or termination events. They include, but not limited to, maternity leave, accident at work, illness leave, vacations, and so on.
Use this page to specify all absence types that need to be included for eSocial processing and respective reporting requirements. Do not enter absence types that are not required for eSocial reporting, for example, unjustified absence from work, or sick leave for less than three days.
|
Field or Control |
Description |
|---|---|
|
Element Name |
Specify an absence take in PeopleSoft. |
|
Absence Reason |
Specify the reason for the selected absence take. Absence reasons are associated with absence takes through absence take types on the Absence Take Types page (GP_ABS_TYPE). If no reason is specified, the setup for this row applies to all reasons for the selected absence take. |
|
Employee |
Select if the selected absence take and reason applies to employees. Clear this option if it applies to non-employees. |
|
eSocial Code |
Select the corresponding eSocial code to map to the selected absence take and reason. These codes are defined on the Absence Legal Codes Page. |
|
Days Before |
Enter the number of days, before the beginning of absence, that the selected absence event (for example, S-2230) needs to be submitted to eSocial (for an early submission). |
|
Event Code |
Select an event (for example, S-2230) to be used to submit transactions of the corresponding absence setup to the eSocial system by the closing of the period (the 7th day of the next month) in normal circumstances. |
|
Reported Duration |
Enter, for the selected absence take and reason, the minimum number of days for absences to be included for eSocial reporting by the closing of the period. In other words, if an employee reports absence using the selected take and reason, and the number of absence days is lower than the reported duration, the absence is not reported to eSocial. |
|
Accrued Absence Days |
Enter, for the selected absence take and reason, the number of accrued absence days to be reported to eSocial as soon as this number is met, instead of waiting until the closing of the period. |
Use the Country and Nationality Cd Bra page (ES_COUNTRY_TBL_BRA) to map country codes with RFB and RAIS nationality codes.
Navigation:
This example illustrates the fields and controls on the Country and Nationality Cd BRA page.
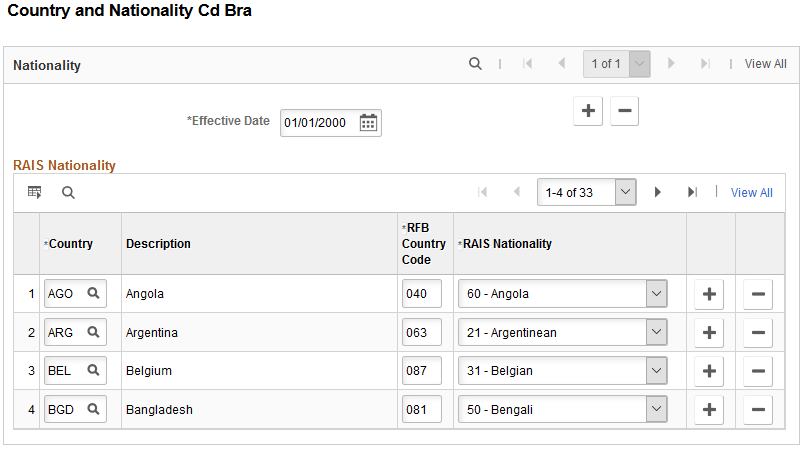
Use this page to map codes from the Country table to RFB and RAIS nationality codes. When the project (which includes the eSocial functionality) is applied, a batch process is executed automatically to convert RAIS nationality codes that were referenced in the Brazil (History) section of the Add a Person or Modify a Person - Regional Page to associated country codes.
|
Field or Control |
Description |
|---|---|
|
Country and Description |
Select a country code. Country codes are stored in the COUNTRY_TBL table in PeopleSoft. The corresponding country description is displayed after a country code is selected. |
|
RFB Country Code |
Enter a 3-digit numeric Secretaria da Receita Federal do Brasil (Department of Federal Revenue of Brazil) code to map to the selected country code. |
|
RAIS Nationality |
Select a nationality code that is used in RAIS reports to map to the selected country code. |
Use the INSS Tax Incidence Code page (GPBR_SOC_PREV_CD) to define INSS tax codes.
Navigation:
This example illustrates the fields and controls on the INSS Tax Incidence Code page.
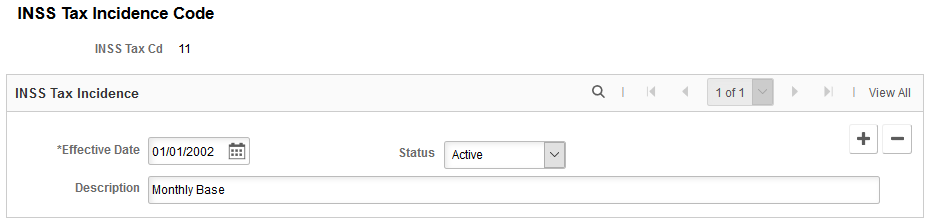
Global Payroll for Brazil delivers a list of social security incidence codes for use in eSocial reporting.
Use the Income Tax Incidence Code page (GPBR_INC_TAX_CD) to define income tax codes.
Navigation:
This example illustrates the fields and controls on the Income Tax Incidence Code page.
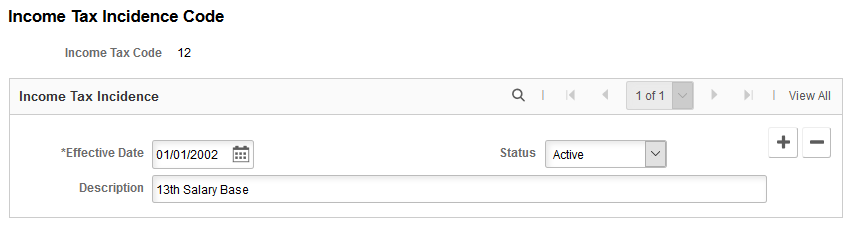
Global Payroll for Brazil delivers a list of income tax incidence codes for use in eSocial reporting.
An income tax code must be numeric only, 2 to 4 digits in length. If you add a code manually, the system ignores the zeros entered before the first positive integer, for example, 0320 will be treated as 320.
Use the Wage Type Code page (GPBR_WAGE_CODE) to define wage type codes.
Navigation:
This example illustrates the fields and controls on the Wage Type Code page.
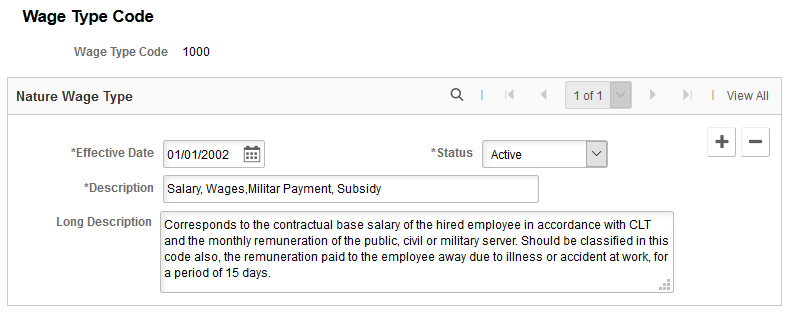
Global Payroll for Brazil delivers a list of wage type codes for use in eSocial reporting.
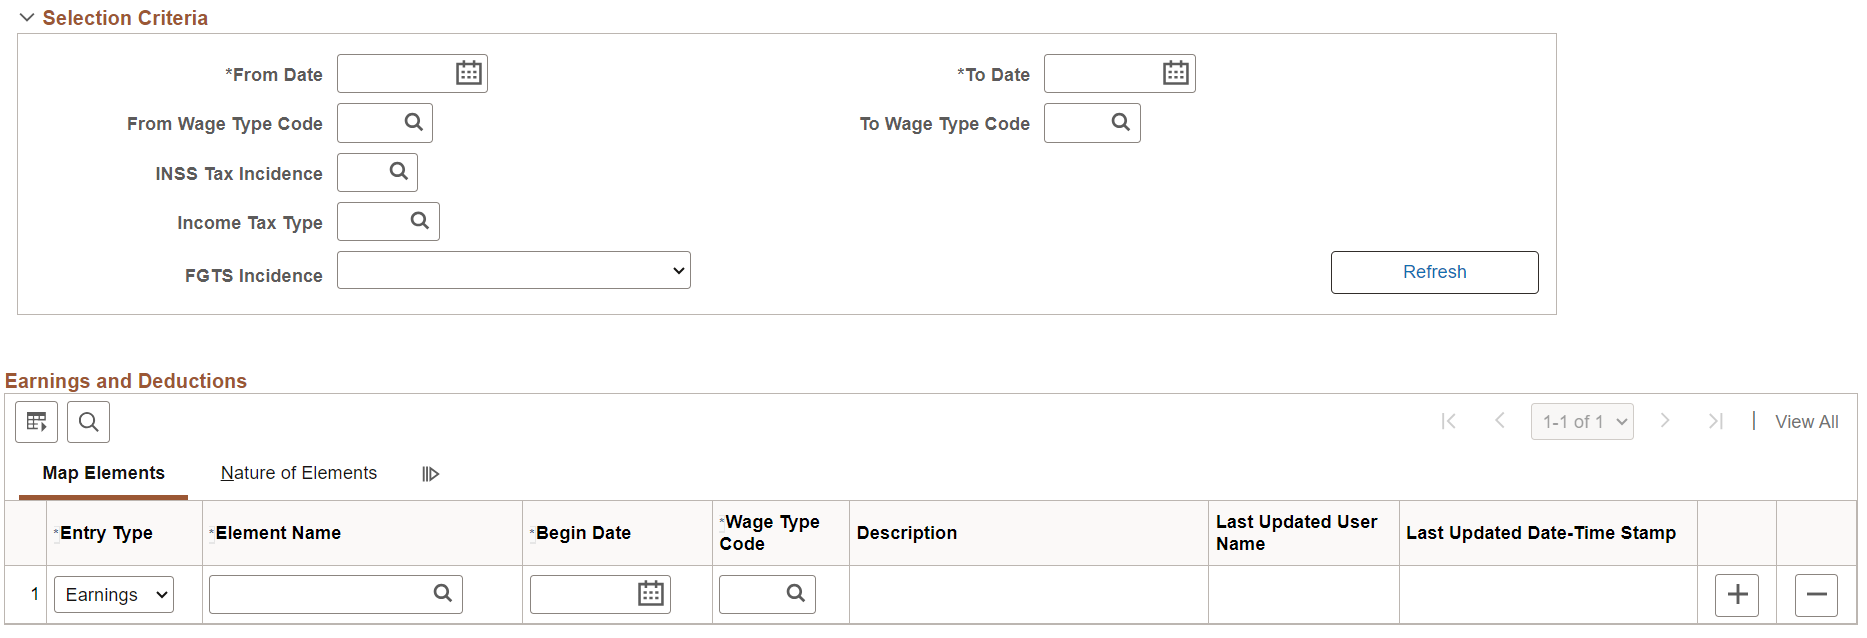
Use the Wage Types Table page (GPBR_WAGE_TYPE) to assign wage type as well as other incidence codes to accumulator elements for use in eSocial reporting.
Navigation:
This example illustrates the fields and controls on the Wage Types Table page (1 of 2).
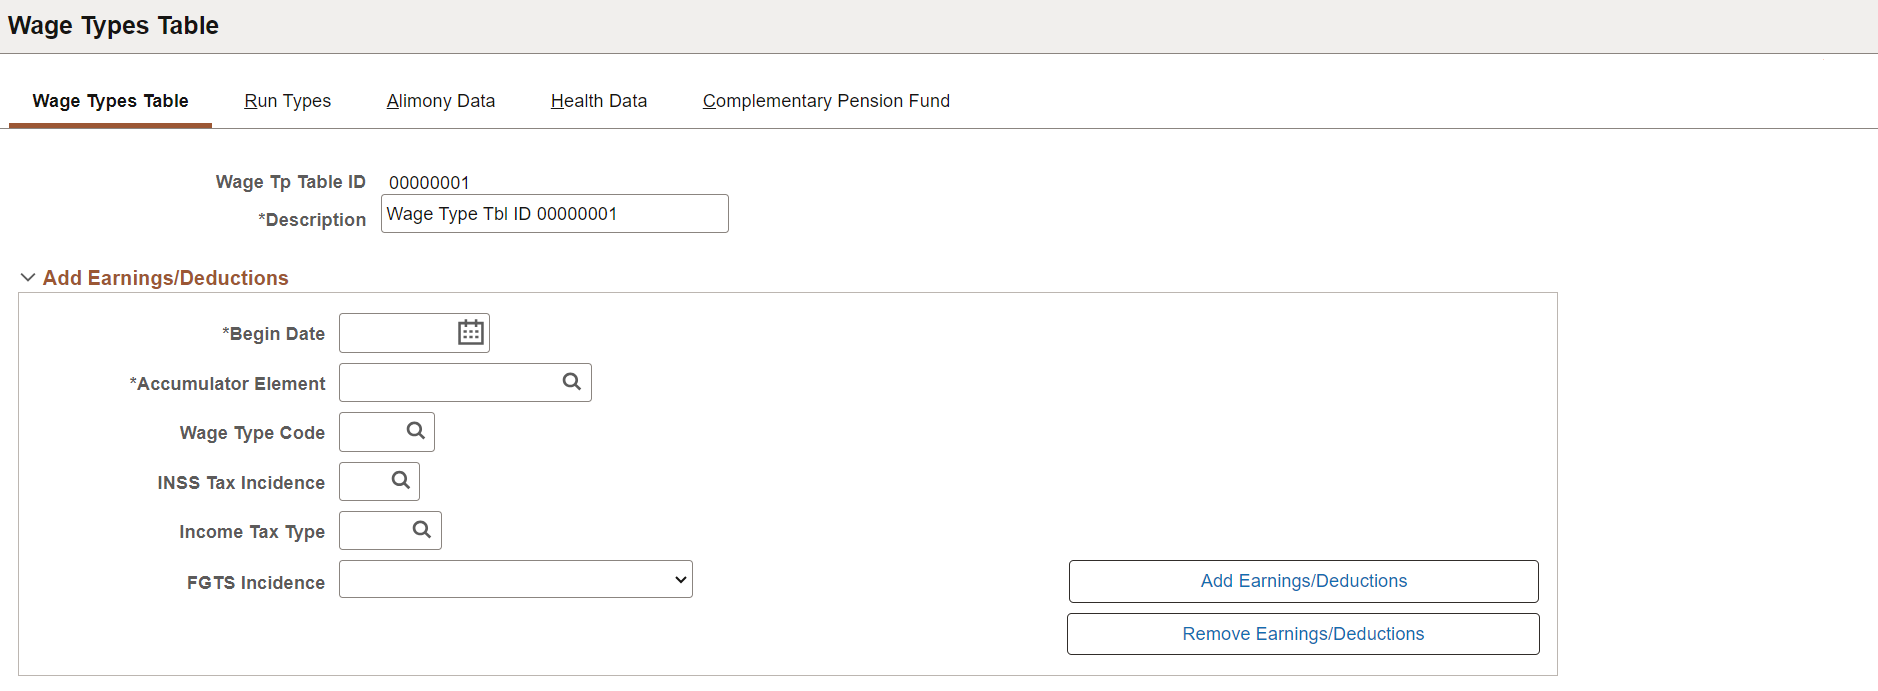
This example illustrates the fields and controls on the Wage Types Table page (2 of 2).
Wage Types Table Setup
Wage types table setup supports the processing of S-1010 Wage Event Table event reports. The S-1010 event is responsible for initial loading earnings and deduction elements and other related information that is used in payroll for companies, as well as tracking its data changes moving forward.
Wage types table setup consists of:
Definition of INSS tax codes on the INSS Tax Incidence Code Page.
Definition of income tax codes on the Income Tax Incidence Code Page.
Definition of wage type codes on the Wage Type Code Page.
Creation of wage types tables (referencing previously defined tax and wage type codes) on the Wage Types Table Page.
Association of wage type tables and companies on the (BRA) Company Details BRA Page.
Information entered in wage types tables (earnings and deduction elements) is not company-specific. To make this information available for eSocial reporting, it has to be linked to companies so that valid wage type changes are submitted to the eSocial system for all impacted companies. Each wage types table setup can be referenced by company on the Company Details BRA page.
Entering tax exemption details for companies (if any) on the Exemption Proceedings Page.
To support eSocial reporting for the S-1010 event, Global Payroll for Brazil delivers the GPBR_ESOCIAL_COMPANY_SYNC service operation that is used to identify data changes that are made to the Earnings and Deductions section of the Wage Types Table page after the completion of the initial loading process. Through Integration Broker, service operation messages will be triggered on the Wage Types Table page, the Exemption Proceedings page, as well as in the Company BRA (COMPANY_TABLE_BRA) component when these online transactions are saved. Integration Broker tracks the online data changes that eSocial requires, and determines the appropriate actions (add, change, or delete) for the eSocial reports.
When you save this component, the system validates that for each element that is associated with a suspended by judicial decision code value, additional judicial information is entered on the Exemption Proceedings page. It displays a warning message if the information is not available on that page. Suspended by judicial decision code values include:
For INSS Tax Incidence: any 2-digit code that begins with 9
For Income Tax Incidence: any 2-digit or 4-digit code that begins with 9
For FGTS Incidence: any value that begins with Susp Judicial
|
Field or Control |
Description |
|---|---|
|
Wage Tp Table ID (wage types table ID) |
Enter the identifier of the wage types table. Wage types table IDs function like setIDs in the event splitting process for payroll events. They are associated with companies on the (BRA) Company Details BRA Page. |
Add Earnings/Deductions
Use this section to look up payroll elements by accumulator and enter default codes and properties. Matching accumulator elements are displayed on the Earnings and Deductions section, along with default codes and properties.
|
Field or Control |
Description |
|---|---|
|
Begin Date |
Enter the start date when this wage type code definition becomes valid. The government can return an error for a submitted event that has a retroactive date. If the begin date is earlier than the actual month and year, this system message appears: Warning -- date out of range. The date entered is out of the actual month and year period. This is not normally true for this date. Either acknowledge that the date is OK, or correct the entered date. |
|
Accumulator Element |
Specify an accumulator. Only accumulator elements are available for selection. |
|
Wage Type Code |
Select a wage type code. Wage Type Codes are defined on the Wage Type Code Page. |
|
INSS Tax Incidence |
Select an INSS tax code. INSS tax codes are defined on the INSS Tax Incidence Code Page. |
|
Income Tax Type |
Select an income tax code. Income tax codes are defined on the Income Tax Incidence Code Page. |
|
FGTS Incidence |
Select an FGTS code. Values are: FGTS - 13th Salary FGTS - Base FGTS - Termination (Prior Notice) Not Applicable Susp Judicial (Prior Notice) (suspended by judicial decision prior notice) Susp Judicial 13th Salary Susp Judicial Monthly |
|
Add Earnings/Deductions |
Click to add matching accumulator elements to the Earnings and Deductions section. |
|
Remove Earnings/Deductions |
Click to remove matching accumulator elements from the Earnings and Deductions section. |
Selection Criteria
You can use this section to query payroll elements and wage type codes to which they are currently mapped.
Results are displayed in the Earnings and Deductions section.
Earnings and Deductions: Map Elements
When you click the Add Earnings/Deductions button in the Add Earnings/Deductions section, the system populates the Earnings and Deductions section with all earning and deduction elements for the selected accumulator, and the wage type code that are specified in the Add/Remove Accumulator section. You can add or remove them manually as necessary.
|
Field or Control |
Description |
|---|---|
|
Entry Type |
Displays or enter either Deduction or Earnings. |
|
Element Name |
Displays or enter payroll elements that need to be reported on event S-1010. Available values are filtered by the selected entry type. |
|
Begin Date |
Displays or enter the start date when the selected wage type code definition becomes valid. This date controls the available values of the INSS Tax Incidence, Income Tax Type and FGTS Incidence fields. A “date out of range” warning message appears if the entered start date is earlier than the current month and year. |
Earnings and Deductions: Nature of Elements
The system populates this section with other codes and properties of the accumulator elements that are specified in the Add Earnings/Deductions section. You can add or remove them manually as necessary.
Note: To specify an element for use in alimony calculation, select an alimony-specific value, for example, 51, 52, 53, 54, or 55, as its income tax type.
|
Field or Control |
Description |
|---|---|
|
Type |
Displays the nature of the element. Values are: Deduction Earning Informative Informative Deduction |
Use the Run Types page (GPBR_RUN_TYPE) to specify run types, eSocial events, and other needed information for corresponding payroll elements. This information is used in compensation-related events, for example, S-1200, S-1210, S-2299 and S-2399. It does not apply to S-1010 event reports.
Navigation:
This example illustrates the fields and controls on the Run Types page.

|
Field or Control |
Description |
|---|---|
|
Run Type Name |
Select a run type process. Results of selected run type processes are reported to eSocial. |
|
Total Earnings and Total Deductions |
Select accumulators to be used for total earnings and total deductions respectively. |
|
Net Pay Element |
Select the net pay element for the selected run type process. |
|
Event Code |
Select the eSocial event with which the corresponding run type associates. (S-1200 and S-1210) When the Identify Calendars option of the payroll event process is triggered for the S-1200 and S-1210 events, the system selects all applicable calendars for the selected companies and competency period on the eSocial Payroll Events run control page. (S-2299 and S-2399) Similarly, when the termination event process is run on the eSocial Termination Events run control page, applicable calendars for payment are identified as well. Based on the type (payroll or termination) of event processing, applicable calendars are finalized calendars that are linked to run types, which are associated with the corresponding events on the Run Types Page. A company is associated with wage types table setup (which contains run type setup) on the (BRA) Company Details BRA Page. See Also Processing Phases and Options |
|
Payroll Tp (payroll type) |
Select if the payroll is done monthly, annually (for example, 13th salary), or not applicable. |
|
Payment Tp (payment type) |
Select the payment type. Values are: N/A Payroll Term Non Empl (termination for non employees) Termination Vacation |
Use the Alimony Data page (GPBR_SPEC_WAGE) to enter information regarding alimony beneficiaries.
Navigation:
This example illustrates the fields and controls on the Alimony Data page.
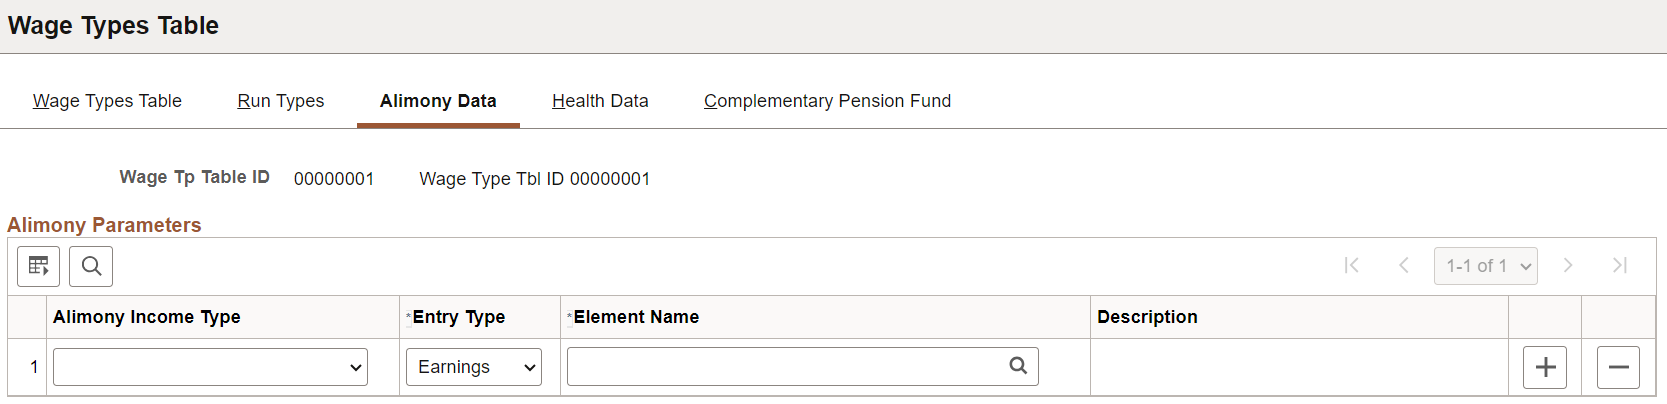
|
Field or Control |
Description |
|---|---|
|
Alimony Income Type |
Select the income type of the alimony. |
|
Entry Type |
Select the type of the element to be selected, Deduction or Earnings. |
|
Element Name |
Select an applicable element for the selected alimony income type. The element list is filtered by the entry type. |
Use the Health Data page (GPBR_HLTH_WAGE) to specify health plan setup for payroll event reporting.
This information is used in compensation-related events, for example, S-1200, S-1210, S-2299 and S-2399. It does not apply to S-1010 event reports.
Navigation:
This example illustrates the fields and controls on the Health Data page.
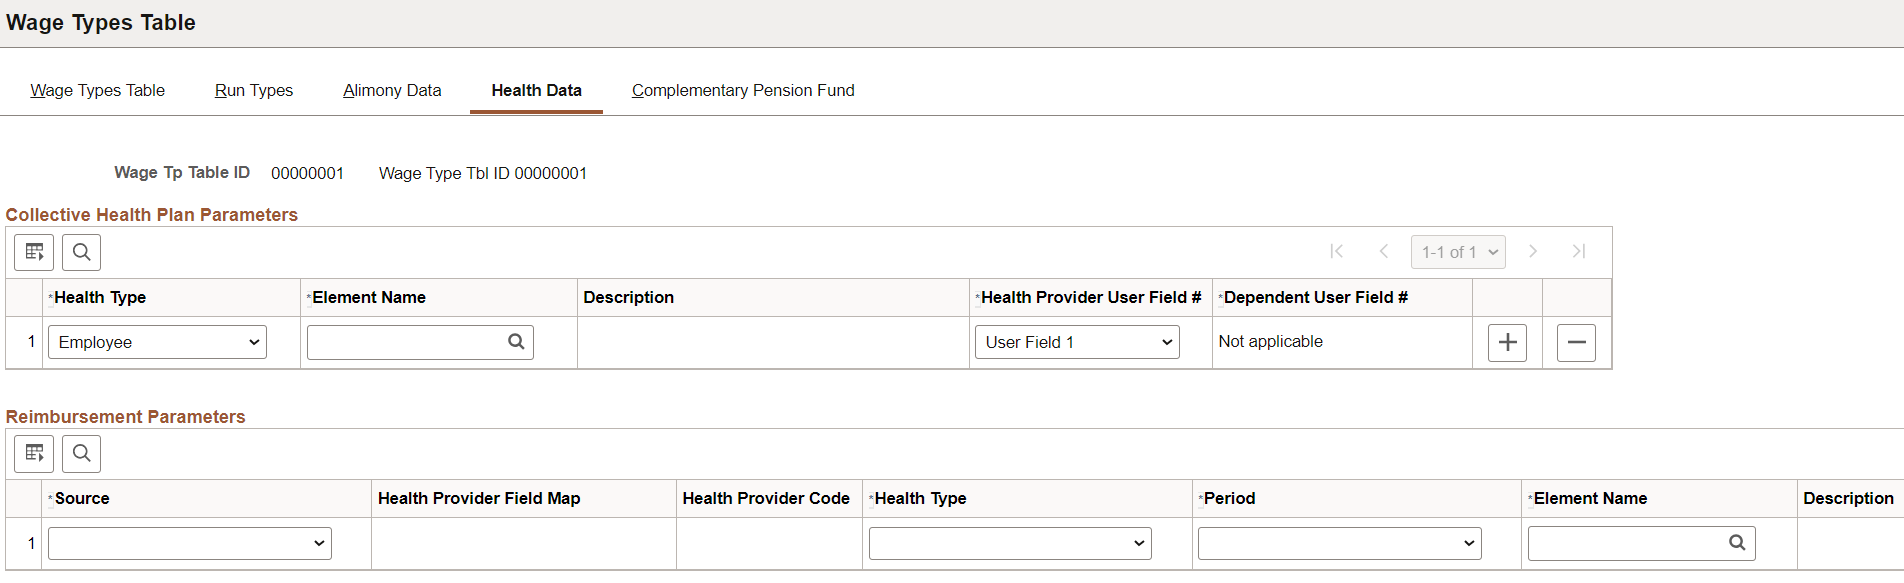
Collective Health Plan Parameters
Use this section to identify the operator(s) of the corporate collective private health care plan.
|
Field or Control |
Description |
|---|---|
|
Health Type |
Select Employee or Dependent to indicate whether the associated element will be used for mapping employee data or data of their dependents. |
|
Element Name |
Select an applicable deduction element. |
|
Health Provider User Field # |
Select the element's user field to be the Health Provider indicator. This field is applicable to both Dependent and Employee health types. Note: The user fields for Health Provider and Dependent must be different. |
|
Dependent User Field # |
Select the element's user field to be the Dependent indicator. This field is applicable only to the Dependent health type. Note: The user fields for Health Provider and Dependent must be different. |
Reimbursement Parameters
Use this section to specify setup related to the reimbursements that the employer makes during the calculation period to workers for the medical or dental expenses that the workers paid to their health service providers.
|
Field or Control |
Description |
|---|---|
|
Source |
Select the source of reimbursement, Employer or Health Provider. |
|
Health Provider Field Map |
Select the element's user field to be the Health Provider indicator. Or, use the Select Health Provider value if the system already has specific elements for each of its health provider setup. This field becomes editable if the selected source is Health Provider. Note: The user fields for Health Provider Field Map, third-party Health Provider, and Dependent must be different. Health providers are defined on the Health Providers Page. |
|
Health Provider Code |
Select an applicable health provider. This field becomes editable if the Health Provider Field Map field value is Select Health Provider. |
|
Health Type |
Select Employee or Dependent to indicate whether the associated element will be used for mapping employee data or data of their dependents. |
|
Period |
Select whether the reimbursement amount applies to Current Period or Previous Years. |
|
Element Name |
Select an applicable earnings element. |
|
Health Third Party User Field |
Select a user field to be the medical assistance provider (for example, doctor, clinic, or laboratory) indicator. Note: The user fields for Health Provider Field Map, third-party Health Provider, and Dependent must be different. |
|
Dependent User Field # |
Select the element's user field to be the Dependent indicator. This field is applicable only to the Dependent health type. Note: The user fields for Health Provider Field Map, third-party Health Provider, and Dependent must be different. |
Use the Complementary Pension Fund page (GPBR_CMP_PENS_FUND) to enter information regarding Complementary Pension Fund.
Navigation:
This example illustrates the fields and controls on the Complementary Pension Fund page.
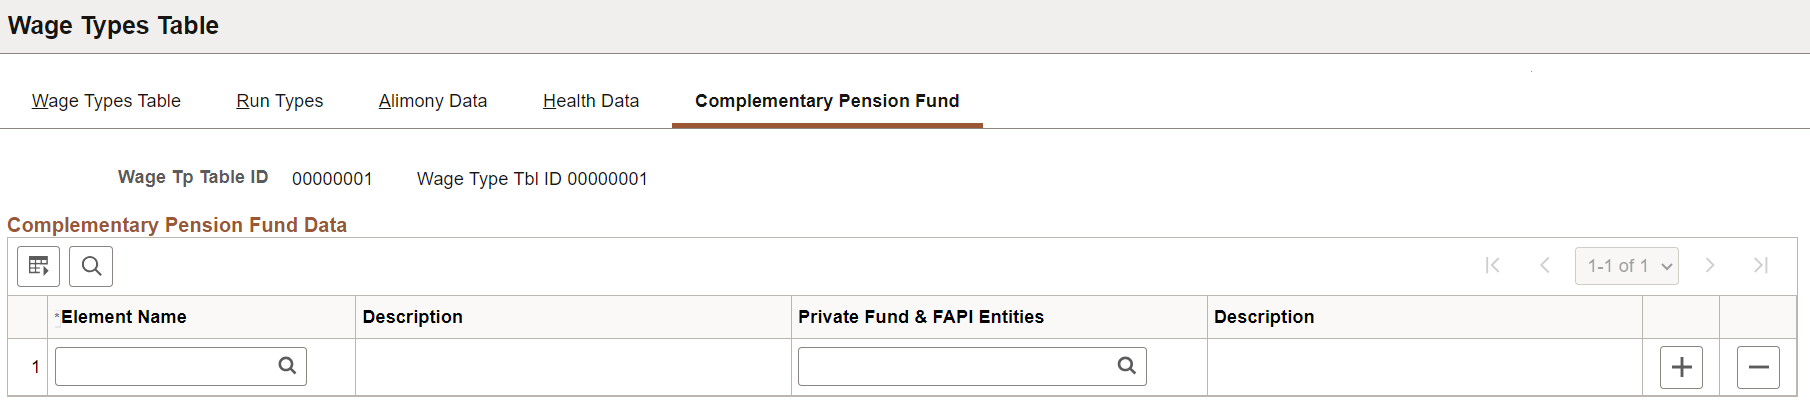
|
Field or Control |
Description |
|---|---|
|
Element Name |
Select the element to be used for mapping employee data or data of their dependents. Only deduction elements are available for selection. |
|
Private Fund & FAPI Entities |
Select the applicable pension entity identifier for the specified element. Private funds and FAPI entities are defined on the Private Fund & FAPI Entities Page. |
Use the Exemption Proceedings page (GPBR_PROCEED_DT) to define the wage type proceeding details for companies.
Navigation:
This example illustrates the fields and controls on the Exemption Proceedings page.

Use this page to enter proceeding details for companies that have tax exemptions specified in their elements on the Wage Types Table page. Data changes to this page, once validated, will be submitted to eSocial for the referenced company using the S-1010 event.
|
Field or Control |
Description |
|---|---|
|
Company |
Select a company. Only companies that are associated with the listed wage types table ID on the Company BRA page are available for selection. If you select a different company, the system prompts to confirm if it can clear all the data entered for the old company on this page. Enter the proceeding information for the new company. |
Proceeding Definition
|
Field or Control |
Description |
|---|---|
|
Court Order Type |
Select the court order type of the tax exemption. Values are: FGTS Income Tax - IRRF Social Security-INSS Union Contribution Note: The Union Contribution court order type is no longer used in the eSocial S-1.0 version. The value can still be viewed in proceedings that were created before it became obsolete. If you select a different court order type, the system prompts to confirm if it can clear all the elements entered for the current proceeding number. |
|
Proceeding Type |
Enter the government proceeding type. This field is required if the selected court order type is Social Security-INSS. Values are: Administrative Judicial |
|
Proceeding Number |
Select or enter the proceeding number of the tax exemption. Note: The field prompt is available for use if the Enabled option is selected on the Adm/Legal Proceedings Parameters BRA Page. Enter the number manually, if the option is not selected. If the selected court order type is FGTS, proceeding numbers that belong to the Judicial proceeding type and are created for either Tax only or Tax and FGTS or FGTS only/Termination Soc Cont become available for selection. If the selected court order type is Income Tax - IRRF, proceeding numbers that belong to the Judicial proceeding type and are created for Tax only or Tax and FGTS become available for selection. If the selected court order type is Social Security-INSS, proceeding numbers that are created for Tax only or Tax and FGTS and the specified proceeding type become available for selection. If the selected court order type is Union Contribution, enter the proceeding number manually. You can add the same proceeding number to the system more than once for different court order type and suspension code combinations. Proceedings are defined on the Administrative/Legal Proceedings BRA Page. |
|
Extension of Decision |
Enter the decision extension type. This field becomes editable if the selected court order type is Social Security-INSS. Values are: INSS Employer Cont. + Dis Ins.: The employer’s social security contribution plus discount of the insured. INSS Employer Contribution: The employer’s social security contribution. |
|
Suspension Code |
Select or enter the applicable suspension code for the selected proceeding number of the tax exemption. This code is required for the Social Security-INSS and Income Tax - IRRF court order types. Note: The field prompt is available for use if the Enabled option is selected on the Adm/Legal Proceedings Parameters BRA Page. Enter the number manually, if the option is not selected. If the selected court order type is Union Contribution, enter the suspension code manually. |
Elements
Enter a minimum of one element.
|
Field or Control |
Description |
|---|---|
|
Entry Type |
Enter the element type, Deduction or Earnings. |
|
Element Name |
Specify an element. Elements of the specified entry type are available for selection based on these conditions:
See Also Wage Types Table Page. |
|
Begin Date |
Enter the date when the corresponding element information begins to be validated for eSocial reporting. The current date is prepopulated if no element is chosen. If an element is selected, the system populates this field with the same begin date this element has on the Wage Types Table page. |
Use the eSocial Diagnostic Procedures page (GPBR_ESOC_CODE) to define diagnostic procedure codes.
Navigation:
This example illustrates the fields and controls on the eSocial Diagnostic Procedures page.
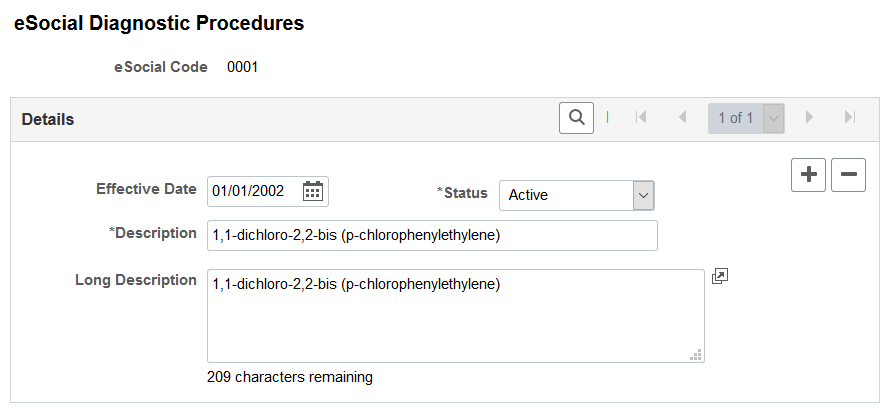
The system prepopulates this component with diagnostic procedure codes from table 27 in eSocial. Diagnostic procedure codes are referenced on the Laboratory Exams BRA Page to support worker health reporting using the S-2220 event.
Use the Hazard Agent Codes BRA page (HAZ_AGENT_TBL_BRA) to define hazard agent codes.
Navigation:
This example illustrates the fields and controls on the Hazard Agent Codes BRA page.
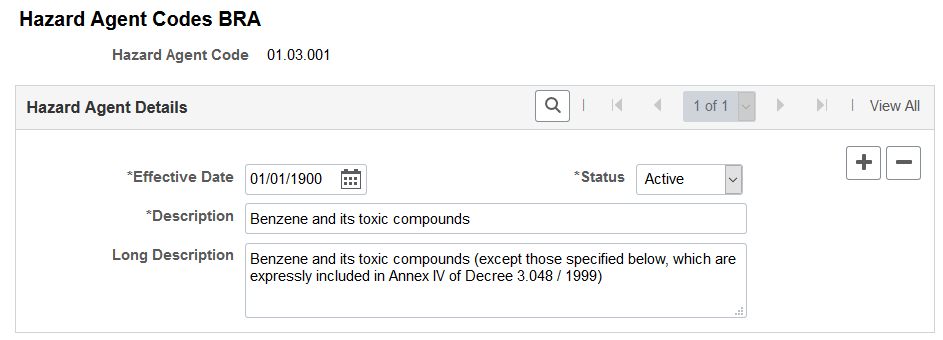
The system prepopulates this component with hazard factor codes from table 24 in eSocial. These codes are used in work environment condition reporting using the S-2240 event.
|
Field or Control |
Description |
|---|---|
|
Hazard Agent Code |
Displays the eSocial hazard agent code, which is 9 positions in length. |
Use the Hazard Factor Table page (HAZARD_FACTOR_BRA) to define hazard factor codes.
Navigation:
This example illustrates the fields and controls on the Hazard Factor Table page.
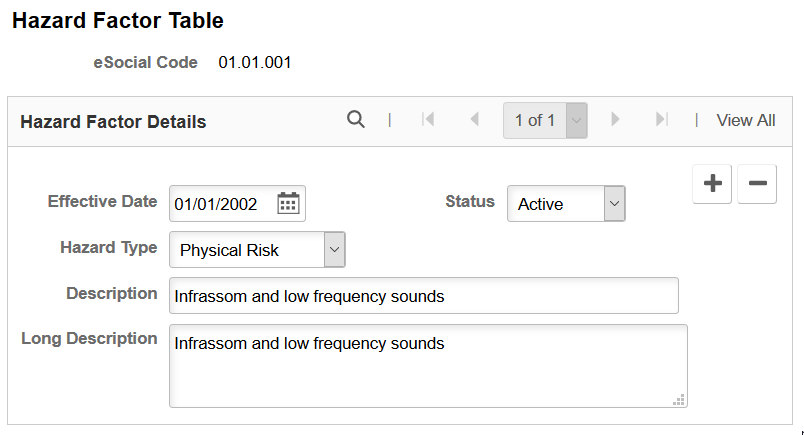
Note: This page is not used.
The system prepopulates this component with hazard factor codes from table 23 in eSocial. These codes are used in work environment condition reporting using the S-2240 event.
While you can access the cloned Hazard Factor Table page (GPBR_HAZARD_FACTOR) from , it is recommended that you access this page using the Workforce Monitoring navigation.
|
Field or Control |
Description |
|---|---|
|
eSocial Code |
Displays the code for the eSocial hazard factor, which is 9 positions in length. |
|
Hazard Type |
Specify the type of the hazard factor. Values are: Biological Risk Chemical Risk Ergonomic Risk Mechanical Risk Other Physical Risk |
Use the Special Activities page (ACTIVITIES_BRA) to define special activity codes.
Navigation:
This example illustrates the fields and controls on the Special Activities page.
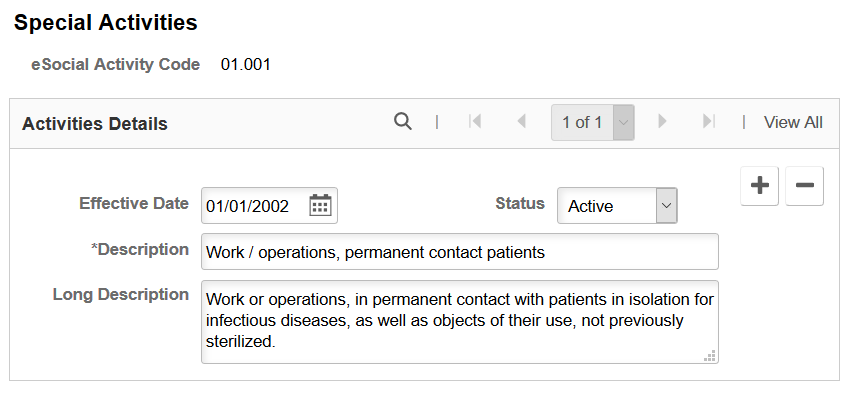
Note: This page is not used.
The system prepopulates this component with special activity codes from table 28 in eSocial. These codes are used in work environment condition reporting using the S-2240 event.
While you can access the cloned Special Activities page (GPBR_ACTIVITIES) from , it is recommended that you access this page using the Workforce Monitoring navigation.
Use the Revenue Code page (GPBR_REVENUE_CODE) to define revenue codes.
Navigation:
This example illustrates the fields and controls on the Revenue Code page.
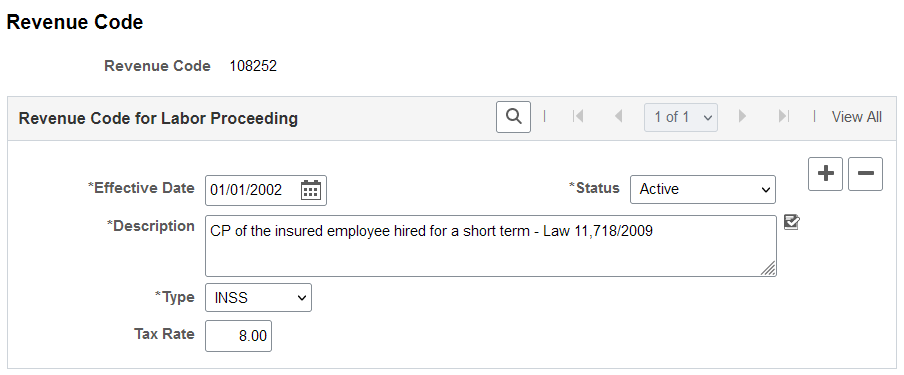
The system prepopulates this component with revenue codes from table 29 in eSocial. Revenue codes are referenced on the Labor Proceeding Tax BRA Page to report IRRF and INSS tax-related amounts using the S-2501 event.
|
Field or Control |
Description |
|---|---|
|
Type |
Select the type for the revenue code, INSS or IRRF. |
|
Tax Rate |
The system does not populate zero or variable rate values. |