Entering Picking Feedback Online
As stockroom workers perform the actual picking process, they update the orders online using the Material Picking Feedback component. Entries into this component keep the system quantities accurate by recording the actual picking results (for items that have not been allocated) or any exceptions (for items that have been allocated).
Once you have entered the picking results, you can use the auto process feature to move the demand lines to the shipped or depleted state, bypassing the Picking Confirmation process, Shipping/Issues component, and Deplete On Hand Quantity process. Shipping overrides can be entered on this component.
Note: If your environment includes inventory transfer transactions from electronic data collection systems, such as keyboard wedges or the Inventory Transfer EIP, then you should verify that the Inventory Transfers process (IN_TRANSFER) has been run before entering data into the Material Picking Feedback component. Processing your picking feedback data before the completion of any pending bin-to-bin transfer transactions can drive quantity in the material storage location negative and generate errors.
|
Page Name |
Definition Name |
Usage |
|---|---|---|
|
DEMAND_PICK_INV |
Modify the quantities of demand lines with allocated stock or enter the actual quantities and picking storage locations for demand lines with no allocated stock. If the Use External Warehouse Control option is active for the business unit, use this page to delete order lines from a picking plan. |
|
|
DMND_PICK_SRCH_SEC |
Enter parameters for the released demand lines that you want to update on the Material Picking Feedback page. |
|
|
DMND_PICKLN_SEC |
Select multiple lines from a single pick batch ID for display on the Material Picking Feedback page. |
|
|
Zoom to Line Page |
DMND_PICK_GOTO_SEC |
Navigate directly to a specific demand line by clicking the Zoom to Line link on the Material Picking Feedback page. |
|
DMND_DTL_INV_SEC |
View demand information for a specific demand line. You can also modify some of the shipment information for the line on this page. |
|
|
DMND_SRL_FETCH, DMND_SRL_ALC_FETCH |
Replace the serial IDs allocated to the order with other eligible serial IDs. |
|
|
Additional Information Page |
CP_CFGCDE_SEC_PNL1 |
View the configuration code for an item for which you are providing picking feedback. |
|
LOAD_OPT_INV_SP |
Modify load information for a picking plan ID or a shipping ID. |
|
|
Load Capacity Inquiry Page |
LOAD_INQ_SP |
View load information defined for the ship via and carrier ID associated with the load ID. |
|
Manage Loads Page |
LOAD_CONS_INV |
Combine order lines into a load for shipping on a particular carrier. |
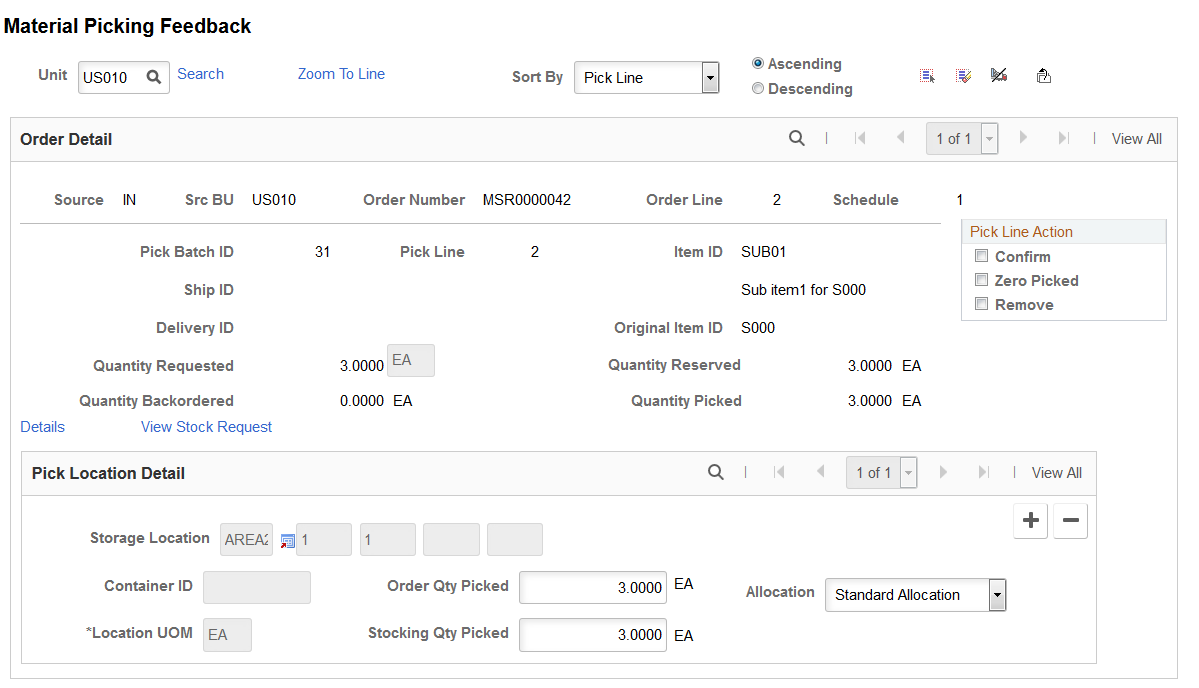
Use the Material Picking Feedback page (DEMAND_PICK_INV) to modify the quantities of demand lines with allocated stock or enter the actual quantities and picking storage locations for demand lines with no allocated stock.
If the Use External Warehouse Control option is active for the business unit, use this page to delete order lines from a picking plan.
Navigation:
This example illustrates the fields and controls on the Material Picking Feedback page (page 1 of 3). You can find definitions for the fields and controls later on this page.
This example illustrates the fields and controls on the Material Picking Feedback page (page 2 of 3). You can find definitions for the fields and controls later on this page.
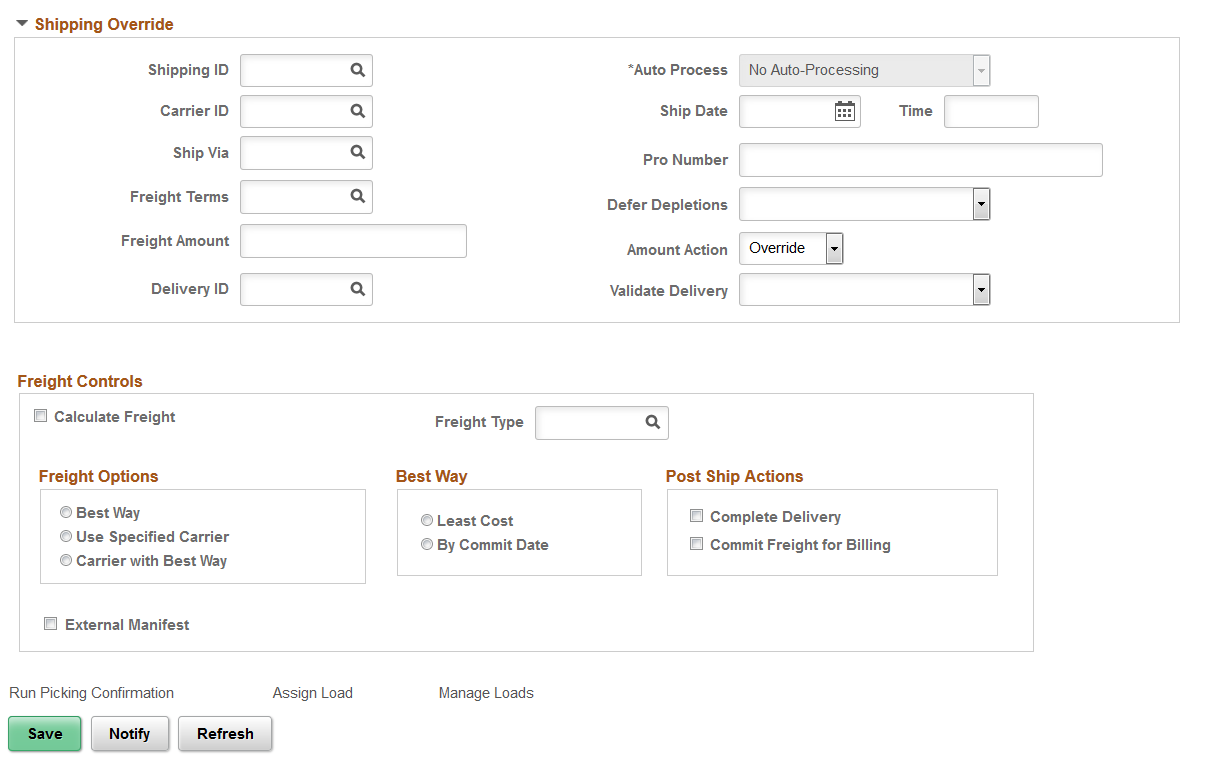
This example illustrates the fields and controls on the Material Picking Feedback page (page 3 of 3). You can find definitions for the fields and controls later on this page.
Use the Material Picking Feedback page to change information about the physical picking process and to confirm the order lines have been picked by selecting the Confirm check box for all picked lines. Picked lines must be confirmed before they are eligible for the Picking Confirmation process.
Field or Control |
Description |
|---|---|
Sort By |
Indicate how the displayed demand lines should be sorted and whether the sort is in Ascending or Descending order. Note: Because natural database order differs from platform to platform, PeopleSoft Inventory performs a secondary sort rather than automatically changing to natural database order. Except for item ID sorts, the full demand key (demand source, source business unit, order number, order line, schedule line, item ID, and demand line) constitutes the secondary sort. |
Confirm All and Unconfirm All |
Click these icons to confirm or unconfirm all order lines except those for which the Remove check box is selected. |
|
Click this icon to set the zero pick option for all order lines except those for which the Confirm or Remove check boxes are selected. |
|
Click this icon to unpick all order lines except those for which the Confirm or Zero Pickedcheck boxes are selected. This action removes the order lines from the pick batch, making them available to appear on another picking plan. |
 (Zero Pick All Lines icon)
 (Remove All From Pick Batch
icon)
(Remove All From Pick Batch
icon)Order Detail
Use the Order Detail group box to scroll through multiple demand lines, then use the Pick Location Detail group box to scroll through the picking lines that make up each demand line.
Field or Control |
Description |
|---|---|
Source, Src BU, Order Number, Order Line, and Schedule |
Displays the information to identify a specific line. The source application, source business unit, order number, order line number, and schedule number distinguish this line from all other lines in the PeopleSoft Inventory business unit. |
Confirm |
Select this check box to indicate that the specified quantity has been picked from the appropriate material storage location (MSL) in the Pick Location Detail group box. Picked lines must be confirmed before they are eligible for the Picking Confirmation process. |
Zero Picked |
Select to zero pick the line. All pick quantities and allocation quantities for the demand line are cleared. Zero picked lines are allowed to pass through to the confirmation and shipping steps so that the full quantity on the demand line can be canceled or backordered depending on how the backorder rule has been defined. |
Remove |
Select to unpick a demand line. This action removes the line from the pick batch and moves it back to the Releasable state, making it available to print on another order release request. When moving a demand line back to the Releasable state the allocation is lost. To keep the allocation, use the Undo Fulfillment Request process page with the Keep All Allocations check box selected. |
Ship ID |
Displays the Shipping ID of this order line. |
Delivery ID |
Displays the delivery ID of this order line. Deliveries are logical groupings of order lines that can be shipped together using the delivery management feature. PeopleSoft Inventory and Order Management can use these groupings for pricing sales orders, adding freight charges, and packing shipping containers. Each delivery is assigned a unique delivery ID. See Understanding PeopleSoft Delivery Management and Freight Calculations. |
Original Item ID |
Displays the original item ID if the substitute item replaced the original item. |
Quantity Reserved |
Displays the quantity reserved for the demand line. |
Quantity Backordered |
The amount of the original order that was placed on back order by the reservation processes or through online lot allocation. |
Quantity Picked |
Displays the quantity that has been picked for the demand line. For demand lines with the Partial Quantities flag set to no, the quantity picked cannot be less than the planned release quantity. For demand lines that do not allow overpicks, the quantity picked cannot be greater than the planned release quantity. |
Details |
Select to access the Material Picking Feedback - Demand Detail where you can view demand information for a specific demand line. You can also modify some of the shipment information for the line on this page. |
View Stock Request |
Select to access the Stock Requests inquiry page where you can view additional information for this order and demand line. |
Select Serial IDs |
Select to access the Serial ID Selection page where you can replace the serial IDs allocated to the order with other eligible serial IDs. |
Configuration Code |
Select to access the Additional Information page (CP_CFGCDE_SEC_PNL) where you can view the configuration code for the item. |
Pick Location Detail group box
Use the Pick Location Detail group box to scroll through the picking lines that make up each demand line.
Field or Control |
Description |
|---|---|
Storage Location and Location UOM (location unit of measure) |
If you did not create an allocation during the Order Release process, enter the material storage location (MSL) from which you picked the material. If you did create an allocation during the Order Release process, or if you are modifying previously saved feedback, you cannot update picking storage locations here. You can change only the quantities. To change material storage location information, delete the row or set the quantity to 0 for the existing location, then insert a new row. Note: The business unit's default display options determine how many storage levels appear upon entry to this page. If, however, the material was actually picked from a storage location with additional levels, this information overrides the defaults and all appropriate levels appear. If you are entering a material storage location that requires additional levels, enter the storage area, then refresh the page to display the remaining levels. If you attempt to pick from a WIP, hold, or suspended location, the system displays an error message and prevents you from saving the feedback. You also cannot save picking feedback if the location is undergoing a cycle count and you have elected to close the material storage locations during cycle counts. |
Order Qty Picked (quantity picked in the ordering UOM) and Stocking Qty Picked (quantity picked in the stocking UOM) |
Enter the quantity picked from this material storage location. You can enter the quantity in either the ordering or the stocking UOM, and the system automatically calculates the other quantity. If you are providing feedback for items that were picked in response to a lot allocation, you can change only the material storage location and quantity, and the material storage location must be valid for the lots allocated to the demand line. For lot-controlled, serial-controlled, and staged date-controlled items, the picked quantity appears in the middle section of the page and the lower section is unavailable for entry. Note: If you are picking lot-controlled items, a warning message appears if the scheduled ship date is before the availability date or after the expiration date. If you did not create an allocation during the Order Release process, the message appears when you enter the lot ID. If you did create an allocation during the Order Release process, it appears when you save the page. |
Allocation |
Displays the type of allocation on this demand line. The options are:
|
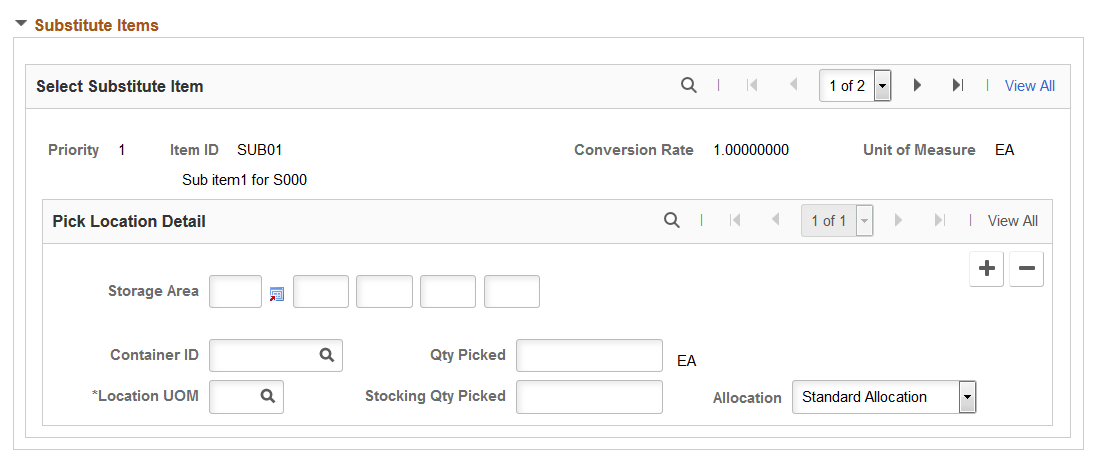
Substitute Items group box
Click the Substitute link on the Material Picking Feedback page to view the Substitute Items Group box details. Use the fields to select the items to replace the original item or to partially select the substitute items. Select the storage area of the substitute item and the relevant details as required.
The Substitute Items link appears when:
You have a substitute item defined for the business unit and item combination.
You must also select the Use for Shipments check box under the Usage tab on the Define Business Unit Item-Substitutes page.
The original item is not part of a kit.
The original item is not a configured Item.
The demand line is not lot-allocated.
The demand line is not backordered.
The demand line is not a Return to Vendor (RTV) transaction.
The item is not an ATP-reserved item.
The Allow Sub Item flag is set on the demand line.
The Demand line is not associated with shipping container or ship serial.
Note: Item substitutes cannot be used on a return to vendor MSR.
Field or Control |
Description |
|---|---|
Priority |
Displays the priority ranking of the substitute item. The highest priority ranking has the lowest priority number. |
Conversion Rate |
The quantity of the substitute item required to replace the original item, in the item's standard UOM. |
Note: When using substitutes on sales orders, the order unit of measure for the original item must also exist for the substitute item. In addition, the conversion rate between the original item and the substitute item must be equal to one (1).
Shipping Override group box
Use the Shipping Override group box to enter shipping parameters to be applied to each demand line that you have selected on this page. The shipping parameters are applied when you select an auto-process option to advance to the shipped or depleted state. These values are only applied to the demand lines if they are successfully confirmed by the fulfillment engine. The freight amount and the Defer Depletions value are only applied if the order is successfully shipped.
Field or Control |
Description |
|---|---|
Shipping ID |
Enter a Shipping ID to be applied to the selected lines. Your entry overrides any existing shipping IDs located on the selected demand lines. |
Auto Process |
Select this option to process the demand lines passed the confirmed state to the shipped or depleted state when launching the Picking Confirmation process from this page. Auto processing cannot be used when multiple pick lines have been selected for processing. |
Carrier ID |
Enter a carrier ID to be applied to the selected lines. Use caution with this override entry since a delivery ID can have a specific carrier defined for it. These fields must be synchronized or the selected lines are removed from the delivery ID. In addition, applying a carrier ID to the selected lines (or delivery ID) can prevent best way freight calculations with the external third party freight feature. |
Ship Via |
Enter a ship via code to be applied to the selected lines. Use caution with this override entry since a delivery ID can have a specific ship via code defined for it. These fields must be synchronized or the selected lines are removed from the delivery ID. |
Defer Depletions |
Select the value of Override to Yes or Override to No to change the value of the Defer Depletions field on each demand line selected by this page. When this field is left blank, the default value is derived from the Carrier page; if there is no default value on the Carrier page then the system uses the default value on the Setup Fulfillment-Shipping page. This field does not display if you have selected the value of Do not use this feature on the Setup Fulfillment-Shipping page. For more information in the Defer Depletions feature, go to the "Shipping Inventory" topic, "Delaying the Billing and Costing of Inventory Shipments" section. |
Freight Amount |
Enter an amount to be added to the existing freight charge or manually override the freight charge. The Amount Action field on this page determines how this value is applied. |
Amount Action |
Select the option to apply the value in the Freight Amount field. The options are:
|
Delivery ID |
Enter a delivery ID to be applied to the selected lines. Deliveries are logical groupings of order lines that can be shipped together using the delivery management feature. Your entry overrides any existing delivery IDs located on the selected demand line. |
Validate Delivery |
Select an option to validate the deliveries when this page is saved. The system confirms that the attributes of the delivery and the demand lines that are assigned to the delivery are still valid. The system looks for demand lines on the delivery that do not match the values in the delivery key fields defined on the Inventory Definition - Business Unit Options: Delivery Management page used to build a delivery. For example, if the carrier ID must be the same for all demand lines on the delivery but not all the demand lines have the same carrier ID, then the system produces an error. The system also recalculates the total weight and volume, total number of containers, and total number of packages. The options are:
See Understanding PeopleSoft Delivery Management and Freight Calculations. |
Freight Controls group box
Field or Control |
Description |
|---|---|
Calculate Freight |
Select this check box to have this process calculate freight for the selected deliveries. Depending on the delivery parameters, this process can calculate freight using either the PeopleSoft internal calculator or the integration to an external third-party freight system. For a delivery using third-party freight, selecting this check box directs the process to launch the Inventory Freight Request EIP. Freight can be calculated for the new deliveries or one or more existing delivery IDs. |
Freight Type |
Enter the freight type code to be used by the external third-party freight system. Freight types are defined at the SetID level and used to derive the correct freight service definition to send with the outbound message to the third-party provider. |
Freight Options |
Select one of the following freight options to request freight from an external third-party freight system:
|
Best Way |
If you have selected Best Way or Carrier with Best Way in the Freight Options group box, then use this group box to choose your best way option:
|
Complete Delivery |
Select this check box to set the status of the delivery to Complete Delivery which indicates that all fulfillment steps for the delivery are complete and all demand lines in the delivery are ready to be depleted using the Deplete On Hand Qtys process. If the PeopleSoft Inventory business unit is using deliveries, the Deplete On Hand Qtys process only pick ups demand lines that are on a delivery with the Complete Delivery status. |
Commit Freight for Billing |
Select this check box to indicate that the freight on this delivery is ready to be processed by PeopleSoft Billing and by PeopleSoft Cost Management. |
External Manifest |
Select this check box to instruct the external third-party freight system to create or update shipping manifests for the individual carriers. The manifest information, including tracking numbers for the selected deliveries, containers, and packages, is sent to the PeopleSoft system and maintained with the shipping history information. In order to use external manifest all of the demand lines in the delivery must be in the fulfillment state of Shipped. A freight option of Best Way or Use Specified Carrier must be selected to perform external manifesting. |
Links
Field or Control |
Description |
|---|---|
Run Picking Confirmation |
Click to run the Picking Confirmations process from this page. This link is available if you have not selected the Auto Process Save check box. This check box is available on the Material Picking Feedback row of the Setup Fulfillment-Fulfillment Task Options page (business unit level). If no value is entered in the Setup Fulfillment component, then the default value comes from the Fulfillment Engine Options (SetID level). Select the Auto Process Save check box on these pages to automatically launch the Picking Confirmations process when the Material Picking Feedback page is saved. The Picking Confirmation process cannot be used when multiple pick lines have been selected for processing. |
Assign Load |
Click this link to access the Load Assignment Options page where you can modify load information for a picking plan ID or a shipping ID. |
Manage Load |
Click this link to access the Manage Loads page (LOAD_CONS_INV) where you can combine order lines into a load for shipping on a particular carrier. |
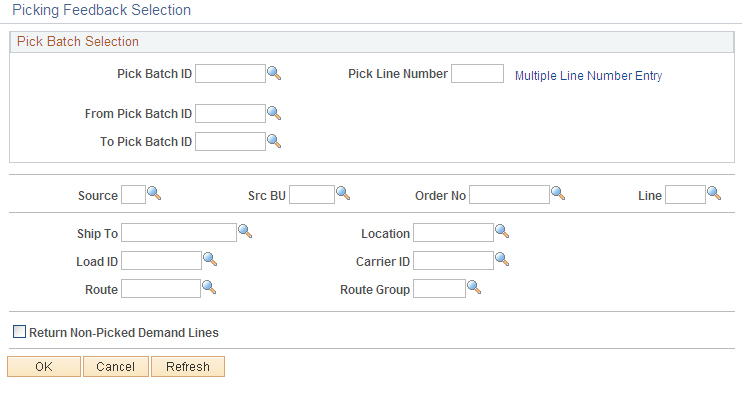
Use the Picking Feedback Selection page (DMND_PICK_SRCH_SEC) to enter parameters for the released demand lines that you want to update on the Material Picking Feedback page.
Navigation:
Click the Search link on the Material Picking Feedback page.
This example illustrates the fields and controls on the Picking Feedback Selection page. You can find definitions for the fields and controls later on this page.
Field or Control |
Description |
|---|---|
Return Non-Picked Demand Lines |
Select to display demand lines that have not been included on a pick batch, either because you have not run the Order Release Request process or because the demand lines were not eligible for inclusion on the pick batch ID. For example, selecting this check box enables you to pick up demand lines in the releasable state. Also, locations with zero- or negative-quantity balances are not included on a pick batch. However, if you know that these locations have sufficient quantity and negative balances are permitted, you can pick from these locations and use return non-picked demand lines to enter the necessary feedback about the pick. |
Note: If you change the pick batch ID or enter a value in the Pick Line Number field after selecting multiple line numbers, the system cancels the multiple line number selection. Similarly, click OK on the Multiple Line Number Entry page to erase any single line number entered on this page.
Use the Multiple Line Number Entry page (DMND_PICKLN_SEC) to select multiple lines from a single pick batch ID for display on the Material Picking Feedback page.
Navigation:
Click the Multiple Line Number Entry link on the Picking Feedback Selection page.
This example illustrates the fields and controls on the Multiple Line Number Entry page. You can find definitions for the fields and controls later on this page.
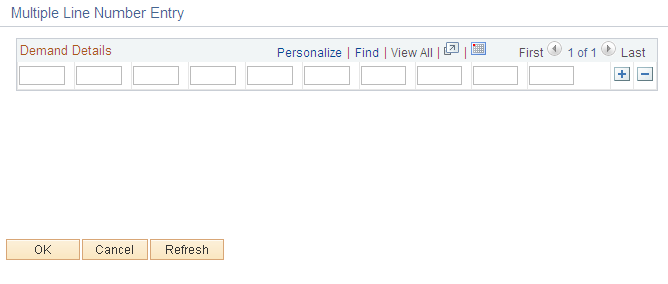
Enter the line pick line numbers with which you want to work.
Note: The system does not validate the entries on this page. If you enter a line number that does not exist for the selected pick batch ID, the system simply ignores the invalid line.
Note: When the Picking Confirmations process is run from this component, it automatically builds selection criteria that matches entries on the Picking Feedback Selection page. When using this feature, the selection criteria for the Picking Confirmations process is set to select all lines on the given pick plan that have been marked as confirmed. The individual pick plans are not used.
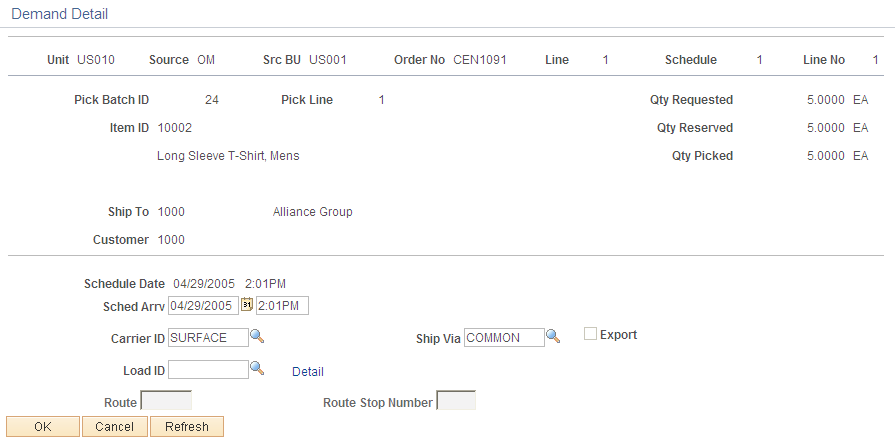
Use the Material Picking Feedback - Demand Detail page (DMND_DTL_INV_SEC) to view demand information for a specific demand line.
You can also modify some of the shipment information for the line on this page.
Navigation:
Click the Details link on the Material Picking Feedback page.
This example illustrates the fields and controls on the Material Picking Feedback-Demand Detail page. You can find definitions for the fields and controls later on this page.
Field or Control |
Description |
|---|---|
Kit ID |
Displays the product kit ID if this demand line contains a kit component. Select the product kit ID to access the Kit Display page where you can view the entire kit. See Kit Display Page. |
Kit Qty Requested |
If the demand line contains a product kit component, the field displays the total number of complete product kits requested on the sales order or material stock request. |
Kit Qty Reserved |
If the demand line contains a product kit component, the field displays the total number of complete product kits that have been reserved for the sales order or material stock request. |
Kit Qty Picked |
If the demand line contains a product kit component, the field displays the total number of complete product kits that have been picked for the sales order or material stock request. |
Sched Arrv |
Change a demand line's scheduled arrival date and time. Note: If the business unit requires closure calendar validation and processing for receiving activities, as defined on the Closure Calendar page, and you enter a scheduled arrival date or time that is a defined closure date, the system issues an error message. You can either accept the exception by clicking No, or reschedule by clicking Yes. If you click Yes, the system returns the first valid future date and time. |
Export |
Select this check box to identify the shipment is an intercompany transfer or sales order requiring export shipping documentation. |
Route and Route Stop Number |
Change a demand line's route assignment, select a new route and stop. Note: When you change a route assignment on this page, PeopleSoft Inventory does not validate the new route. In addition, if you modify either the carrier or the ship via, the system cancels any existing route assignment. Note: Information changed on this page immediately updates the demand line when the component is saved. |
Use the Serial ID Selection page (DMND_SRL_FETCH, DMND_SRL_ALC_FETCH) to replace the serial IDs allocated to the order with other eligible serial IDs.
Navigation:
Click the Select Serial IDs link on the Material Picking Feedback page.
This example illustrates the fields and controls on the Serial ID Selection page. You can find definitions for the fields and controls later on this page.
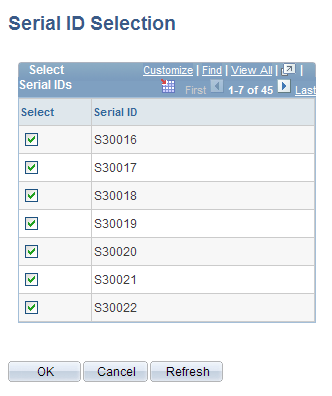
The grayed lines in the Serial ID list indicate IDs that are currently allocated to other demand lines on an pick batch ID. You must delete a serial ID from the demand line to which it is allocated before you can assign it to another order.
Select the check box next to the serial IDs that you have picked to fill the order. When you return to the Material Picking Feedback page, these serial IDs replace those currently allocated to the demand line.
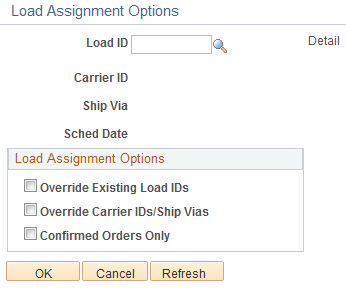
Use the Load Assignment Options page (LOAD_OPT_INV_SP) to modify load information for a picking plan ID or a shipping ID.
Navigation:
Click the Assign Load link on either the Material Picking Feedback page or the Shipping/Issues - Order Summary page.
This example illustrates the fields and controls on the Load Assignment Options page. You can find definitions for the fields and controls later on this page.
Field or Control |
Description |
|---|---|
Detail |
Click this link to access the Load Capacity Inquiry page (LOAD_INQ_SP) and view load information defined for the ship via and carrier ID associated with the load ID. (Prerequisite) Establish ship via codes on the Ship Via Codes page under the Common Definitions menu. |
Override Existing Load IDs |
Select to assign the load ID defined here to all selected order lines, including those for which a different load has already been assigned. |
Override Carrier IDs/Ship Vias |
Select to assign the carrier ID and ship via for the load ID defined here to all order lines. If you leave this option blank, the system does not copy the load ID to lines whose carrier and ship via values differ from those assigned to this load. |
Shipped Orders Only |
If you accessed this page from the Shipping/Issues - Order Summary page, select to apply load assignment changes only to orders with a Shipped status on the Order Summary page. |
Confirmed Orders Only |
If you accessed this page from the Material Picking Feedback page, select to apply load assignment changes only to orders that have been confirmed as picked. |