Staging Interunit Transfer and RMA Receipts
|
Page Name |
Definition Name |
Usage |
|---|---|---|
|
INV_RECV_HDR |
Determine which interunit transfer or RMA to receive, enter the actual quantity received, and specify the receipt status. |
|
|
INV_RECV_SEL_LOT |
Search for available lot and serial information for any lot-controlled or serial-controlled items. Update this information on the Receipt Details page or the Putaway Details page. |
|
|
INV_RECV_LN |
Define the status of individual items in a receipt. |
|
|
INV_RECV_SERIAL |
View and update the receiving lot and serial information for lot-controlled and serial-controlled items that you selected on the Receipt Header page. |
|
|
INV_RECV_SHP_SER |
Record quantity received by serial ID, and if applicable, by lot ID. |
|
|
INV_RECV_LN_PUTWY |
Specify the appropriate putaway action for received items. |
Field or Control |
Description |
|---|---|
Unit |
The PeopleSoft Inventory business unit that is receiving the stock. Note: To create a single receipt for items received by multiple PeopleSoft Inventory business units, enter a business unit that is not the business unit in which the item actually resides. For example, you can create a receipt for a centralized receiving business unit and specify the business unit in which the item resides at the line level of the receipt. |
Receipt Number |
The number that you enter (or have the system assign automatically) when creating the receipt. |
Receipt Type |
When you add a new receipt, the system presents you with a search dialog in which you must specify the type of receipt. Your selection determines which fields appear in the InterUnit and RMA Receiving component. Values are: Interunit Transfer: Select to enter a receipt for an interunit transfer. Return Material Authorization: Select to enter a receipt for an RMA. |
Here are the basic steps involved in receiving interunit transfers and RMAs:
Define the type of receipt on the InterUnit and RMA Receiving - Receipt Header page.
Update item information on the InterUnit and RMA Receiving - Receipt Line page.
Define an appropriate putaway action on the InterUnit and RMA Receiving - Putaway Details page.
When you save the InterUnit and RMA Receiving component, either initiate auto-putaway processing or insert the items into the staging interface table (STAGED_INF_INV) for multistep putaway processing.
For lot- and serial-controlled items, select lot and serial information for the entire receipt or enter this information manually.
Receipt of Interunit Transfers
A transfer of stock between two inventory business units is known as an interunit transfer. To create an interunit transfer:
In the source (shipping) inventory business unit, add a material stock request (MSR) with the request type of Interunit Transfer. The MSR includes a destination (receiving) inventory business unit.
Complete the demand fulfillment steps within the source (sending) Inventory business unit to ship the stock.
Run the Deplete On Hand Quantity (Depletion) process in the source unit. In addition to other functions, this process calculates the transfer price of the stock and any additional transfer costs. The transfer prices (including material, landed, and additional transfer costs) are stored in the IN_DEMAND_TRPC table where prices are broken out by cost element (material, landed, and addl trans).
When the items are received in the destination business unit, run the Load Staged Items process. The material and landed cost portions of the transfer price are included in the cost of the item by cost element. The additional transfer costs (using the cost element Addl Trans) can be written off to an expense account or included in the cost of the item depending on your setting in the Expense Transfer Fees check box on the Inventory Definition - Business Unit Definition page.
Run the Accounting Line Creation process page to create the accounting entries for the interunit transfer. These accounting entries record the changes to the inventory stock accounts, intransit accounts, and record any additional transfer expenses or gain/loss on transfers.
Interunit Shipping and Receiving Adjustments
When the source business unit ships items to the receiving business unit, the default expected quantity received is the quantity shipped, in the shipping UOM. If you override the quantity received and the resulting quantity is either greater than or less than the quantity shipped, the system writes a transfer adjustment entry (Interunit Business Transfer Adjustment - Transaction Group 042) to the transaction history record (TRANSACTION_INV) upon closure of the receipt line to account for the gain or loss.
In addition to adjusting for quantity differences, the system compares the lot IDs and serial IDs shipped from the source business unit with the lot IDs and serial IDs received. If there are any differences, the system makes an adjustment entry at the lot or serial level.
|
Shipped Lot ID |
Received Lot ID |
Shipped Quantities |
Received Quantities |
042 Transactions Generated |
|---|---|---|---|---|
|
No lot |
No lot |
15 |
5 |
-10 |
|
Lot A |
Lot A |
10 |
5 |
-5 for Lot A |
|
Lot B |
Lot B |
5 |
5 |
N/A |
|
Lot C |
Lot D |
20 |
20 |
-20 for Lot C + 20 for Lot D |
|
Lot E |
Lot F |
15 |
10 |
-15 for Lot E +10 for Lot F |
The unit cost varies according to the costing method that you used for the items in the receipt:
For standard cost items, the unit cost is the current effective-dated total standard cost in the Standard Cost table.
For perpetual average cost items, the unit cost is the current unit cost in the Perpetual Average Cost table.
For actual cost items, the unit cost is the default actual cost for the destination business unit.
For consigned stock, non-owned items, and periodic average cost items, the unit cost is the default average cost for the destination business unit.
For non-cost items, the unit cost is zero.
Use the InterUnit and RMA Receiving - Receipt Header page (INV_RECV_HDR) to determine which interunit transfer or RMA to receive, enter the actual quantity received, and specify the receipt status.
Navigation:
This example illustrates the fields and controls on the InterUnit and RMA Receiving - Receipt Header page. You can find definitions for the fields and controls later on this page.
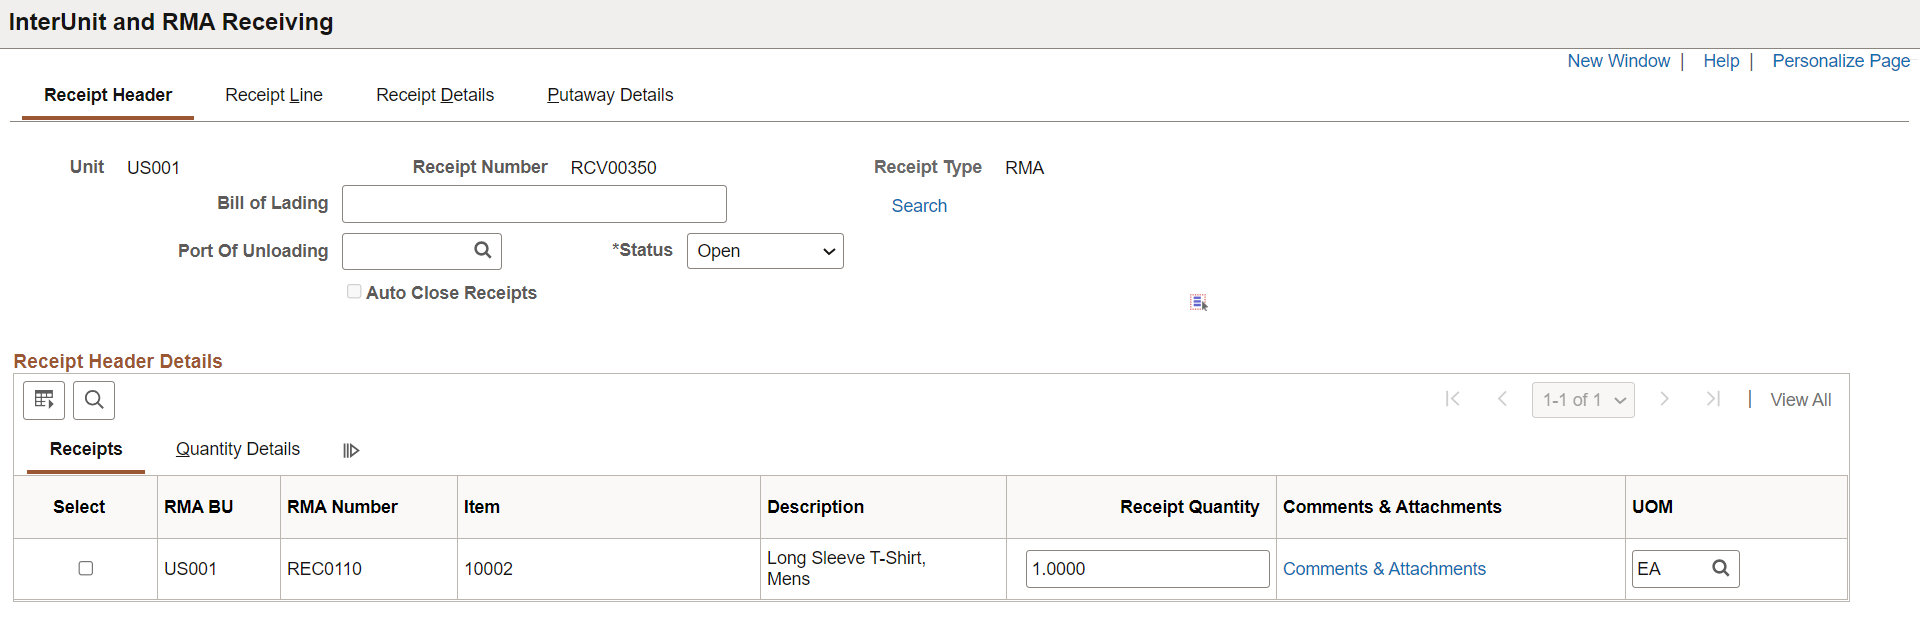
Click the Search link to access either the RMA Search dialog (if you entered Return Material Authorization as the receipt type) or the Interunit Transfer Search dialog (if you entered Interunit Transfer as the receipt type), where you can search for a specific RMA or interunit transfer to put away.
For both searches, use wildcards as necessary.
For RMAs, the RMA business unit is required.
Open RMA lines matching the search parameters populate the corresponding fields in the InterUnit and RMA Receiving component.
For interunit transfers, the source business unit is required.
In-transit interunit transfers matching the search parameters populate the corresponding fields in the InterUnit and RMA Receiving component.
Select a receipt status: Closed, Open, or Pending.
The receiving transaction varies depending upon the receipt status, the receipt type, and whether the Auto Close Receipts option (on the Inventory Definition - Business Unit Options page and enables the system to close an interunit or RMA receipt automatically) is active:
Receipt Type
Transactions Performed
Automatic Receipt Closure Conditions
RMA
You can only receive RMAs with an Open RMA line status using this page. Once the full quantity of the RMA is received, the system changes the status of the RMA line to Closed.
If the received quantity on the line is greater than or equal to the shipped quantity, the system sets the status of the receipt line to Closed when you save the page. Once all receipt lines have been closed (either manually or automatically), the system sets the status of the header to Closed.
Interunit transfer
The system displays interunit transfers with a status of Open or Pending as stock in transit.
Setting the status to Closed updates the shipping information. After a receipt is closed, the interunit transfer is no longer considered in transit; if the value received is greater or less than the value transferred, the system creates a gain or loss transaction. If other receivers for the shipment line exist, the system closes those receiver lines upon saving the component. You cannot update bill of lading information for a closed interunit transfer receipt.
The system performs the same automatic closure validation and processing as for an RMA receipt with the following exception: since an interunit transfer can be received under multiple receiver IDs, the system includes cumulative interunit transfer receipt IDs. When the system determines that the entire interunit transfer has been received, it closes the lines and headers of every receiver ID associated with the transfer.
Select the check box next to an item to indicate that it has been received; click Select All to mark all items as received.
If you are receiving lot- or serial-controlled items, refreshing the page or accessing a different page takes you to the Select Receiving Lot/Serial page, where you can search for lot and serial information.
For RMA receipts, the lot or serial information comes from the data that you entered for the RMA line. For interunit receipts, the lot or serial information and container ID, if applicable, come from the original shipment. You can also update this information on the InterUnit and RMA Receiving - Putaway Details page or the InterUnit and RMA Receiving - Receipt Details page.
The receipt quantity and its corresponding UOM are derived as follows:
For interunit transfers: Quantity shipped in the shipping UOM minus any quantity already received for the shipment line (not less than 0).
For RMAs: RMA line quantity in the returned UOM minus any quantity already received from the RMA line.
Note: If the cumulative quantity received exceeds the shipped quantity, the value in the quantity field automatically changes to 0 but can be modified.
Note: To receive an item in a UOM other than the shipping UOM, select a new UOM from the list of available UOMs. If whole number precision is defined for the shipping or return UOM (on the Units of Measure page) and previous receipts in a different UOM exist for the interunit transfer or RMA, the Receipt Quantity appears in the standard UOM for the item.
The previously received quantity is the cumulative quantity received on this receipt ID for the interunit ID.
The Non-Owned field, which only appears for interunit transfers, indicates whether the quantity is from a non-owned material storage location.
This field enables you to identify quantities for which a demand line has been picked from both owned and non-owned locations; however, you cannot receive an item from both owned and non-owned locations on the same receipt ID.
Click Comments & Attachments link to view the header comments and the list of uploaded attachments. Click the attachment file name link to view or download it.
Use the Select Receiving Lot/Serial page (INV_RECV_SEL_LOT) to search for available lot and serial information for any lot-controlled or serial-controlled items.
Update this information on the Receipt Details page or the Putaway Details page.
Navigation:
Click the Select All button or select the check box next to an item and then refresh the InterUnit and RMA Receiving - Receipt Header page.
Field or Control |
Description |
|---|---|
Search |
Click to search for a specific lot or serial ID. (The system restricts the search to the items listed in the scroll area.) |
Quantity |
For serial-controlled items, the quantity must always be 1. Alternatively, you can select the appropriate lots on this page and later change the quantities on the InterUnit and RMA Receiving - Putaway Details page. |
Select the check box next to the line of lot and serial IDs that you want to receive, or click the Select All button.
Use the InterUnit and RMA Receiving - Receipt Line page (INV_RECV_LN) to define the status of individual items in a receipt.
Navigation:
This example illustrates the fields and controls on the Interunit and RMA Receiving - Receipt Line page. You can find definitions for the fields and controls later on this page.

Field or Control |
Description |
|---|---|
Status |
Indicate the receipt line's status. If you select Closed, the system performs different transactions, depending upon the receipt type. For interunit transfers: A Closed status updates the shipping information. After a receipt line is closed, the interunit transfer is no longer considered in transit and the system creates a gain or loss transaction if the value received is greater or less than the value transferred. For RMAs: A Closed status updates the RMA line status as Closed. |
Quantity Received and Recv Date/Time (received date and time) |
Update these fields if a physical inspection reveals differences between the defaults shown on the page and what you are staging for putaway. |
ChartField |
For RMAs, click to override the credit accounting information for the received item on the ChartField Overrides page.Using BI Publisher Reports to Support Configured ChartFields |
|
Comments & Attachments |
Click to view the line comments and the list of uploaded attachments. Click the attachment file name link to view or download it. |
The Intrastat Interunit Returns and Replacement fields are only available for Intrastat interunit transfers. If both the source and destination business units are members of the European Union and require Intrastat reporting, mark the interunit receipt as a replacement or a return. The system populates these two fields based on the values that you entered during creation of the transfer order on the Detail Override/Exceptions page or the Accounting/Interunit Detail page.
Field or Control |
Description |
|---|---|
Intrastat InterUnit Returns |
The interunit or intercompany transfer contains goods that were previously sent to another business unit but are now being returned. The transfer is reported on the Intrastat return with a Nature of Transaction code indicating that it is a return. (If you clear this option, the transfer is a normal transfer and is reported on the Intrastat return with a Nature of Transaction code indicating that it is a purchase. If you select this option, the Replacement field value is NA (not applicable). A transfer can be a return or a replacement, but not both. |
Replacement |
This field works in conjunction with the Intrastat InterUnit Returns field. Values are: NA: The interunit transfer is a normal transfer order or a return. This is the default value when the Intrastat InterUnit Returns option is selected. RN (replacement of goods not returned): The transfer replaces an order that had been previously received but was scrapped or otherwise disposed of. The transfer order is reported on the Intrastat return with a Nature of Transaction code indicating that it is a replacement of goods that have not been returned. RR (replacement of returned goods): The transfer replaces an order that was returned to the source business unit. The transfer order is reported on the Intrastat return with a Nature of Transaction code indicating that it is a replacement of goods that have been returned. |
Note: To receive an item in a UOM other than the shipping UOM, select a new receiving UOM from the list of available UOMs.
Use the InterUnit and RMA Receiving - Receipt Details page (INV_RECV_SERIAL) to view and update the receiving lot and serial information for lot-controlled and serial-controlled items that you selected on the Receipt Header page.
Navigation:
This example illustrates the fields and controls on the InterUnit and RMA Receiving - Receipt Details page. You can find definitions for the fields and controls later on this page.

Field or Control |
Description |
|---|---|
Enter Ship Serials |
Click to access the Select Ship Serial IDs page, where you can mark quantity received by serial or lot ID for shipping serial-controlled items. |
Copy Lines to Putaway Page |
Click to populate the fields on the Putaway Detail page with the data that you select or enter here. |
Note: The system retrieves default material storage location information for the item, but it overwrites any previously existing information on the Putaway Details page.
The system automatically updates the Receipt Header and Receipt Lines pages with any quantity changes that you make here.
Use the Select Ship Serial IDs page (INV_RECV_SHP_SER) to record quantity received by serial ID, and if applicable, by lot ID.
Navigation:
Click the Enter Ship Serials link on the InterUnit and RMA Receiving - Receipt Details page.
Eligible shipping serial ID numbers that you entered during shipment of the interunit transfer or creation of the RMA appear. Select the shipping serial ID number or numbers that you want to receive.
Note: Shipping serial-controlled items are not tracked by a serial number in the warehouse. Rather, the shipping serial number is associated with lines or items that are shipped to a customer or other location. If these items are returned, note the serial ID or lot ID on the Receipt Details page for reference. If the item is put away without serial IDs and you want to ship it again, either reenter the original shipping serial ID or create a new one.
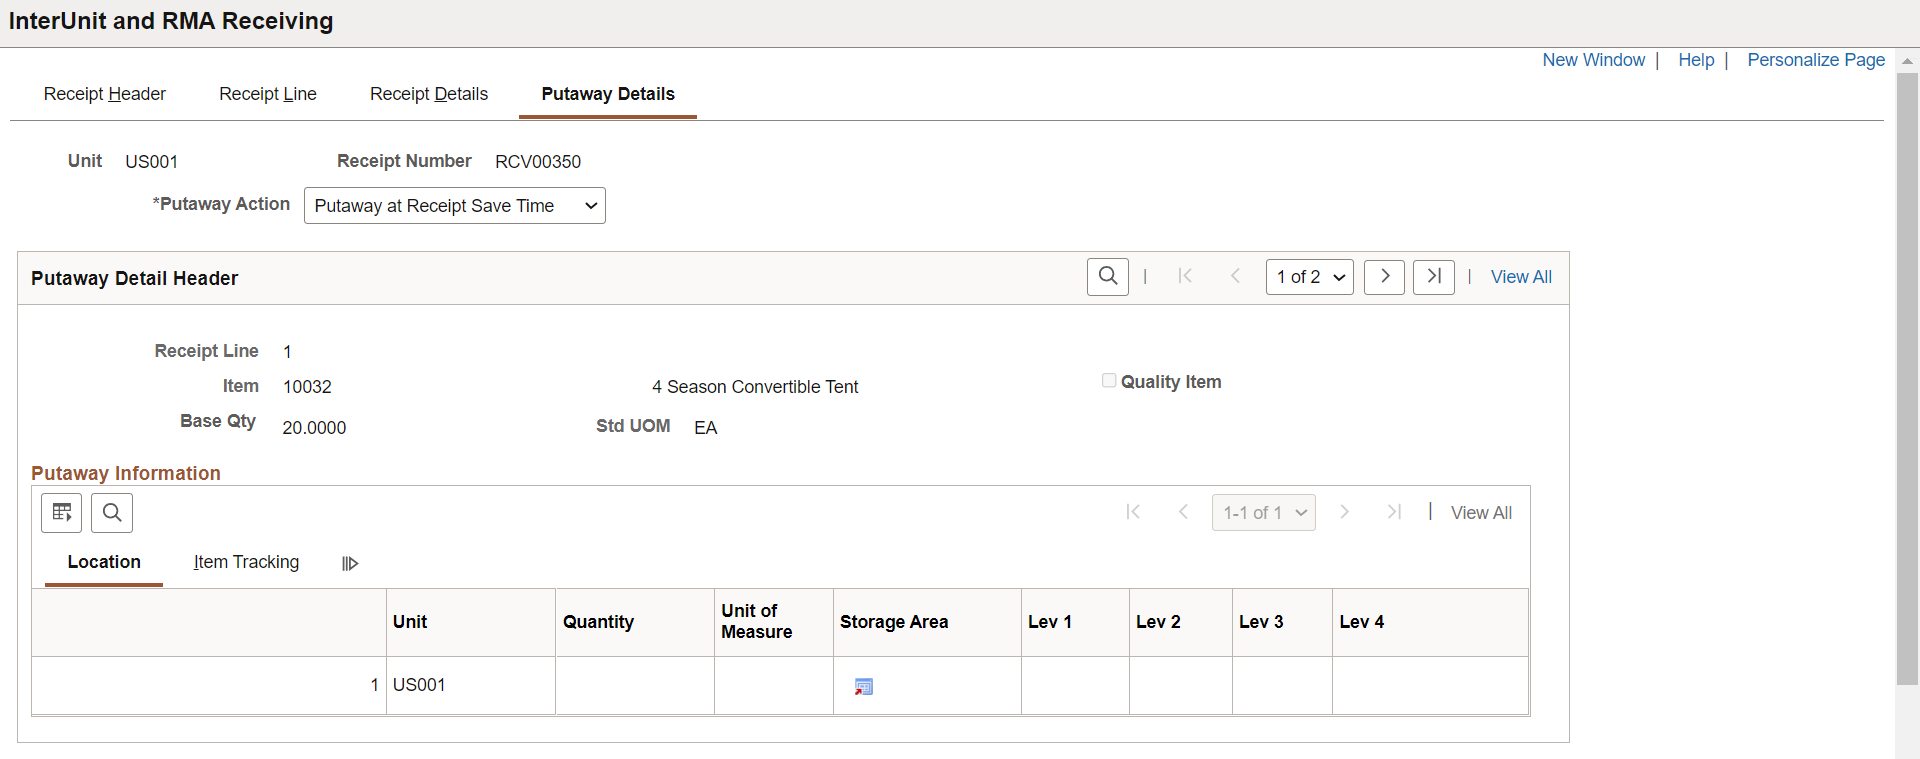
Use the InterUnit and RMA Receiving - Putaway Details page (INV_RECV_LN_PUTWY) to specify the appropriate putaway action for received items.
Navigation:
This example illustrates the fields and controls on the InterUnit and RMA Receiving - Putaway Details page. You can find definitions for the fields and controls later on this page.
Field or Control |
Description |
|---|---|
Putaway Action |
Select one of the following actions to determine when items should be put away. Values are: Stage for Putaway at Save Time: Insert items into the staging interface table (STAGED_INF_INV). You can then use multistep putaway processing to put these items away. Putaway at Receipt Save Time: Launch auto-putaway processing automatically upon saving the InterUnit and RMA Receiving component. |
Quality Item |
Appears for RMA receipts if your installation includes PeopleSoft Quality. If the item has a control plan in PeopleSoft Quality, this check box is selected; if the item does not have a control plan, the check box is clear. Once the receipt line status is Closed, saving this page calls a function to create a quality data-entry session, where you can enter quality control information for the RMA receipt. Note: If you want to track quality information, initiate the quality data entry session and enter quality control information before you put the item away. |
Storage Area |
The default putaway location for RMA or interunit transfers appears, but you can specify a different putaway material storage location. Note: The business unit's default display options determine how many location levels appear upon entry to this page. If you are entering a material storage location that requires additional levels, enter the storage area, then refresh the page to display the remaining levels for that area. If necessary, split the item quantity across material storage locations by adding a putaway line on the page. The new putaway line displays the item data from the row on which you clicked the Add button, with the business unit and location information copied from the line above. All other fields must be populated where applicable. If the receiving business unit is a VMI business unit, and the source business unit is not a VMI business unit, and the demand source is OM, then a non-owned location can be selected for an owned item. |
Transfer |
Click to access the Storage Location Search page. |
Directed Putaway |
If directed putaway is active for the business unit, click to access the Directed Putaway Locations page, where you can view and select material storage locations that meet putaway rules established for the item or business unit. |
Configuration Code |
The default comes from the value that you entered for the RMA or (for interunit receipts) for the shipment from the originating business unit. You can use any configuration code that is valid for the PeopleSoft Inventory business unit and lot ID. Note: The Configuration Code tab only appears for configured items. |
Note: If you click the Copy Lines to Putaway Page button on the InterUnit and RMA Receiving - Receipt Details page, the copy overrides any information that you have already entered here.