Setting Up Clauses
|
Page Name |
Definition Name |
Usage |
|---|---|---|
|
CS_CLAUSE_DEFN |
Define clause information, dependent clauses, alternate clauses with related rules, and submit clauses for approval. |
|
|
CS_LIBRARY_DEFN |
Define clause libraries. |
|
|
CS_CLS_GROUP_DEFN |
Define clause groups. |
|
|
CS_CLS_CLASS |
Set up classes for document clauses. |
|
|
Copy Information From Page |
CS_OBJS_COPY_SP |
Create a clause by coping the clause from an existing clause. |
|
CS_ASSOC_CLSGRP_SP |
Associate clauses with clause groups. |
|
|
CS_OBJ_ADDBINDS_SP |
Add a bind variable to the content of a clause. |
|
|
CS_CLS_APPROVAL |
Preview clause approvals. |
Use the Clause Definition page (CS_CLAUSE_DEFN) to define clause information, such as defining dependent clauses and defining alternate clauses and related rules, and to submit clauses for approval.
Navigation:
This example illustrates the fields and controls on the Clause Definition page: Details tab (1 of 2).
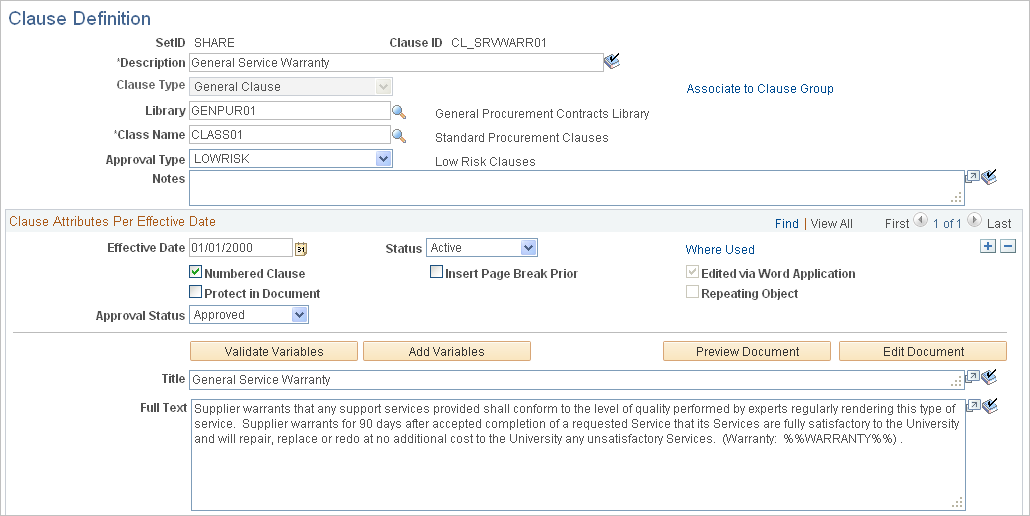
This example illustrates the fields and controls on the Clause Definition page: Details tab (2 of 2).

Use this page to define clauses. You can define alternate and dependent clauses, as well as associate clauses with clause groups. Clauses are used when creating documents. You can create clauses using this page, or using Microsoft Word, which can be used to edit rich-text .
When you insert a clause into a section or document configurator, the content format value for the section or configurator determines whether text is used from the Full Text field or the Reference Text field. Use the Reference Text field to enter simple, or abbreviated, text strings for the clause instead of the entire text in the Full Text field.
Field or Control |
Description |
|---|---|
Copy From |
Click to access the Copy Information From page. The button is available when you are adding a clause, and it enables you to copy an existing clause to create a new clause. When you click this button, the system provides a list of existing clauses. |
Associate to Clause Group |
Click to access the Associate to Clause Group Page, where you can associate the clause with a clause group. By grouping clauses, you can use them when performing clause searches. For additional information about Clause Groups, see Clause Libraries, Groups, and Classes. |
Clause Type |
Select a value to indicate the type of clause you are adding. This field is only available when you are adding a clause. After making a selection, you cannot change the clause type. Values include:
Note: When you save a table clause and there are no repeating binds defined for the table clause, then the system displays a warning that you cannot use the table clause, but you can save it. |
Library |
Select a library to which you want to assign this clause. You use libraries to group contract clauses and develop an authoring document infrastructure that can support complex solicitation and documents. For additional information about Clause Libraries, see Clause Libraries, Groups, and Classes. |
Class Name |
Select the clause class with which you want to associate this clause. You use classes to group similar clauses for searches. Class Name is a required field and determines the approval types that are available for the clause. For additional information about Clause Classes, see Clause Libraries, Groups, and Classes. |
Approval Type |
Click to select an approval type, which is used when approving clauses. The system bases the available options on the approval types that have been defined for the class name that you selected. Approval types control the approval routing that the clause requires the clause usage within documents. The system can provide a default value for the approval type based on the associated class name. |
Notes |
Enter informational text that is related to this clause. The system does not use the text when validating the clause. |
Clause Attributes Per Effective Date
Field or Control |
Description |
|---|---|
Effective Date |
Select an effective date. Clauses are effective-dated to retain a history of clause text and approvals, and to make changes to clauses without affecting terminology in existing documents. When a document is generated, the system uses the start date of the contract to determine which clauses to include in the document. When you change a clause, you should add a new effective-dated row that represents the date that you want to start using the clause in new contracts. When you add new effective-dated rows for the clause, the system assigns the new row an approval status of Initial. Note: Clause librarians should include the Correct History option in rows of history in clause maintenance, especially when new effective-dated changes are commonly added as of today. |
Status |
Select a status to assign to the clause. This is a required field for all effective-dated records in PeopleSoft Supplier Contract Management. Options include:
|
Edited via Word Application (edited using Microsoft Word application) |
Displays as selected if the clause was checked out and edited in Microsoft Word. If the check box is selected and disabled, the document was edited. This indicates that you may have rich text associated with the clause and if you make text edits using this page, then the rich text edits will be lost. If you attempt to edit the document, the system displays a warning. |
Where Used |
Click to identify where this clause is used, which includes sections and document configurators. For additional information about Where Used searches, see Performing Where-Used Searches, |
Numbered Clause |
Select to indicate that the clause title is to be numbered in the Microsoft Word document. The clause title is numbered according to the default numbering style that is defined on the Document Format and Options Page. This check box is selected as the default setting. An example of numbered clauses is: Deselect this check box to indicate that the clause is not numbered in the document or preview document. For example: |
Insert Page Break Prior |
Select to begin the clause on a new page. The document will contain a page break prior to this clause. This is useful when you are creating signature pages for the contract. |
Protect in Document |
Select to indicate that the clause should be protected in a document. This means that the clause is read-only when you generate the document. This feature enables you to specify that a clause is protected on a clause-by-clause basis when you check in a document. When you select to protect a clause, the system displays that the clause is protected in the Content Elements grid on the Document Configurator Definition Page. If a clause is protected and the protection is removed using Microsoft Word, and then the document is checked in, the system issues a warning that the clause is protected in the library but was changed in the edited document. |
Suppress Duplicate Keys |
Select to suppress duplicate keys in a table clause. When you suppress duplicate keys, the system clears the cell value if the bind value is identical to the value in the previous cell. For example if an item ID is the same for five rows, the system only displays the item ID value in the first row of data. When you select this check box, the Last Key Field Column becomes available where you can define the last column to which you want to suppress duplicate values. |
Last Key Field Column |
Enter the column position of the last key field in a table clause. A key field is a table column value for a specific field of data. When you define the last column, the system only suppresses duplicate fields for columns up to and including the column indicated by the value that you enter. See Table Clause Examples in the Table Clauses topic. |
Repeating Object |
Displays as selected when the clause is repeating in nature. The system determines whether this check box is selected based on the bind variables that are included in the clause. If the system detects a bind variable that repeats, such as %%Item ID%% (level one) in the clause title or text, then it displays this check box as selected. This check box is typically deselected for most clauses. However, because special rules and edits can be applied as repeating objects, knowing when an object repeats is helpful. When you are adding a table clause, the system automatically selects this check box. |
Approval Status |
Select or view the approval status for the clause. Options include: Approved and Initial. This field is display-only if you are using the Approval Framework to approve clauses. When you use the Approval Framework process, the system automatically updates this field. Using the Approval Framework process is determined by selecting the Clause Approval check box on the Installation Options - Supplier Contract Management Page. This field is available If the Clause Approval check box is not selected on the Installation Options page. This also indicates that clauses are approved manually. The value that appears by default is established in the Default Clause Status field on User Preferences - Supplier Contract Management Page. To save time when approving clauses, you can provide the clause librarian the ability to create a clause that is already in an Approved status. This option is also used when a librarian checks out and edits a document. The system changes the status back to Approved upon check-in. The approval status is determined for each effective-dated row of the clause because each row acts as a new version of the clause. If the system requires approvals, each effective-dated row of the clause must be submitted for approval unless the clause librarian has the ability to approve clauses. Clause librarians who can approve clauses can have the system automatically update the clause status for newly copied, created, or edited clauses. The system validates the structure of a clause before it saves or submits the clause for approval. If a clause structure is not valid, the system displays a message and applies the Initial clause status, regardless of the values on the User Preference - Supplier Contract Management page. Note: If you are approving a table clause, the system requires that the Microsoft Word document contains a formatted table. After you create the table, you can change the clause status to Approved. See Approving Clauses. |
Validate Variables |
Click to verify that bind variables in the clause exist, and if repeating binds also exist that they are being used correctly. This process is similar to saving the clause, except that validating bind variables enables you to verify the binds of the clause without saving it. The validation also checks that the bind variables are valid and that the dependent clause relationships in the clause are valid when repeating binds are used. These validations ensure that any dependent clause structures that might repeat contain repeating binds with the proper levels and internal key structures relative to binds that the system uses in the main parent clause. If errors occur with this process, the system populates the Errors grid with the issues. |
Add Variables |
Click to search for and add bind variables to the clause title, full text, or reference text. The purpose of adding a variable is to designate a location within the clause that the system uses to place an actual transaction or wizard value when it generates the document. When you add bind variables using this button, the system places variables at the end of any text within the field to which you are adding the bind. If you know which bind variable to use, you can alternatively type it directly into the clause title, full text, or reference text without using this button. Note: After you edit the clause in Microsoft Word, you should not use this button. This changes the value in the PeopleSoft page and causes you to lose Microsoft Word formatting you may have made to the clause. |
Preview Document |
Click to open the clause in a read-only mode using Microsoft Word. When creating the document, the system applies paragraph-style formats from the Microsoft Word template that is defined for the SetID. The preview also expands dependent clauses. Note: Numbered clause previews always start with the first number in the Microsoft Word numbering scheme; however, when the system generates the final document, the numbers can change based on positions in the document. |
Edit Document |
Click to edit clause content using Microsoft Word. Before editing documents, you should understand Microsoft Word functionality and integration with PeopleSoft Supplier Contract Management to help you create the contract library. When you click this button, the system displays the Checked Out By and On fields, and creates a Microsoft Word document that includes the title, full text, and reference text fields. You must save this file to a local location before you check the document back into the PeopleSoft system. The system creates a default file name with the SetID, clause ID, and effective date of the clause that is being edited as part of the file name. While you can apply custom formats using Microsoft Word, you should use the Microsoft Word template and paragraph styles to process formats when previewing and generating the document. This formats numbers and content consistently for finished documents. See also Protected Areas and Editing Clause Text. |
Checked Out By |
Displays the user ID of the person who has checked out the clause and is editing it. |
On |
Displays the date that the clause was checked out to be edited. |
Cancel Checkout |
Click to cancel the checkout of a clause without checking in any changes. Note: If you saved a local version of the clause, it remains on the local client system. |
Check In |
Click to check in the Microsoft Word version of the clause. This process uploads the Microsoft Word version of the clause so that the PeopleSoft system is aware of the rich formatting that you added for the clause. To check in the clause, load the file from the location that you selected when you clicked the Edit Document button. The system validates the file you select to ensure that it is an XML file and that it has embedded keys that identify it as the clause that was originally checked out. |
Preview Approvals |
Click to view approvers for the clause. This button is only available when the Clause Approval check box is selected on the Installation Options - Supplier Contract Management Page. When you click this button, the system opens the Clause Approval Status Page, where you can review information about approval stages, paths, and who is reviewing or approving the clause. |
Submit for Approvals |
Click to initiate the approval process for the clause. This button is only available when the Clause Approval check box is selected on the Installation Options - Supplier Contract Management Page. When you enable clause approvals, the system uses a more formal process for users to review, modify, and approve the clause. The system notifies approvers and reviewers when the clause is waiting for their approval. For clauses that do not require approval, the system displays a secondary page stating that approval is not required, and automatically approves the clause. |
Approval Details |
Click to access the Clause Approval Status Page, where you can review information about a clause that has already been sent for approvals or has already been approved. This link is only available when the Clause Approval check box is selected on the Installation Options - Supplier Contract Management Page. |
Title |
Enter descriptive text that identifies the content of the clause. |
Full Text |
Enter the text to use for a clause. When a clause is used in a section, configurator, and so on, you can specify whether it is full text or reference text, but not both. The text becomes a part of the document when you use this element to generate the document. Click the Expand Full Text button to view a larger portion of the text. You might have to scroll to see all of the text. Click the Collapse Full Text button to reduce the viewing area. Typically, if you have a simple clause that does not have special formats, then you can use PeopleSoft pages to create the clause, and use the Microsoft Word template that is associated with the configurator to control standard numbering, bold text, title font sizes, and text. If you require more specific formats, then leave the Title and Full Text fields blank and edit directly in Microsoft Word. See also Editing Clause Text and Understanding Microsoft Word Integration with Supplier Contract Management. Note: You should not cut and paste from a Microsoft Word document directly into PeopleSoft pages. Some Microsoft Word characters do not translate correctly. If you do cut and paste into the PeopleSoft page, you need to review the text and clear any format issues with the clause in PeopleSoft Supplier Contract Management, or edit the clause in Microsoft Word. |
Reference Text |
Enter text that is considered to be a reference to additional information concerning the clause. Use this field to reference another, existing clause within your library, instead of using, or repeating, the full text of the existing clause. For example, you are creating a document that relates to hazardous materials. In addition, you have an existing clause in your library about the Federal Acquisition Regulation (FAR) 52.223-3 Hazardous Material Identification and Material Safety Data. Instead of repeating the existing FAR clause text within your new clause, you can reference the text using this field. Note: If you are creating a table clause, you cannot use reference text. You must use the Full Text field for table clauses. |
Dependents - Details
Use this section to include a list of mandatory clauses that accompany the primary clause. If you add this primary clause to a section or document configurator, dependent clauses that are listed in this section will appear after the primary clause when the system generates the document. Dependent clauses appear as indented children below the main clause when displayed in the document configurator and in the generated word document, depending on how paragraph styles and indentation is specified for outline numbering related to the paragraph style.
You cannot select a primary clause to be its own dependent clause. However, dependent clauses can have dependents that also have dependent clauses. The system checks for looping situations and adjusts them during the document generation process.
For general information about dependent clauses, see Dependent Clauses.
Field or Control |
Description |
|---|---|
Sequence |
Enter a value that represents the order in which the system should use dependent clauses. The lowest value is the first clause to be used after the primary clause when the system generates the document. |
Numbered |
Select to make this dependent clause a numbered clause that follows the primary clause. This check box is available when you select the Numbered Clause check box for the primary clause. If the check box is disabled, the primary clause is not a numbered clause and, therefore, the dependent clause cannot be numbered. If you select the Numbered Clause check box, then you can decide whether you want to continue that numbering scheme for dependent clauses. This field enables you to determine which dependent clauses are numbered. A number scheme can be different in these two scenarios:
|
Content ID |
Select a clause to use as a dependent clause for this primary clause. When you select the dependent clause, the system uses it along with the primary clause to generate the document. You cannot select the primary clause. For a clause to be valid, it must have at least one effective-dated row that exists on or before the effective date of the primary clause. |
Description |
Displays the description of the clause to use as the dependent clause for the current clause that you are maintaining. Click the Description link to access the Clause Definition page, where you can view or maintain the dependent clause. |
Content Format |
Select how you want to represent the text in the document when you use this dependent clause:
|
Dependents - Statuses
Field or Control |
Description |
|---|---|
Effective Status |
Displays whether the dependent clause is at an Active or Inactive status. You cannot select a clause that is inactive; however, if the clause is being updated and has been changed to an Inactive status since it was added as a dependent clause, then this message informs you of the change. If the clause is inactive, the system does not use it in the document as a dependent clause, and does not display an approval status. |
Approval Status |
Displays the current state of approval for the dependent clause. The states are Initiated, Pending, and Approved. You can assign a dependent clause regardless of its effective or approval status. If the dependent clause has been changed to an Inactive status, the system does not display an approval status. To check whether a dependent clause has been approved using clause workflow approvals, use the clause Approval Status page. This page provides useful information because you can submit dependent clauses separately for approval, depending on approval types. |
Prior Approved Rows Exist |
The system displays this column if the dependent row that is currently displayed is not approved, but a previously effective-dated row for the dependent clause that was approved does exist. |
Future Pending Change Exist |
The system displays this column when pending rows for this dependent clause need to be approved before they can be used. |
Alternates - Attributes
Use the Alternates grid to define whether the system should potentially use an alternate clause instead of the primary clause. You can list multiple alternate clauses for use instead of the primary clause. Although they might exist, the system does not process any alternate clauses of an alternate clause. For general information about alternate clauses, see Alternate Clauses.
Field or Control |
Description |
|---|---|
Priority |
Enter a number that represents the importance of this alternate clause in the document. The lower the number, the higher the priority. The priority determines the order in which the system evaluates the alternate clauses, providing that the rule for the alternate clause is met. If a rule is true, the system places all objects that are attached to the rule of the alternate clause, and their children, into the document, and it considers no additional alternates. When rules are not met, the system uses the primary clause and all of its dependents. |
Alternate Clause |
Select the alternate clause. You cannot select the primary clause that you are working with as an alternate for itself, and you cannot select the same alternate clause twice. If you are not using alternate rules, you can still list alternate clauses. You can select these clauses manually from within a generated Microsoft Word document. |
|
Click this button to access the Select a Clause page, where you can initiate a search for a specific clause. The page provides detailed search criteria such as clause effective dates, classes, groups in which a clause might be used, and dates on which the clause was checked out for editing. |
Description |
Click to access the Clause Definition page for the clause you select. |
Content Format |
Select how you want to represent the text in the document when you use this alternate clause:
|
Approval Status |
Displays the approval status for this alternate clause. You can add alternate clauses that are in the Initial or Pending status. The system uses this field for informational purposes and does not require an Approved status for the system to list the alternate clause. If an alternate clause is not approved and is selected by a rule, the system does not include the unapproved alternate version of the clause in the document. |

Alternates - Rules
Use this tab to associate alternate type rules to alternate clauses. The rule determines whether the alternate clause should replace the primary clause. Each alternate clause can have a rule attached. The system checks the alternates in their priority to find the first alternate for which the rule is true, and that alternate becomes the first clause instead of the primary clause in the document. If none of the rules are true, the system does not substitute the alternate clause.
Alternate rules can contain only level zero binds; however, you can use an alternate rule on clauses that repeat. When you save the clause definition and a bind that is used in the rule does not meet the document generation requirements, the system displays a message that errors were found with the binds. You cannot approve the clause until the errors are resolved. The error also appears in the message area of the clause. The following code is an example of an error message:
Rule JHAR5 cannot be attached as an alternate rule because it contains binds from a level > 0. (10420,306)Field or Control |
Description |
|---|---|
Rule |
Select a rule for this alternate clause. Only alternate rules are available for selection, not standard rules. When you make the selection, the system displays a description of the rule. You can click the link to view the rule itself. |
Use the Library Definition page (CS_LIBRARY_DEFN) to define clause libraries.
Navigation:
To establish a library, enter a library name and description. If you leave the fields blank, you can update them later.
After you establish a library, you can assign contract clauses to it using the Library field on the Clause Definition page. For general information about Clause Libraries, see Clause Libraries, Groups, and Classes.
Use the Group Definition page (CS_CLS_GROUP_DEFN) to define clause groups.
Navigation:
You can use groups to categorize clauses. When adding clauses to document configurators, you can use clause groups as search criteria. You can associate contract clauses with groups by clicking the Associate to Clause Group link on the Clause Definition page. For general information about groups, see Clause Libraries, Groups, and Classes.
. The purpose of clause groups is to quickly add multiple clauses to the Document Configurator Definition Page and the Section Definition Page. After clauses are added using a group, the clauses are maintained individually within the configurator or section.
Note: You cannot add a group as a dynamic object to a section or document configurator.
To add a clause group:
Enter the name of the group in the Group Name field and click Add.
Enter a description of the clause group and click Save.
To add clauses directly to the group, select an existing clause ID in the Clause ID field.
You can also add a clause to one or more groups while maintaining the clause by clicking the Associate to Clause Group link on the Clause Definition page.
Groups can contain multiple clauses, and a clause can be included in one or more groups.
Use the Clause Class page (CS_CLS_CLASS) to set up classes for document clauses.
Navigation:
Use this page to classify clauses and map the clause classes to approval types. This enables the user to use those classes that require workflow approvals for the clause definition itself or within documents. At least one class must be defined. One class can also be designated as the default for new clauses. When a class is associated with a clause, the default approval type is supplied for that clause. This determines the behavior for the clause in terms of its approval process and when it can be used. For general information about Clause Classes, see Clause Libraries, Groups, and Classes.
Field or Control |
Description |
|---|---|
Class Name |
Displays the name of the class. If you are adding a class, the field is required. |
Default |
Select to make this clause class the default class value when a clause is defined. You can select only one class as a default. |
Approval Settings
Use this section if the class must be approved. If some classes do not need to be approved, then leave this section blank.
Field or Control |
Description |
|---|---|
Approval Type |
Select an approval type for this clause class. This allows you to control the approval options that are available to the clauses that are associated with this class. The system uses the approval roles and settings that are contained in the approval type definition to control workflow routings. You cannot select duplicate approval types. |
Default |
Select which, if any, approval type you want to be the default value when this clause class is used for collaboration. If you select a type, that type appears when you select this class for use with a document clause. You can change the approval type on the clause, but it cannot be cleared and always returns to the default approval type. This ensures that all clauses that are related to this class can be designated for workflow processing. |
Use the Associate to Clause Group page (CS_ASSOC_CLSGRP_SP) to associate clauses with clause groups.
Navigation:
Click the Associate to Clause Group link on the Clause Definition page.
This example illustrates the fields and controls on the Associate to Clause Group page.

Use the Clause Group field to select a group with which you want to associate this clause. You can associate a clause with multiple groups. Clause groups are user-defined. You can use them to group types of clauses, or you can use them to group a sequential list of common clauses that can go together in documents, but are not mandatory dependencies. You can use these groups in document configurator maintenance to select all clauses by group and include them in the configurator.
Use the Add Bind Variables to Content Fields page (CS_OBJ_ADDBINDS_SP) to add a bind variable to the content of a clause.
Navigation:
Click the Add Variables button on the Clause Definition page.
This example illustrates the fields and controls on the Add Bind Variables to Content Fields page.

Binds that are used in PeopleSoft Supplier Contract Management are variable definitions that enable you to map source transaction or contract wizard values into contract clauses.
Field or Control |
Description |
|---|---|
Bind Variable |
Select a bind variable. The system displays details about the predefined variable when you click the Search button. You can create binds using the Bind Definition field and then map them to transaction records. See Setting Up Binds. |
Bind Type |
Select the type of bind to add to this clause. You can use this field to create a list from which you can select a variable. Values are:
|
Field Type |
Displays the type of field that you are adding to the clause. Field types define the structure of the data. Values are:
See Setting Up Binds. |
Field Length |
Displays the field length of the bind that you are adding to the clause. |
Title |
Select to include this bind variable in the Title field of the clause. |
Full Text |
Select to include this bind variable in the Full Text field of the document clause. |
By Reference |
Select to include this bind variable in the Reference Text field of the document clause. |
Adding a Bind Variable
You can add bind variables to the Title field, the Full Text field, or the By Reference Text field.
To add a bind variable:
Use the Bind Variable field to select the variable that you want to add to the clause content.
Alternatively, use the Bind Type field to select a type of bind from which you can add a variable to the clause content.
Click the Search button.
The system displays details about a single bind if you select a specific bind variable, or it displays a list of binds if you select to search by type. This functionality gives you an opportunity to use the bind or find another one.
From the list of binds, select those that you want to add to the clause.
The system places the variable at the end of the field that you specify; Title, Full Text, or Reference Text. You can move the variable to the location that you want within the document after the system inserts the variable.
Select the location where you want to add the bind variable in the clause.
You can add variables to a single clause element or to multiple elements, including the title, full text, and by-reference text.
PeopleSoft Supplier Contract Management supports a standard set of bind variables that represent PeopleSoft Purchasing transactional elements of the contract and include fields such as %%Supplier Name%%, %%Location%%, and %%Item Description%%.
Use the Clause Approval Status page (CS_CLS_APPROVAL) to preview clause approvals.
Navigation:
Click the Preview Approval button on the Clause Definition page.
This example illustrates the fields and controls on the Clause Approval Status page.

This feature is available only when the Clause Approval check box is selected on the Installation Options - Supplier Contract Management Page.
Use this page to review approvers and reviewers, add ad hoc approvers or reviewers, and submit a clause for approval. When approvals are required and you submit the clause for approval, the system routes the approval notifications and sets the contract approval status to Pending.
If you submit a clause that does not require approvals, the system displays the Clause Approval Status page, which indicates that approvals are not needed and the clause is approved automatically.
If approvals are needed and the approval criteria has been met, the system sets the clause approval status to Pending, sends an e-mail, and creates a worklist item for approvers in the first relevant steps based on approval configuration. This page displays the updated approval status.
Note: If bind variables have not been resolved, the system does not send the clause for approval and displays the errors that exist in the variable definitions.
Field or Control |
Description |
|---|---|
Return to Clause Definition |
Click to return to the Clause Definition page. |