Establishing PeopleSoft Purchasing Business Units
To define the PeopleSoft Purchasing business units, use the Purchasing Business Unit component (BUS_UNIT_PM).
This section discusses how to Establish PeopleSoft Purchasing Business Units.
|
Page Name |
Definition Name |
Usage |
|---|---|---|
|
BUS_UNIT_TBL_PM |
Create PeopleSoft Purchasing business units or update existing ones. |
|
|
RFQ_REQUIRED_RULE |
Define and view details about the RFQ required rule. |
|
|
BUS_UNIT_PM_COMNT |
Define standard comments to print on dispatched purchase orders. |
|
|
BUS_UNIT_PM_MATCH |
Define matching rules. |
|
|
BUS_UNIT_PM_IMAGE |
Define file directory locations for images that you want to print on purchase orders. |
|
|
Entry Event Defaults Page |
BUS_UNIT_PM_EE |
Select default entry events at the business unit level. You can access this page if entry events are enabled. |
|
VAT Defaults Setup Page(value added tax defaults setup) |
VAT_DEFAULTS_DTL |
Enter VAT defaults for the requisition, purchase orders, RFQs, and procurement cards. If you access this page by clicking the VAT Default link on the Purchasing Definition - Business Unit Definition page, the VAT driver and VAT driver keys are inherited from the PO Business Unit Definition (purchase order business unit definition) component and cannot be changed. If you access this page by using the standard menu navigation, you can specify the VAT driver and any VAT driver keys as applicable. |
|
Copy VAT Defaults From (copy value added tax defaults from) Page |
VAT_DFLT_SRCH_COPY |
Copy VAT defaults from one business unit to another. |
|
Mobile Receiving Page |
BU_OPT_MOBILE_REC |
Establish Mobile Receiving Ad Hoc default values. |
|
BUS_UNIT_TBL_PM2 |
Create business unit options or update existing ones. |
|
|
BUS_UNIT_TBL_PM3 |
Define transaction document autonumbering options. |
Use the Purchasing Definition - Business Unit Definition page (BUS_UNIT_TBL_PM) to create PeopleSoft Purchasing business units or update existing ones.
Navigation:
This example illustrates the fields and controls on the Business Unit Definition. You can find definitions for the fields and controls later on this page.
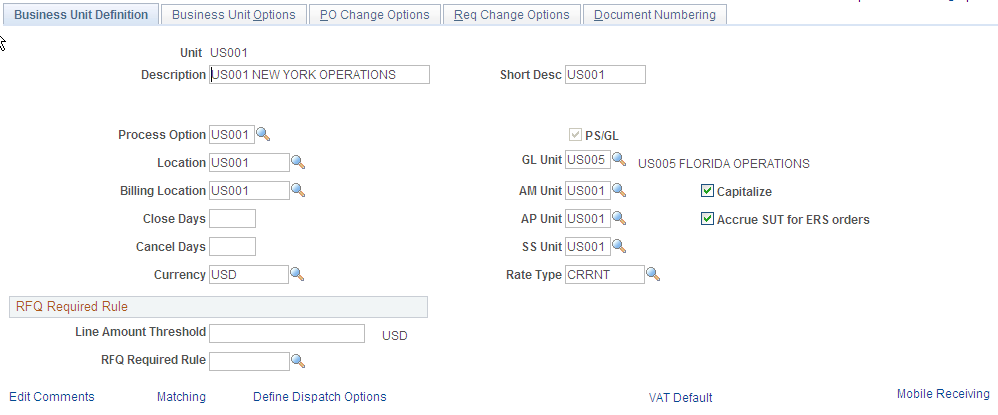
When you access this page in Add mode, you can enter only the unit description, default SetID, and short description. Enter this information and click the Create BU (create business unit) button, which appears only in Add mode, to create the business unit. If you access the page in Update/Display mode, the remaining fields on the page become available for entry.
Field or Control |
Description |
|---|---|
Process Option |
Select the processing option ID for this business unit to be used throughout the procurement cycle. Values are defined on the Purchasing Options - Purchasing Options page. This defines options such as freight terms and payment terms for the business unit. |
Location |
Select the location code for the physical location of this business unit. The system uses this code to derive the organization address that prints on dispatched transactions. Define values on the Location - Location Definition page. |
Billing Location |
Select the code for the location where invoices are sent for this business unit. Define values on the Location - Location Definition page. By default, this information appears on transactions that are created for this business unit. |
Close Days and Cancel Days |
Enter the number of days that a requisition or purchase order, or a canceled requisition or purchase order, must remain open after its last update activity before it is eligible for closure. Cancel and close days enable you to delay the closure of requisitions and purchase orders after they are canceled or entirely received. If you are using PeopleSoft Payables, you can also use cancel and close days to delay closure after requisitions or purchase orders are invoiced. Note: The close days value that you define for the business unit is for purchase order reconciliation and has no relationship to the close days value on the Close Short Run control pages. |
PS/GL (PeopleSoft/general ledger) |
Select to enable transactions for this business unit to be posted to the general ledger and to link this business unit to a VAT entity. The GL Unit (general ledger unit) field becomes available for entry. |
GL Unit (general ledger unit) |
Select a PeopleSoft General Ledger business unit. By default, this business unit appears on transaction distribution lines for this PeopleSoft Purchasing business unit. If you are linking this PeopleSoft Purchasing business unit to a VAT entity, enter the applicable PeopleSoft General Ledger business unit. You can access this link using the PeopleSoft General Ledger business unit. You cannot directly link a PeopleSoft Purchasing business unit to a VAT entity. |
AM Unit (asset management unit) |
Select the default PeopleSoft Asset Management business unit for the transactions that this PeopleSoft Purchasing business unit creates. When you create a purchasing transaction, the PeopleSoft Asset Management business unit appears by default if the item is an asset. You can override this information at the transaction level. |
Capitalize |
Select if most of the asset purchases are capital items. |
AP Unit (accounts payable unit) |
Select the PeopleSoft Payables business unit that is to be used on evaluated receipt settlement (ERS) purchases. |
Accrue SUT for ERS orders (accrue sales and use tax for evaluated receipt settlement orders) |
Select if sales and use tax (SUT) should accrue for any ERS orders that this business unit creates. |
SS Unit (strategic sourcing unit) |
Select the default PeopleSoft Strategic Sourcing (SS) business unit that is to be used for this PeopleSoft Purchasing business unit. Note: When you enter the same PeopleSoft Strategic Sourcing business unit for multiple PeopleSoft Purchasing business units, PeopleSoft Strategic Sourcing copies requisitions from multiple PeopleSoft Purchasing business units into an event. |
Rate Type |
Select the rate type to be used for currency conversion. By default, the currency code and rate type apply to all purchasing transactions for this business unit. |
Tax supplier |
Select to integrate with a third-party tax supplier for tax processing. The system calculates tax from the third-party tax supplier (Vertex or Taxware) when it creates purchase orders online or when sourcing to a purchase order. When you select this check box, depending on the tax supplier that you select, certain fields appear in the group box below this check box. Note: This check box is available only if you select a tax supplier (Vertex or Taxware) on the Installation Options - Overall page. |
Taxware Group Box
This group box is available only if third-party Taxware or Vertex software is installed, and if the Tax supplier check box is selected.
Field or Control |
Description |
|---|---|
Company |
Enter the tax supplier company code. This field appears for these third-party tax products: Vertex Q Series, Vertex O Series, and Taxware Sales and Use Tax. The company code that you enter in this field passes information to the third-party Taxware or Vertex software as input parameters. |
Organization |
Enter the organization. This field appears instead of the Company field for the Taxware Enterprise third-party tax product. |
Division |
Enter the tax supplier division code. This field appears for these third-party tax products: Vertex Q Series, Vertex O Series, and Taxware Sales and Use Tax. The division code passes information to the third-party Taxware or Vertex software as input parameters. |
Department |
Enter the tax supplier department. This field appears only for the Vertex O Series third-party tax product. The department code passes information to the third-party Taxware or Vertex software as input parameters. |
Use Freight Product Code |
Select this option to associate the freight with the tax supplier product code and to indicate applicable tax rates. Note: This field is available only for Taxware. |
RFQ Required Rule
Use this group box to define a threshold line amount and RFQ required rule that, when the amount is exceeded or the rule is met, requires a requisition item to go through the RFQ cycle before it is included on a purchase order.
Field or Control |
Description |
|---|---|
Line Amount Threshold |
Enter a threshold amount. The threshold amount is the line amount limit that triggers that an RFQ is required to source the requisition. When a user exceeds the threshold amount for a requisition line, the system resets the RFQ Required check box to be selected for that line on the requisition. For example, if you are buying something and it costs more than 1000 USD, the system requires that you get a couple of bids before it will source it to the recommended or specified supplier. |
RFQ Required Rule (request for quote required rule) |
Select an RFQ rule from the rules defined in the RFQ Required Rules component. |
|
Click the Go To RFQ Required Rule button to access the RFQ Required Rule page, where you can define and view details about the RFQ required rule. |
Mobile Receiving |
Use this link to access the Mobile Receiving page. |

Use the Request For Quote (RFQ) Required Rule page (RFQ_REQUIRED_RULE) to define and view details about the RFQ required rule.
Navigation:
Click the Go To RFQ Required Rule button on the Purchasing Definition - Business Unit Definition page.
This example illustrates the fields and controls on the RFQ Required Rule. You can find definitions for the fields and controls later on this page.
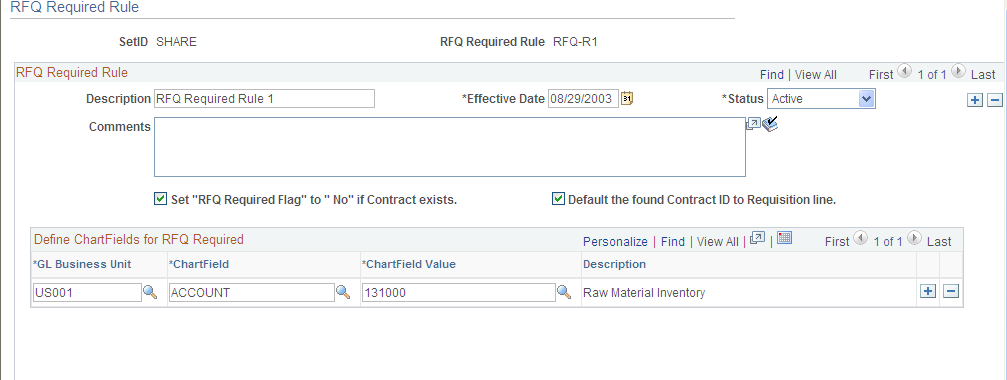
Use this page to define ChartField values that will set the RFQ Required option to Yes for requisitions created online or through the Requisition Loader process. You can also define the RFQ Required option in the Purchasing Item Attributes or Item Category component when an RFQ is required any time that the item or category is specified on a requisition.
Some organizations require RFQ processing whenever a specific ChartField value is referenced on a requisition. For example, whenever a specified project is entered on a requisition, the funding requirements of the project require that the request go out for bid. The RFQ Required Rule page enables you to define the RFQ Required flag based on that ChartField value. When a requisition is created, the system checks the ChartField values that you define on this page and sets the RFQ Required option accordingly.
Field or Control |
Description |
|---|---|
Set "RFQ Required Flag" to "No" if Contract exists |
Select to bypass the RFQ cycle if a contract exists. Note: The system ignores the Default Contract on Req check box setting when the system applies the RFQ rule and you select this check box. |
Default the found Contract ID to Requisition line |
Select to supply by default the contract ID to the requisition line. |
Use the Standard Comments page (BUS_UNIT_PM_COMNT) to define standard comments to print on dispatched purchase orders.
Navigation:
Click the Edit Comments link on the Purchasing Definition - Business Unit Definition page.
The comments that you enter on this page are printed on dispatched purchase orders if you select the Print BU Comments (print business unit comments) check box on the Dispatch Purchase Orders page. You can set up these comments to contain the terms and conditions for purchase orders for this business unit.
Use the Matching Options page (BUS_UNIT_PM_MATCH) to define matching rules.
Navigation:
Click the Matching link on the Purchasing Definition - Business Unit Definition page.
Select the default matching rules for this business unit. If matching rules are defined at the supplier level, those rules will override business unit-level matching rules. You can override both the business unit and supplier level matching rules on the purchase order.
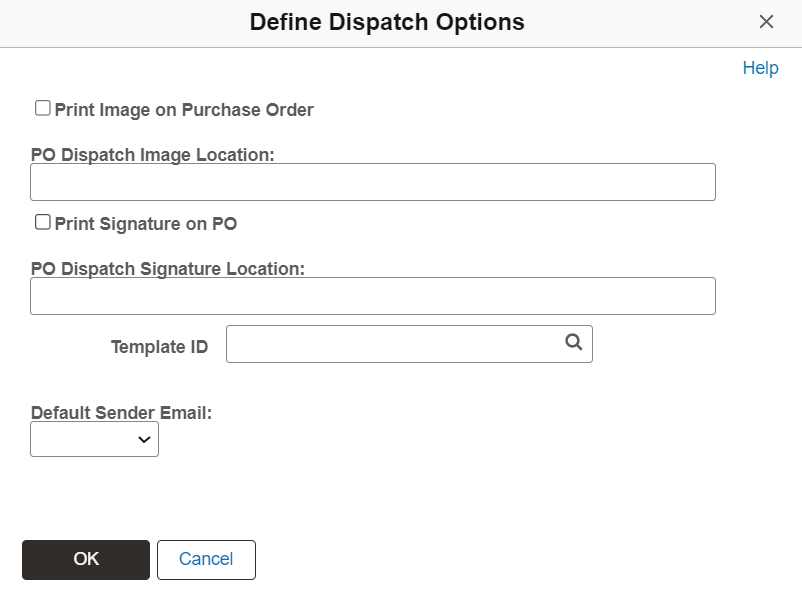
Use the Define Dispatch Options page (BUS_UNIT_PM_IMAGE) to define file directory locations for images that you want to print on purchase orders.
Navigation:
Click the Define Dispatch Options link on the Purchasing Definition - Business Unit Definition page.
This example illustrates the fields and controls on the Define Dispatch Options. You can find definitions for the fields and controls later on this page.
Field or Control |
Description |
|---|---|
Print Image on Purchase Order and PO Dispatch Image Location |
Select to print an image (logo) on purchase orders, and enter the directory location of the image file. |
Print Signature on PO and PO Dispatch Signature Location |
Select to print a signature on purchase orders, and enter the directory location of the signature file. |
Template ID |
Select the report template to use with this business unit to dispatch a purchase order. You use the report template to identify a BI Publisher report layout. The template provides a common report layout when dispatching purchase orders for both PeopleSoft eProcurement and Purchasing. If the Template ID field on this page is blank, then the system uses the default template on the BI Publisher Report Definition page This field appears only if you have selected the Enable XML Publisher check box on the Purchasing page of the Installation Options component. This check box selects the Oracle BI Publisher to format and print purchase orders during the dispatch process for both PeopleSoft Purchasing and PeopleSoft eProcurement. You use Oracle BI Publisher for reporting. It is a Java-based product within the Oracle Fusion Middleware family. |
|
Default Sender Email |
For PO dispatch email notification, select a sender email id.
Note: If Buyer or Specific is selected, it overrides the Default Sender Email configuration on the Installation Options - Purchasing Page. |
Image Locations
Consider these points when working with images and their locations:
For Structured Query Report (SQR) processes to work as designed, you must store associated images in external files.
The folder in which you store external image files must be shared.
For Microsoft Windows NT environments, define the directory locations using the universal naming convention (for example, \\server_name\folder_name\…).
When you run the PO Dispatch/Print (purchase order dispatch and print) process (POPO005), the image file to print on the purchase order is determined by the output format that you select on the Process Scheduler Request page. The PO Dispatch/Print process takes the image file name that you enter here and parses out the file extension information. The process uses this file extension to determine the image type that the PRINT-IMAGE command uses.
This table describes file extension values and their compatible image types to be used in the PRINT-IMAGE command:
|
File Extension |
Image Type |
|---|---|
|
No extension |
BMP-FILE |
|
.BMP |
BMP-FILE |
|
.JPG |
JPEG-FILE |
|
.GIF |
GIF-FILE |
|
.EPS |
EPS-FILE |
|
Others |
HPGL-FILE |
The next two tables describe output type options that are available for the PO Dispatch/Print process on the Process Scheduler Request page, along with their compatible output formats, output file extensions, and image types.
This first table represents output types for web, file, and email:
|
Output Format |
Output File Extension |
Image Type That Works |
|---|---|---|
|
CSV |
.CSV |
None |
|
HP |
.LIS |
HPGL-FILE |
|
HTM |
.HTM |
JPEG-FILE, GIF-FILE, BMP-FILE |
|
LP |
.LIS |
None |
|
OTHER |
.LIS |
None |
|
|
|
JPEG-FILE |
|
PS |
.LIS |
EPS-FILE |
|
SPF |
.SPF |
BMP-FILE |
This table represents output types for a printer:
|
Output Format |
Output File Extension |
Image Type That Works |
|---|---|---|
|
HP |
None |
HPGL-FILE |
|
LP |
None |
None |
|
OTHER |
None |
None |
|
PS |
None |
EPS-FILE |
Note: The HPGL image type works with HP LaserJet printers.
Printing Images
To print an image:
Check the PSSQR.INI file to verify that the SQRDIR is set to the path where the SQR executables are stored.
Ensure that the drive that is storing the image has the correct permissions set.
Verify that the image is not corrupt.
In a UNIX environment, you can print only EPS-FILE image types.
See the product documentation for PeopleTools: BI Publisher for PeopleSoft.
Use the Copy VAT Defaults From (copy value added tax defaults from) page (VAT_DFLT_SRCH_COPY) to copy VAT defaults from one business unit to another.
Navigation:
Click the VAT Default link on the Purchasing Definition - Business Unit Definition page.
You can insert rows for any or all of the VAT driver keys, as well as the VAT country or state. You can also delete any existing rows.
Field or Control |
Description |
|---|---|
Copy Values to New Rows |
If you are inserting a row for a VAT driver key, select this check box to copy all the VAT defaults from the previous row to the new row. Otherwise, all VAT default fields for the new row will be blank. |
Copy Defaults From |
Click to access the VAT Defaults Copy From page, which you can use to copy VAT default specifications from another key combination for the same VAT driver. |
Return to VAT Defaults Sub-Search (return to value-added tax defaults sub-search) |
Click to return to the Purchasing Definition component. |
VAT Reporting Country (value-added tax reporting country) |
Select the country or countries for which you are defining VAT defaults. For regular defaults, defaults are obtained for the VAT reporting country. For service VAT treatment defaults, defaults are obtained for the supplier's location country. |
Defaulting State |
As applicable, select the state for which you want to define VAT default values. |
Default Details |
Enter the effective date, status and, if applicable, the VAT SetID. |
VAT Apportionment Control (value-added tax apportionment control) |
When you create purchase orders for a PeopleSoft Purchasing business unit, the system selects a default business unit for VAT recovery and rebate calculations based on this value. Business units have different VAT recovery and rebate percentages based on their locations. Values are: Dist GL BU (distribution general ledger business unit): Selects the PeopleSoft General Ledger business on the purchase order distribution line. Txn BU (transaction business unit): Selects the business unit on the purchase order header. Txn GL BU (transaction general ledger business unit): Selects the PeopleSoft General Ledger business unit on the purchase order header. |
Note: The remaining fields on the page vary based on the combination of VAT driver and VAT driver keys. See the section on VAT fields for details about the fields and VAT drivers that appear.
Use the Copy VAT Defaults From (copy value added tax defaults from) page (VAT_DFLT_SRCH_COPY) to copy VAT defaults from one business unit to another.
Navigation:
Click the Copy Defaults From link on the VAT Defaults Setup page.
Field or Control |
Description |
|---|---|
Search Criteria |
Enter the criteria by which you want to search. |
Search |
Click to retrieve the results based on the criteria entered. |
Copy From |
Select a link for any of the results returned to view the details of the VAT setup on the Copy VAT Defaults Setup page. When you have viewed the details, you can click Copy to copy the VAT setup. The system returns you to the VAT Defaults Setup page with the copied fields. Or you can select the appropriate option for any of the results returned and click Copy to copy from that row. The system returns you to the VAT Defaults Setup page with the copied fields. |
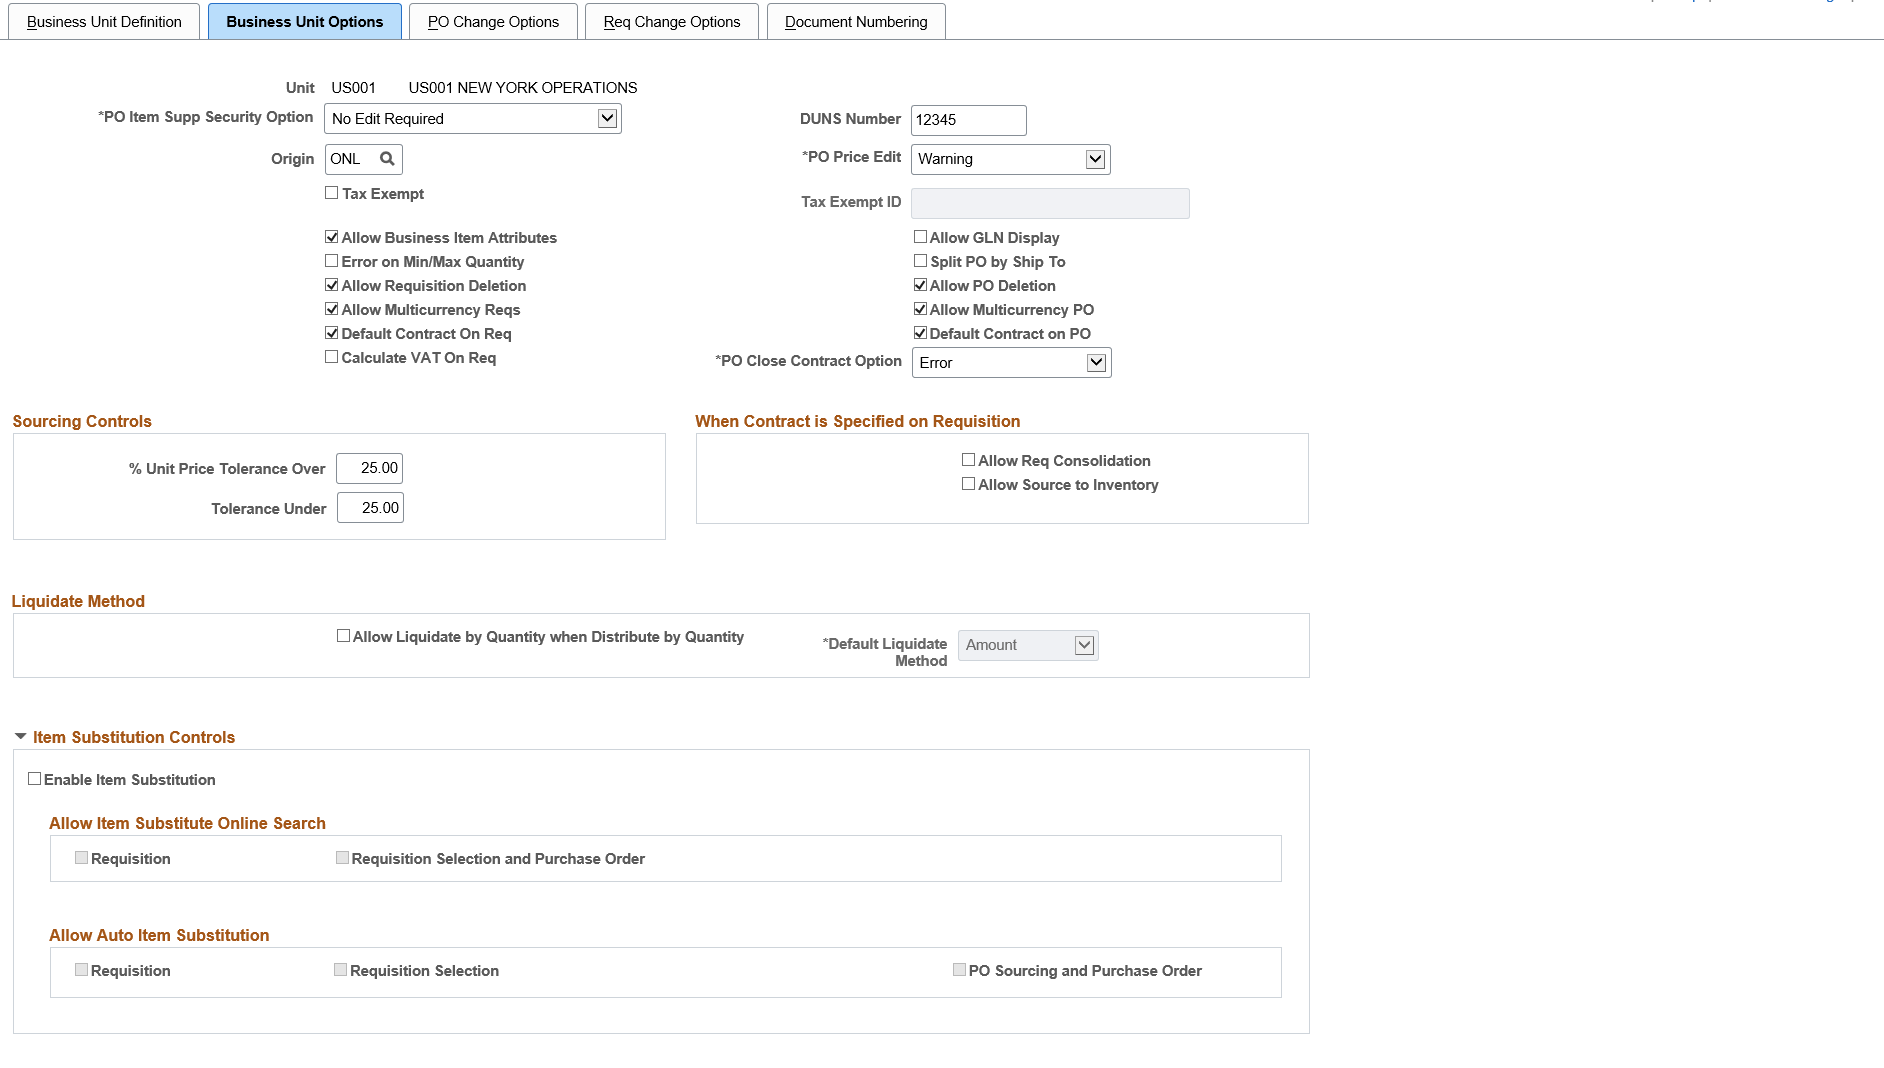
Use the Purchasing Definition - Business Unit Options page (BUS_UNIT_TBL_PM) to create PeopleSoft Purchasing business units or update existing ones.
Navigation:
This example illustrates the fields and controls on the Purchasing Definition - Business Unit Options page (1 of 2). You can find definitions for the fields and controls later on this page.
This example illustrates the fields and controls on the Purchasing Definition - Business Unit Options page (2 of 2). You can find definitions for the fields and controls later on this page.
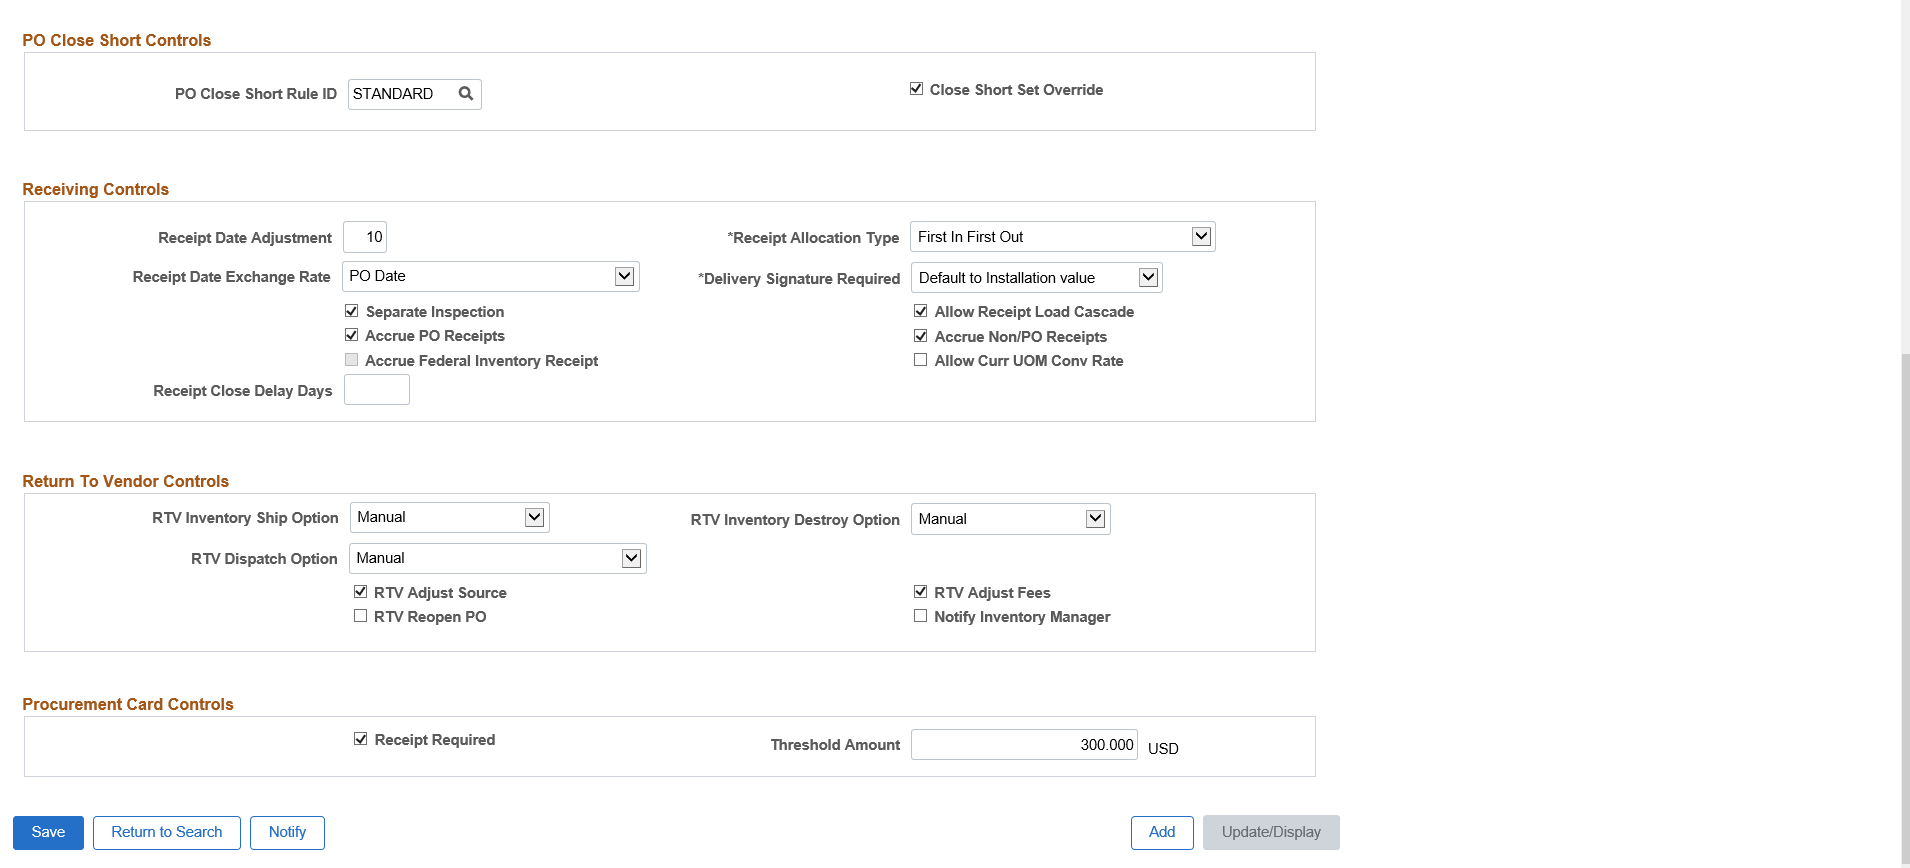
Field or Control |
Description |
|---|---|
PO Item Supplier Security Option (purchase order item supplier security option) |
Select a value to indicate how the system handles edits to item and supplier combinations on purchase order lines: Edit Required Must Use Item ID: A valid item ID with an established item and supplier relationship is required for each purchase order line. You can't order an item by description and must use an item that is defined in the Item supplier tables. Edit Required When Use Item ID: An item ID isn't required on the purchase order line, and you can order an item by description. However, if you order by item ID, the item must exist in an Item supplier table. The difference between this and the No Edit Required value is that you are restricted to items that have an active purchase order supplier established. No Edit Required: An item ID isn't required on the purchase order line, and you can order an item by description. If you order by item ID, you can order any item that is established in the Item tables for PeopleSoft Purchasing, even if no item and supplier relationship is established. |
Origin |
Select the origin code to be used on ERS invoices so that you can process ERS matching by origin in PeopleSoft Payables. PeopleSoft Purchasing can also use this code for reporting to identify transaction origins. |
Receipt Date Adjustment |
Enter a number of days by which receiving dates can be adjusted. If you do not specify a value, receiving dates by default become the current system date and cannot be changed. For example, entering 7 enables you to enter a receipt date that is plus or minus seven days from the current date. This is useful when an item is received and you do not have time to enter the receipt on the same business day. Without a receipt date adjustment value, you must enter the receipt using the next business day's date. Consequently, the entry could show a late delivery in the records when the delivery was actually on time. |
DUNS Number (Dun and Bradstreet number) |
Enter a DUNs number. |
Receipt Allocation Type |
Select the method to allocate the receipt amount across the distributions for the schedule for the received items. Values are: FIFO (first-in-first-out): Purchase order quantities are fulfilled based on the sequence in which they are added to the purchase order schedule. This is the default receipt allocation type. Prorate: Purchase order quantities are fulfilled by calculating the percentage of received quantity to the total purchase order line quantity. The received quantity is then allocated to each distribution line using that percentage. This is for noninventory items only. For example, if the schedule quantity is 300 and the schedule has three distribution lines, each distribution has a quantity of 100. If you receive a quantity of 75, each distribution is allocated a received quantity of 25. Specify: Allocations are fulfilled by the user manually entering the receipt quantity or amount at the distribution level when receiving purchase order schedules with multiple distributions. This enables the specific allocation of the receipt quantity or amount by open purchase order distribution quantity or amount. Split Distributions: The receipt quantity is allocated to the distributions in the same manner as the prorate type and the resulting receipt asset lines are all assigned to the same asset. For serialized items, each individual unit is split across all the distributions and grouped together under a separate asset. Note: The receipt allocation type that you select here appears as the default when you create a receipt for this PeopleSoft Purchasing business unit. Note: The Prorate and Split Distributions allocation types are hidden when the item is designated for inventory. |
Receipt Date Exchange Rate |
Select the date on which to base the receipt date exchange rate for purchase order receipts and receipts that are not purchase order receipts. Values are: PO Date (purchase order date): Select to base the exchange rate on the purchase order header date. Receipt Date: Select to base the exchange rate on the receipt date. |
Accrue Federal Inventory Receipt |
Select this check box to perform the following actions:
|
PO Price Edit |
Select the purchase price edit: Values are:
|
RTV Dispatch Option (return to vendor dispatch option)RTV dispatch option |
Select the dispatch method to use as this business unit's default value for the return to vendor (RTV) functionality. This functionality determines the default value for the return to vendor function on how the RTV will be dispatched to the supplier. The system uses the dispatch options that you define for the business unit as default values when user preferences are set by default to the business unit RTV dispatch option. When you save information on this page, the settings you define become effective. RTV dispatch option values for a business unit are: Dispatch When Shipped: Select to submit the RTV Dispatch process automatically when all lines on the RTV have been shipped. Manual: Select to indicate that the RTV transaction requires collaboration between groups and that you must submit the RTV Dispatch/Print process by using the Process Scheduler. This is the default value for the field. |
RTV Inventory Ship Option (return to vendor inventory ship option)return to vendor inventory ship option |
Select the return to vendor ship option that you want to use as this business unit's default value for the Inventory Process field on the RTV line. RTV Inventory ship option values are: Express: Select to use the RTV express option to process purchasing and inventory data collection transactions at the same time. This means that you can perform inventory issue (automatic issue) or adjustment (automatic adjustment) actions from within the Purchasing RTV component. Note: The Express value will be automatically overridden on the RTV line if the associated Inventory business unit is defined as a Warehouse Management System (WMS) type. You define the warehouse setting using the Use External Warehouse Control check box on the Business Unit Options page for Inventory. Fulfillment: Select to set the user's preference to perform Inventory fulfillment processing for RTV transactions. This enables the user to create an Inventory material stock request transaction and to process it through Inventory fulfillment processing. The Fulfillment value is valid only for RTV processing when RTV line disposition is Ship. Manual: Select to indicate that the RTV ship transaction must be completed manually. This option requires that you perform the Inventory Express manually to remove the items from inventory. |
RTV Inventory Destroy Option (return to vendor inventory destroy option)return to vendor inventory destroy option |
Select the return to the vendor destroy option that you want to use for this business unit's default value for the Inventory Process field on the RTV line. RTV Inventory destroy option values are: Express: Select to use the RTV express option for the RTV lines that have a disposition of Destroy. This means that the user can perform Inventory adjustment (automatic adjustment) actions from within the Purchasing RTV component. Manual: Select to indicate that the RTV transaction must be manually adjusted within inventory. When you use the Manual option, the system does not perform the RTV adjustment function. You must use the Inventory Adjustment component to adjust balances for inventory returns that are to be destroyed. |
PO Close Short Rule ID |
Select the PO Close Short Rule ID from a prompt list of available Rule IDs. The Rule ID is needed for the close short process to determine a rule to close short the PO The close short will not be processed if the ID is blank. |
Delivery Signature Required |
Select an option that indicates that a signature is required from the individual receiving a Mobile Inventory delivery for this receiving business unit. Options include:
See smin, Using Mobile Delivery, Processing Deliveries Using Mobile Devices, Adding a Signature to a Delivery |
Receipt Close Delay Days |
Indicates the minimum number of days that must pass since a receipt was last updated to make it eligible for closing. |
Receipt Required |
Select the Receipt Required check box to indicate that any transaction line amount greater than the threshold amount will require attachments. |
Threshold Amount |
Enter the amount limit for a requisition line. Note: This field becomes editable if you select the Receipt Required check box. |
Additional Business Unit Options
Field or Control |
Description |
|---|---|
Allow Multicurrency Reqs (allow multicurrency requisitions) |
Select to enable requisition lines with different currencies. Item-supplier pricing may be in a currency other than the business unit currency. The supplier currency is automatically converted to the business unit currency for requisition approval purposes. When the requisition lines are sourced to a purchase order, the system uses the requisition currency (if sourced using Requisition Selection with Define PO = 'Y'); otherwise, the supplier currency is used. |
Calculate VAT On Req (calculate value-added tax on requisitions) |
Select to enable VAT to process and calculate onto requisitions and to pass the VAT information from the requisition to other transactions in the procurement process. |
Allow Multicurrency PO (allow multicurrency purchase order) |
Select to enable purchase orders to be entered in the supplier currency, even if the supplier currency differs from the business unit currency. If you do not select this check box, and requisitions are entered in a currency different from the business unit currency, the system creates purchase orders in the business unit currency. The system converts requisition prices and amounts to the business unit currency of the purchase order. |
Default Contract on Req (default contract on requisition) |
Select to automatically supply a contract to a requisition. The system searches for and ensures that the correct contract is selected for use with the requisition. Along with selecting this check box, the system verifies that the Auto Default check box is selected on the Contract page. This makes the contract available to automatically default onto requisition and purchase order transactions. You can override contracts that have been selected by the system. This enables you to receive contract prices for requisition items and to more accurately track budgets and pre-encumberance balances. |
Allow Business Item Attributes |
Select to enable attributes to be established for any item in this business unit. The business unit item attributes override those that you establish for the item in the Item Definition - Purchasing Attributes component. Note: Selecting the Allow Business Item Attributes check box is useful if you must maintain item-specific attributes by business unit as well as by SetID. For example, suppose that several of the business units normally purchase the same item, but each business unit has a different lead time for this item. If you enable business unit item attributes, the lead time that the business unit sets overrides the default lead time, and each business unit can set a different lead time for the same item. |
Default Contract on PO(default contract onto purchase order) |
Select to indicate that the system should automatically search for appropriate contracts for purchase order lines. The check box applies only to manually created purchase orders, and not orders created using a batch process. This automates the process of selecting the most appropriate contract for use with manually created purchase orders. The default value for the field is deselected. If you select to search for contracts, the system begins its search for contracts with process types of Purchase Order, General, or Release-To-Single PO Only and that are in a current version with an Approved status. If the check box is deselected, the system does not search for a contract. If multiple contracts exist, the system selects the contract where the status is Approved, the version is current, and with the most recent (but not future) contract begin date. After validating the contract and using it on the transaction, the system:
This option does not apply to PeopleSoft Services Procurement project roles on the contract. Services Procurement searches for an applicable contract on the work order, and uses it on a purchase order regardless of the Default Contract Flag check box value. This option also does not apply to blanket purchase orders. |
Allow Receipt Load Cascade |
Select to enable this business unit to receive quantities for a purchase order line and cascade that quantity over multiple schedules. For example, assume that you have one purchase order line for 150 items and three schedules for 50 items, each to be delivered a month apart. When the first shipment arrives for receiving, a quantity of 75 items exists. Rather than returning 25 of the items and waiting for the next shipment, you can receive 50 on the first schedule and cascade 25 to the second schedule. In effect, you receive these 25 items early and deduct them from the second schedule. When the next shipment arrives, you receive the remaining 25 items. You can cascade line quantities until an entire order is filled. Note: The Allow Receipt Load Cascade check box is applicable only when you are using the Receiver Load Application Engine process (PO_RECVLOAD) to build receivers from loaded data. This check box is typically used to load bar code transactional data into the system, which builds the data into receivers and cascades the quantities down to the purchase order lines and schedules appropriately. |
Accrue PO Receipts |
Select to enable this business unit to accrue receipts for expensed items without invoices. When you run the Receipt Accrual process (PO_REVACCR), receipts for which you have not yet received an invoice are included in the process. |
Accrue Non/PO Receipts (accrue non/purchase order receipts) |
Select to enable this business unit to accrue receipts for noninventory items without a purchase order. |
Separate Inspection |
Select to require that inspection information be entered apart from receiving information. Inspections can be performed on the receiving dock or in the inspection location to which the inventory item is routed. |
Notify Inventory Manager |
Select to include inventory workflow notifications for return to vendor processing. The system notifies users defined in the INV MGR role that goods are ready to be shipped back to the supplier. The system generates an email notification when the return disposition is Ship or Destroy for Inventory RTVs. You can override the value for individual vendors using the Return to Vendor Defaults page in PeopleSoft Purchasing. |
Tax Exempt |
Select to enable purchasing documents that are created in this business unit to be exempt from sales and use tax. |
ID |
Enter the tax exempt identifier. The ID field becomes available when you select the Tax Exempt check box. |
RTV Adjust Source (return to vendor adjust source) |
Select to enable the adjustment of source documents when items are returned to the supplier for replacement. If you select this check box, the net receipt quantity is adjusted down by the return to vendor (RTV) quantity using this formula: (Net Receipt Quantity)
= (Net Receipt Quantity) – (RTV Qty)
|
Allow Curr UOM Conv Rate (allow current unit of measure conversion rate) |
Select to calculate the purchase order standard quantity using the current conversion rate at receiving or time of purchase order change. If you do not select this check box, or if you do not select the option at receiving or purchase order change, the system uses the purchase order conversion rate. Note: This check box is available only when PeopleSoft Inventory is installed. If PeopleSoft Inventory is not installed, receiving always uses the current conversion rate and won't update the purchase order distribution. Purchase order change uses the current conversion rate and updates the purchase order distributions. |
RTV Adjust Fees (return to vendor adjust fees) |
Select to include adjustment fees when items are returned to the supplier. These fees could include restocking fees or other fees that are imposed on the transaction. |
Allow PO Deletion (allow purchase order deletion) |
Select to enable authorized users to delete purchase orders in the selected business unit. |
RTV Reopen PO (return to vendor reopen purchase order) |
Select to change the purchase order schedule status to Open when items are returned to the supplier for replacement. When the items are reshipped, this check box enables you to receive the items against the original schedule. Note: If you are using commitment control, you can't reopen closed purchase orders, and you will not be able to select this check box. This functionality is not available when you are using commitment control. |
Allow Requisition Deletion |
Select to enable authorized users to delete requisitions in the selected business unit. |
Close Short Override |
Select to enable the Close Short Set Option for overriding on the Close Short Workbench. |
Allow GLN Display |
Select this check box to display the GLN fields on the online purchase order and requisition. The GLN fields will be hidden in case the Allow GLN Display check box is deselected. |
Split PO by Ship To |
Select to direct the sourcing programs to create separate purchase orders for each unique Ship To location. Selecting this check box also restricts purchase orders created online to a single Ship To location although this can be overridden on the supplier or on an individual PO. Note: One-time use addresses and addresses associated with direct shipments or direct receipts will not be segregated by the sourcing programs. Furthermore, PO's or Requisitions containing any of these will never be restricted to a single Ship To Location. Note: If user wants to create Purchase order of same Ship To that belong to same state then it is recommended to select "Split PO by Ship To'' check box for GST enabled Purchasing Business Unit. See Understanding the India Goods and Services Tax (GST) |
|
PO Close Contract Option |
Displays the values Error, None, and Warning. When you are trying to close purchase orders with remaining contract amount or quantity, the system issues an error or a warning message on the Buyer’s WorkBench based on the selected value. Error: If the selected PO Close Contract Option is Error, then the check box in the Not Qualified Section on the Buyer’s Workbench – Processing Results page is disabled. The log displays the exception. As the check box is disabled, you cannot override the exception. This way you can avoid closing such POs. Instead, you can use the PO Close Short process to release the amounts and quantities to the contract. For more information on PO Close Short process, see Running the Close Short Process. Warning: : If the selected PO Close Contract Option is Warning, then the check box in the Not Qualified Section on the Buyer’s Workbench – Processing Results page is enabled. When you select the check box, a warning message is displayed indicating that the PO line has remaining amounts or quantities to be released back to the contract. You can either perform the PO Close Short process as suggested in the message or ignore it. The exception is displayed in the log. You can override the exception and close the PO. None: If the PO Close Contract Option is None, then the check box in the Not Qualified Section on the Buyer’s Workbench – Processing Results page is enabled. Selecting the PO does not display any message. The exception is displayed in the log. You can override the exception and close the PO. Note: The purchase order reconciliation process identifies the PO lines with remaining quantity or amount, which have a contract and generates the exception mentioned above. The Buyer’s WorkBench works based on the BU setup and the exception logged into the exception table. The exception is not applicable for those PO lines which are:
Displays the exception for the PO Lines - without matching enabled:
Displays the exception for the PO Lines - matching enabled:
|
Sourcing Controls
Field or Control |
Description |
|---|---|
% Unit Price Tolerance/Tolerance Over (percent unit price tolerance/tolerance over) and % Unit Price Tolerance/Tolerance Under (percent unit price tolerance/tolerance under) |
Enter the percentage over and under by which the purchase order price can vary from the requisition price. By default, these values appear on requisitions that are created for this business unit. |
When Contract is Specified on Requisition
Field or Control |
Description |
|---|---|
Allow Req Consolidation |
Select to allow requisition consolidation when a contract ID is present on the requisition line. |
Allow Source to Inventory |
Select to allow inventory sourcing when a contract ID is present on the requisition line. |
Item Substitution Controls
Field or Control |
Description |
|---|---|
Enable Item Substitution |
Select this check box to enable item substitution for this Purchasing business unit. If you enable item substitution, you must also select at least one check box in the Allow Item Substitute Online Search or Allow Auto Item Substitution group boxes. Note: Upon selecting the Enable Item Substitution check box, all the Item Substitute fields will be enabled for entry on the Requisition, Req Selection/Req Expediter, Sourcing Workbench, Purchase Order, and Receipt pages, and on other applicable components for this business unit. |
Allow Item Substitute Online Search |
The options in this section allows item user to access online search for item substitutions on the Requisition and/or during Requisition Selection and on the Purchase Order. |
Allow Auto Item Substitution |
Select to enable automatic item substitution on the Requisition, during Requisition Selection, and/or during PO Sourcing and on the Purchase Order. |
Liquidate Method
Field or Control |
Description |
|---|---|
Allow Liquidate by Quantity when Distribute by Quantity |
Select to indicate that the purchase order business unit is liquidated by quantity when distributed by quantity. If you do not select this check box, the Comm. Cntrl. Budget Processor process automatically liquidates pre-encumbrance and encumbrance balances by amount only. |
Note: The installation must include commitment control to use this option.
Field or Control |
Description |
|---|---|
Default Liquidate Method |
Select a default liquidate method for the purchase order business unit. You can liquidate by quantity or amount. |
Note: You must select the Allow Liquidate by Quantity when Distribute by Quantity check box to define a quantity default liquidate method.
Use the Purchasing Definition - Document Numbering page (BUS_UNIT_TBL_PM3) to define transaction document autonumbering options.
Navigation:
Select Requisitions, Purchase Orders, Receivers, Requests For Quotes, and Return to Vendors to enable autonumbering for the associated transaction. The last number that was assigned for each transaction appears.
This example illustrates the fields and controls on the Document Numbering. You can find definitions for the fields and controls later on this page.
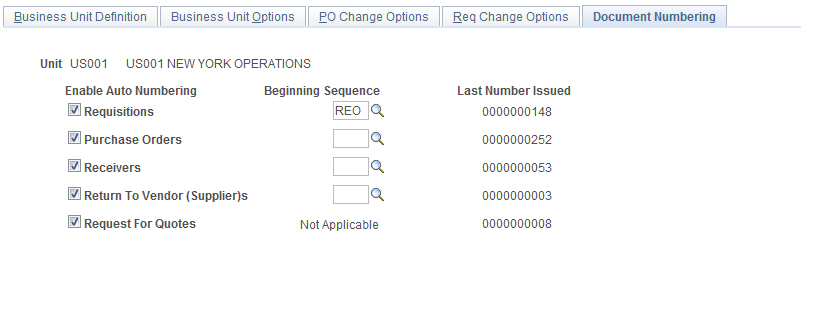
Field or Control |
Description |
|---|---|
Beginning Sequence |
To enter the beginning sequence number for the Purchase order, users have to create a valid auto numbering entry. If the Beginning Sequence is blank the Last Number field in the PO Business Unit will be used in the Auto Numbering routines. If the value has been entered in the Beginning Sequence field, the standard Auto Numbering will be used for the Purchase Orders. Note: When using the standard Auto Numbering, the default sequence is ignored since the Beginning Sequence value here serves as the default. |
Last Number Issued |
Displays the Last Number value stored in the Purchasing Business Unit if the Beginning Sequence is blank. If the Beginning Sequence is entered, the value displayed will be from the Auto Numbering Table |