Setting System-Wide Security Options
To set up system-wide security options, use the Security Options (SECURITY_OPTIONS), Security View Names (SECURITY_VIEW_NAMES), Apply Security (APPLY_SECURITY), Security SetID Class (SEC_SETID_CLS), Security SetID Operator (SEC_SETID_OPR), Security Business Unit Class (SEC_BU_CLS), Security Business Unit Operator (SEC_BU_OPR), Operator Defaults (OPR_DEFAULT), Role Worker (RB_ROLE_WORKER), Security Views (SECURITY_VIEWS) components.
This topic provides overviews of row-level security views, sensitive worker information, and predefined security roles and sample users.
|
Page Name |
Definition Name |
Usage |
|---|---|---|
|
SECURITY_OPTIONS |
Select the type of security to implement (user or permission list) and the key fields that are controlled by the security settings. |
|
|
RUN_FIN9001 |
Initiate the process that activates the selected security options. |
|
|
SECURITY_VIEWS |
Define the type of security for each view in the system. The Apply Security Setups process changes the security view names to match the levels of security for each view. These names use the file extensions for the corresponding security type. |
|
|
SEC_BU_CLS |
Grant access to a business unit by using a permission list. |
|
|
SEC_BU_OPR |
Grant access to a business unit by using a user ID. |
|
|
SEC_SETID_CLS |
Grant access to a tableset using a permission list. |
|
|
SEC_SETID_OPR |
Grant access to a tableset by using a user ID. |
|
|
OPR_DEF_TABLE_RB1 |
Define overall preferences for a specified PeopleSoft user. |
|
|
OPR_DEF_TABLE_RC |
Define preferences for call center agents and other users of the Case component. |
|
|
OPR_DEF_TABLE_RSF |
Define preferences for sales representatives. |
|
|
OPR_DEF_TABLE_RG |
Select user default values that you want the system to display on the Change Request page in PeopleSoft HelpDesk. |
|
|
OPR_DEF_TABLE_RSP |
Select default values that you want the system to use when it does account assignments. |
|
|
RB_ROLE_WORKER |
Define user roles that can access sensitive and semi-sensitive worker information. |
Business units and setIDs are maintained in edit tables and can be used as primary keys throughout the system. When a field uses an edit table to select values, you are limited to the values that are defined for the edit table. With PeopleSoft row-level application security, you can specify which values in the edit table are available in a particular view.
Views enable you to access data horizontally for multiple tables. Views are Structured Query Language (SQL) statements that filter out data rows. Users with permission to access particular setIDs or business units see only a subset of the values in the edit tables.
After you set up views, you can specify which users or roles can access the pages that contain secured field values. Within each page, you can also hide specific fields from particular roles.
Security View Names
PeopleSoft delivers applications with security views that apply to key fields in the system. You can alter these views or build views of your own; however, they would be considered a customization. View names include suffixes that reflect the type of security for the view. This table lists the view name suffixes and describes the corresponding security type.
|
View Name Suffix |
Security Type |
|---|---|
|
NONVW |
No security. |
|
OPRVW |
User security. |
|
CLSVW |
Permission list security. |
Note: Although PeopleSoft generally follows this naming convention, the system does not enforce it. As long as you have the view defined in the security view names grid the view name will work.
Row-Level Security for Users
After you select security options and set up security view names, define the security-controlled field values that each user or permission list can access. When you secure key fields in the application, the pages that you use depend on the level of system security that you select. If you select user-level security, use the user security pages. If you select role-level security, use the permission list security pages.
PeopleSoft uses enterprise integration points to transmit worker data from PeopleSoft Human Capital Management (PeopleSoft HCM) to PeopleSoft CRM. Most of the data that PeopleSoft CRM subscribes to from PeopleSoft HCM is sensitive.
Some users, however, should not have access to this data. To give users access to sensitive and semi-sensitive data, you must select the roles that are associated with the users and then indicate what type of information is available to them—either confidential or home contact information.
Users who have sensitive (confidential) data access defined in the Secured Worker Role setup page, can view date of birth, age, national ID, gender, and employee status fields in the Worker and Case components; otherwise, the system hides this information. Users who have semi-sensitive data (home contact) access can view home address, home phone, home email, and home pager fields for a worker.
If a role doesn't have access to sensitive or semi-sensitive data, then all users belonging to the role cannot view the associated fields on the pages in the Worker and Case components.
Warning! When users have access to sensitive or semi-sensitive data, the system enables them to edit some pages. If a user modifies a field in PeopleSoft CRM, the changes could be overwritten the next time that a PeopleSoft HCM message is transmitted to PeopleSoft CRM because the information comes to PeopleSoft CRM through a one-way transmission from PeopleSoft HCM.
PeopleSoft provides several roles with predefined user profiles and permission lists in the demonstration database. You can use these sample security configurations as they are delivered, or you can modify them to meet your specific security requirements. The roles and permissions are part of the system data, and the users are part of the sample data delivered in the demonstration database.
This topic discusses:
PeopleSoft CRM system IDs.
PeopleSoft HelpDesk and PeopleSoft Support user IDs.
PeopleSoft Integrated FieldService user IDs.
PeopleSoft high tech industry user IDs
PeopleSoft government industry user IDs
PeopleSoft Marketing user IDs.
PeopleSoft Sales user IDs.
PeopleSoft Order Capture user IDs.
PeopleSoft Order Capture Self Service user IDs.
PeopleSoft Quality user IDs.
PeopleSoft multichannel applications user IDs.
PeopleSoft CRM System IDs
PeopleSoft delivers predefined user IDs, passwords, and associated roles for PeopleSoft CRM.
Note: To look up role information for a user ID, select and then click the Roles tab.
This table lists the delivered PeopleSoft user IDs and passwords:
|
User ID and Password |
Description |
|---|---|
|
SYSADM |
System Administrator |
|
EMPL |
Employee |
|
MGR |
Line Manager |
PeopleSoft HelpDesk, PeopleSoft HelpDesk for Human Resources, and PeopleSoft Support User IDs
This table lists the predefined user IDs and passwords for PeopleSoft HelpDesk, PeopleSoft HelpDesk for Human Resources, PeopleSoft HelpDesk for Higher Education, and PeopleSoft Support:
|
User ID and Password |
Description |
|---|---|
|
CCAG |
Call Center Agent |
|
CCMGR |
Call Center Manager |
|
CRAWLING / WELCOME |
HR Call Center Level One Agent USA (E-Business HCM) |
|
FKELLY / WELCOME |
HR Call Center Level Two Agent UK (E-Business HCM) |
|
HELPAA |
Help Desk Applications Administrator |
|
HELPAG |
Help Desk Agent |
|
HELPMGR |
Help Desk Manager |
|
HHDCAN_ADMIN |
HR HelpDesk Administrator (Canada) |
|
HHDCAN_AGT1 |
HR HelpDesk Agent 1 (Canada) |
|
HHDCAN_AGT2 |
HR HelpDesk Agent 2 (Canada) |
|
HHDCAN_AGT3 |
HR HelpDesk Agent 3 (Canada) |
|
HHDCAN_MGR |
HR HelpDesk Manager (Canada) |
|
HHDUSA_ADMIN |
HR HelpDesk Administrator (USA) |
|
HHDUSA_AGT1 |
HR HelpDesk Agent 1 (USA) |
|
HHDUSA_AGT2 |
HR HelpDesk Agent 2 (USA) |
|
HHDUSA_AGT3 |
HR HelpDesk Agent 3 (USA) |
|
HHDUSA_MGR |
HR HelpDesk Manager (USA) |
|
HSCOTT / WELCOME |
HR Call Center Level One Agent UK (E-Business HCM) |
|
KADDAI / WELCOME |
HR Call Center Level Two Agent USA (E-Business HCM) |
|
MBORHO / WELCOME |
HR HelpDesk Administrator (E-Business HCM) |
|
RJAMES / WELCOME |
HR Self-Service Manager (E-Business HCM) |
|
SMARTHA / WELCOME |
HR Self-Service Employee (E-Business HCM) |
|
SOLTNMGR |
Solution Manager |
|
SSS_AA00100 |
Higher Education Worker and Student |
|
SSS_CONST |
Higher Education Constituent |
|
SSS_FACULTY |
Higher Education Faculty Worker |
|
SSS_FAO |
Higher Education Financial Aid Officer |
|
SSS_FUND |
Higher Education Fundraiser |
|
SSS_HEADMIN |
Higher Education Administrator |
|
SSS_HEAG1 |
Higher Education Level One Agent |
|
SSS_HEAG2 |
Higher Education Level Two Agent |
|
SSS_HEBLENDAG |
Higher Education Blended Agent (IT and non-IT cases) |
|
SSS_ITAG |
Higher Education IT Agent |
|
SSS_MKTMGR |
Higher Education Marketing Manager |
|
SSS_MKTR |
Hgher Education Marketer |
|
SSS_MKTR1 |
Higher Education Marketer |
|
SSS_REC |
Higher Education Recruiter |
|
SSS_REC1 |
Higher Education Recruiter |
|
SSS_REC2 |
Higher Education Recruiter |
|
SSS_REC3 |
Higher Education Recruiter |
|
SSS_RECMGR |
Higher Education Recruiting Manager |
|
SUPPAA |
Support Applications Administrator |
|
TECHSPEC |
Technical Specialist |
PeopleSoft Integrated FieldService User IDs
This table lists the predefined user IDs and passwords for PeopleSoft Integrated FieldService:
|
User ID and Password |
Description |
|---|---|
|
DISPATCH |
Dispatcher |
|
FSAA |
Field Service Applications Administrator |
|
FSAG |
Field Service Agent |
|
FSENG |
Field Service Engineer |
|
FSMGR |
Field Service Manager |
|
INVAG |
Inventory Agent |
|
INVMGR |
Inventory Manager |
|
PRODMGR |
Product Manager |
|
PURCHAG |
Purchasing Agent |
|
RECAG |
Receiving Agent |
|
TECHSUP |
Technical Support |
PeopleSoft High Tech Industry User IDs
This table lists the predefined user IDs and passwords for the PeopleSoft high technology industry:
|
User ID and Password |
Description |
|---|---|
|
HITECHADMIN |
High Technology Administrator |
|
HITECHAGENT |
High Technology Agent |
|
HITECHSS |
High Technology Self-Service |
|
HITECHGUEST |
High Technology Guest |
PeopleSoft Government Industry User IDs
This table lists the predefined user IDs and passwords for the PeopleSoft government industry:
|
User ID and Password |
Description |
|---|---|
|
GOVADMIN |
Government Administrator |
|
GOVAGENT |
Government Agent |
|
GOVSS |
Government Self Service |
|
GOVGUEST |
Government Guest |
|
GOVMGR |
Government Manager |
PeopleSoft Marketing User IDs
This table lists the predefined user IDs and passwords for PeopleSoft Marketing:
|
User ID and Password |
Description |
|---|---|
|
CAMPMGR |
Campaign Manager |
|
MKTAA |
Marketing Application Administrator |
|
MKTANAL |
Marketing Analyst |
|
MKTCRT |
Marketing Creative |
|
MKTMGR |
Marketing Manager |
|
MKTRES |
Marketing Researcher |
|
SRVCONA |
Service Contract Administrator |
PeopleSoft Sales User IDs
This table lists the predefined user IDs and passwords for PeopleSoft Sales:
|
User ID and Password |
Description |
|---|---|
|
SLSREP |
Inside Sales Rep |
|
FLDSLSREP |
Field Sales Rep |
|
SLSMGR |
Sales Manager |
|
LDQUAL |
Lead Qualifier |
|
SLSAA |
Sales Application Administrator |
|
CHSLSMGR |
Channel Sales Manager |
PeopleSoft Order Capture User IDs
This table lists the predefined user IDs and passwords for PeopleSoft Order Capture:
|
User ID and Password |
Description |
|---|---|
|
OCADMIN |
Order Capture Administrator |
|
OCMGR |
Order Capture Manager |
|
OCREP |
Order Capture Representative |
PeopleSoft Order Capture Self Service User IDs
This table lists the predefined user IDs and passwords for PeopleSoft Order Capture Self Service:
|
User ID and Password |
Description |
|---|---|
|
CPCUST |
Customer |
|
CPSS |
Customer Self Service |
|
GUEST |
Guest |
|
HITECHGUEST |
High Technology Guest |
|
USGUEST |
Guest - US001 (USA) |
PeopleSoft Quality User IDs
This table lists the predefined user IDs and passwords for PeopleSoft Quality:
|
User ID and Password |
Description |
|---|---|
|
QAANAL |
Quality Analyst |
|
QAAA |
Quality Application Administrator |
|
QAMGR |
Quality Manager |
PeopleSoft Multichannel Applications User IDs
This table lists the predefined user IDs and passwords for users implementing PeopleSoft multichannel applications:
|
User ID and Password |
Description |
|---|---|
|
ERMSMGR |
ERMS Manager |
|
ERMSAGENT |
ERMS Agent |
Use the Security Options page (SECURITY_OPTIONS) to select the type of security to implement (user or permission list) and the key fields that are controlled by the security settings.
Navigation
Image: Security Options page
This example illustrates the fields and controls on the Security Options page.
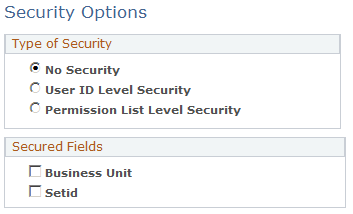
Type of Security
|
Field or Control |
Definition |
|---|---|
| No Security |
Select to disable PeopleSoft application security. All users who are authorized to access a page can select any valid setID or business unit. PeopleSoft CRM applications are delivered with security disabled. |
| User ID Level Security and Permission List Level Security |
Select to enable PeopleSoft application security by user ID or permission list. Each option controls which rows of data a user can see based on user ID or permission list. |
Secured Fields
|
Field or Control |
Definition |
|---|---|
| Business Unit |
Select to implement security for the Business Unit field, which is the primary key for many transactional data tables. In some situations, the Business Unit field is a non-key field on a record. |
| SetID |
Select to implement security for the SetID field, which is the primary key for many setup and rules tables. In some situations, the SetID field is a non-key field on a record. |
Use the Apply Security Setups page (RUN_FIN9001) to initiate the process that activates the selected security options.
Navigation
Image: Apply Security Setups page
This example illustrates the fields and controls on the Apply Security Setups page.

Select the language that you are using to apply security and then click Run to load the security views that you created.
It is highly recommended that you clear the application server cache after the Apply Security process has completed. Check the process monitor to determine when the process has finished.
Use the RD_CACHE_DEL application engine program to clear the application cache.
One way to run this program is directly from the operating system command line:
Navigate to the <%PS_CFG_HOME>\bin\client\winx86 directory.
Enter the following command: psae -CT <dbtype> -CS <server> -CD <database name> -CO <oprid> -CP <oprpswd> -R <run controlid> -AI <program id> -I <process instance>
As an example, a user operating with a Microsoft database named CR910TST on a server named ADDB0123 might type psae -CT MICROSFT -CS ADDB0123 -CD CR910TST -CO PS -CP PS -R CRM -AI RD_CACHE_DEL -I 1
Application Engine programs can also be submitted online from the Application Engine Request page. )
See “Managing Application Engine Programs” in PeopleTools: Application Engine product documentation.
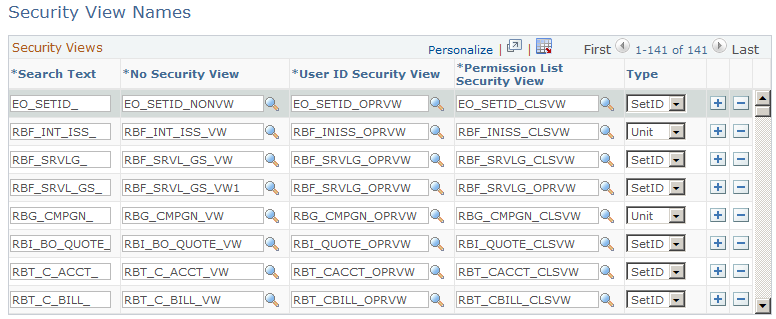
Use the Security View Names page (SECURITY_VIEWS) to define the type of security for each view in the system.
The Apply Security Setups process changes the security view names to match the levels of security for each view. These names use the file extensions for the corresponding security type.
Navigation
Image: Security View Names page
This example illustrates the fields and controls on the Security View Names page.
|
Field or Control |
Definition |
|---|---|
| Search Text |
Displays the view name prefixes supplied by each application. When you run the Apply Security Setups process, the system searches for view names that begin with these prefixes. If a view name begins with a prefix from this list, the process changes the view name extension to match the security type that you selected in the security options. The system stores the list in the SEC_VIEW_NAMES table, where you can review or update this information. You can also configure new security views for the system on this page. Note: There is no need to access this page unless you want to implement customized security views. |
| No Security View User ID Security View and Permission List Security View |
Displays the different security views for the view name prefixes that are supplied by each application. When you run the Apply Security Setups process, the Application Engine process can switch to the Permission List Security View (CLSVW), the User ID Security View (OPRVW) or the No Security View (NONVW) based on the option you selected on the Security Options page. |
| Type |
Select the type of field (SetID or Unit) that the security view affects. |
Use the Business Unit Security by Permission List page (SEC_BU_CLS) to grant access to a business unit by using a permission list.
Navigation
Image: Business Unit Security by Permission List page
This example illustrates the fields and controls on the Business Unit Security by Permission List page.
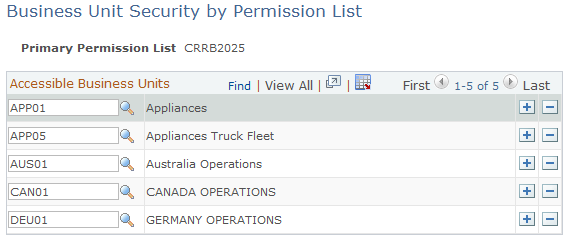
Select the business units to which you want the permission list to have access.
Note: PeopleSoft does not deliver any business units that are associated with permission lists. You must make this association using the Business Unit Security by Permission List page.
Use the Business Unit Security by User ID page (SEC_BU_OPR) to grant access to a business unit by using a user ID.
Navigation
Image: Business Unit Security by User ID page
This example illustrates the fields and controls on the Business Unit Security by User ID page.
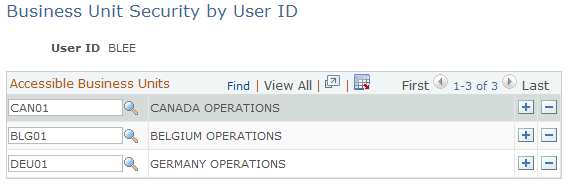
Select the business units to which you want the user ID to have access.
Note: PeopleSoft does not deliver any business units that are associated with user IDs. You must make this association using the Business Unit Security by User ID page.
Use the TableSet Security by Permission List page (SEC_SETID_CLS) to grant access to a tableset using a permission list.
Navigation
Image: TableSet Security by Permission List page
This example illustrates the fields and controls on the TableSet Security by Permission List page.
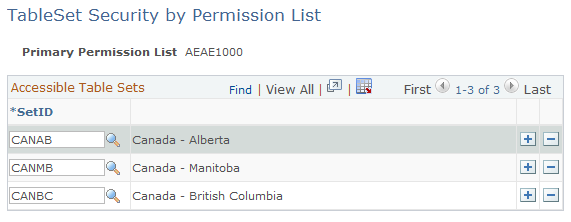
Select the setIDs to which you want the permission list to have access.
Use the TableSet Security by User ID page (SEC_SETID_OPR) to grant access to a tableset by using a user ID.
Navigation
Image: TableSet Security by User ID page
This example illustrates the fields and controls on the TableSet Security by User ID page.
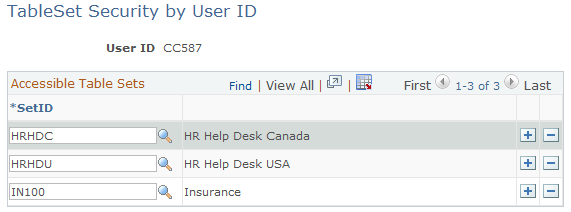
Select the setIDs to which you want the user ID to have access.
Use the Overall Preferences page (OPR_DEF_TABLE_RB1) to define overall preferences for a specified PeopleSoft user.
Navigation
Image: Overall Preferences page
This example illustrates the fields and controls on the Overall Preferences page.
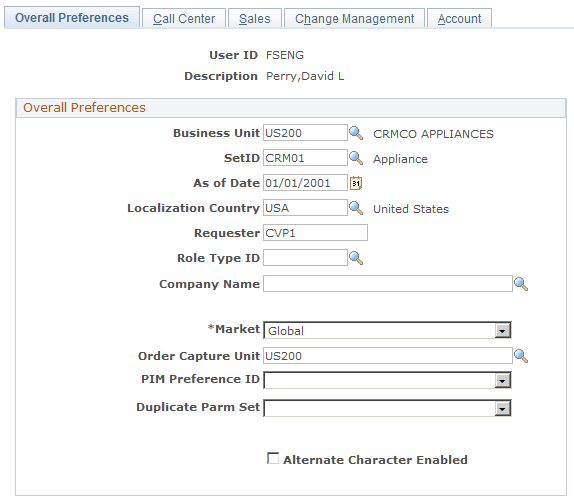
Note: User preferences are associated with user IDs. When you create user IDs for implementation team members and PeopleSoft users, define preferences for each user.
|
Field or Control |
Definition |
|---|---|
| Business Unit |
Select the user's default business unit. Select a business unit that is valid for the pages that the user normally accesses. |
| SetID |
Select the default setID for this user. The setID represents a set of control table information. SetIDs enable business units to share a set of control table information. |
| As of Date |
Select the default date to use as the as of date when running date-driven reports and processes. |
| Localization Country |
Select the country code for the localization country. |
| Requester |
Enter a default requester ID to appear on requisitions that are initiated by this user from the Manage Material component in PeopleSoft Integrated FieldService or the RMA Form (return material authorization form) component in PeopleSoft Support. Important! If you integrate with PeopleSoft Purchasing, the requester ID must be a valid user ID and requisition requester in PeopleSoft Purchasing. |
| Role Type ID |
If a self-service user has multiple roles, select the role type to use as the default when signing in to the self-service site. The only supported role types for self-service users are individual consumer (role type 9) and contact (role type 8). |
| Company Name |
For self-service users who can represent multiple companies, select the company whose data appears when the contact first signs in. |
| Market |
Select the preferred market for the user ID. The preferred market associated with the user ID determines what data and functionality are available to the user. |
| Order Capture Unit |
Select the order capture unit that you want the system to use as a default for the user. This business unit is used by Order Capture, Order Capture Self Service, and product catalog. The system uses this business unit to derive the setID that is used to retrieve product catalogs the selected user can access (including PeopleSoft Order Capture Self Service guest user IDs). If this business unit is not specified, the system looks up the order capture business unit (marked as default business unit) that is defined under |
| PIM Preference ID (personal information manager preference ID) |
Select the preference ID that you want the system to use if the user is a personal information manager. |
| Duplicate Parm Set |
This field is not used now in PeopleSoft CRM. No value is required for this field. |
| Alternate Character Enabled |
Select to activate the fields that support alternate character functionality in application pages that are so enabled. The alternate character fields do not appear on application pages until you select this check box. |
Use the Call Center page (OPR_DEF_TABLE_RC) to define preferences for call center agents and other users of the Case component.
Navigation
Image: Call Center page (1 of 3)
This example illustrates the fields and controls on the Call Center page (1 of 3).
Image: Call Center page (2 of 3)
This example illustrates the fields and controls on the Call Center page (2 of 3).
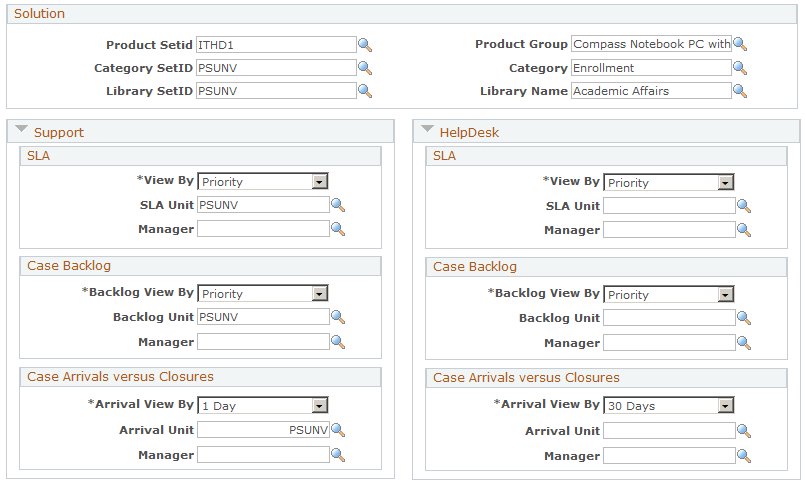
Image: Call Center page (3 of 3)
This example illustrates the fields and controls on the Call Center page (3 of 3).
Default Business Units and Display Template ID
|
Field or Control |
Definition |
|---|---|
| Primary |
Select this check box if you want the system to use the display template, component, market, and business unit as the user's primary default. Selecting a primary business unit provides the system with a default for items that are call-center related. It does not affect functionality that is business-unit driven such as the category/type/detail setup table default or solution searching in self-service. |
| Template Family |
Select the display template family that you want the system to default to for the user. Once an agent opens a case, however, the agent cannot change the display template family. Depending on how you configure your system, an agent can use different display templates to view information for the same case. |
| Component |
Select the component that you want the system to default to for the user. Components can be associated with multiple display templates, each of which provides a different presentation of a page. |
| Business Unit |
Select the business unit that you want the system to default to for the user for the display template, component, and market. |
| Display Template ID |
Select the display template that you want the system to default to for the user. Display templates enable you to control the appearance and behavior of components (pages or sets of pages) for your various business needs. |
Frequently Used Solution
|
Field or Control |
Definition |
|---|---|
| Maximum Solutions to Display |
Enter the maximum number of solutions that are to appear on the Frequently Used Solutions page. |
EBS Security
Enter values in this section of the page if implementing the integration between PeopleSoft CRM HR HelpDesk and Oracle E-Business HCM.
|
Field or Control |
Definition |
|---|---|
| Responsibility Name |
Enter the Responsibility Name to be passed to the Oracle E-Business HCM system as part of the security authorization for this user. |
| Responsibility Application |
Enter the Responsibility Application to be passed to the Oracle E-Business HCM system as part of the security authorization for this user. |
| Security Group Name |
Enter the Security Group Name to be passed to the Oracle E-Business HCM system as part of the security authorization for this user. |
| Organization ID |
Enter the Organization ID to be passed to the Oracle E-Business HCM system as part of the security authorization for this user. |
Solution
Use this section to enter default values to be populated on the solution dashboard pagelets.
At runtime, these values can be modified through the personalization option on the corresponding pagelet. Runtime changes are updated on this page as well.
|
Field or Control |
Definition |
|---|---|
| Product SetID and Product |
Enter the setID and name of the default product to use for populating the Top Solutions by Product pagelet. |
| Category SetID and Category |
Enter the setID and name of the default category to use for populating the Top Solutions by Category pagelet. |
| Library SetID and Library Name |
Enter the setID and name of the default solution library to use for populating the Top Solutions by Library pagelet. |
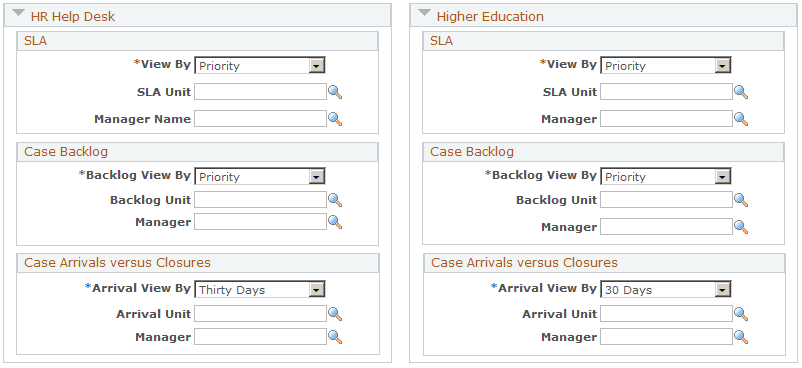
SLA (Service Level Agreement)
Use this section to enter default values to be populated on the case SLA dashboard pagelets for the corresponding vertical families, Support, HelpDesk, HR HelpDesk and Higher Education.
At runtime, these values can be modified through the personalization option on the corresponding pagelet. Runtime changes are updated on this page as well.
|
Field or Control |
Definition |
|---|---|
| View By |
Select the default value to appear on the View By field of the SLA pagelets when they are launched initially. Available values are Priority and Status. |
| SLA Unit |
Select the business unit by which the case information on the SLA pagelets is filtered and displayed. |
| Manager |
Select the manager of the provider groups by which the case information on the pagelet is filtered and displayed. This value is used only for the SLA pagelet that is available in the Manager Dashboard. |
Case Backlog
Use this section to enter default values to be populated on the case backlog dashboard pagelets for the corresponding vertical families, Support, HelpDesk, HR HelpDesk and Higher Education.
At runtime, these values can be modified through the personalization option on the corresponding pagelet. Runtime changes are updated on this page as well.
|
Field or Control |
Definition |
|---|---|
| Backlog View By |
Select the default value to appear on the View By field of the case backlog pagelets when they are launched initially. Available values are Priority and Status. |
| Backlog Unit |
Select the business unit by which the case information on the case backlog pagelets is filtered and displayed. |
| Manager |
Select the manager of the provider groups by which the case information on the pagelet is filtered and displayed. This value is used only for the case backlog pagelet that is available in the Manager Dashboard. |
Case Arrivals versus Closures
Use this section to enter default values to be populated on the case arrivals versus closures dashboard pagelet for the corresponding vertical families, Support, HelpDesk, HR HelpDesk and Higher Education.
At runtime, these values can be modified through the personalization option on the corresponding pagelet. Runtime changes are updated on this page as well.
|
Field or Control |
Definition |
|---|---|
| Arrival View By |
Select the default value to appear on the View By field of the case arrivals versus closures pagelet when it is launched initially. Available values are Day, Week and Month. |
| Arrival Unit |
Select the business unit by which the case information on the case arrivals versus closures pagelet is filtered and displayed. |
| Manager |
Select the manager of the provider groups by which the case information on the pagelet is filtered and displayed. This value is used only for the case arrivals versus closures pagelet, which is only available in the Manager Dashboard. |
Use the Sales page (OPR_DEF_TABLE_RSF) to define preferences for sales representatives.
Navigation
Image: Sales page
This example illustrates the fields and controls on the Sales page.
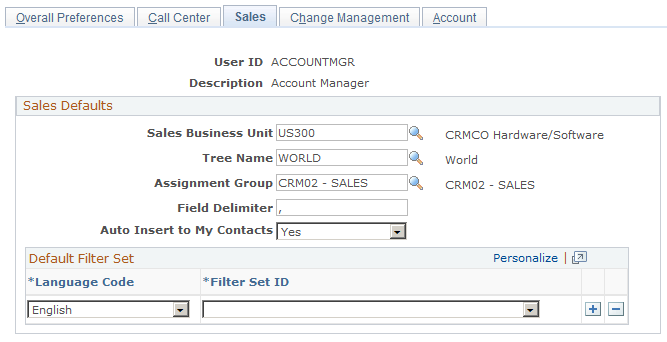
Sales Defaults
|
Field or Control |
Definition |
|---|---|
| Sales Business Unit |
Select the assigned business unit. While looking up Sales Business Units, if you are unable to see them, run the Application Engine by navigating to . After running the Application Engine, restart the Application Server. Now, Sales Business Units will be displayed in the Look Up Sales Business Unit page. |
| Tree Name |
Select the default sales territory tree to which the sales user can be assigned. |
| Assignment Group |
Select in what kind of assignment group that you want this sales user to appear. Note: Assignment group is part of territory assignment criteria. |
| Field Delimiter |
Choose to use delimiters other than the comma, such as the semicolon. This is used for lead import. |
| Auto Insert to My Contacts |
Select to enable the user to automatically insert contacts for a company, person, lead, or opportunity to the user's My Contacts list. The insert is triggered when the user clicks the Add to My Contacts toolbar button and the user is either an account owner or account team member for the company, person, lead, or opportunity. |
Use the Change Management page (OPR_DEF_TABLE_RG) to select user default values that you want the system to display on the Change Request page in PeopleSoft HelpDesk.
Navigation
Image: Change Management page
This example illustrates the fields and controls on the Change Management page.
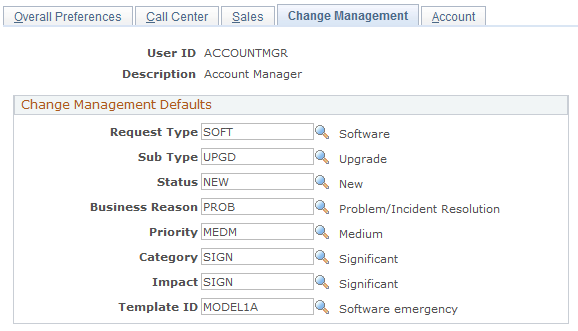
Select the values that you want the system to display by default for the user on to the Change Request page in PeopleSoft HelpDesk.
Use the Account page (OPR_DEF_TABLE_RSP) to select default values that you want the system to use when it does account assignments.
Navigation
Image: Account page
This example illustrates the fields and controls on the Account page.
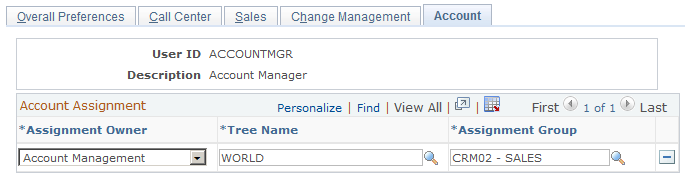
Select the values that you want the system to use when it assigns accounts to the user.
Use the Secure Worker Role page (RB_ROLE_WORKER) to define user roles that can access sensitive and semi-sensitive worker information.
Navigation
Image: Secured Worker Role page
This example illustrates the fields and controls on the Secured Worker Role page.
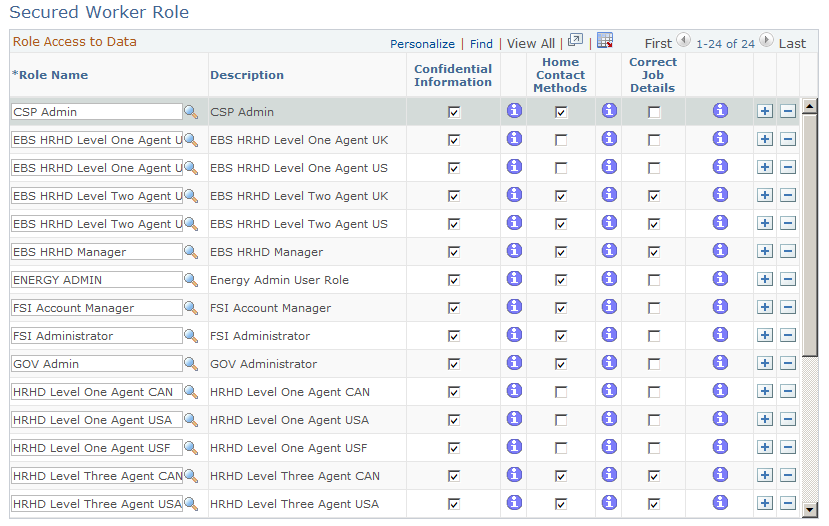
Note: This security applies to the worker component only, not the case. You may use a HelpDesk for Human Resources case template, which displays some of these fields in the Case component, without checking these security options.
Role Access to Data
|
Field or Control |
Definition |
|---|---|
| Role Name |
Select the role that needs access to sensitive and semisensitive data. The roles that are defined in the example are from sample data that PeopleSoft delivers with the application. If you want to create your own roles and use them here, you must first define them in the Roles component. Select |
| Confidential Information |
Select this check box to enable the role to have access to these worker fields: Gender, DOB (date of birth), Age, National ID, and Employee Status. |
| Home Contact Methods |
Select this check box to enable the selected role to have access to these worker fields: Home Address, Home Phone, Home Email, and Home Pager. |
| Correct Job Details |
Select this check box to allow the selected role to view and change all existing rows and to add new rows with no effective date restrictions. Otherwise, the selected role can change only future rows and enter new rows with an effective date greater than the current row. |