Managing Service Orders
This section provides an overview of when service order fields cannot be modified, lists common elements, and discusses how to enter or modify service orders.
|
Page Name |
Definition Name |
Usage |
|---|---|---|
|
RF_SERVICE_ORDER |
Create or review service orders. |
|
|
RF_SO_ACTIVITY |
Enter detailed information about a service order activity. |
|
|
RF_MAT_REQUIRED |
Lists all items and their quantities ordered and received for the service. You can also view item availability and balances. You can't view this page, however, until the service order is saved. |
|
|
RF_SO_SOLN |
Locate information to troubleshoot problems as well as search for and suggest solutions that are associated with the service order. |
|
|
RF_SO_TIME_MAT_EXP |
Record time, material, and expense information for the service order. You cannot log time, material, and expense entries against a service order until the service order has been saved and assigned. |
|
|
RF_SO_NOTE2 |
Add notes and attachments to the service order. |
|
|
RF_SO_BILL_DET |
Record, update, or view a customer's billing information for a service order. When the status of the service order at the header level is set to Closed, the information on this page is display-only. |
|
|
RF_INTERACT_HIST |
View interactions associated with the service order. |
|
|
RF_ASSOCIATION |
Add business object and branch scripts to the service order. |
Your ability to edit fields on the service order header depends on whether the service order has been saved, how you access the Service Order component, and whether the service order is covered by an agreement or warranty. This table lists the conditions that prevent changes to specific fields on the service order:
|
Condition |
Service Order Fields That Cannot be Updated |
|---|---|
|
You save a service order. |
Customer, Service ID, and Case ID. |
|
You select an agreement in a service order. |
Site Name, SIN (site identification number), Product ID, and Serial Number. |
|
You select a warranty in a service order. |
Product ID and Serial Number. |
|
You create a service order from a case. |
Product ID, Site Name, Serial Number, and Case ID. Note: The Product ID and Serial Number fields are not editable if values are passed into them from the case. |
|
Field or Control |
Definition |
|---|---|
| Committed Start Date, Committed Start Time, Committed End Date, and Committed End Time |
Committed dates are generated by entitlements. Committed dates are never available for update. They are read-only. If the automatic service order date and time calculation feature is enabled for the business unit, the committed date and time fields are calculated and populated automatically in the Dates and Times of Service group box on the Service Order page, and the planned dates and times are populated at the activity line level on the Activity page. For service orders that have multiple activity lines, these values stagger at the activity line level based on the estimated duration of the associated service activities. Parallel tasks (activities with the same step number) have identical planned start dates and times; they have different planned end dates and times if their task durations are different. The system uses this date and time information to trigger workflow processes that enable you to monitor and escalate service orders for which work has not begun on time and to manage service orders for which the customer's guaranteed response time has been exceeded. Note: The system initiates workflow processes based on the dates on the service order header (committed and preferred) versus the activity level. Planned start and end dates and times are used to populate the assigned technician's availability calendar. You may assign a technician manually, but the system doesn't write the information to the calendar until a user enters the dates. |
| Customer Preferred Start Date, Customer Preferred Start Time, Customer Preferred End Date, and Customer Preferred End Time |
Enter the dates and times when the work on the service order must begin and finish, based on the customer's request. Customer preferred dates are never automatically populated. They are always entered and are available only for update on the Service Order page, not on the My Service Order page. |
| Planned Start Date, Planned Start Time, Planned End Date, and Planned End Time |
Planned dates and times are populated at the activity line level on the Activity page if the automatic service order date and time calculation feature is enabled for the business unit. |
Use the Service Order - Service Order page (RF_SERVICE_ORDER) to create or review service orders.
Navigation
To add a service order to a PeopleSoft Support case, access the Related Actions page of the PeopleSoft Support Case component. Select an action of Create Service Order, and click the Go button. You may need to select a service and possibly reselect an agreement before clicking Go.
When a service order is related to a PeopleSoft Support case, click the Details link for the service order on the Related Actions page.
From the Customer 360 page, select an action of Add Service Order, and click theGobutton.
Image: Service Order - Service Order page (1 of 2)
This is the first of two examples illustrating the fields and controls on the Service Order - Service Order page.

Image: Service Order - Service Order page (2 of 2)
This is the second of two examples illustrating the fields and controls on the Service Order - Service Order page.
Access the toolbar and view the service order header information at the top of the Service Order page. When you create a service order, all sections on the Service Order page expand.
Customer Information
These fields provide header-level information for the service order. If you create a service order from the PeopleSoft Support Case component, the system automatically populates these fields by using the data that is entered for the case.
|
Field or Control |
Definition |
|---|---|
| Customer and Contact |
Click the Search button to access the Search for Sold To Customer page, where you can search for an existing company or consumer record in the system, or create a company, company with contact, consumer, or consumer with contact by using the Quick Create feature. You can also enter the name of the company or consumer requesting service and then click the Search button. On the search page, you can select both the name of the customer and a contact. Click the Customer link to access the record of the selected company or consumer. |
| Anonymous Caller |
Select to use an anonymous user as the customer for the service order. The system populates the Customer field with the value that the administrator has specified for an anonymous user, and you cannot edit the Customer field until you clear this check box. No change regarding the use of an anonymous user is allowed after the service order is saved. This check box is invisible on the Service Order page if you clear the Allow Anonymous User check box on the service order configuration template that is used by this business unit. |
| First Name and Last Name |
Enter the name of the person who placed the service request. If you enter the name of a contact first and click the Search button, the system automatically populates the customer, site name, and address information. Click the directory Search button to access the Search for Sold To Customers page, where you can search for an existing contact record in the system, or create a company's contact or consumer's contact by using the Quick Create feature. |
| Phone |
Enter the phone number of the contact. |
| Postal |
Enter the postal code of the consumer or customer. |
| Alternate Phone |
Enter an alternate phone number of the consumer or customer. This field is for information only and is saved only with the transaction, not in the customer's record. |
| Site Name |
Enter the site where the requested service will be performed. Multiple sites can be associated with each customer. To add a new site for a customer, click the Transfer to Site button to access the Site component. |
| Address |
If you select a customer that is associated with a primary ship-to address (specified in the Customer record), the system automatically populates this field with that address when you select the customer. Later, if you select a site and this site is also associated with a primary ship-to address (specified in the Site record), the system populates this field with that address and overwrites any current address. If there is no primary ship-to address associated with the customer or site that you select, the system uses the customer address. |
| View Address |
Click this link to access the Address Information page, where you can view the address where the requested service will be performed. |
| SIN (site identification number) |
Enter the site identification number that is associated with the selected site. You assign a SIN to a valid site through the Agreement component. This field is not shown on the Service Order page if you clear the Show SIN check box on the service order configuration template that is used by this business unit. |
Incident Address
Enter information about the location of the incident. The section does not appear if you clear the Allow Incident Address check box on the service order configuration template that is used by this business unit.
|
Field or Control |
Definition |
|---|---|
| Edit Address |
Click the link to access the Incident Address page and specify the location of the incident if it is different from the customer address. You can enter either a street address or the intersection for the incident. Click the Create Using Entered Address button on the Incident Address page to populate the address on the section. |
| Additional Detail |
Enter additional information about the location by using free-form text. |
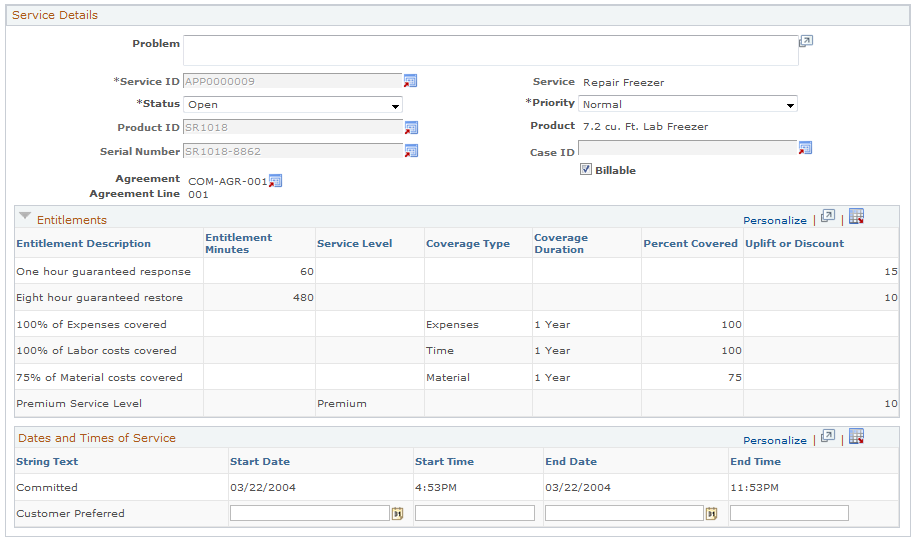
Service Details
|
Field or Control |
Definition |
|---|---|
| Problem |
Use this free-form field to enter any additional information about the service or problem. If the service order is created from a case, the system enters the problem from the case. This field is positioned before the service information because you may need to record additional information before the service can be determined. |
| Service ID |
Select the requested service. Services must first be established in the system by using the Service component. The system automatically creates service order activities that have been defined on the service template. You can modify the service order activities and add additional lines for other service activities. |
| Product ID |
Enter the product ID that requires service. Before you can specify a product ID, the product must be established in the system. If you enter a product ID that is associated with more than one installed product, the system displays the Installed Product List page, where you can select the applicable installed product. The Product ID field and its associated prompt and transfer buttons are invisible on the Service Order page if the Hide All Product Information product display option is selected on the service order configuration template that is used by this business unit. |
| Serial Number |
Enter the serial number of the product that requires service. If you enter a serial number of an installed product that does not have a status of Uninstalled, the system automatically populates the service order with the information from that installed product, including the customer, product ID, and site name–if they do not already exist in the service order. To add a new installed product, click the Transfer to Installed Product button to access the Installed Product and Service page. The Serial Number field and its associated prompt and transfer buttons are invisible on the Service Order page if either the Hide All Product Information or the Prompt for Product Master, Hide Install Product Information product display option is selected on the service order configuration template that is used by this business unit. |
| Priority |
Select the current priority that is associated with the service order: Low, Normal, High, or Urgent. You can also design notification processes based on these priorities by using the workflow features in PeopleTools. By default, new service orders have a normal priority, and new service order activities reflect the priority of the service order header. Note: You can configure the dispatch board to display service orders or use AAF to initiate workflow processes by adding your own terms and policies that trigger actions based on service order priority. |
| Installed |
Indicates that the selected product is also an installed product. This check box is visible on the Service Order page only if you select the Prompt for Product Master, Show Installed Product Information product display option on the service order configuration template that is used by this business unit. |
| Case ID |
Enter the ID of a support case that you want to associate with the service order. When you create a service order and associate it with a case, the PeopleSoft CRM system records the service order creation on the Related Actions page of that case. If you create a service order from the Related Actions page of the case, this field is automatically populated with the associated case number. Note: If you select a case ID in the service order in which a customer is not yet selected, the lookup prompt displays all cases where the call center business unit is identical to the service order's business unit. If a customer is selected in the service order, the case lookup prompt displays all cases (for that customer) where the Customers record group of their call center business unit is associated with the same setID as the Customers record group of the field service business unit. For example, business units US200 and US300 use the same set of customers that are defined for the CRM01 setID. If you create a service order under US200 and select ABC Inc as the customer, clicking the case lookup displays all cases under US200 and US300 that are opened for ABC Inc. Access the Record Group page to view the tableset control settings of business units. |
| Billable |
The system automatically selects this check. You can clear it, however, if you don't do billing. This check box controls the pricing of the service fee. Neither the Billable check box nor the Billing tab appear on the Service Order page if you clear the Show Billing Information check box on the service order configuration template that is used by the business unit. |
| Select Agreement or Warranty |
Click to perform an entitlement search for the new service order. The system uses the information in the Customer Information group box to perform the search. If there is only one agreement or warranty found on the search, it's automatically populates the Entitlements section on the page. If more than one agreement line or warranty matches the search criteria, the Entitlement Match page appears, enabling you to select the applicable agreement line or warranty. When you click OK on the Entitlement Match page, the system populates the name of the selected agreement or warranty and its entitlement items in the Entitlements group box. In addition, the system populates the service order with the service from the agreement line. It also populates the committed start and end dates and times when the automatic service order date and time calculation feature is enabled at the business unit level and the entitlements that are needed for the calculation are available. The system also populates the planned dates and times of the activities if autocalculation is turned on. Once you save the service order, you cannot select another set of entitlements for the service order. You can, however, navigate to the actual agreement or warranty or view the entitlements right from the Service Order page. For entitlement searches that are performed from the service order, the system considers only agreements with a scope of site. Note: When creating a service order from a case, the agreement or warranty on the case is also the agreement or warranty specified on the newly created service order. The agreement from the case may, however, not be applicable to the service being performed. From the Related Actions drop-down list box on the Case page, select Service Order to access the Create Service Order page, and then select the appropriate agreement or warranty. |
Entitlements
This section lists entitlements that are associated with the selected agreement, warranty, or service and their details as defined on the Entitlements page.
This information does not appear if you clear the Show Agreement Information check box on the service order configuration template that is used by this business unit.
Note: If entitlements are tied to the service, they still appear regardless of the configuration template.
Dates and Times of Service
There are two sets of dates and times that apply to the entire service order.
They are the committed dates and times and the customer-preferred dates and times. The committed times are based on the service level for the entitlements that are defined for the agreement or warranty or service.
The customer-preferred dates and times are not required and are not automatically populated. You may change these values if the customer wants to specify a date and a time that are different from the committed date and time.
Note: The only entitlement defined at the business unit level is service level, which doesn't generate the committed dates and times. These values are display-only.
|
Field or Control |
Definition |
|---|---|
| Start Date, Start Time, End Date, and End Time |
If the customer prefers dates and times for the service that are different from the committed dates and times, enter them in these fields. The committed dates appear only and are based on the contractual agreement that you have with the customer. Note: The system uses the committed dates and times to calculate a set of planned dates and times for the activities that are related to the service. The system automatically calculates dates and times for activities from the committed dates and times, not the customer preferred dates. You can change the planned dates on the Activities page using the date and time fields within the Activities Actions group box on the Activities page. If customer-preferred dates and times exist, the system does not send workflow if the committed dates and times are not met. |
Approval Information
The system displays this information conditionally based on the service order configuration.
|
Field or Control |
Definition |
|---|---|
| Approval Required |
Select to indicate that a service order must be manually approved before any of the service order activities can be approved. The default value for this setting is specified when the service is defined in the Service component. If the definition requires approval, approval status must be manually set to Approved on the service order. |
| Approval Status |
Select the current approval status of the service order. If the Approval Required check box is selected, you must manually change the value from Pending to Approved. When the approval status is changed to Approved, you cannot modify the field. Note: If the service order requires approval, the status of the service order header cannot be changed to Completed or Closed until the approval status is set to Approved. |
| Approved By and Approval Date |
These fields are automatically populated based on who is logged in. They are display-only fields. |
Use the Service Order - Activities page (RF_SO_ACTIVITY) to enter detailed information about a service order activity.
Navigation
Image: Service Order - Activities page (1 of 3)
This is the first of three examples illustrating the fields and controls on the Service Order - Activities page.
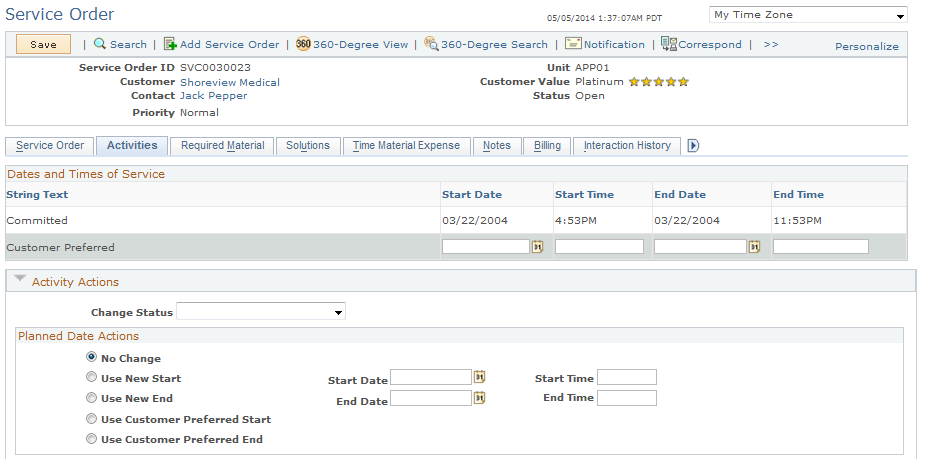
Image: Service Order - Activities page (2 of 3)
This is the second of three examples illustrating the fields and controls on the Service Order - Activities page.
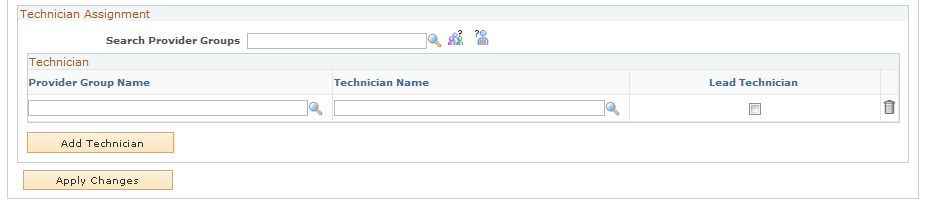
Image: Service Order - Activities page (3 of 3)
This is the third of three examples illustrating the fields and controls on the Service Order - Activities page.
Dates and Times of Service
For reference purposes, the system displays the dates and times of service from the Service Order page. You can, however, enter new dates and times in the customer-preferred fields to update the dates and times on the service order.
Activity Actions
This section is collapsed upon entry to the page. It is used to apply changes to all activities at once. If there is only one activity on the service order, then this section does not appear.
|
Field or Control |
Definition |
|---|---|
| Change Status |
Select a value and then click the Apply Changes button to change the status for all activities. |
| Planned Date Actions |
Use this section to update the dates and times on all activities. You may select only one of the five listed options. To specify a new planned start or end date and time, select either the Use New Start or Use New End option, enter the date and time, and then click the Apply Changes button. The automatic calculation functionality resets the planned dates and times for the activity appropriately. If no service level can be determined for this service order, then the automatic calculation uses the default service level for the business unit to reset the planned dates and times. The same is true for the Use New End Date option, except that the automatic calculation schedules the activities backwards based on this end date and time. If you entered a customer-preferred date and time, you may update the planned dates and times by selecting either the Use Customer Preferred Start Date option or the Use Customer Preferred End Date option and clicking the Apply Changes button. The planned dates and times are calculated as described previously, except that the customer-preferred start or end values are used instead of the new planned values. |
| Technician Assignment |
Use this section to change the assignment on all activities. By first selecting a provider group, you can use the assignment engine to choose multiple technicians or a provider group. You can also click the Add Technician button to manually add a new technician. If you run the assignment engine after specifying technicians, the new technicians are appended to the list of previously specified technicians. Click the Apply Changes button to add the technician to all activities. If there are no provider groups or technicians listed in the grid, then no changes are made to the activity assignments. Important! Note that when you reassign service orders, the system does not reassign any service order lines that have time, material or expense associated with those lines. |
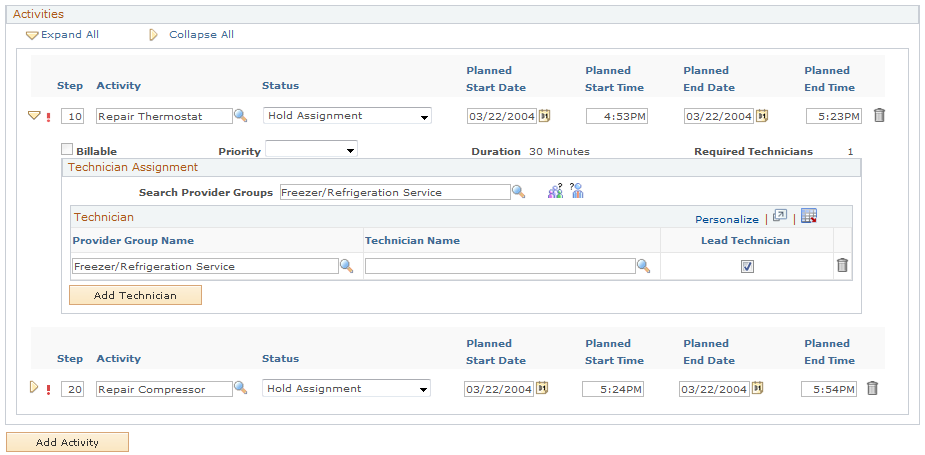
Activities
This group box lists the step numbers, planned start dates and times, planned end dates and times, and statuses for each activity that is part of the service. You can also use this section to add assignments and reassign technicians.
The fields in this group box list the group members (and their corresponding provider group) that have been assigned to perform the work on the service order activity. You can assign multiple technicians to perform the work from the same or from different provider groups.
|
Field or Control |
Definition |
|---|---|
 |
Click the Expanded button to view additional information for the individual activity. |
| Approval Information |
If you are using approvals, the technician assigned to the line must be able to see if the activity has been approved before starting the activity. Therefore, if the activity has not been approved, the activity line has a status of Pending Approval, and the only fields that the technician can change are the planned start dates and times, end dates and times, and priority. This is true, however, for the My Service Orders page only. |
| Search Provider Group |
Click the Search Provider Group button to locate a provider group for the activity. This field is used when clicking the suggest group member button. |
 |
Click the Suggest a Provider Group button to select from a subset of provider groups on the Provider Group Summary page that is derived from information on the service order. |
 |
Click the Suggest Group Member button to select from a ranked listing of qualified, available technicians on the Candidate Summary page. You must select a provider group before you can generate a candidate list. |
| Provider Group Name |
Enter the name of the provider group that will perform the requested service work. This field is initially populated with the default provider group that is defined in the selected agreement line (if available) or in the specified service. Provider groups must first be established on the Provider Groups page. Click the Lookup button to access the Provider Groups component. |
| Technician Name |
Enter the name of the provider group member (technician) who will perform the requested service work. This field is initially populated with the default group member that is defined in the selected agreement line (if available) or in the specified service. Group members must first be defined on the Provider Groups or Provider Group Members page. Click the Lookup button to access the Provider Group Members component. |
| Lead Technician |
Select to indicate that the group member in the Technician Name field of the row is the technician who is responsible for the service order activity. By default, the first technician associated with the line is the lead technician. Note: The system requires that you to have one lead technician. You cannot have more than one lead technician for an individual activity. |
| Add Technician |
Click to add a new technician to the activity. |
Use the Service Order - Required Material page (RF_MAT_REQUIRED) to lists all items and their quantities ordered and received for the service.
You can also view item availability and balances. You can't view this page, however, until the service order is saved.
Navigation
Image: Service Order - Required Material page
This example illustrates the fields and controls on the Service Order - Required Material page.
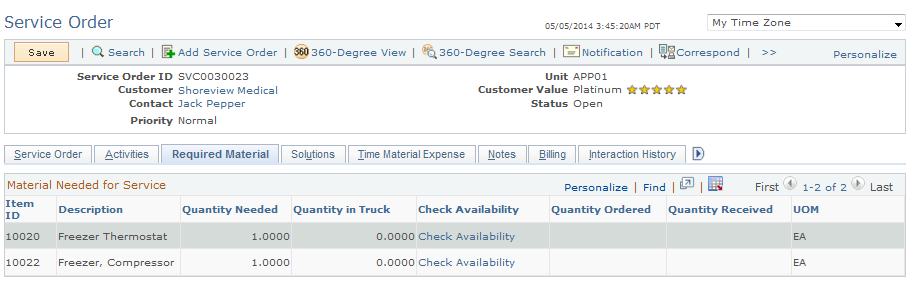
Based on the service definition for the service order, this page automatically populates all the items and their quantities ordered and received for the service. The quantity needed comes from the service order. However, the quantities ordered and received come from data entered in the Order Materials component or from the service order material usage for auto-receiving.
|
Field or Control |
Definition |
|---|---|
| Item ID |
Displays the item that is required to perform the service activity. The system displays the description of the selected item next to this field. Items are established in the system tables by using the Item Definition page or the Item Master EIP. |
| Quantity Needed |
Displays the quantity from the service definition. If no activities are defined for the service, then the item information comes from the Service Details component. If activities are defined for the service, then the item information comes from the service activity. If one item is needed for more than one activity, then the total quantity for all the activities appears. |
| Quantity in Truck |
Displays the quantity in the technician's good storage location. The quantity is from the good location of the lead technician on the service order. This information is stored in PeopleSoft Inventory. Therefore, if the integration to Inventory is disabled, then the information in this column does not appear. If the integration is enabled, the system populates the quantity in this column through an EIP with Inventory. |
| Check Availability |
Click this link to access the Service Order - Item Information page and navigate to the item. From this page, you can transfer to the Item Definition or Item Substitutes page. Or, you can view item availability and balances. Item availability and balances information comes from PeopleSoft Inventory. Item definition and substitutes information is contained within the PeopleSoft CRM database. The system does not need to get information from PeopleSoft Supply Chain Management. |
| Quantity Ordered |
Displays any previously ordered quantity for the item on this service order. If the item is on more than one activity, the system displays the sum of all the ordered quantities for the item. |
| Quantity Received |
Displays any previously received quantity for the item on this service order. If the item is on more than one activity, then it is the sum of all the received quantities for the item. |
| UOM (unit of measure) |
Displays the standard unit of measure for the item quantity. |
Use the Service Order - Solutions page (RF_SO_SOLN) to locate information to troubleshoot problems as well as search for and suggest solutions that are associated with the service order.
Navigation
Image: Service Order - Solutions page
This example illustrates the fields and controls on the Service Order - Solutions page.
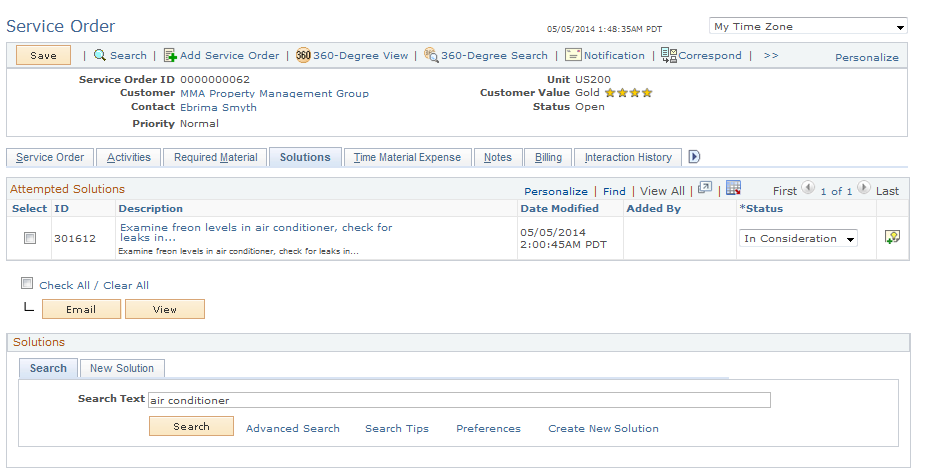
Use the Solutions page to search for and suggest solutions that are associated with the service order.
Use the Service Order - Time Material Expense page (RF_SO_TIME_MAT_EXP) to record time, material, and expense information for the service order.
Navigation
Image: Service Order - Time Material Expense page (1 of 2)
This is the first of two examples illustrating the fields and controls on the Service Order - Time Material Expense page.

Image: Service Order - Time Material Expense page (2 of 2)
This is the second of two examples illustrating the fields and controls on the Service Order - Time Material Expense page.

Note: You cannot log time, material, and expense entries against a service order until you save the service order and it has been assigned.
|
Field or Control |
Definition |
|---|---|
| Technician |
The system displays this field if more than one technician is assigned to the service order. The field contains all the names of the technicians who are assigned to this service order. If you select a technician, the system displays only the time entries for the activities that are assigned to that technician. To view everything, choose All Technicians. |
Time
Enter date and time details for activities that were performed to fulfill the requirements of the service order.
|
Field or Control |
Definition |
|---|---|
| Type |
Use this field to categorizes the time that you are entering. Values may include: Activity: Select to enter time that is spent on any one of the activities or on the entire service order. Break: Select to enter the time that the technician spent on break. Travel: Select to enter the time that it took the technician to travel to and from the site. Wait: Select to enter the time spent waiting for the customer or other technicians (when no work was being performed). Note: Time types are customer definable. The field values shown are examples. To define your own time types, select You can then override the billable flag at the business unit level. There is a billable setting for each of these time types on the FieldService Definition - Billing Options page. If the time type billable flag is not selected, then the prepaid quantity on the agreement is not decremented. |
| Activity |
Select the activity for which you want to record time. This field should contain all the activity names on this service order. If you are recording time for the entire service order, select All Activities. If there is only one activity and the activity name is blank, the system displays the name of the service. If you add a new activity to the service order, the system displays the new activity as well. |
| Technician |
Select the name of the technician for whom you are entering time. |
| Billable |
Select this check box if the time is billable to the customer. Note: The system may automatically select this check box if the Billable check box is selected for the time type at the business unit level. |
| Duration |
Displays the difference between the start and end of the time entry. The system displays a grand total at the bottom of the page. |
| Time Entry Tab |
Select this tab to enter the start date and time and the end date and time for the activity. |
| Comments |
Enter any comments about the time that you are entering. |
| Copy Planned Times |
Click to copy the existing activities and their planned times into the time log. Use this feature to reduce data entry if the actual time is the same as the planned time. If there are any variations in the planned and actual times, you can update or delete the entries and add new entries. |
Material
Record any material that is used or removed for the service order. If you selected auto-receiving during installation, the system records materials that are not used, so that the entire receipt quantity can be recorded.
|
Field or Control |
Definition |
|---|---|
| Usage Details |
Use the fields on this tab to record information about the materials that were used for the activities on the service order. After you select the activity and item, use the Action field to indicate if the item was removed, used, or not used. You can also record quantity, the item's serial ID, lot ID, and if the material usage is billable. |
| Receipt Details Tab |
Select this tab to view or enter the purchase order number, line number, interunit order ID, and interunit order line information for the item. |
| Failure Code Tab |
Select this tab to choose a failure code for any part or item that is not operational. Note: Failure codes are not valid if you select Used as the action when you are recording material usage. |
| Item Type Tab |
Select this tab to view whether the item is serviceable, returnable, or consumable. |
| Technician Tab |
Select the name of the technician who performed the action. You can select any technician that is assigned to the service order. |
Expense
Use the Expense group box to record expense information that is associated with performing the work for the service order.
|
Field or Control |
Definition |
|---|---|
| Summary |
Use this tab to enter expense information that was incurred by the technician, including the expense type, amount, and currency. Note: Enter the total amount for mileage, not the amount per mile. Also, you must record expense information for the entire service order. You cannot record expense information for an individual activity. |
| Description |
Select this tab to enter a description and a comment for each expense item. |
Use the Service Order - Notes page (RF_SO_NOTE2) to add notes and attachments to the service order.
Navigation
To enter a note that is specific to a service order activity, select the corresponding activity from the Associated Activity drop-down list box.
Use the Service Order - Billing page (RF_SO_BILL_DET) to record, update, or view a customer's billing information for a service order.
When the status of the service order at the header level is set to Closed, the information on this page is display-only.
Navigation
Image: Service Order - Billing page (1 of 2)
This is the first of two examples illustrating the fields and controls on the Service Order - Billing page.
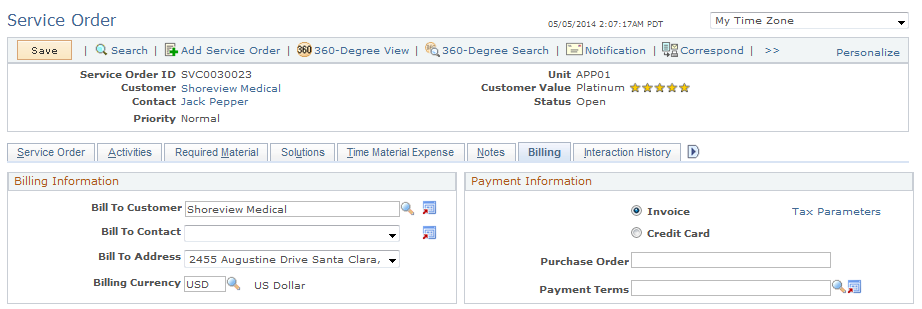
Image: Service Order - Billing page (2 of 2)
This is the second of two examples illustrating the fields and controls on the Service Order - Billing page.

This page serves multiple purposes. It enables a user with a manager role to view billing information, purchase order numbers, and credit card authorization information for the service that is performed at the customer site. It also enables users to view subtotals for all fees, apply adjustments, recalculate totals, and view the billable amount in the customer or field service business unit currency.
Billing Information
If you selected an agreement for the service order, the system populates this group box with information from the bill to customer on the associated agreement.
|
Field or Control |
Definition |
|---|---|
| Bill to Customer |
Select the customer that should be billed for the service. |
| Bill To Contact |
Select the contact that should be billed for the service. |
| Bill To Address |
Select the customer address to which the bill should be sent. |
| Bill Currency |
Select the currency that the customer is using for the transaction. The currency name appears to the right of the field. When the information is sent to PeopleSoft Contracts, the system prints the name of the currency on the invoice. |
Payment Information
|
Field or Control |
Definition |
|---|---|
| Purchase Order |
Enter the customer-provided purchase order number. Note: This field does not have any integration to PeopleSoft Supply Chain Management (PeopleSoft SCM) and is not required. If you enter a purchase order number in this field, the system posts it to PeopleSoft Contracts. When PeopleSoft Contracts sends the information to PeopleSoft Billing for invoice generation, the system prints the purchase order number on the invoice. |
| Invoice |
Select if the customer intends to pay for the service by invoice. |
| Payment Terms |
If you selected the Invoice option, use this field to select the billing cycle for the invoice (for example, NET30 - Due in 30 days). The payment terms appear on the invoice that is sent to the customer. |
| Credit Card |
Select if the customer intends to pay for the service by credit card. The system displays the Credit Card Information link after you select this option. |
| Credit Card Information |
Click to access the Credit Card Details page, where you enter credit card authorization information, such as the card type, card number, expiration month, expiration year, and verification number. The system displays the authorization status, date, and code on the Transactions Results page after you click the Submit Transaction button on the Credit Card Details page. Note: You can integrate credit card information with Cybersource, a third-party card vendor. The Credit Card Details page is also used in the Case component to submit customers' credit card information for authorization purposes. See Credit Card Information Page. See Setting up Credit Card Integration for Integration Broker in: Integration for Integration Broker |
| Tax Parameters |
Click this link to access the Tax Parameters page, where you indicate whether the customer is exempt from taxes. If the customer is tax-exempt, enter the exemption certificate number and tax code that the customer supplies to you. The system uses a default tax code based on the customer's address, but you can override it by choosing another value. |
Billing Details
The system uses all billable fees for time, materials, and expenses that were entered on the Time Material Expense page. Managers can use this section to adjust the fees by increasing or decreasing a fee by a percent or by an amount.
The system does not calculate the new total price using with the adjustments until a user clicks the Recalculate Totals button. The system then calculates the sum of all lines, including those that have changed, and provides the recalculated amount in the Total Amount field.
|
Field or Control |
Definition |
|---|---|
 |
Click the Expanded button to the left of the Fee column to view all billable amounts that were included in the price for a given fee. |
| +/- |
Select the plus sign (+) to indicate a positive adjustment to the price or the minus sign (-) to indicate a negative adjustment to the price. |
| Adjustment |
Enter either a dollar amount or a percentage value. |
| Type |
Select Percent or Amount. |
| Reason |
Select the reason for the adjustment. These values are user-definable. The PeopleSoft system delivers this feature without any values. |
| Other |
If the predefined values for the Reason field do not describe the reason for the adjustment, click this link to access the Other Reason page, where you can enter a unique description of the reason. |
| Extended Price |
This value is calculated when you click the Recalculate Totals button. The system sums the total of the price, plus or minus any adjustments. |
| Recalculate Totals |
Click this button any time there is a change to the Billing Details grid that impacts the price or the currency code. The system recalculates the total cost of the fees. |
| Clear Adjustments |
Click this button to clear all adjustments that were made and return to the original total amounts. |
Use the Service Order - Interaction History page (RF_INTERACT_HIST) to view interactions associated with the service order.
Navigation
Image: Service Order - Interaction History page
This example illustrates the fields and controls on the Service Order - Interaction History page.
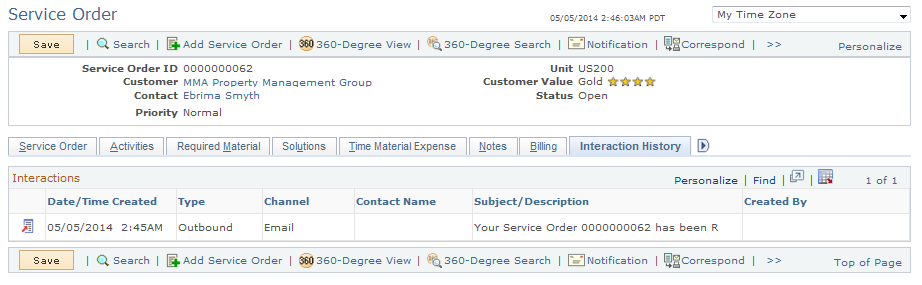
This page displays the summary information of all interactions that have been created for the service order.
PeopleSoft Integrated FieldService supports ERMS (Email Response Management System), the framework that is used in PeopleSoft CRM to receive, classify, route, answer, and respond to a customer's emails in a timely and professional manner.
PeopleSoft Integrated FieldService customers can send service order status inquiries in the form of structured (web form) and unstructured (free-form) emails. Regardless of how these requests are answered, either through auto-response by the system for structured emails or manual response by customer service representatives for unstructured emails, the system creates interactions for inbound and outbound email messages that are received and delivered during the process on the 360-Degree View. These interactions are also listed on the Interaction History page.
|
Field or Control |
Definition |
|---|---|
 |
Click the Go To Interaction Detail button to access the corresponding interaction, a correspondence (View Correspondence page), an outbound email (Notification page), or an interaction (Interaction page). |
Use the Service Order - Related Objects page (RF_ASSOCIATION) to add business object and branch scripts to the service order.
Navigation
Image: Service Order - Related Objects page
This example illustrates the fields and controls on the Service Order - Related Objects page.
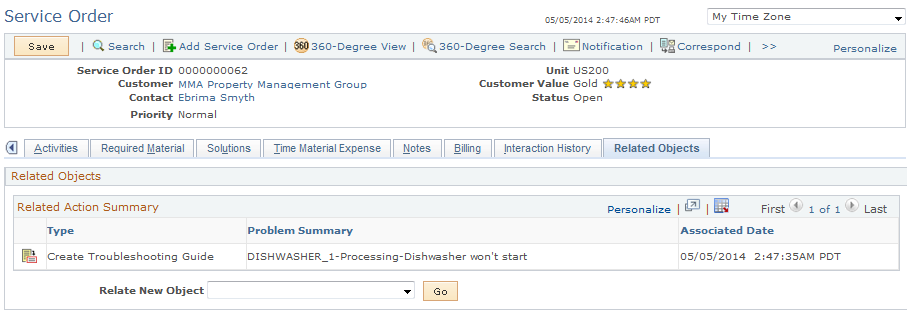
You can add multiple branch scripts, but only one business project, to a service order.
Related Action Summary
The system displays all objects that are associated with the service order in this grid.
|
Field or Control |
Definition |
|---|---|
 |
Click the Details button to open the corresponding object. |
| Relate New Object |
Select an object, Business Project or Troubleshooting Guide Script, to associate with the service order. If you added a branch script to a service, the system automatically populates the script for service orders that are created for that service. Note: You can enter one business project per service order. |
| Go |
Click to access the Use Troubleshooting Guide or Use Business Project page, where you select the business project or troubleshooting guide that you want to associate with the service order. |