8 Maintaining and Upgrading a Grid
This chapter discusses how to maintain and modify a grid in TimesTen Scaleout.
Note:
-
The following sections consider the grid and database generated by the examples found in "Configure your grid" and "Creating a database" as the grid and database configuration on which the commands are run.
-
All the tasks described in the next sections require that you run the
ttGridAdminutility from the active management instance as the instance administrator, unless stated otherwise.
Maintaining the model of a grid
The model is a comprehensive list of the objects that give shape to a grid. Depending of the version of the model, the model may either describe a previous, present, or desired structure of a grid.
The ttGridAdmin utility has several commands that enable you to review any stored version of the model:
-
Compare different versions of the model
-
Export a version of the model
-
Import a model as the latest version of the model
-
List the available versions of the model
For more information on the different versions of the model or model operations, see "Model versioning" in this document or "Model operations" in the Oracle TimesTen In-Memory Database Reference, respectively.
Modifying a grid
TimesTen Scaleout defines several different types of objects in the model to give shape to a grid:
-
Data space groups
-
Hosts
-
Installations
-
Instances
-
Physical groups
Additionally, there are two types of model objects that describe the databases that the grid manages and that, in conjunction, define the names by which you connect to these databases. These types of objects are:
-
Database definitions
-
Connectables
Note:
See "Central configuration of the grid" for a complete list of the types of model objects and their descriptions.You can create, modify, or delete objects in the model. Consider that changes you make to the model only take effect after you apply them to the current version of the model.
Note:
-
See "Configure your grid" for details on how to create the objects that give shape to a grid.
-
See "Creating a database", "Modifying the connection attributes of a database", or "Destroying a database" for details on how to create, modify, or delete the objects that define a database, respectively.
-
See "Applying the changes made to the model" for details on the versions of the model and applying changes to the current version of the model.
The following sections describe how to modify or delete the objects that give shape to a grid:
Modifying objects in a grid
Of the objects in the model that give shape to a grid, only hosts and instances can be modified. Physical groups or installations can only be deleted. These sections describe how to modify the attributes of the hosts and instances in a grid:
Modify a host
You can modify certain attributes of a host with ttGridAdmin hostModify command. The name and communication parameters (internal or external DNS names or IP addresses) of a host cannot be modified. Once you assign a host to a data space group and apply that assignment to the current version of the model, you cannot change it. You can modify the assignments to physical groups at any time. However, once a host is assigned to a data space group, its physical group assignments are no longer relevant.
See "Assigning hosts to physical groups" for an example where several hosts are modified.
For more information on the ttGridAdmin hostModify command, see "Modify a host (hostModify)" in the Oracle TimesTen In-Memory Database Reference.
Modify an instance
You can modify the installation associated with an instance with ttGridAdmin instanceModify command. Also, this command enables you to modify the TCP/IP port number of the replication agent of a management instance, but only if there is not a second management instance available. In other words, you can only modify the TCP/IP port number of the replication agent of a management instance if the port is not in use. See "Upgrade a grid to a patch-compatible release" for an example where several instances are modified.
For more information on the ttGridAdmin instanceModify command, see "Modify an instance (instanceModify)" in the Oracle TimesTen In-Memory Database Reference.
Deleting objects from a grid
This section describes how to delete objects from a grid:
Delete an instance
Depending on the type of instance you want to delete, follow either of the next procedures:
Delete a data instance
Before you can delete a data instance from a grid, you need to remove the element of the data instance from the distribution map of every database, as shown next:
-
Remove the element of the data instance from the distribution map of every database as shown in "Removing elements from the distribution map".
-
Delete the data instance from the latest version of the model.
% ttGridAdmin instanceDelete host7.instance1
Instance instance1 on Host host7 deleted from Model
-
Apply the changes made to the latest version of the model.
% ttGridAdmin modelApply
...
Identifying any deleted objects.......................................OK
Stopping deleted instances............................................OK
Deleting instances....................................................OK
...
ttGridAdmin modelApply complete
For more information on the ttGridAdmin instanceDelete command, see "Delete an instance (instanceDelete)" in the Oracle TimesTen In-Memory Database Reference.
For more information on the ttGridAdmin modelApply command, see "Applying the changes made to the model" in this document and "Model operations" in the Oracle TimesTen In-Memory Database Reference.
Delete a management instance
Only the standby management instance can be deleted from a grid. If you intend to delete the active management instance in a grid with two management instances, first switch the standby management instance to active with the ttGridAdmin mgmtActiveSwitch command, then proceed.
Important:
For availability, we highly recommend that you always have an active and a standby management instance in your grid. Only delete the standby management instance if you intend to replace it with another one as soon as possible.If you intend to delete the active management instance in a grid with only one management instance, consider destroying the grid in a graceful manner. See "Destroying a grid" for details on how to gracefully destroy a grid.
To delete the standby management instance from a grid, perform these tasks:
-
Confirm that the instance you want to delete is the standby management instance.
% ttGridAdmin mgmtStatus
Host  Instance  Reachable RepRole(Self) Role(Active) Role(Self) Seq RepAgent RepActive Message
----- --------- --------- ------------- ------------ ---------- --- -------- --------- -------
host1 instance1 Yes       Active        Unknown      Active     338 Up       Yes
host2 instance1 Yes       Standby       Unknown      Standby    338 Up       No
-
Delete the standby management instance from the latest version of the model.
% ttGridAdmin instanceDelete host2.instance1
Instance instance1 on Host host2 deleted from Model
-
Apply the changes made to the latest version of the model.
% ttGridAdmin modelApply
...
Unconfiguring standby management instance.............................OK
Identifying any deleted objects.......................................OK
Stopping deleted instances............................................OK
Deleting instances....................................................OK
...
ttGridAdmin modelApply complete
For more information on the ttGridAdmin mgmtActiveSwitch command, see "Starting, stopping and switching management instances" in this document and "Switch the active management instance (mgmtActiveSwitch)" in the Oracle TimesTen In-Memory Database Reference.
For more information on the ttGridAdmin instanceDelete command, see "Delete an instance (instanceDelete)" in the Oracle TimesTen In-Memory Database Reference.
For more information on the ttGridAdmin modelApply command, see "Applying the changes made to the model" in this document and "Model operations" in the Oracle TimesTen In-Memory Database Reference.
Delete an installation
You may want to delete an installation if you just performed an upgrade operation to a new release of TimesTen Scaleout. Deleting an installation does not remove the installation files, since the files may be still in use if the location of the files is shared by other installations in this or any other grid. See "Upgrade a grid to a patch-compatible release" for more information on upgrade and cleanup operations, which includes deleting the previous release installation model object and files.
However, if you are deleting an installation because you are removing its associated host from the topology of the grid, see "Delete a host" for details on how to delete a host and its associated objects, which includes the installation model object and files.
Delete a host
Before you can delete a host from a grid, you must ensure that other model objects associated with the host are not in use, as shown next:
-
Remove the element of every data instance associated with the host from the distribution map of every database, as shown in "Removing elements from the distribution map".
-
Delete every instance and installation associated with the host, and then, delete the host from the latest version of the model. You can either delete each object separately, as shown in Example 8-1, or use the
-cascadeof option of thettGridAdmin hostDeletecommand to delete the host and every instance and installation associated with it, as shown in Example 8-2.Example 8-1 Delete a host and all its associated objects separately.
% ttGridAdmin instanceDelete host7.instance1
Instance instance1 on Host host7 deleted from Model

% ttGridAdmin installationDelete host7.installation1
Installation installation1 on Host host7 deleted from Model

% ttGridAdmin hostDelete host7
Host host7 deleted from Model
-
Apply the changes made to the latest version of the model.
% ttGridAdmin modelApply
...
Identifying any deleted objects.......................................OK
Stopping deleted instances............................................OK
Deleting instances....................................................OK
Deleting installations from model.....................................OK
Deleting any hosts that are no longer in use..........................OK
...
ttGridAdmin modelApply complete
-
If the installation files associated with the installation model objects you just deleted are not in use by any other installation object in this or any other grid, then delete the files. Ensure that you change the permissions of the directory so that you can delete all files.
% cd /grid
% chmod -R 750 tt18.1.4.1.0/
% rm -rf tt18.1.4.1.0/
For more information on the ttGridAdmin instanceDelete, ttGridAdmin installationDelete, or ttGridAdmin hostDelete command, see "Delete an instance (instanceDelete)", "Delete an installation (installationDelete)", or "Delete a host (hostDelete)", respectively, in the Oracle TimesTen In-Memory Database Reference.
For more information on the ttGridAdmin modelApply command, see "Applying the changes made to the model" in this document and "Model operations" in the Oracle TimesTen In-Memory Database Reference.
Delete a physical group
Before you can delete a physical group from a grid, you must ensure that it is not in use, as shown next:
-
Remove the physical group from every host associated with it.
% ttGridAdmin hostModify host3 -removePhysicalGroup rack1
Host host3 modified in Model
-
Delete the physical group form the latest version of the model.
% ttGridAdmin physicalDelete rack1
PhyscialGroup RACK1 deleted.
-
Apply the changes made to latest version of the model.
% ttGridAdmin modelApply
For more information on the ttGridAdmin hostModify or ttGridAdmin physicalDelete command, see "Modify a host (hostModify)" or "Delete a physical group (physicalDelete)", respectively, in the Oracle TimesTen In-Memory Database Reference.
For more information on the ttGridAdmin modelApply command, see "Applying the changes made to the model" in this document and "Model operations" in the Oracle TimesTen In-Memory Database Reference.
Reconfiguring membership servers
These sections describe how to view and modify your current membership configuration:
For more information on membership servers, see the Apache ZooKeeper documentation at http://zookeeper.apache.org.
View the current membership configuration
To view your current membership configuration, run the ttGridAdmin membershipConfigExport command. This lists the membership servers and the ports used.
% ttGridAdmin membershipConfigExport
Servers ms_host1!2181,ms_host2!2181,ms_host3!2181
For more information on the ttGridAdmin membershipConfigExport command, see "Export the membership configuration file (membershipConfigExport)" in the Oracle TimesTen In-Memory Database Reference.
Add membership servers
You can add a new server to the list of membership servers to reflect your desired membership configuration. To add the ms_host4 server and its client port 2181:
-
Create a new server configuration file, for example,
membership2.conf. For more information on the ZooKeeper client configuration file, see "Configuring Apache ZooKeeper as the membership service". -
Append the new membership server and port to the current list of membership servers.
Servers ms_host1!2181,ms_host2!2181,ms_host3!2181,ms_host4!2181
Enable the new membership configuration
To enable your new membership configuration, perform these tasks:
-
Replace the ZooKeeper client configuration file in the latest version of the model with the newly created file.
% ttGridAdmin membershipConfigImport membership2.conf
Membership configuration file membership2.conf imported
-
Run the
ttGridAdmin modelApplycommand to apply the changes to the latest version of the model.% ttGridAdmin modelApply Creating new model version............................................OK Exporting current model (version 3)...................................OK Identifying any changed management instances..........................OK Identifying any deleted objects.......................................OK Verifying installations...............................................OK Verifying instances...................................................OK Updating grid state...................................................OK Pushing new configuration files to each instance......................OK Making model version 3 current, version 4 writable....................OK ttGridAdmin modelApply complete
-
Stop and restart every instance in the grid. For more information on stopping and restarting a grid, see "Stopping a grid" and "Restarting a grid" respectively.
For more information on the ttGridAdmin membershipConfigImport command, see "Import the membership configuration file (membershipConfigImport)" in the Oracle TimesTen In-Memory Database Reference.
For more information on the ttGridAdmin modelApply command, see "Applying the changes made to the model" in this document and "Model operations" in the Oracle TimesTen In-Memory Database Reference.
Redistributing data in a database
You can increase or decrease the number of elements in which your data is distributed. However, this requires more than just adding or removing data instances from the current version of the model; you must also add or remove the elements of the data instances from the distribution map of the database.
The different tasks for maintaining the distribution map of a database are:
-
Add a replica set to the distribution map. When you add a replica set to the distribution map (and the distribution map is applied), TimesTen Scaleout re-distributes a portion of the data in the elements of each replica set to the elements of the newly added replica set.
-
Remove a replica set without a replacement from the distribution map. If the removed replica set is not replaced with another replica set, when the distribution map is applied, the data stored in the elements of the removed replica set is evenly re-redistributed into the elements of the remaining replica sets.
-
Remove a data instance and replace it with another data instance that is not already defined in the distribution map. In this case, when the distribution map is applied, the data is copied from the element of the removed data instance to the element of the new data instance; the data stored in the elements of the other replica sets is not re-distributed.
-
Evict a replica set from the distribution map. If all elements in a replica set have unrecoverable failures, evict the replica set from the distribution map. Evicting a replica set results in data loss. When you evict a replica set from the distribution map, you can either:
-
Evict the replica set without a replacement. If the evicted replica set is not replaced with another replica set, when the distribution map is applied, the data in the evicted replica set is lost and the data stored in the elements of the other replica sets is not re-distributed.
-
Evict and replace the replica set with another replica set that is not already defined in the distribution map. When the distribution map is applied, since the data in the elements of the evicted replica set is lost, the element of the new replica set is empty and the data stored in the elements of the other replica sets is not re-distributed.
See "Recovering when the replica set has a permanently failed element" for information on how to evict failed replica sets from the distribution map.
-
The ttGridAdmin dbDistribute command can add and remove elements and evict replica sets from the distribution map of a database, then redistribute existing data across the resulting replica sets. Your existing data is redistributed once you apply the change to distribution map with the ttGridAdmin dbDistribute -apply command.
Note:
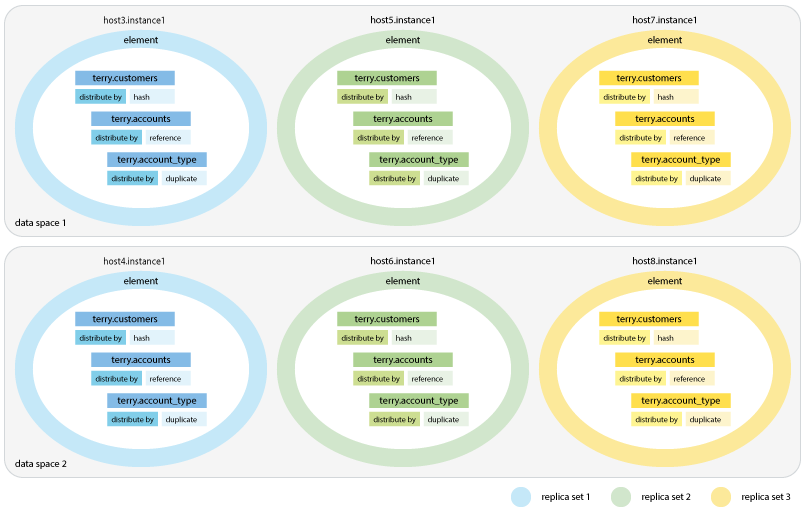
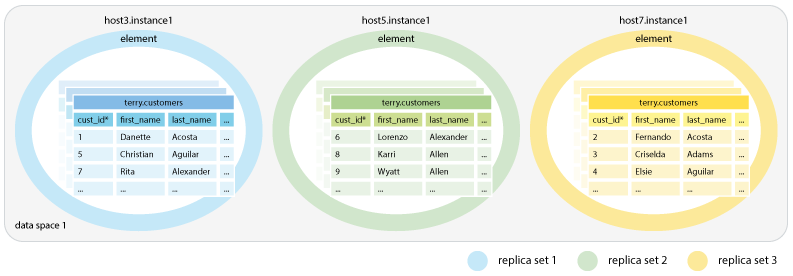
Data distribution cannot execute concurrently with DDL or DML statements. As a result, thettGridAdmin dbDistribute -apply command terminates with an error if you are currently executing any DDL or DML statements that insert, update, or delete data. Any DML statements that insert, update or delete while data distribution is in process are blocked until data distribution completes. However, you can execute any read-only statements while data distribution is in process.Figure 8-1 shows the database schema and topology of the elements of the database1 database that the examples in the following sections use.
Adding elements to the distribution map
To increase the number of elements in which your data is distributed, you need to first increase the number of data instances associated with the grid. Also, you must ensure that you have the same number of data instances to each data space group. For example, in a grid with k set to 2, you must add an equal number of data instances to data space group 1 and data space group 2.
If you are adding elements to the distribution map of the database with the intention of increasing the amount of memory available in the permanent memory region, consider increasing the size of the permanent memory region instead. You can accomplish this by modifying the value of the PermSize attribute.
Note:
-
Every host with a data instance must have enough physical memory available to support the value of the
PermSizeattribute. See "Determining the value of the PermSize attribute" and "Modify the connection attributes in a database definition" for more information on how to calculate and modify the value of thePermSizeattribute. -
Consider that even when rows are re-distributed to the elements of the new data instances, the memory previously used by these rows in their original elements is still in use by a table page and can only be used by new rows of the same table.
Add a data instance for each data space group available to the current version of the model.
% ttGridAdmin hostCreate -internalAddress int-host9.example.com -externalAddress
 ext-host9.example.com -like host3 -cascade -dataSpaceGroup 1
Host host9 created in Model
Installation installation1 created in Model
Instance instance1 created in Model

% ttGridAdmin hostCreate -internalAddress int-host10.example.com -externalAddress
 ext-host10.example.com -like host3 -cascade -dataSpaceGroup 2
Host host10 created in Model
Installation installation1 created in Model
Instance instance1 created in Model

% ttGridAdmin modelApply
...
Verifying installations...............................................OK
Creating new installations............................................OK
Verifying instances...................................................OK
Creating new instances................................................OK
...
Checking ssh connectivity of new instances............................OK
Starting new data instances...........................................OK
ttGridAdmin modelApply complete
Note:
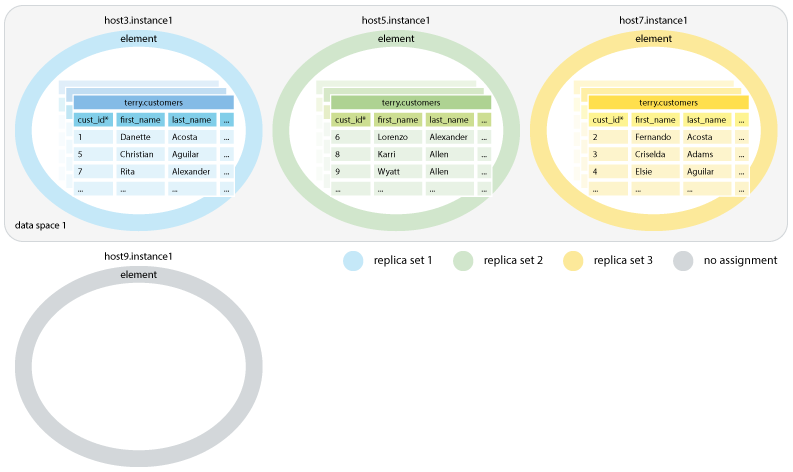
See "Adding data instances" and "Applying the changes made to the model" for more information on how to add data instances to a grid.Figure 8-2 shows an example of the hash distribution of the customers table in the database1 database. Notice that the element of the host9.instance1 data instance is empty. Even though the host9 host is assigned to data space group 1, element 7 is not considered part of data space 1 until the host9.instance1 data instance is added to the distribution map of the database1 database.
Add the element of the host9.instance1 data instance to the distribution map of the database1 database.
% ttGridAdmin dbDistribute database1 -add host9.instance1
Element host9.instance1 has been marked to be added
Distribution map change enqueued
To ensure that the distribution map of the database remains balanced, add the element of the data instance that will hold the replica of the element of the host9.instance1 data instance, host10.instance1, to the distribution map of the database1 database.
% ttGridAdmin dbDistribute database1 -add host10.instance1 -apply
Element host10.instance1 has been marked to be added
Distribution map updated
Note:
Ensure that you only use the-apply option when you are done adding all new elements to the distribution map of the database to avoid TimesTen Scaleout returning an error.Figure 8-3 shows how some of the data stored in the elements inside data space 1 in Figure 8-2 is re-distributed into the element of the new data instance, host9.instance1.
Figure 8-3 Data distribution after adding an element (and its replica)
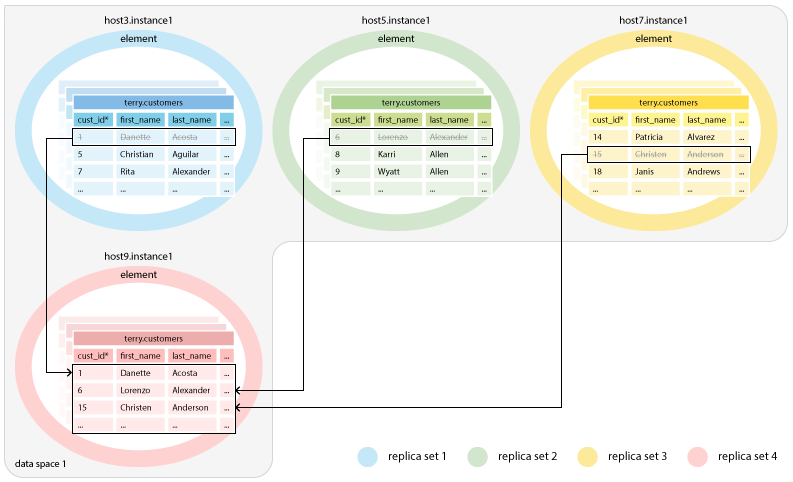
Description of ''Figure 8-3 Data distribution after adding an element (and its replica)''
You can verify the progress of the redistribution operation from any element of the database with the ttDistributionProgress built-in procedure.
Command> call ttDistributionProgress();
< 2018-12-04 14:49:48.872975, 1, 2, 1, Data Checkpoint, <NULL>, <NULL>, <NULL>,
 <NULL>, <NULL>, 1910, 0, 176, 1910, 8, 8 >
1 row found.
For more information on the ttGridAdmin hostCreate or ttGridAdmin dbDistribute command, see "Create a host (hostCreate)" or "Set or modify the distribution scheme of a database (dbDistribute)", respectively, in the Oracle TimesTen In-Memory Database Reference.
For more information on the ttGridAdmin modelApply command, see "Applying the changes made to the model" in this document and "Model operations" in the Oracle TimesTen In-Memory Database Reference.
For more information on the ttDistributionProgress built-in procedure, see "ttDistributionProgress" in the Oracle TimesTen In-Memory Database Reference.
Removing elements from the distribution map
You can remove and replace elements from the distribution map with the following in mind:
-
Remove and replace a single element:
-
If you have a grid where
kis set to1, you can remove and replace the element only if both the element and data instance are operational. -
If you have a grid where
kis set to2, you can remove and replace a single element within a replica set by removing the element and replacing it with another element as long as the other element in the replica set is operational.See "Replace an element with another element" and "Remove a replica set" for more information on how to use the
ttGridAdmin dbDistributecommand with the-removeoption.
Note:
"Remove and replace a failed element in a replica set" has more information on how to resolve failure issues of a single element within a replica set. -
-
Evict an entire replica set:
-
If all the elements of a replica set have failed, then the data stored in the replica set is unavailable. "Recovering when the replica set has a permanently failed element" describes what happens when a replica set fails, how TimesTen Scaleout recovers the replica set, or how you can evict the entire replica set if the elements in the replica set cannot be automatically recovered.
-
The ttGridAdmin dbDistribute command with the -remove option removes an element from the distribution map of a database. When you remove a an element from the distribution map of a database, you have these options:
Replace an element with another element
If the removed element is replaced with the element of a new data instance and you apply this change to the distribution map of the database, the data in the replica set is copied to the element of the new data instance. The data stored in the other replica sets is not re-distributed. Consider doing this when you want to replace a host with another one or a host must be shut down, but you do not want to modify the way your data is being distributed.
Add a data instance to the current version of the model.
% ttGridAdmin hostCreate -internalAddress int-host9.example.com -externalAddress
 ext-host9.example.com -like host3 -cascade -dataSpaceGroup 1
Host host9 created in Model
Installation installation1 created in Model
Instance instance1 created in Model

% ttGridAdmin modelApply
...
Verifying installations...............................................OK
Creating new installations............................................OK
Verifying instances...................................................OK
Creating new instances................................................OK
...
Checking ssh connectivity of new instances............................OK
Starting new data instances...........................................OK
ttGridAdmin modelApply complete
Note:
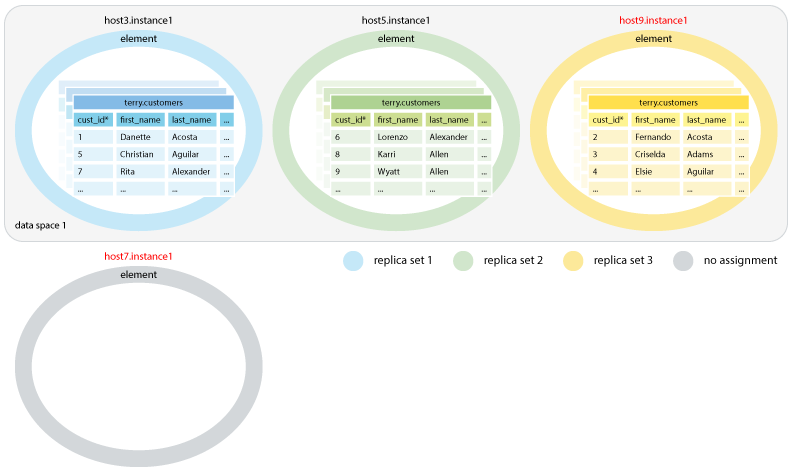
See "Adding data instances" and "Applying the changes made to the model" for more information on how to add data instances to a grid.Figure 8-4 shows an example of the hash distribution of the customers table in the database1 database. Notice that the element of the host9.instance1 data instance is empty. Even though the host9 host is assigned to data space group 1, its element is not part of a replica set until it is added to the distribution map of the database1 database.
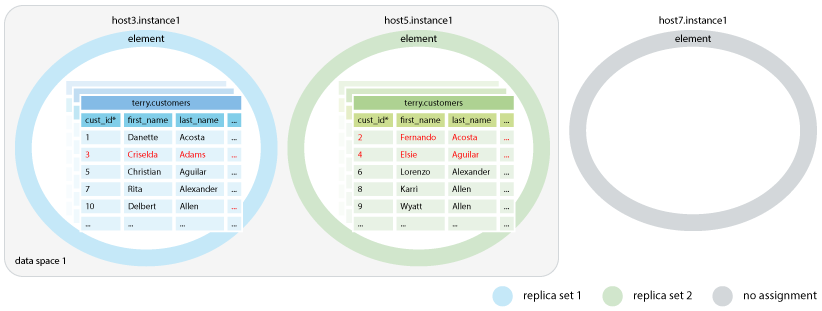
Remove the element of the host7.instance1 data instance and replace it with the element of the host9.instance1 data instance in the distribution map of the database1 database.
% ttGridAdmin dbDistribute database1 -remove host7.instance1
 -replaceWith host9.instance1 -apply
Element host7.instance1 has been marked to be removed and replaced by element host9.instance1
Distribution map updated
Figure 8-5 shows how the data previously stored in the element of the host7.instance1 data instance is copied to its replacement.
Figure 8-5 Data distribution after replacing an element
Description of ''Figure 8-5 Data distribution after replacing an element''
To destroy the checkpoints and transaction logs of the removed element, use the ttGridAdmin dbDestroy -instance command.
% ttGridAdmin dbDestroy database1 -instance host7.instance1
Database database1 instance host7 destroy started
For more information on the ttGridAdmin dbDistribute or ttGridAdmin dbDestroy command, see "Set or modify the distribution scheme of a database (dbDistribute)" or "Destroy a database (dbDestroy)", respectively, in the Oracle TimesTen In-Memory Database Reference.
Remove a replica set
If you remove the element of a data instance without a replacement from the distribution map of a database, you must also remove its replica. In other words, you must remove the replica set in its entirety. When you remove a replica set, TimesTen Scaleout re-distributes the data stored in the replica set to the remaining replica sets. Consider doing this when you want to scale down the number of hosts in which your data is stored.
Important:
Consider that the database size is defined by the value of thePermSize attribute times the number of replica sets available. Removing one replica set from the distribution map of the database will remove as many MB from the database size as MB set in the PermSize attribute. See "Determining the value of the PermSize attribute" for more information on how to determine the database size of a database.
Before removing a replica set, ensure that the remaining replica sets will have enough space to store a portion of the data stored in the replica set you are about to remove. If necessary, increase the database size by increasing the value of the PermSize attribute. See "Modify the connection attributes in a database definition" for more information on how to increase the value of the PermSize attribute.
Figure 8-6 shows an example of the hash distribution of the customers table in the database1 database.
Remove the element of the host7.instance1 data instance from the distribution map of the database1 database.
% ttGridAdmin dbDistribute database1 -remove host7.instance1
Element host7.instance1 has been marked to be removed
Distribution map change enqueued
To ensure that the distribution map of the database remains balanced, remove the element of the data instance holding the replica of the element of the host7.instance1 data instance from the distribution map of the database1 database.
% ttGridAdmin dbDistribute database1 -remove host8.instance1 -apply
Element host8.instance1 has been marked to be removed
Distribution map updated
Note:
-
To find out which data instance holds the replica of the element of another data instance, use the
ttGridAdmin dbStatuscommand while specifying the-replicasetoption. -
Ensure that you only use the
-applyoption when you are done removing all the necessary data instances from the distribution map of the database to avoid TimesTen Scaleout returning an error.
Figure 8-7 shows how removing a replica set from the distribution map of a database removes its elements from their previously assigned data spaces. The figure also shows how the data previously stored in the removed replica set is re-distributed to the replica sets still within each data space.
Figure 8-7 Data distribution after removing a replica set
Description of ''Figure 8-7 Data distribution after removing a replica set''
To destroy the checkpoints and transaction logs of the removed replica set, use the ttGridAdmin dbDestroy -instance command.
% ttGridAdmin dbDestroy database1 -instance host7.instance1
Database database1 instance host7 destroy started
% ttGridAdmin dbDestroy database1 -instance host8.instance1
Database database1 instance host8 destroy started
For more information on the ttGridAdmin dbDistribute or ttGridAdmin dbDestroy command, see "Set or modify the distribution scheme of a database (dbDistribute)" or "Destroy a database (dbDestroy)", respectively, in the Oracle TimesTen In-Memory Database Reference.
Stopping a grid
Gracefully stopping a grid can only occur if the grid has no loaded databases. Once you ensure that all databases are unloaded, you can proceed to stop the grid, as shown next:
-
Unload all databases. See "Unloading a database from memory" for details.
-
Stop all data instances.
% ttGridAdmin instanceExec -type data ttDaemonAdmin -stop
Overall return code: 0
Commands executed on:
  host3.instance1 rc 0
  host4.instance1 rc 0
  host5.instance1 rc 0
  host6.instance1 rc 0
  host7.instance1 rc 0
  host8.instance1 rc 0
Return code from host3.instance1: 0
Output from host3.instance1:
TimesTen Daemon (PID: 4498, port: 6624) stopped.
Return code from host4.instance1: 0
Output from host4.instance1:
TimesTen Daemon (PID: 4536, port: 6624) stopped.
Return code from host5.instance1: 0
Output from host5.instance1:
TimesTen Daemon (PID: 4492, port: 6624) stopped.
Return code from host6.instance1: 0
Output from host6.instance1:
TimesTen Daemon (PID: 4510, port: 6624) stopped.
Return code from host7.instance1: 0
Output from host7.instance1:
TimesTen Daemon (PID: 4539, port: 6624) stopped.
Return code from host8.instance1: 0
Output from host8.instance1:
TimesTen Daemon (PID: 4533, port: 6624) stopped.
-
If there is an standby management instance, stop it.
% ttGridAdmin mgmtStandbyStop
Standby management instance host2.instance1 stopped
-
Stop the active management instance.
% ttGridAdmin mgmtActiveStop
Active management instance stopped
For more information on the ttGridAdmin instanceExec command, see "Execute a command or script on grid instances (instanceExec)" in the Oracle TimesTen In-Memory Database Reference.
Restarting a grid
To restart a grid, you must first restart all instances before attempting to reload any database, as shown next:
-
Follow the step that matches the configuration of your grid:
-
If your grid has a single management instance configuration, start the management instance.
% ttGridAdmin mgmtActiveStart
This management instance is now the active
-
If your grid has an active standby configuration, follow the instructions described in "Bring back both management instances" to determine the best candidate for the active role and restart both the active and standby management instances.
-
-
Start all data instances.
% ttGridAdmin instanceExec -type data ttDaemonAdmin -start
Overall return code: 0
Commands executed on:
  host3.instance1 rc 0
  host4.instance1 rc 0
  host5.instance1 rc 0
  host6.instance1 rc 0
  host7.instance1 rc 0
  host8.instance1 rc 0
Return code from host3.instance1: 0
Output from host3.instance1:
TimesTen Daemon (PID: 19072, port: 6624) startup OK.
Return code from host4.instance1: 0
Output from host4.instance1:
TimesTen Daemon (PID: 19144, port: 6624) startup OK.
Return code from host5.instance1: 0
Output from host5.instance1:
TimesTen Daemon (PID: 19210, port: 6624) startup OK.
Return code from host6.instance1: 0
Output from host6.instance1:
TimesTen Daemon (PID: 19247, port: 6624) startup OK.
Return code from host7.instance1: 0
Output from host7.instance1:
TimesTen Daemon (PID: 19284, port: 6624) startup OK.
Return code from host8.instance1: 0
Output from host8.instance1:
TimesTen Daemon (PID: 19315, port: 6624) startup OK.
-
Reload all databases as shown in "Reloading a database into memory".
For more information on the ttGridAdmin mgmtActiveStart and ttGridAdmin mgmtStandbyStart commands, see "Management instance operations" in the Oracle TimesTen In-Memory Database Reference.
For more information on the ttGridAdmin instanceExec command, see "Execute a command or script on grid instances (instanceExec)" in the Oracle TimesTen In-Memory Database Reference.
Upgrading a grid
This section discusses how to upgrade your grid to either a patch-compatible release or a not patch-compatible release.
Note:
To check if your version of TimesTen is patch compatible with the target TimesTen release for upgrade, see theREADME.html file in the target TimesTen distribution.Upgrade a grid to a patch-compatible release
Upgrading a grid to a patch-compatible release consists of ensuring that every instance uses for its operations the installation files provided by a newer patchset (or patch) release of TimesTen, for example, upgrading the installation from a 18.1.x to a 18.1.y release.
To upgrade a grid to a newer patch-compatible release, perform these tasks:
Create an installation from a new release on every host
You may use the ttGridAdmin installationList command to determine the hosts that need to be upgraded and the location of the current installations, as shown in Example 8-3.
Example 8-3 List of hosts and installations
The example uses the ttGridAdmin installationList command to display the hosts and their associated installations of the grid1 grid.
% ttGridAdmin installationList
Host  Install       Location                     Comment
----- ------------- ---------------------------- -------
host1 installation1 /grid/tt18.1.4.1.0
host2 installation1 /grid/tt18.1.4.1.0
host3 installation1 /grid/tt18.1.4.1.0
host4 installation1 /grid/tt18.1.4.1.0
host5 installation1 /grid/tt18.1.4.1.0
host6 installation1 /grid/tt18.1.4.1.0
host7 installation1 /grid/tt18.1.4.1.0
host8 installation1 /grid/tt18.1.4.1.0
Create an installation from the new TimesTen release on every host defined in the model.
Note:
If the default name for installations,installation1, is already in use, you need to provide a name for the new installation. The example uses installation2 as the name for the new installation on every host of the grid.% ttGridAdmin installationCreate host1.installation2 -location /grid -source host1:/mydir/timesten181420.server.linux8664.zip Installation installation2 on Host host1 created in Model % ttGridAdmin installationCreate host2.installation2 -location /grid -source host1:/mydir/timesten181420.server.linux8664.zip Installation installation2 on Host host2 created in Model % ttGridAdmin installationCreate host3.installation2 -location /grid -source host1:/mydir/timesten181420.server.linux8664.zip Installation installation2 on Host host3 created in Model % ttGridAdmin installationCreate host4.installation2 -location /grid -source host1:/mydir/timesten181420.server.linux8664.zip Installation installation2 on Host host4 created in Model % ttGridAdmin installationCreate host5.installation2 -location /grid -source host1:/mydir/timesten181420.server.linux8664.zip Installation installation2 on Host host5 created in Model % ttGridAdmin installationCreate host6.installation2 -location /grid -source host1:/mydir/timesten181420.server.linux8664.zip Installation installation2 on Host host6 created in Model % ttGridAdmin installationCreate host7.installation2 -location /grid -source host1:/mydir/timesten181420.server.linux8664.zip Installation installation2 on Host host7 created in Model % ttGridAdmin installationCreate host8.installation2 -location /grid -source host1:/mydir/timesten181420.server.linux8664.zip Installation installation2 on Host host8 created in Model
Apply the changes made to the latest version of the model. TimesTen copies the installation files to the location specified for each host.
% ttGridAdmin modelApply
For more information on the ttGridAdmin installationList or ttGridAdmin installationCreate command, see "List installations (installationList)" or "Create an installation (installationCreate)", respectively, in the Oracle TimesTen In-Memory Database Reference.
For more information on the ttGridAdmin modelApply command, see "Applying the changes made to the model" in this document and "Model operations" in the Oracle TimesTen In-Memory Database Reference.
Upgrade management instances
How you upgrade your management instances depends on whether you have one or two management instances configured in your grid. Follow the procedure that better applies to your configuration:
Upgrading management instances in an active standby configuration
When you have an active standby configuration for your management instances, you can upgrade each management instance separately without any interruption of service by ensuring that an active management instance is always up.
-
Stop the standby management instance.
% ttGridAdmin mgmtStandbyStop
Standby management instance host2.instance1 stopped
-
Modify the standby management instance to use the new installation.
% ttGridAdmin instanceModify host2.instance1 -installation installation2
Instance instance1 on Host host2 modified in Model
-
Apply the changes made to the latest version of the model.
% ttGridAdmin modelApply
-
Start the standby management instance by running the
ttGridAdmin mgmtStandbyStartcommand on the standby management instance.% ttGridAdmin mgmtStandbyStart Standby management instance started
-
Verify that the standby management instance is operational and synchronized with the active management instance with the
ttGridAdmin mgmtStatuscommand.% ttGridAdmin mgmtStatus Host Instance Reachable RepRole(Self) Role(Active) Role(Self) Seq RepAgent RepActive --------------------------------------------------------------------- host1 instance1 Yes Active Unknown Active 445 Up Yes host2 instance1 Yes Standby Unknown Standby 445 Up NoNote:
Ensure that the sequence number matches in both instances to ensure that both instances are communicating properly and synchronized. If the sequence number does not match, run thettGridAdmin mgmtExaminecommand for instructions on how to proceed. See "Examine management instances (mgmtExamine)" in the Oracle TimesTen In-Memory Database Reference for more information on thettGridAdmin mgmtExaminecommand. -
On the standby management instance, switch the active and standby management instances.
% ttGridAdmin mgmtActiveSwitch This is now the active management instance
TimesTen Scaleout stops the active management instance and promotes the standby management instance to active.
-
On the new active management instance, modify the installation of the old active management instance.
% ttGridAdmin instanceModify host1.instance1 -installation installation2 Instance instance1 on Host host1 modified in Model
-
Apply the changes made to the latest version of the model.
% ttGridAdmin modelApply
-
On the old active management instance, start the instance as a standby management instance.
% ttGridAdmin mgmtStandbyStart
Standby management instance started
-
Verify that the standby management instance is operational and synchronized with the active management instance.
% ttGridAdmin mgmtStatus Host Instance Reachable RepRole(Self) Role(Active) Role(Self) Seq RepAgent RepActive ----------------------------------------------------------------------------- host1 instance1 Yes Standby Unknown Standby 451 Up No host2 instance1 Yes Active Unknown Active 451 Up YesNote:
Ensure that the sequence number matches in both instances to ensure that both instances are communicating properly and synchronized. If the sequence number does not match, run thettGridAdmin mgmtExaminecommand for instructions on how to proceed. See "Examine management instances (mgmtExamine)" in the Oracle TimesTen In-Memory Database Reference for more information on thettGridAdmin mgmtExaminecommand.
For more information on the ttGridAdmin mgmtStandbyStop, ttGridAdmin mgmtStandbyStart, and ttGridAdmin mgmtStatus commands, see "Management instance operations" in the Oracle TimesTen In-Memory Database Reference.
For more information on the ttGridAdmin instanceModify command, see "Modify an instance (instanceModify)" in the Oracle TimesTen In-Memory Database Reference.
For more information on the ttGridAdmin mgmtActiveSwitch command, see "Starting, stopping and switching management instances" in this document and "Switch the active management instance (mgmtActiveSwitch)" in the Oracle TimesTen In-Memory Database Reference.
For more information on the ttGridAdmin modelApply command, see "Applying the changes made to the model" in this document and "Model operations" in the Oracle TimesTen In-Memory Database Reference.
Upgrading a single management instance
In a single management instance configuration, you need to restart the active management instance for the new installation to take effect, as shown next:
-
Modify the active management instance to use the new installation.
% ttGridAdmin instanceModify host1.instance1 -installation installation2
Instance instance1 on Host host1 modified in Model
-
Apply the changes made to the latest version of the model.
% ttGridAdmin modelApply
-
Stop the active management instance.
% ttGridAdmin mgmtActiveStop
Active management instance stopped
-
Restart the active management instance.
% ttGridAdmin mgmtActiveStart
This management instance is now the active
For more information on the ttGridAdmin instanceModify command, see "Modify an instance (instanceModify)" in the Oracle TimesTen In-Memory Database Reference.
For more information on the ttGridAdmin modelApply command, see "Applying the changes made to the model" in this document and "Model operations" in the Oracle TimesTen In-Memory Database Reference.
For more information on the ttGridAdmin mgmtActiveStop and ttGridAdmin mgmtActiveStart, see "Management instance operations" in the Oracle TimesTen In-Memory Database Reference.
Upgrade data instances
Before you can restart a data instance so that the new installation takes effect, you need to unload all databases:
-
Unload all databases as shown in "Unloading a database from memory".
-
Stop all data instances.
% ttGridAdmin instanceExec -type data ttDaemonAdmin -stop
Overall return code: 0
Commands executed on:
  host3.instance1 rc 0
  host4.instance1 rc 0
  host5.instance1 rc 0
  host6.instance1 rc 0
  host7.instance1 rc 0
  host8.instance1 rc 0
Return code from host3.instance1: 0
Output from host3.instance1:
TimesTen Daemon (PID: 4498, port: 6624) stopped.
Return code from host4.instance1: 0
Output from host4.instance1:
TimesTen Daemon (PID: 4536, port: 6624) stopped.
Return code from host5.instance1: 0
Output from host5.instance1:
TimesTen Daemon (PID: 4492, port: 6624) stopped.
Return code from host6.instance1: 0
Output from host6.instance1:
TimesTen Daemon (PID: 4510, port: 6624) stopped.
Return code from host7.instance1: 0
Output from host7.instance1:
TimesTen Daemon (PID: 4539, port: 6624) stopped.
Return code from host8.instance1: 0
Output from host8.instance1:
TimesTen Daemon (PID: 4533, port: 6624) stopped.
-
Modify all the data instances to use the new installations.
Note:
You can perform this step before unloading the databases or stopping the data instances if you want to reduce the down time the databases incur during the upgrading operation.% ttGridAdmin instanceModify host3.instance1 -installation installation2 Instance instance1 on Host host3 modified in Model % ttGridAdmin instanceModify host4.instance1 -installation installation2 Instance instance1 on Host host3 modified in Model % ttGridAdmin instanceModify host5.instance1 -installation installation2 Instance instance1 on Host host3 modified in Model % ttGridAdmin instanceModify host6.instance1 -installation installation2 Instance instance1 on Host host3 modified in Model % ttGridAdmin instanceModify host7.instance1 -installation installation2 Instance instance1 on Host host3 modified in Model % ttGridAdmin instanceModify host8.instance1 -installation installation2 Instance instance1 on Host host3 modified in Model
-
Apply the changes made to the latest version of the model.
% ttGridAdmin modelApply
-
Restart all data instances.
% ttGridAdmin instanceExec -type data ttDaemonAdmin -start
Overall return code: 0
Commands executed on:
  host3.instance1 rc 0
  host4.instance1 rc 0
  host5.instance1 rc 0
  host6.instance1 rc 0
  host7.instance1 rc 0
  host8.instance1 rc 0
Return code from host3.instance1: 0
Output from host3.instance1:
TimesTen Daemon (PID: 19072, port: 6624) startup OK.
Return code from host4.instance1: 0
Output from host4.instance1:
TimesTen Daemon (PID: 19144, port: 6624) startup OK.
Return code from host5.instance1: 0
Output from host5.instance1:
TimesTen Daemon (PID: 19210, port: 6624) startup OK.
Return code from host6.instance1: 0
Output from host6.instance1:
TimesTen Daemon (PID: 19247, port: 6624) startup OK.
Return code from host7.instance1: 0
Output from host7.instance1:
TimesTen Daemon (PID: 19284, port: 6624) startup OK.
Return code from host8.instance1: 0
Output from host8.instance1:
TimesTen Daemon (PID: 19315, port: 6624) startup OK.
-
Restart all databases as shown in "Reloading a database into memory".
For more information on the ttGridAdmin instanceExec or ttGridAdmin instanceModify command, see "Execute a command or script on grid instances (instanceExec)" or "Modify an instance (instanceModify)", respectively, in the Oracle TimesTen In-Memory Database Reference.
For more information on the ttGridAdmin modelApply command, see "Applying the changes made to the model" in this document and "Model operations" in the Oracle TimesTen In-Memory Database Reference.
Optional: Delete the installation of the previous release on every host
To avoid assigning the wrong installation to new instances, it is recommended that you delete the installation model objects of the previous release for each host in the model, as shown in Example 8-4.
Example 8-4 Deleting the installations of a previous release
The example uses the ttGridAdmin installationDelete command to delete the installation model objects that are no longer in use from the model of the grid1 grid.
% ttGridAdmin installationDelete host1.installation1
Installation installation1 on Host host1 deleted from Model

% ttGridAdmin installationDelete host2.installation1
Installation installation1 on Host host2 deleted from Model

% ttGridAdmin installationDelete host3.installation1
Installation installation1 on Host host3 deleted from Model

% ttGridAdmin installationDelete host4.installation1
Installation installation1 on Host host4 deleted from Model

% ttGridAdmin installationDelete host5.installation1
Installation installation1 on Host host5 deleted from Model

% ttGridAdmin installationDelete host6.installation1
Installation installation1 on Host host6 deleted from Model

% ttGridAdmin installationDelete host7.installation1
Installation installation1 on Host host7 deleted from Model

% ttGridAdmin installationDelete host8.installation1
Installation installation1 on Host host8 deleted from Model
Then, the example uses the ttGridAdmin modelApply to apply the changes made to the latest version of the model.
% ttGridAdmin modelApply
Furthermore, if the installation files associated with the installation model objects you just deleted are not in use by any other installation object in this or any other grid, then delete the files on every host. Ensure that you change the permissions of the directory so that you can delete all files, as shown in Example 8-5.
Example 8-5 Deleting the installation files of a previous release
% cd /grid
% chmod -R 750 tt18.1.4.1.0/
% rm -rf tt18.1.4.1.0/
For more information on the ttGridAdmin installationDelete command, see "Delete an installation (installationDelete)" in the Oracle TimesTen In-Memory Database Reference.
Upgrade a grid to a not patch-compatible release
Generally, all patchset (and patch) releases of the same major release of TimesTen are patch compatible. For exceptions or major release upgrades, you need to migrate the data from your current databases to databases in a different grid, one based on the target upgrade release.
To upgrade a grid to a newer release that is not patch compatible with your current release, perform these tasks:
-
Install the newer TimesTen distribution, as shown in "Installing TimesTen Scaleout".
-
Using your new TimesTen installation, set up a new grid and databases to import the data of your current databases, as shown in "Configure your grid" and "Creating a database".
Note:
The new grid does not need to match the topography (K-safety value and number of replica sets) of your current grid. -
Export the data from your current databases and import it into the databases of your new grid, as shown in "Exporting and importing a database".
-
Optional: Destroy your previous grid, as shown in "Destroying a grid".
Destroying a grid
Gracefully destroying a grid consists in destroying all databases and deleting every object of the model, as shown next:
-
Unload all databases as shown in "Unloading a database from memory".
-
Destroy all databases as shown in "Destroying a database".
-
Delete all hosts, installations, and instances from the latest version of model, except for the active management instance and its associated host and installation.
% ttGridAdmin hostDelete host2 -cascade
Instance instance1 on Host host2 deleted from Model
Installation installation1 on Host host2 deleted from Model
Host host2 deleted from Model

% ttGridAdmin hostDelete host3 -cascade
Instance instance1 on Host host3 deleted from Model
Installation installation1 on Host host3 deleted from Model
Host host3 deleted from Model

% ttGridAdmin hostDelete host4 -cascade
Instance instance1 on Host host4 deleted from Model
Installation installation1 on Host host4 deleted from Model
Host host4 deleted from Model

% ttGridAdmin hostDelete host5 -cascade
Instance instance1 on Host host5 deleted from Model
Installation installation1 on Host host5 deleted from Model
Host host5 deleted from Model

% ttGridAdmin hostDelete host6 -cascade
Instance instance1 on Host host6 deleted from Model
Installation installation1 on Host host6 deleted from Model
Host host6 deleted from Model

% ttGridAdmin hostDelete host7 -cascade
Instance instance1 on Host host7 deleted from Model
Installation installation1 on Host host7 deleted from Model
Host host7 deleted from Model

% ttGridAdmin hostDelete host8 -cascade
Instance instance1 on Host host8 deleted from Model
Installation installation1 on Host host8 deleted from Model
Host host8 deleted from Model
-
Apply the changes made to the latest version of the model.
% ttGridAdmin modelApply
...
Unconfiguring standby management instance.............................OK
Identifying any deleted objects.......................................OK
Stopping deleted instances............................................OK
Deleting instances....................................................OK
Deleting installations from model.....................................OK
Deleting any hosts that are no longer in use..........................OK
...
ttGridAdmin modelApply complete
-
Stop the active management instance.
% ttGridAdmin mgmtActiveStop
Active management instance stopped
-
Destroy the active management instance.
% /grid/tt18.1.4.1.0/bin/ttInstanceDestroy

** WARNING **

   The uninstallation has been executed by a non-root user.
   If the TimesTen daemon startup scripts were installed,
   you must run $TIMESTEN_HOME/bin/setuproot -uninstall
   to remove them. If you proceed with this uninstallation, you
   will have to remove the startup scripts manually.

** WARNING **

   All the files in the directory :

   /grid/instance1

   will be removed, including any files that you or other users
   may have created.

   Are you sure you want to completely remove this instance? [ yes ]

NOTE: /grid/instance1/info contains information related to the data
      storesthat have been created with this release. If you remove
      /grid/instance1/info you will no longer be able to access your
      data stores, nor would you be able to restore nor migrate your data.

   Would you also like to remove all files in
 /grid/instance1/info? [ no ] yes

NOTE: /grid/instance1/conf contains information related to the
      instance configuration.

   Would you also like to remove all files in
 /grid/instance1/conf? [ no ] yes
/grid/instance1 Removed
The TimesTen instance instance1 has been destroyed.
-
Delete the installation files on each system with a TimesTen installation. Ensure that you change the permissions of the directory so that you can delete all files.
% cd /grid
% chmod -R 750 tt18.1.4.1.0/
% rm -rf tt18.1.4.1.0/
For more information on the ttGridAdmin hostDelete, ttGridAdmin mgmtActiveStop, or ttInstanceDestroy command, see "Delete a host (hostDelete)", "Stop the active management instance (mgmtActiveStop)", or "ttInstanceDestroy", respectively, in the Oracle TimesTen In-Memory Database Reference.
For more information on the ttGridAdmin modelApply command, see "Applying the changes made to the model" in this document and "Model operations" in the Oracle TimesTen In-Memory Database Reference.