Creating and Maintaining Navigation Collections for Custom Homepage Tabs
Use the Navigation Collections page to create and maintain links in any custom tabs navigation collection.
Navigation:
-
-
Do one of the following:
-
Click the Add Collection link to create a new navigation collection.
-
Click the Search button and select an existing navigation collection to maintain.
-
Note:
This Employee Self Service navigation collection was used to generate the custom tabs shown in the previous example.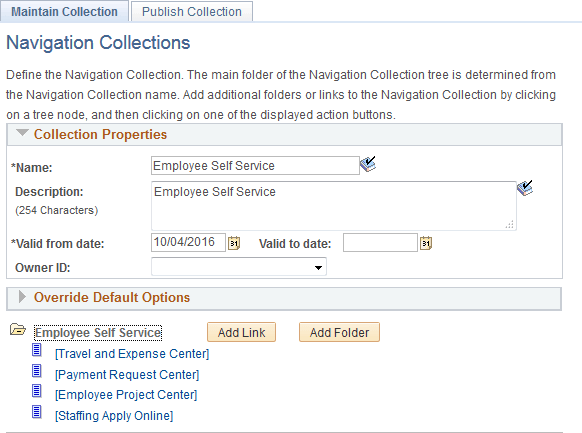
To serve as a custom homepage tab, a link must reside in the root folder of the navigation collection, and not in a subfolder.
To maintain a custom tabs navigation collection:
-
Click the Add Link button to define a new local or remote link.
-
Select an existing link and click the Edit Link button to edit an existing link.
-
Select an existing link and click the Delete Link button to delete an existing link.
Important:
Do not edit the properties for the Custom Tabs navigation collection delivered with PeopleSoft Interaction Hub.
Field or Control Description Name
Enter a name for the navigation collection.
Description
Enter a description for this navigation collection.
Valid from date
Select the date on which you want this navigation collection to become active.
Valid to date
Select the date on which you want this navigation collection to become inactive.
Owner ID
Set the default owner ID for new definitions you create. Alternatively, leave the option blank, which is the default, to allow users to select the owner ID they want. The Owner ID helps identify which applications team last made a change to a definition.
Add Link
Click to access the Add Link page to define a link for a new custom tab. On the Add Link page, you can create a link to a local menu item or to a remote component based content reference.
See Adding a Link, Selecting a Local Link, and Selecting a Remote Link for more information on creating local and remote links in navigation collections.
Note: Do not select the Open in a new window check box.
If you need to create a remote link to a non-component based content reference, then you will need to edit the custom tabs navigation collection through Structure and Content. See “Creating a Content Reference to a Remote, Non-Component-Based Item” for more information.
Add Folder
Click to add a subfolder to the navigation collection.
Important: Links in subfolders are not supported for custom tabs navigation collection. Do not create a subfolder and links within the subfolder.
Edit Link
Click to access the Edit Link page for a link.
Delete Link
Click to access the Confirmation page to delete or cancel the deletion.
Maintaining Content References in a Custom Tabs Navigation Collection
You can use the Structure and Content component to maintain content references in a custom tabs navigation collection. This will allow you to:
-
Disable a homepage tab by selecting the hide from portal navigation attribute.
-
Enable the display of a homepage tab (for example, one of the tabs delivered as sample data) by deselecting the hide from portal navigation attribute.
-
Manually create a content reference to a remote non-component-based item.
To access a custom tabs navigation collection in the Structure and Content component:
-
Select .
-
Click the Portal Objects link.
-
Click the Navigation Collections link.
-
Click the link for the custom tabs navigation collection.
This example illustrates the fields and controls on the Structure and Content page for a custom tabs navigation collection.
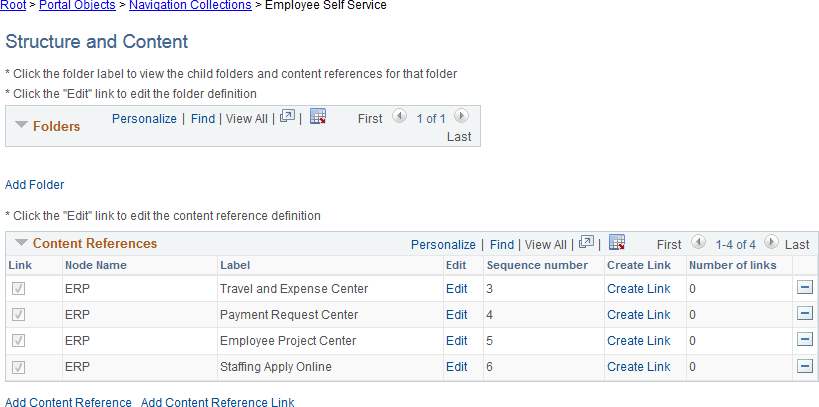
To disable a custom homepage tab, click the Edit link for that content reference. Then, select the Hide from portal navigation option and save the definition.
To enable a custom homepage tab, click the Edit link for that content reference. Then, deselect the Hide from portal navigation option and save the definition.
Creating a Content Reference to a Remote, Non-Component-Based Item
Note:
Remote, non-component based content (such as a remote dashboard) must be accessible through unified navigation from the PeopleSoft Interaction Hub system before it can be designated as a homepage tab.
To manually create a content reference to a remote, non-component-based item such as a remote dashboard to be used as a custom homepage tab:
-
On the Structure and Content page click the link labeled Add Content Reference.
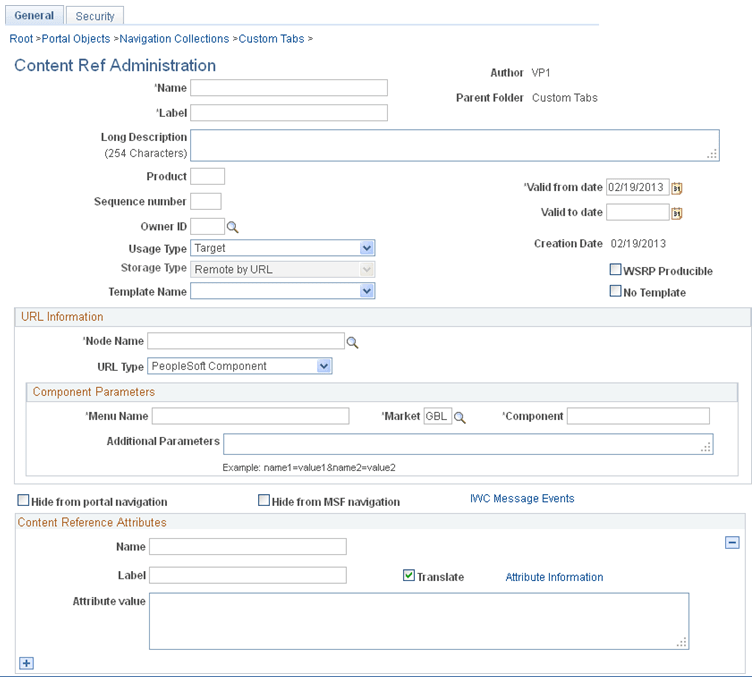
This example illustrates the fields and controls on the Content Ref Administration page.
-
Specify the node name of the portal host node, such as HRMS, ERP, or LOCAL_NODE.
Note:
For a remote dashboard, the Node Name field can specify LOCAL_NODE or can be left blank.
-
In the URL Type field, select one of the following:
-
PeopleSoft Generic URL – For remote content from a PeopleSoft application.
-
Non-PeopleSoft URL – For remote content from a non-PeopleSoft system, such as an external web site.
-
-
In the Portal URL field, enter a partial or full URL depending on the URL type:
-
For a PeopleSoft Generic URL, navigate to the remote item through the menu from the local system. Copy the full URL. Then, remove the server, port, servlet, site, portal, and node from the URL, leaving you with a partial URL string.
For example, when navigating using unified navigation from a local PeopleSoft Interaction Hub system, a partial URL string would be similar to the following:
h/?tab=REMOTEUNIFIEDDASHBOARD&unifieddashboard=y&remotedburl=http%3a%2f%2fserver%3aport%2fpsp%2fps%2fEMPLOYEE%2fHRMS%2fh%2f%3ftab%3dHC_HRS_RECRUITING_HOMEPAGE_TAB%26pslnkid%3dHC_HRS_RECRUITING_HOMEPAGE_LNK&uninavpath=Recruiting%20Dashboard{HC_HRS_RECRUITING_HOMEPAGE_TAB}For example, a partial URL string for a remote SmartNavigation folder would be similar to the following:
c/ROLE_EMPLOYEE.HRCD_CO_DIRECTORY.GBL?NAVSTACK=Clear&pt_fname=HC_COMPANY_DIRECTORY&isleaf=false&abnpcode=WEBLIB_HRCD.ISCRIPT1.FieldFormula.IScript_setFolderFromTree&abnds=t&TREE_NAME=COMPANY_DIRECTORY&TREE_SETID=&TREE_USERKEY=&TREE_EFFDT=&TREE_BRANCH=&abnnode=&cmd=uninav&unabnfldr=false&uninavabnpcode= -
For a Non-PeopleSoft URL, copy the full URL from the browser and paste it into the Portal URL field. For example:
http://server.example.com/content/my_info.htmlNote:
Alternatively, you can use the Node Definitions page to create a node definition for the non-PeopleSoft system, which would include the definition of the Content URI Text field—for example,
http://server.example.com/. If you identify that non-PeopleSoft node through the NODE attribute as indicated in step 5, then you can specify a partial URL—for example,content/my_info.html. See Defining Portal Nodes for more information.
-
-
Define the following four content reference attributes to link the content reference to a remote menu item and enable real-time security checks:
Name Attribute Value CREFID
The name of the remote CREF as defined in the content provider system.
LOCATION
REMOTE
NODE
The portal host node name of the remote node.
PORTAL
The name of remote portal. This must be the same name as the current portal in the local system—for example, EMPLOYEE.
-
Save the content reference definition.
Note:
The Custom Tabs navigation collection delivered with PeopleSoft Interaction Hub 9.1 Rev 2 (and above) includes definitions for several remote, non-component based items that can be used as examples, including the Recruiting Dashboard and the Manager Dashboard, among others.