Model Parallel Approvals

Model parallel approval workflows that route requests to multiple approvers simultaneously for concurrent review and approval.

Example: A purchase request is sent simultaneously to the Procurement and Finance teams for review. Each team reviews the request independently, and the workflow proceeds after all required reviews are complete.

Model a Parallel Approval Using Parallel Gateway

In this example, you'll use a parallel gateway to synchronize two parallel tasks and wait for both to complete. You'll then add an if/else gateway to route the workflow based on the combined outcome of those tasks.

  1. Create a workflow.
    1. In the Workflow section, click Create Workflow.
    2. Enter details for the workflow and click Create. See Create a Workflow.
  2. Configure the start and end events.
    1. In the start event, add a JSON payload that would trigger the workflow. See Configure a Start Event.
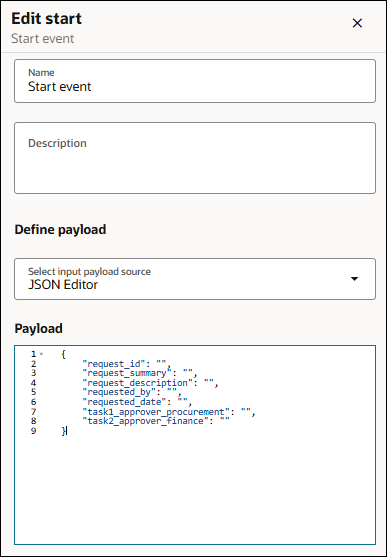
      The image shows the Edit start dialog for configuring a workflow start event. The panel includes a Name field populated with Start event and an empty Description field. Under Define payload, a dropdown labeled "Select input payload source" is set to JSON Editor. Below it, a Payload section displays a JSON template with empty string values for the following fields: request_id, request_summary, request_description, requested_by, requested_date, task1_approver_procurement, and task1_approver_finance.

    2. In the end event, add a JSON payload to return a response when the workflow completes. See Configure an End Event.
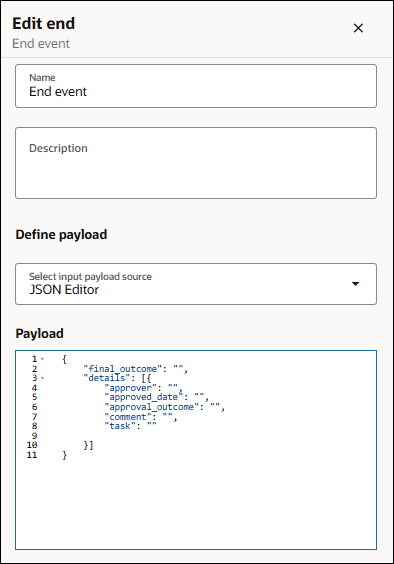
      The image shows the Edit end dialog for configuring a workflow end event. The panel includes a Name field populated with End event and an empty Description field. Under Define payload, an informational message states, "All end events share the same payload definition." A dropdown labeled "Select input payload source" is set to JSON Editor. Below it, the Payload section displays a JSON template containing a final_outcome field and a details array with objects that include the fields approver, approved_date, approval_outcome, comment, and task.

  3. Add a parallel gateway.

    When you add a parallel task, a parallel gateway is automatically created. Select the task, click Add above or below the task element, and then select Add Parallel.
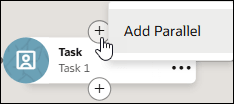

    The image shows a Task node. There are two plus signs on the top and bottom of the node. An Add Parallel menu is open.

    A parallel task is added to the workflow along with its associated parallel gateway. You can add additional parallel tasks within the same parallel gateway, as needed. In this example, you'll add one parallel task (Task 2) above Task 1.


    The image shows a parallel processing workflow in the workflow designer. The process begins with a Start event, followed by a parallel gateway that splits the workflow into two branches. The upper branch leads to Task 2, while the lower branch leads to Task 1. Both branches converge at a second parallel gateway, after which the workflow continues to an End event. Validation/error indicators are displayed on Task 1 and Task 2, and a warning icon appears on the End event, indicating configuration issues that require attention.

    The first parallel gateway node splits the workflow into the parallel tasks - Task 1 and Task 2, allowing them to run concurrently. The second parallel gateway node synchronizes the branches and waits until both tasks are complete.

    • To configure the name and description of a parallel gateway node, select the node, click Actions Actions icon and then select Configure.
    • To delete a parallel gateway, delete the parallel tasks associated with it. The gateway is removed automatically.
  4. Configure the tasks in the parallel gateway. See Configure Tasks.
    1. Configure Task 1 for approval by Procurement.
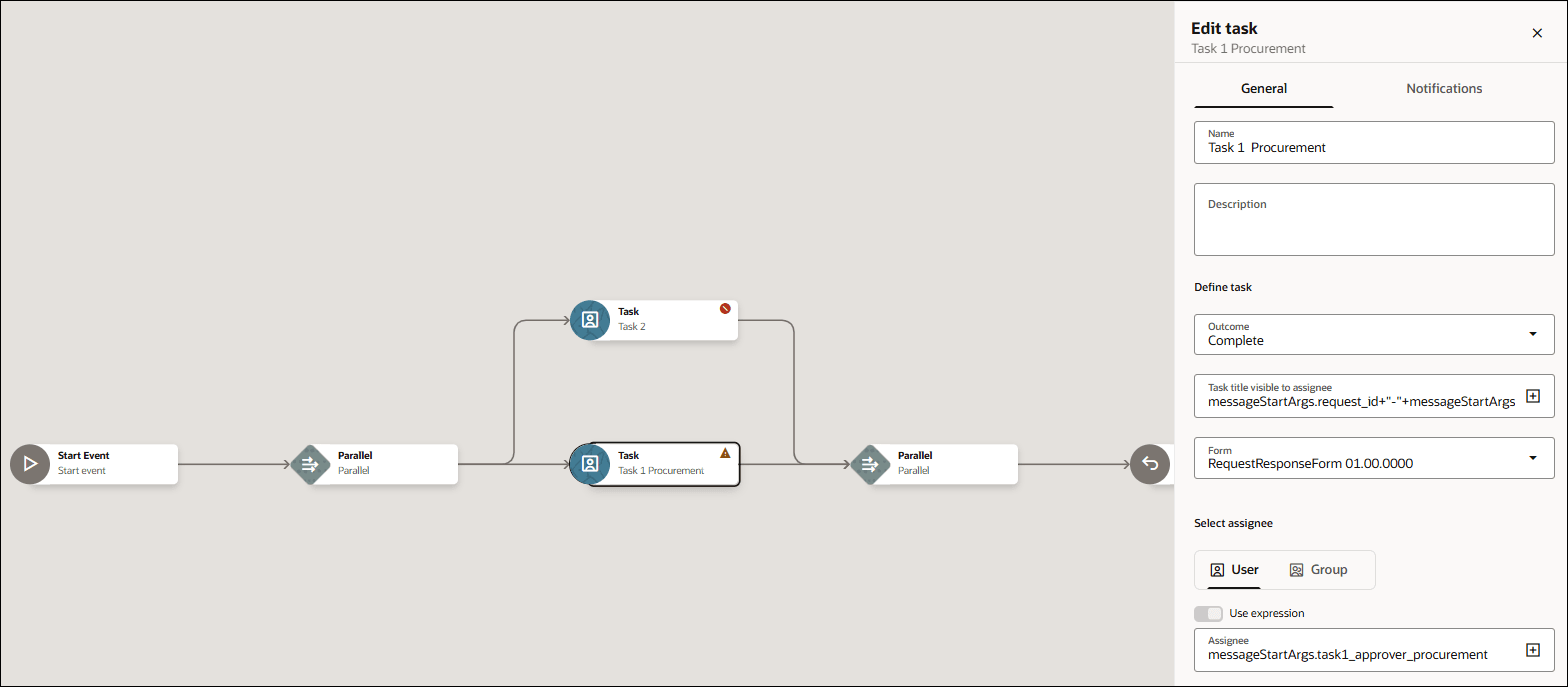
      Screenshot of a workflow designer showing a parallel approval workflow with an Edit task panel open for Task 1 Procurement. The workflow begins with a Start Event, followed by a Parallel gateway that splits into two concurrent tasks: Task 1 Procurement on the lower branch and Task 2 on the upper branch. The branches rejoin at a second Parallel gateway before continuing to an End event. On the right, the Edit task panel displays details about Task 1 Procurement, such as Name, Description, Outcome, Task title, Form and Assignee.

    2. Configure Task 2 for approval by Finance.
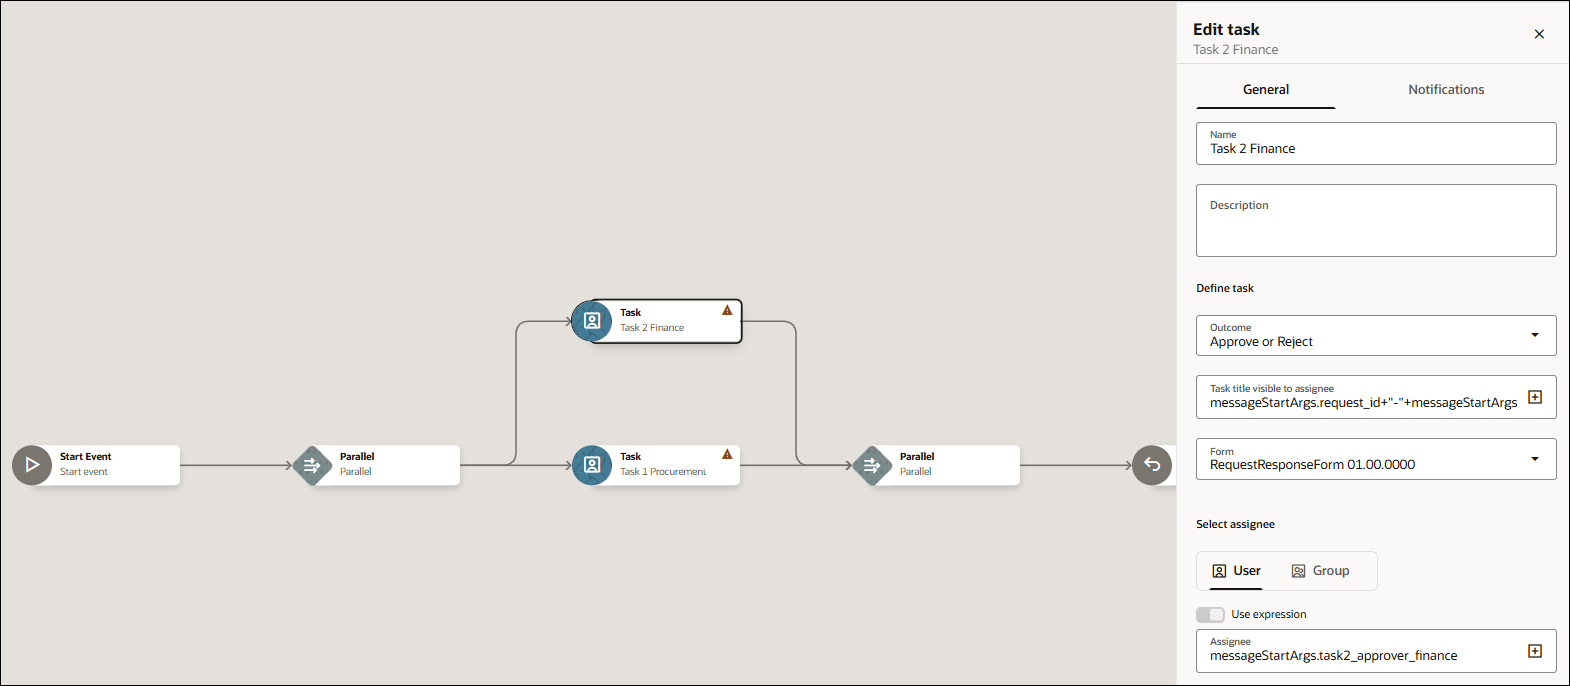
      Screenshot of a workflow designer showing a parallel approval workflow with an Edit task panel open for Task 1 Procurement. The workflow begins with a Start Event, followed by a Parallel gateway that splits into two concurrent tasks: Task 1 Procurement on the lower branch and Task 2 Finance on the upper branch. The branches rejoin at a second Parallel gateway before continuing to an End event. On the right, the Edit task panel displays details about Task 2 Finance such as Name, Description, Outcome, Task title, Form and Assignee.

  5. Add an if/else gateway after the second node of the parallel gateway.

    Use an if/else gateway after the parallel gateway node that synchronizes the parallel tasks to evaluate their combined outcomes and determine the next path in the workflow.
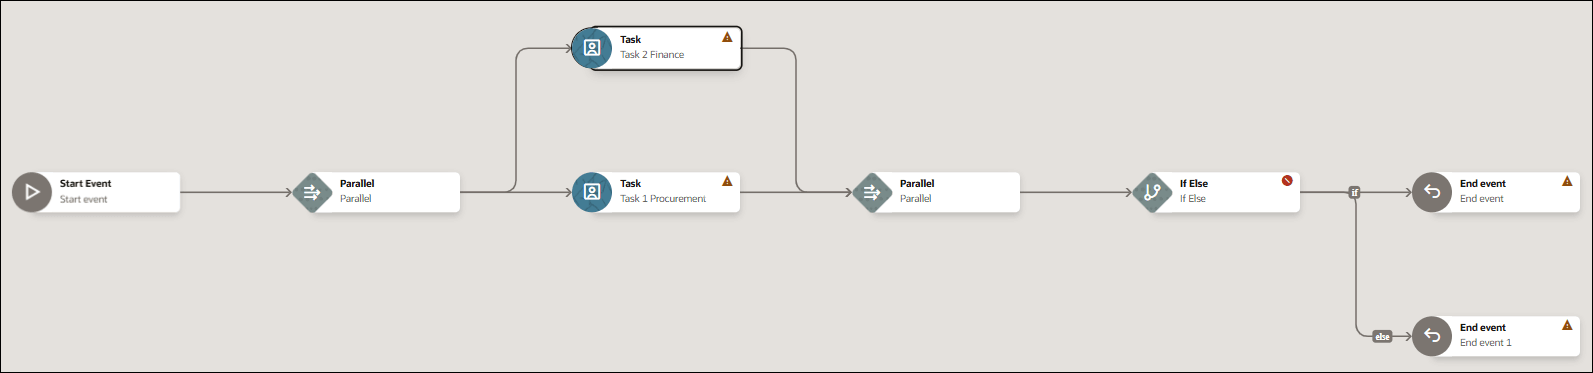

    Screenshot of a workflow designer showing a workflow that combines parallel processing with conditional branching. The process begins with a Start Event, followed by a Parallel gateway that splits into two concurrent tasks: Task 1 Procurement on the lower branch and Task 2 Finance on the upper branch. The two branches merge at a second Parallel gateway and continue to an If Else decision node. From the decision node, the primary path proceeds to an End event, while the else branch leads to a second End event (End event 1). Validation or warning indicators are visible on Task 1 Procurement, Task 2 Finance, the If Else node, and both end event nodes, indicating that additional configuration is required.

  6. Configure a condition in the if/else gateway.

    The if/else gateway evaluates a condition using the outputs of one or both tasks. In this example, the condition evaluates the outputs of both the Procurement and Finance approval tasks.

    1. Select the If Else element, click Actions Actions icon and then select Configure.
    2. In the Edit pane, enter the following details.
      1. Provide a meaningful name and description in the appropriate fields.
      2. In the Condition field, specify the condition Task1ProcurementOutput.taskOutcome=="APPROVE"&&Task2FinanceOutput.taskOutcome=="APPROVE"

        You can use the expression editor to build the expression for the condition. See Work with Expressions.

    Based on the result of the condition, the workflow follows one of two paths:

    • If the condition evaluates to true, the workflow proceeds to End event.
    • If the condition evaluates to false, the workflow proceeds to End event 1.
  7. Map input data for the tasks and end events. See Map Data in Tasks and End Events.
    1. Map input data for the task that requires Procurement approval (Task 1 Procurement).
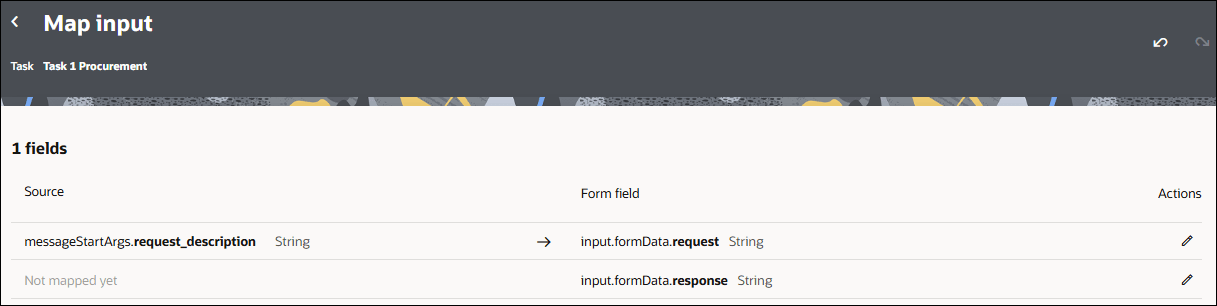
      Screenshot of a Map input configuration page for the Task 1 Procurement task. The page displays a mapping table with 1 field configured. In the first row, the source field messageStartArgs.request_description (String) is mapped to the form field input.formData.request (String), indicated by a right-arrow. An Actions column on the right provides edit (pencil) icons for each mapping row.

    2. Map input data for the task that requires Finance approval (Task 1 Finance).
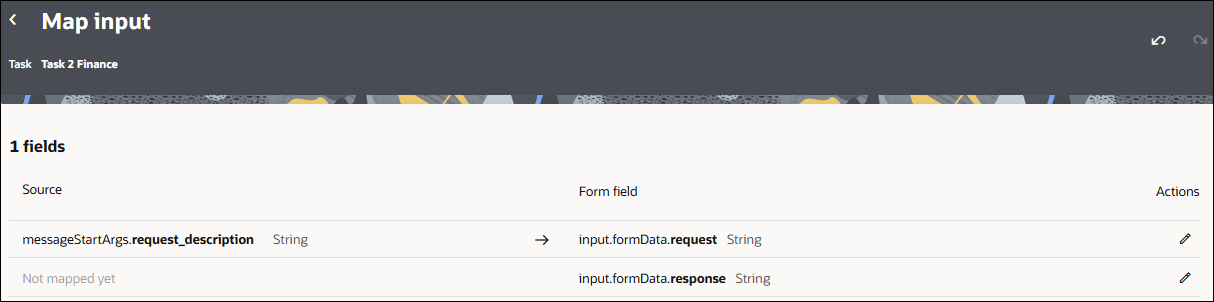
      Screenshot of a Map input configuration page for the Task 2 Finance task. The page displays a mapping table with 1 field configured. In the first row, the source field messageStartArgs.request_description (String) is mapped to the form field input.formData.request (String), indicated by a right-arrow. An Actions column on the right provides edit (pencil) icons for each mapping row.

    3. Map input data for the success end event (End event). The workflow reaches this end event when the condition in the if/else gateway evaluates to true. That is, when both Procurement and Finance approve the purchase request.
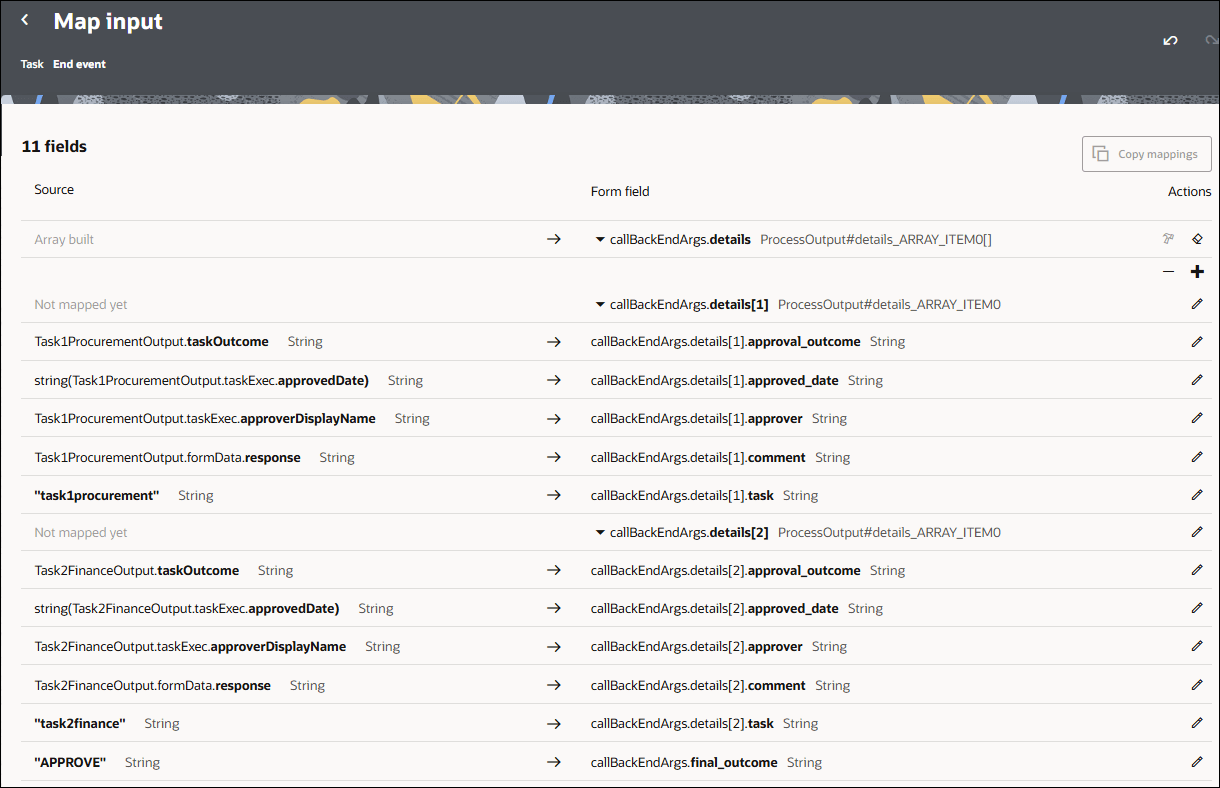
      Screenshot of a Map input configuration page for the End event. The page displays a mapping table with fields configured. An Actions column on the right provides edit (pencil) icons for each mapping row.

    4. Map input data for the rejection end event (End event 1). The workflow reaches this end event when the condition in the if/else gateway evaluates to false, such as when either Procurement or Finance rejects the purchase request.
      Instead of configuring the mappings from scratch, you can copy and reuse the mappings configured in the previous end event (End event) in this end event (End event 1). See Reuse End Event Mappings.

You've successfully created a parallel approval workflow using a parallel gateway.

Once created, you can activate the workflow and use it in an integration. See Activate a Workflow and Add a Workflow to an Integration.

Run the integration to test the workflow, and monitor it's runtime status. See Monitor a Workflow.

To use the workflow with agentic AI, see Use Workflows with Agentic AI.