Provision a Custom Oracle SOA Cloud Service Instance on Oracle Cloud Infrastructure Classic
You use the Oracle Cloud Infrastructure Classic provisioning wizard to provision a custom Oracle SOA Cloud Service instance.
Start the Provisioning Wizard
![]() This topic applies only to Oracle Cloud Infrastructure Classic.
This topic applies only to Oracle Cloud Infrastructure Classic.
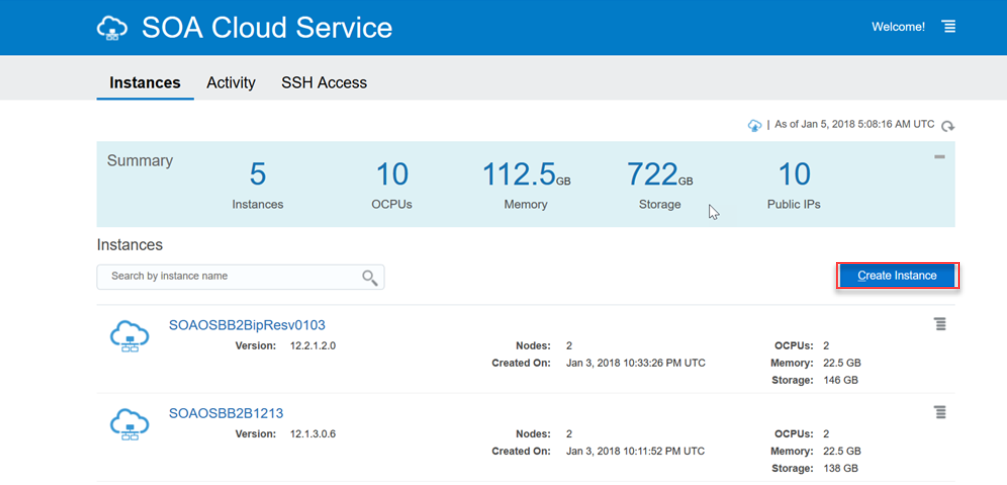
- In the Oracle SOA Cloud
Service Console, click Create
Instance.

Specify Basic Service Instance Information
![]() This topic applies only to Oracle Cloud Infrastructure Classic.
This topic applies only to Oracle Cloud Infrastructure Classic.

| Service Type | Components Installed |
|---|---|
|
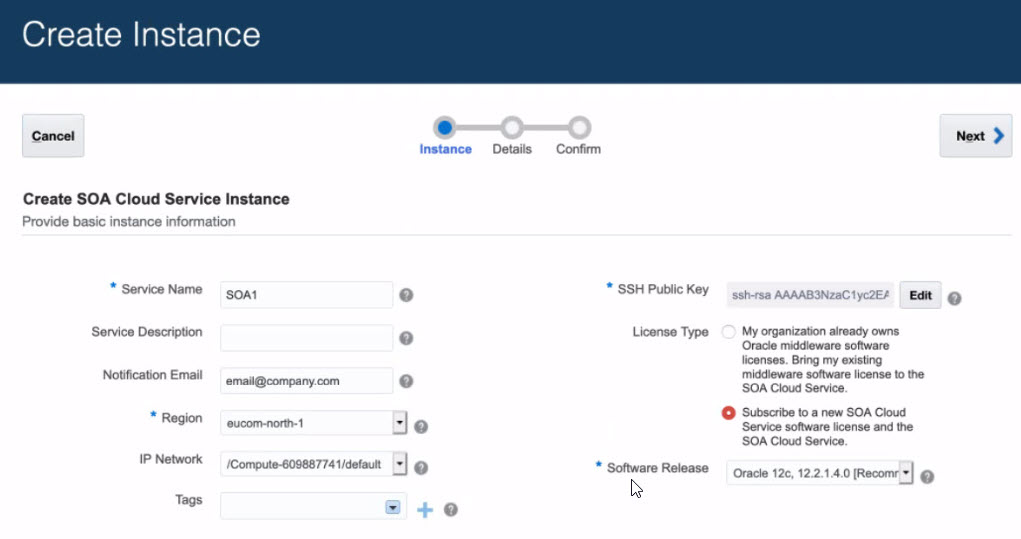
Service Name |
Specify a name that you will use to identify the new service instance. The name must be unique within the identity domain and must meet the following conditions:
|
|
Service Description |
You may add an optional description that can be used to help identify this new service. The description is only used during service list display and is not used internally. |
|
Notification Email |
(Optional) Specify an email address where you would like to receive a notification when the service instance provisioning has succeeded or failed. |
|
Region |
(Available only if your account has regions) Select a region if you want to create the service instance in a specific region, or if you want to use a custom IP network. You must also select a region if you intend to assign reserved IP addresses to your service instance nodes. Do not select Oracle Cloud Infrastructure regions such as us-phoenix-1, us-ashburn-1, or eu-frankfurt-1. For a complete list of Oracle Cloud Infrastructure regions that should not be selected, see Data Regions for Platform and Infrastructure Services. The Oracle Database Classic Cloud Service deployment that you intend to associate with your Oracle SOA Cloud Service instance must be in the same region that you select in this field. If you select No Preference, Oracle SOA Cloud Service will select one of the available Oracle Cloud Infrastructure Classic regions. However, you will not be able to use an IP network or reserved IP addresses for your service instance. |
|
IP Network |
If the regions and IP networks features are supported for your account, during provisioning you can attach the service instance to an IP network that is already created in Oracle Compute Cloud Service. A region name must be explicitly specified when you use an IP network. When you specify an IP network during provisioning, you must also specify a database deployment on Oracle Database Classic Cloud Service or Oracle Database Exadata Cloud Service that is on an IP network. If your Oracle SOA Cloud Service and Oracle Database Classic Cloud Service or Oracle Database Exadata Cloud Service are attached to different IP networks, then the two IP networks must be connected to the same IP network exchange. Access rules required for communication between the Oracle SOA Cloud Service instance and Oracle Database Classic Cloud Service or Oracle Database Exadata Cloud Service deployment are created automatically when connected with IP exchange. See Creating an IP Network in Using Oracle Cloud Infrastructure Compute Classic. Creating IP Networks
Updating IP Networks
Deleting IP Networks
|
|
Tags |
(Not available on Oracle Cloud at Customer) (Optional) Select existing tags or add tags to associate with the service instance. To select existing tags, select one or more check boxes from the list of tags that are displayed on the pull-down menu. To create tags, click Click to create a tag to display the Create Tags dialog box. In the New Tags field, enter one or more comma-separated tags that can be a key or a key:value pair. If you do not assign tags during provisioning, you can create and manage tags after the service instance is created. See Create, Assign, and Unassign Tags. |
|
SSH Public Key |
Specify the value of the VM Public Key, or the name of the file that contains the public key value. Define the public key for the secure shell (SSH). This key is used for authentication when connecting to the Oracle SOA Cloud Service instance using an SSH client. Click Edit to display the public key input for VM access and specify the public key using one of the following methods:
|
|
License Type |
Choose whether you want to leverage the Bring Your Own License (BYOL) option or use your Oracle SOA Cloud Service license.
|
|
Software Release |
WebLogic Server and Fusion Middleware 12.2.1.4.0 and 12.2.1.3.0 are supported. Note: You cannot upgrade Oracle SOA Cloud Service instances from earlier releases (such as 12.2.1.3.0) to the latest release (12.2.1.4.0). Instead, provision a new 12.2.1.4.0 instance. |
|
Metering Frequency |
You will see the Metering Frequency field if you are using a metered account. The default metering frequency is Monthly. Note: Hourly metering is not currently supported. If you choose the Hourly option you will receive a validation error stating that the service type and hourly metering frequency combination is not a valid entitlement. |
Specify the Service Instance Details
![]() This topic applies only to Oracle Cloud Infrastructure Classic.
This topic applies only to Oracle Cloud Infrastructure Classic.
Select Service Type
![]() This topic applies only to Oracle Cloud Infrastructure Classic.
This topic applies only to Oracle Cloud Infrastructure Classic.
Table 4-1 Service Types
| Item | Description |
|---|---|
| Business Activity Monitoring | Install and configure Business Activity Monitoring (Oracle BAM). See "Understanding Oracle Business Activity Monitoring" in Monitoring Business Activity with Oracle BAM (12.2.1.4 | 12.2.1.3 | 12.2.1.2 | 12.1.3). |
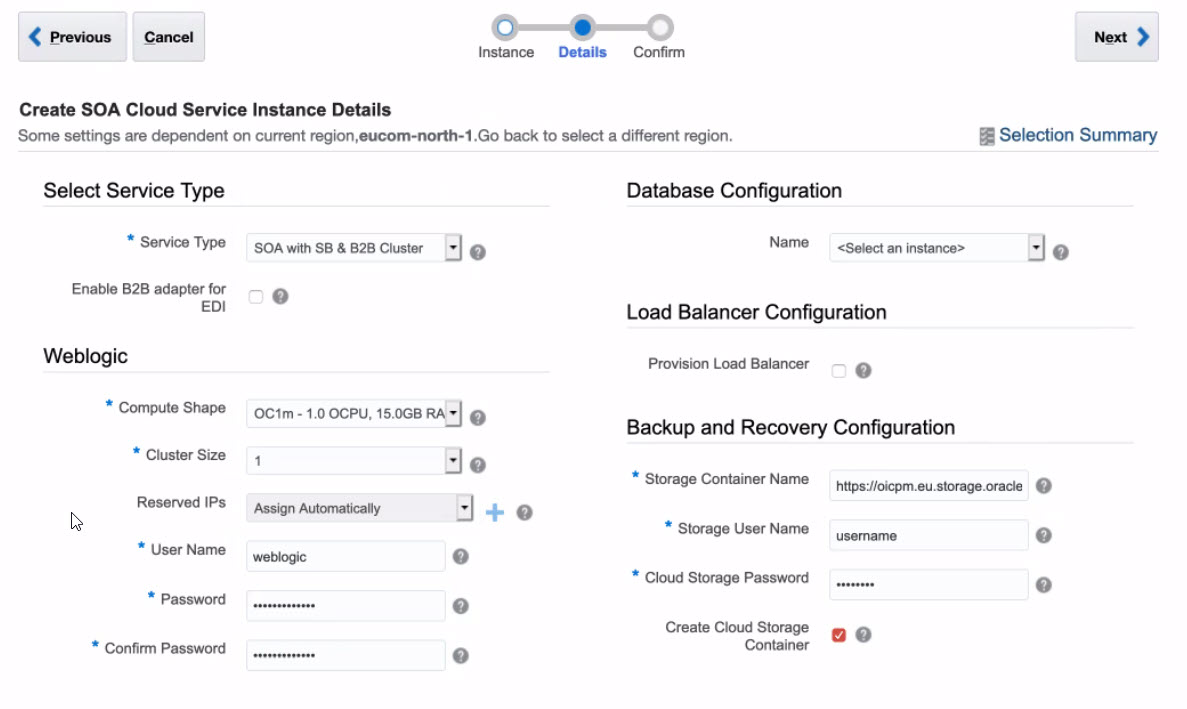
| SOA with SB & B2B Cluster |
Install and configure Oracle SOA Suite, Oracle Service Bus, Oracle B2B, Oracle Technology Adapters, and Oracle Cloud Adapters. When you select this service type, the Enable B2B Adapter for EDI checkbox is presented below the dropdown list. You can choose to enable the B2B Adapter for EDI. See B2B Adapter for EDI. |
Configure WebLogic Server Access
![]() This topic applies only to Oracle Cloud Infrastructure Classic.
This topic applies only to Oracle Cloud Infrastructure Classic.
| Item | Description |
|---|---|
|
Cluster Size |
Oracle SOA Cloud Service always creates a domain with one or more servers in a cluster. Choose the cluster size. Choose between 1, 2, 4 or 8 virtual machines (nodes). Note: If you configure more than one node, it is highly recommended that you enable the load balancer on the next page of the Provisioning Wizard. |
|
Reserved IPs |
Select reserved IP addresses for the nodes in your cluster, or leave the default value as Assign Automatically if you want Oracle to automatically assign IP addresses to these nodes. The number of IP addresses that you select must equal the number of nodes in the cluster. If using Oracle Database Exadata Cloud Service, you must deselect Assign Automatically and explicitly select an IP address. This option is displayed only if you selected a specific Region for this service instance. This field is mandatory if you are using Oracle Database Exadata Cloud Service as your database and optional if you are using Oracle Database Classic Cloud Service. You create IP reservations by using the IP Reservations tab in the Oracle SOA Cloud Service Console or by clicking the + sign to the right of this field. If you do not see this tab on the console, click the gear icon next to this field and follow the instructions to create your first IP reservation. After creating IP reservations, you need to restart the instance creation wizard. See Create and Manage IP Reservations. |
|
Assign IP Reservations |
If you are provisioning an Oracle SOA Cloud Service instance and you associate your service instance with an Oracle Database Exadata Cloud Service database deployment, you must assign the previously reserved IP addresses for your instance nodes. This task is only required if you plan to use an Oracle Database Exadata Cloud Service database deployment for either the Oracle Required Schema or Application Schema databases. For information on reserving IP addresses, see Reserve IP Addresses for Oracle Database Exadata Cloud Service When Region Not Enabled.
You will receive an error message if you click Next and have neglected to specify the reserved IP addresses. If you need to scale out your service at a later time, you will first need to request another IP reservation. |
|
User Name |
The user name of the Oracle WebLogic Server administrator. Note that you can change the user name through the WebLogic Server Administration Console after you have created the instance. |
|
Password |
Specify an Oracle WebLogic Server administrator password that meets the following criteria:
|
Configure the Database
![]() This topic applies only to Oracle Cloud Infrastructure Classic.
This topic applies only to Oracle Cloud Infrastructure Classic.
In the Provisioning Wizard, specify the following information:
| Item | Description |
|---|---|
| Name |
Select an existing Oracle Database Classic Cloud Service or Oracle Database Exadata Cloud Service instance name. Note that only the Oracle Database Classic Cloud Service in the selected region are available for selection. |
| PDB Name |
Enter an optional pluggable database (PDB) name. If a pluggable database name is not specified, the pluggable database name specified during Oracle Database Classic Cloud Service provisioning is used as the default. Note:
|
| Administrator User Name |
Your Oracle Database Classic Cloud Service user name. This value must be set to a database user with SYSDBA system privileges. You can use the default user SYS or any user that has been granted the SYSDBA privilege. |
| Password |
The database administrator password specified when the Oracle Database Classic Cloud Service instance was created. |
Note:
Oracle SOA Suite automatically creates SOA schemas in this database, such as SOAINFRA and MDS. The SOA schemas take the same password that you specified in the WebLogic section of this wizard.Configure the Load Balancer
![]() This topic applies only to Oracle Cloud Infrastructure Classic.
This topic applies only to Oracle Cloud Infrastructure Classic.
Notes:
- If you do not select a load balancer, then the Managed Server URLs (b2bconsole, worklistapp) are not accessible using the load balancer IP address.
- You can add a load balancer later if you do not configure a load balancer while provisioning your Oracle SOA Cloud Service instance. See Add an Oracle Traffic Director Load Balancer to an Oracle SOA Cloud Service Instance Post-Provisioning.
| Item | Description |
|---|---|
|
Provision Load Balancer |
Select the check box to provision a load balancer. A load balancer delivers the following benefits:
If you have more than one node in your cluster and do not choose a load balancer during provisioning, then only one server receives all of the work requests, while the other server(s) in the cluster are idle. The server that receives all of the HTTP requests might become overloaded, while the other servers are under utilized. To add an OTD load balancer later, see Add an Oracle Traffic Director Load Balancer to an Oracle SOA Cloud Service Instance Post-Provisioning. |
|
Load Balancer Policy |
If the Provision Load Balancer check box is selected:
|
|
Compute Shape |
If the Provision Load Balancer check box is selected:
Select the number of Oracle Compute Units (OCPUs) and amount of RAM memory that you want to allocate to the VM for the load balancer. The larger the compute shape, the greater the processing power. The valid compute shapes for Oracle Cloud Infrastructure Classic are:
Note that you cannot change the compute shape after you have created the Oracle SOA Cloud Service instance. |
|
Reserved IPs |
If the Provision Load Balancer check box is selected:
Select a reserved IP address. If using Oracle Database Exadata Cloud Service, you must deselect Assign Automatically and select an IP address. You must select a different IP address from what you selected in the WebLogic section of the wizard. That IP address is disabled from selection in this list. |
Configure Backup and Recovery
Note:
You must have a current subscription to Oracle Cloud Infrastructure Object Storage Classic.
| Item | Description |
|---|---|
|
Storage Container Name |
Enter the name of the Oracle Cloud Infrastructure Object Storage Classic container used to provide storage for your service instance backups using the following format:
For example:
Note: If the storage is used to back up the database, the name cannot include more than one “-” character in the name. If the name contains more than one “-” character the backup will fail. By default, all backups that are more than seven days old are moved to the storage service at this URL. |
|
Storage User Name |
The name of the Oracle Cloud Infrastructure Classic administrator. |
|
Cloud Storage Password |
The password, generated in Oracle Cloud Infrastructure Classic, for the user who created the specified container. |
|
Create Cloud Storage Container |
Select this check box to use the information you specified to automatically create the storage container for you. |
Confirm Your Selections
![]() This topic applies only to Oracle Cloud Infrastructure Classic.
This topic applies only to Oracle Cloud Infrastructure Classic.
Note:
It takes about an hour and a half to create the instance. You are notified by email when it has been created.
