On-demand Onboard
You can use the Oracle Data Cloud platform on-demand onboard feature to independently onboard and activate the user data stored in your data warehouse, CRM database, or any other offline source anytime via the User Data API. You can run models and analytics in your offline source to segment your users and then import their attributes directly into the platform whenever you need to. Your offline data will be added to the platform for activation .
On-demand onboard enables you to do the following:
- Connect your offline source to the platform: Use ID swap and user data API integrations to connect your offline source and the platform.
- Activate users anytime: Segment your users based on product SKUs, articles, models, and analytics and then onboard their attributes into the platform via the user data API for instant activation.
- Rapid and flexible ad-hoc targeting: Quickly onboard content or SKUs that are out-performing expectations.
To use on-demand onboard, deploy the Oracle Data Cloud core tag on your site. The Oracle Data Cloud core tag sends your anonymous unique user IDs (UUIDs) to the platform when users log on to your site. After you write classification rules to map your users' offline attributes to categories you've added to your taxonomy, call the User Data API with your users' IDs and offline attributes. The platform adds your users' offline attributes to their online profiles, which are synced to your UUIDs. In the platform, you can then target categories representing your offline user attributes and deliver them across multiple media execution platforms.
The following diagram illustrates the on-demand onboard process: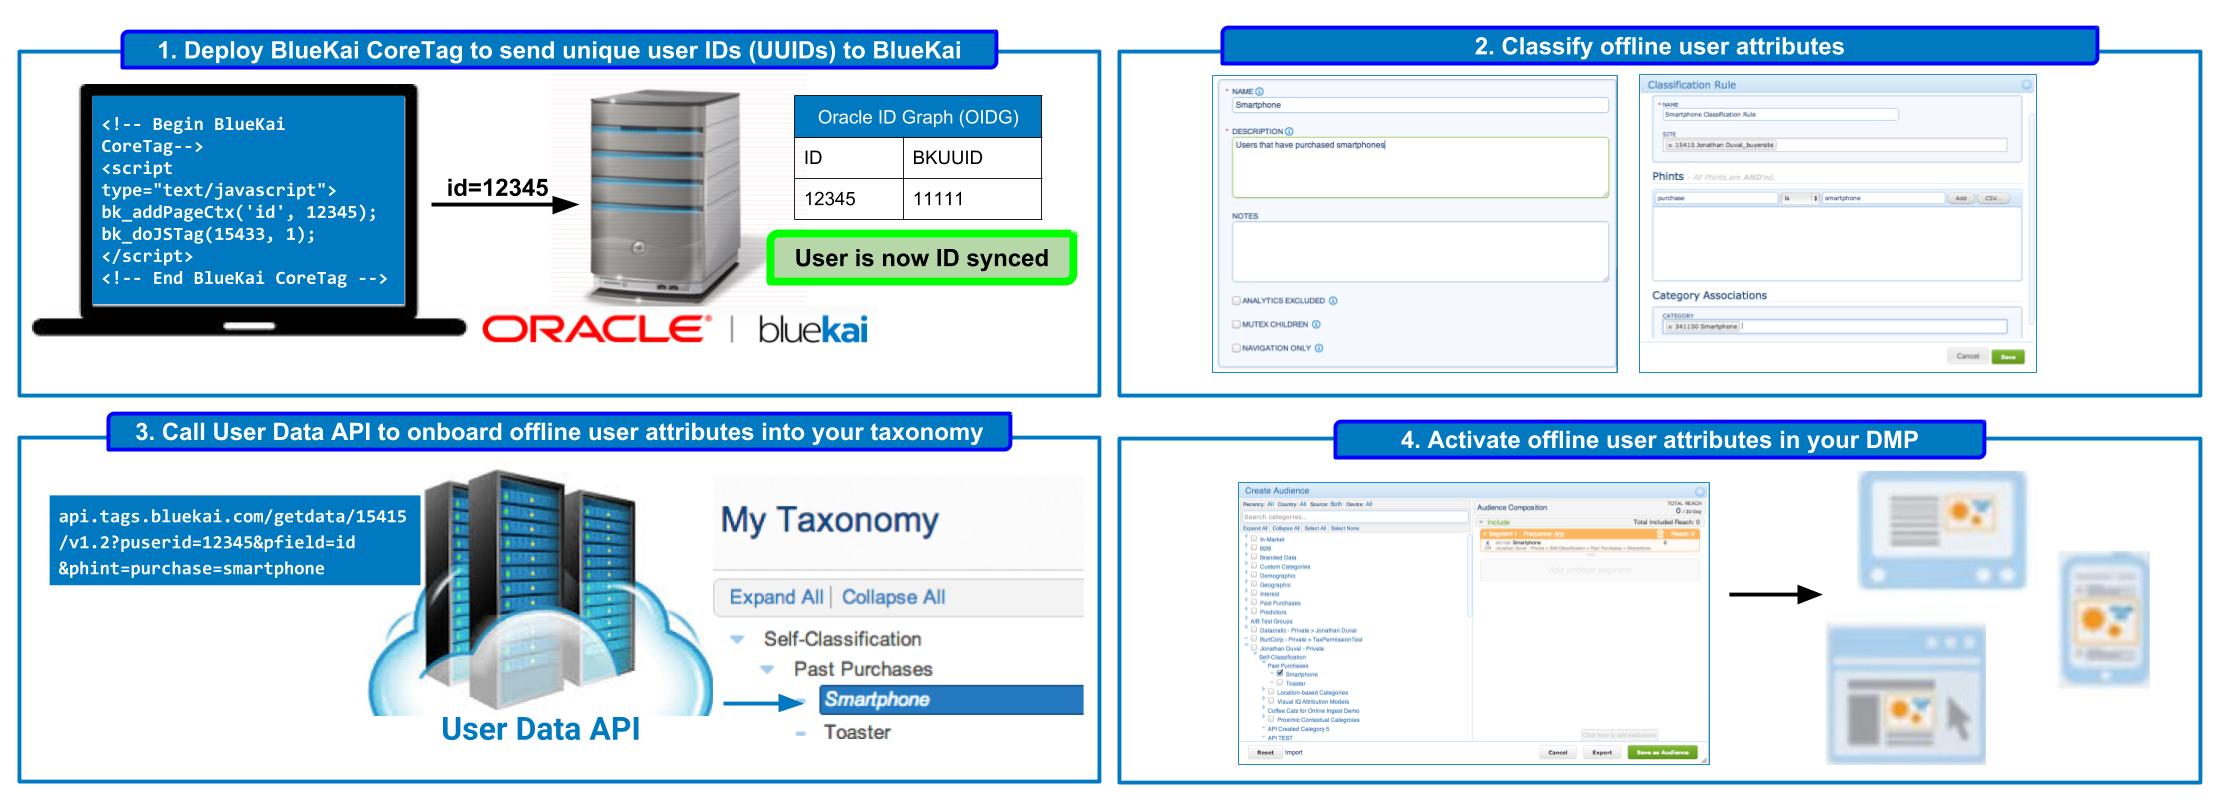
Deploying the Oracle Data Cloud core tag
You can use the Oracle Data Cloud core tag to anonymously identify your site visitors with a cookie ID. The Oracle Data Cloud core tag contains HTML and JavaScript code for collecting UUIDs from your site and sending them to the Oracle Data Cloud platform.
When the platform receives your UUIDs, it synchronizes them to the network of user profiles that are linked together in the Oracle ID Graph. The Oracle ID Graph is used to manage IDs and user attributes for all platform customers. After your UUIDs are synced to the ID graph, you can use the user data API to send your users' offline attributes to the platform.
If you already deployed the Oracle Data Cloud core tag on your site, you can add a phint for passing your UUIDs to the platform using the bk_addPageCtx function.
To create the Oracle Data Cloud core tag and deploy it on your site:
- Create a container to generate a unique site ID that associates your site with the Oracle Data Cloud platform. When your Oracle Data Cloud core tag is fired, the site ID enables the platform to recognize the UUIDs as yours.
Setting Value Name Enter “ID Swap Container for On-Demand Onboard” or another name that makes it easy to identify your container’s functionality. List Type Whitelist (enable) or blacklist (disable) data collection and delivery for users with IP addresses mapped to the countries selected in the Country List.
Use whitelisting to enable data collection/delivery for a small set of countries (all unselected countries are disabled). Use blacklisting to disable a small set of countries. By default, the Netherlands is blacklisted.
Data Providers Onboarding EU Data. To onboard data for user profiles located in the European Union (EU), you must sign Oracle's General Data Protection Regulation (GDPR) Consent agreement. If you have not signed the agreement, but you configure a container or one or more EU countries, the container is created with access to non-EU countries only. Contact your Oracle account representative to obtain and sign the agreement.
Country List Select one or more countries or regions to be whitelisted or blacklisted based on the selected List Type. You can select all the countries in the EU by selecting the EU region.
Default Auction Limit Enter 0 for the number of slots to be allocated on your site for firing third-party pixels. This is the standard limit when ID swapping with the platform. Campaign Access Accept the default (Only Me). - Click Save and Generate Code.
- In the Generate Code dialog, generate the Oracle Data Cloud core tag code . If you used the containers API to create your container, you can copy and configure the Oracle Data Cloud core tag sample provided below.
- Use the following settings for your Oracle Data Cloud core tag:
Setting Value Tag Type Accept the default Synchronous tag type. Site ID Select the HTTP protocol of the page on which the tag is to be deployed (HTTP or HTTPS). Always use a secure ID swap tag (HTTPS) for Web pages that use SSL. Protocol Accept the default Only Me. Add Phints Click Add a Phint, and then enter idin the key box (or another key for identifying your UUIDs in the Oracle Data Cloud platform).Important: Keys support only alphanumeric characters and underscores. Do not include any other characters, such as periods, dashes, and so on.
- Click Copy and then paste the Oracle Data Cloud core tag code before the closing </body> tag on your site. The following example demonstrates the Oracle Data Cloud core tag you will add to your site:
<!-- Begin Oracle Data Cloud core tag -->
<iframe name="__bkframe" height="0" width="0" frameborder="0" style="display:none;position:absolute;clip:rect(0px 0px 0px 0px)" src="about:blank"></iframe>
<script type="text/javascript" src="http://tags.bkrtx.com/js/bk-coretag.js"></script>
<script type="text/javascript">bk_addPageCtx('id', {UUID});bk_doJSTag(YOUR_SITE_ID, 1);</script>
<!-- End Oracle Data Cloud core tag --> - Add code to pass your UUIDs into the
bk_addPageCtxfunction. - If you are using a UUID key other than
id, contact My Oracle Support (MOS) and provide them with your site ID and UUID key type.
Classifying your offline data
To import your offline user attributes into the Oracle Data Cloud platform:
- Create a data map that outlines the keys and values you are passing to the platform.
- Create categories and classification rules that map the user attributes in your offline file to your taxonomy in the platform.
Creating a data map
To organize the offline user attributes you are ingesting and help facilitate the classification process, create a data map. The data map outlines how to organize your offline user attributes in your taxonomy. It also functions as a checklist that you can use to ensure that you’ve created all the necessary categories and classification rules for ingesting your offline data.
The data map should do the following:
- Define the set of attribute keys used in your offline file.
- Define the possible set of values for each attribute key and associate them with human readable category names, if necessary.
- Define the hierarchical relationships, if any, between a set of attribute keys.
Important: Keys support only alphanumeric characters and underscores. Do not include any other characters, such as periods, dashes, and so on.
For example, consider an auto shopping site that collects the makes and models of cars for which users have demonstrated intent to purchase. The key-value pair for the Make node would have the following syntax:MA100=[VALUE]. The example key-value pairs for this node could be as follows:
- MA100=Honda
- MA100=Acura
- MA100=Toyota
The key-value pair for the Model node would have the following syntax:MA110=[VALUE]. Based on the previous example Make nodes, example key-value pairs for the Model node could be as follows:
- MA110=Accord
- MA110=Civic
- MA110=TL
- MA110=TSX
- MA110=Corolla
- MA110=Camry
If the values for the makes were encoded (for example, you pass 23098, 21409, 57983 instead of Honda, Acura, and Toyota), the platform would need human readable category names for these encoded values. For example, the following translations could be used:
- MA110=23098 ->Honda
- MA110=21409 ->Acura
- MA110=57983 ->Toyota
The following data map could then be created for this site:
| Key | Key translation | Value | Value translation (category name) |
|---|---|---|---|
|
MA100 |
Make |
Honda |
Honda |
|
MA100 |
Make |
21409 |
Acura |
|
MA100 |
Make |
57983 |
Toyota |
|
MA110 |
Make>Model |
Accord |
Honda>Accord |
|
MA110 |
Make>Model |
89065 |
Honda>Civic |
|
MA110 |
Make>Model |
TL |
Acura>TL |
|
MA110 |
Make>Model |
TSX |
Acura>TSX |
|
MA110 |
Make>Model |
Corolla |
Toyota>Corolla |
|
MA110 |
Make>Model |
Camry |
Toyota>Camry |
Creating categories and classification rules
A category is a collection of users that have the same attribute (for example, smartphone purchasers). Classification rules map the user attributes extracted from your offline file to categories in the platform taxonomy.
Consider a user that has purchased a smartphone from a brick and mortar store. The offline file could have a "purchase=smartphone" attribute for this user. When this offline attribute is imported into the Oracle Data Cloud platform, it can be mapped to a Past Purchases > Smartphone category in your taxonomy via a classification rule that states "if purchase is smartphone, then the add the user to the Smartphone category.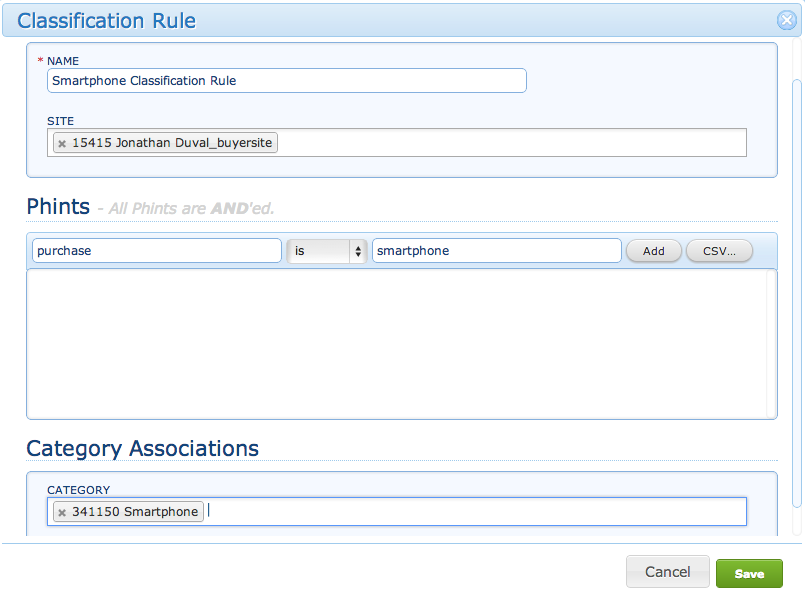
The Oracle Data Cloud platform UI includes the Taxonomy Manager for creating your categories and rules. Alternatively, you can use the category and rule APIs to programmatically create them.
If you purchased consulting services, you can have the Oracle Data Cloud classification and taxonomy team you build your taxonomy.
Calling the user data API
The user data API is a server-side API that you can use to programmatically transfer your user data into the Oracle Data Cloud platform. After you ID swap a user and classify their offline attributes, call the user data API with the site ID, your UUIDs, the key you passed with them in the Oracle Data Cloud core tag (such as id), and key-value pairs (phints) that tag your users' with their offline attributes.
The user IDs will be matched to the ones you passed in the Oracle Data Cloud core tag, and the classification rules you wrote will automatically map your users' offline attributes into the categories you added to your taxonomy. Your offline data will then be ready for targeting, optimization, modeling, and analysis in the Oracle Data Cloud platform.
For example, the following user data API call includes a site ID used for an ID swap ("15433"), passes your UUID ("12345") in the puserid field and the key (id) in the pfield, and tags the user with an attribute ("purchase = smartphone"):
http://api.tags.bluekai.com/getdata/15433/v1.2?puserid=12345&pfield=id&bkuid=a3c18b227976ad07da5d679c7259f726631d39cf49252926407dc05c3e8be643&bksig=uBtWOAzM6cduAbEeaQoU6%2BkNUL87%2Brxudio2DC00Y5c%3D&phint=purchase=smartphone
Important: User data API supports one call per user and approximately 1000 calls per second. The user data API does not include a batch function. will need to make separate API calls on each user for whom you want to ingest attributes. For example, if you have 1M users whose attributes you import into the Oracle Data Cloud platform, you need to make 1M calls to the user data API. For details, see user data API.
After you call the user data API to onboard your offline data, you can add the categories representing your offline user attributes to your target audiences, and deliver the audiences across multiple media execution platforms.
On-demand onboard for web analytics
You can use on-demand onboard to ingest web analytics into the platform. With on-demand onboard for web analytics, you can segment your users based on web data such as events (impressions, clicks, and conversions), page view duration, visitor recency, visitor frequency, and then import these attributes into categories in the platform taxonomy. You can then use your new web analytics-based categories for targeting, optimization, modeling, and analysis.
The process for ingesting web data with on-demand onboard is similar to that for ingesting offline data except that you use tag management tools to deploy an ID swap tag (a pixel) that sends your users' anonymous encrypted unique user IDs (BKUUIDs) to your web analytics platform. You export files from your web analytics platform that include your users' BKUUIDs and web data, and you then pass the BKUUIDs in your calls to the user data API.
On-demand onboard for web analytics supports all major web analytics properties that can receive a custom external user ID (for example, Adobe Site Catalyst). Check with your web analytics platform for the domain where the BKUUIDs should be sent.
To use on-demand onboard for web analytics:
- Create a container to generate a unique site ID that associates your site with the Oracle Data Cloud platform.
- Select Manage > Tags.
- Click Create New to create a new tag.
- In the Name box, enter a descriptive name for your tag schedule (for example, "ID Swap Schedule - On-Demand Onboard for Web Analytics').
- In the HTML box, enter an ID swap pixel that has the following syntax:
<img src="YOUR_WEB_ANALYTICS_PLATFORM?bk_uuid=$_BK_UUID" height = "1" width="1">
The$_BK_UUIDmacro gets your user's BKUUID (a 16-character alphanumeric ID that may include special characters) , which is passed in the call to your web analytics platform.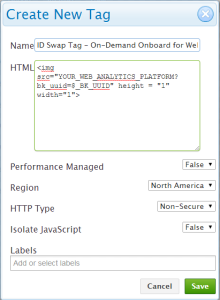
- Click Save.
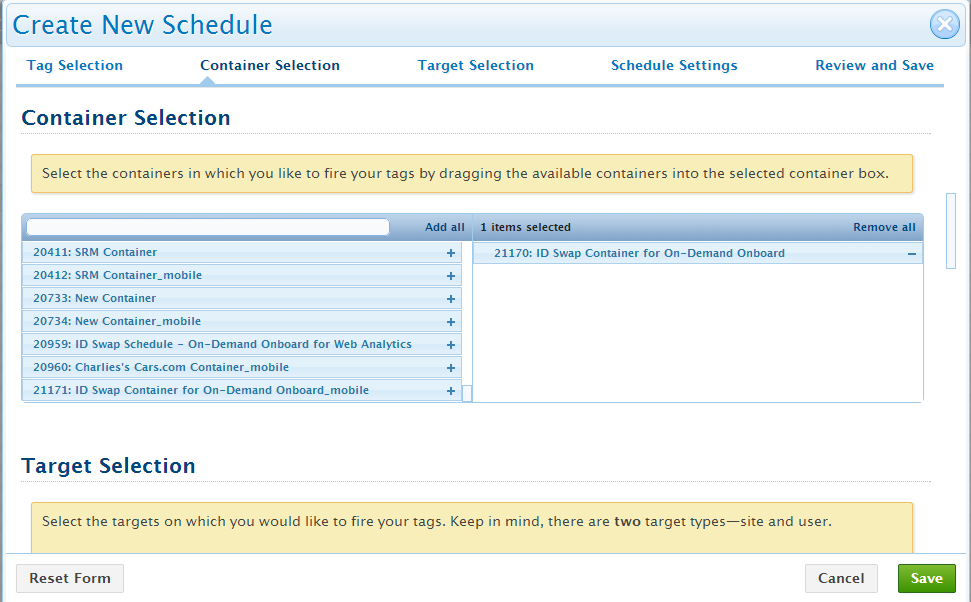
- Select Manage > Schedules.
- Click Create New and then create a new schedule to fire the ID swap tag on your users once every 10 days.
- Under Tag Selection, select the ID swap tag.
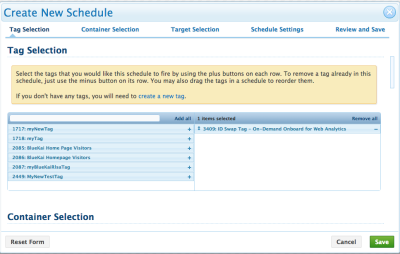
-
Under Container Selection, select the swap ID container you created.
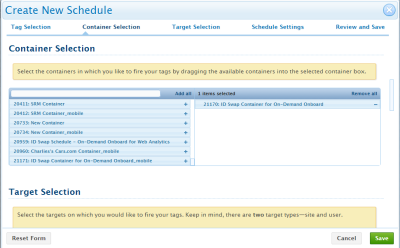
-
Under Schedule Settings, enter the following values for the General settings:
Setting Value Status Active Priority 100 Start Date Enter the date on which the ID swap tag is to start firing End Date Leave blank -
Enter the following values for the Advanced settings:
Advanced setting Value Inside iFrame Enabled Override: Tag Avg. Latency Limit (ms) 5000 Override: Max Tag Execution Time (ms) 1000 Frequency 1 time every 10 days - Click Save.
- Monitor the ID swap tag to verify that it is firing in a timely manner.
- Generate a tag report to see the total number of hits your tag is generating with over a specific time range.
- Classify your web analytics data.
- In your web analytics platform, run a query for users with a BKUUID in your desired segments and then export a file that includes those files. Then programmatically feed the BKUUIDs and web analytics-based user attributes into calls to the user data API.
- Call the user data API. You will use a slightly different syntax when making calls to the user data API when ingesting web analytics data because you are passing BKUUIDs instead of your own UUIDs and the
idkey. For example, the following user data API call includes a site ID used for an ID swap (15433), passes the user's encrypted BKUUID in theuseridfield (IVwOKp9c99OlDDhD), and tags the user with an attribute (purchase = smartphone):http://api.tags.bluekai.com/getdata/15433/v1.2?userid=IVwOKp9c99OlDDhD&bkuid=a3c18b227976ad07da5d679c7259f726631d39cf49252926407dc05c3e8be643&bksig=uBtWOAzM6cduAbEeaQoU6%2BkNUL87%2Brxudio2DC00Y5c%3D&phint=purchase=smartphone