Creating audiences
Before creating an audience, you must create filters for the Customer Data List.
To create an audience:
- Do one of the following:
- On any page, click
 and select Create Audience from the Audiences menu.
 - On the Manage Audiences page, click Create Audience.
The Create audience dialog opens.
- On any page, click
- In the Name field, type a unique name for the audience.
- Select a Customer Data List from the List dropdown list.
- Optionally, type a description in the Description field.
The description appears in the About this audience section of the Audience Designer.
- Click Create.
The Audience Designer opens.
About the Audience Designer
You use the Audience Designer to design an audience.
 Operators
Select the operators for joining filters.
 Design tab
Use this tab to design the audience.
Use this tab to run the audience and view results.
 Segmentation tab
Use this tab to create waterfall-based audience segmentation.
 About this audience
View and edit the audience description.
 Filters
Select the filters for the audience.
 Final Audience
Create the Final Audience. This must be the last stage in the audience.
 Note
Note
Add comments.
 Canvas
Design the audience by dragging filters, operators, and the Final Audience to the canvas.
 Settings
Select audience settings, such as when the audience is automatically unpublished.
 Close
Close
Close the Audience Designer and return to the Manage Audiences page.
 Publish
Publish the audience locally. (This does not publish to other systems, such as Responsys.)
 Save
Save
Save your changes, or save a copy of the audience with a different name.
 Validate
Validate the audience to ensure that it is constructed correctly.
Note: The audience is automatically validated when you attempt to publish it, but you can use this button to validate the audience while designing it.
About filters on the canvas
Filters are displayed on the Audience Designer canvas as follows:
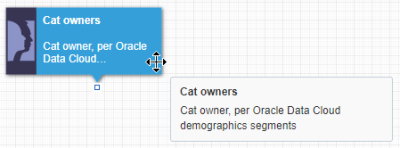
The filter name is displayed in bold, and its description is shown below the name. If the filter description does not fit in the box, move your mouse cursor over the filter to display the full details.
About operators
You can join filters using the AND, OR, or MINUS operators.
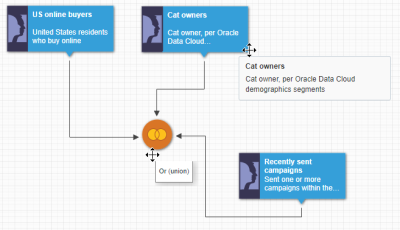
 AND and ORThe AND operator gets only members common to result sets of all filters, and the OR operator gets all members in result sets of all filters.
For the AND and OR operators, you may use up to five filters (paths). The following example shows an audience formed from the union of “US online buyers” OR “Cat owners” OR “Recently sent campaigns”.
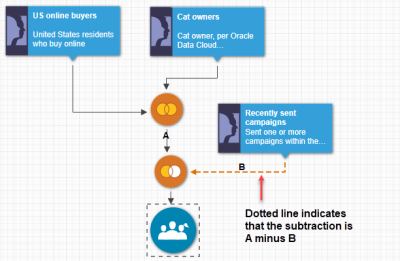
 MINUSThe MINUS operand gets the members as a result of subtracting the result set of one filter from the result set of another filter.
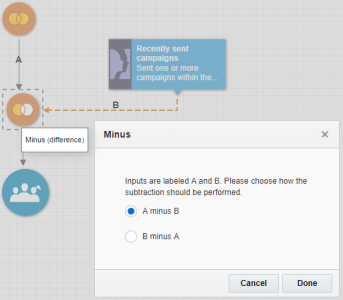
For this operator, you may select only two filters (paths). You must also specify the way subtraction should be performed, path A-B, or path B-A. For example, the following image shows “US online buyers” OR “Cat owners” MINUS those who were “Recently sent campaigns”.
About the Final Audience
The Final Audience terminates the flow and provides the final result set for the audience. This must be the last stage in the audience definition. You may have only one Final Audience in an audience definition.
Designing an audience
To design an audience:
- Select the filter type and the filter from the list of filters and drag it onto the canvas.
You may use up to ten filters in an audience definition. You can also create an audience from a single filter.
To view the filter definition in Filter Designer, double-click the filter on the canvas.
- Join the filters using the AND, OR, or MINUS operators. (If your audience contains only one filter, go directly to step 4 and add the Final Audience stage.)
- For the MINUS operator, specify the way the subtraction should be performed:
- Add the Final Audience stage.
- Specify when the audience should be unpublished and the email addresses to receive notifications about the audience:
- Click Settings and expand Options.
- Select the auto unpublish option you want from the Lifecycle options list.
- Type the email addresses in the Enter email address to receive notifications about this audience field.
Separate multiple addresses with commas or semicolons.
- Click OK.
- Click Validate to ensure that your audience is constructed correctly.
Any errors are displayed in the Validate section. To continue, fix the errors and re-validate the audience.
Next step


