Managing audiences
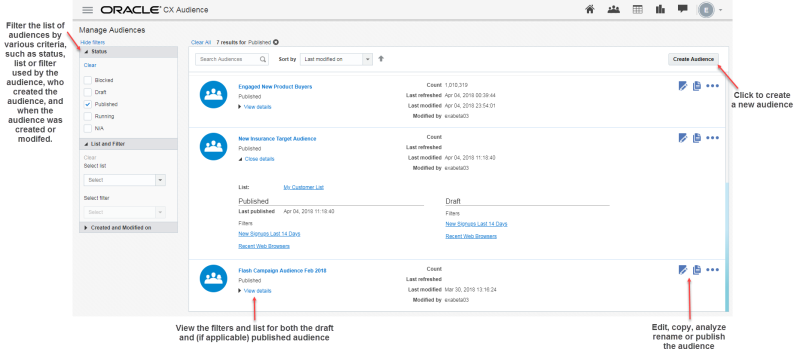
Use the Manage Audiences page to manage audiences from one centralized location. This page displays all audiences in your account, including all Filters used in the audience, and gives you the ability to edit, publish, and analyze your audiences.
To open the Manage Audiences page:
- Click
 .
. - Select Manage Audiences from the Audiences menu. The Manage Audiences page is displayed.
To open an audience:
- Click the audience name. The audience opens in Audience Designer.
Managing audience lists and filters
By default, the Manage Audiences page displays audiences created for all Lists by all users. You can view audiences for a specific List, and for audiences created by a specific user.
To filter the audience list:
- Expand the filter categories, and then select the filter criteria. You can filter by the following:
- Audience status
- Lists and filters used by the audience
- Created or last modified date ranges
- Who created or modified the audience (available in the "Created and Modified on" category)
To restore default filter field values:
- Click the Clear button to clear individual filter criteria, or click Clear All to remove all filters applied to the audiences list.
To sort the list of audiences:
- Choose the sort criteria from the Sort by list.
- Click the Ascending/Descending arrow to sort the list in ascending or descending order.
Taking actions with your audience
Depending on your audience's status, you can view, edit, publish, and analyze your audience from the Manage Audiences page.
To view audience details:
- Locate the audience for which you want to view details.
- Click the View Details arrow in the audience's row in the table. The row expands to show details.
To take an action with your audience:
- Locate the Audience row of the audience for which you want to take action.
- Use the action buttons at the end of the audience's row to take action. Available actions depend on the audience status. For example, you cannot analyze an audience in Draft status, nor can you delete an audience in Published status.
- Edit opens the Audience Designer page for the audience.
- Copy enables you to save a copy of your audience using a different name. Note that the audience is associated with the same List as the original.
- Analyze opens the Analyze tab for the audience.
- Publish to opens the dialog for publishing the audience to the external system you selected, either your SFTP server or to Oracle Responsys.
- Delete displays a confirmation dialog; click Delete again to complete the action. Note that deleting an audience cannot be reverted. To delete an audience with Published status, go to the Analyze tab and unpublish it first.
- Rename opens the Rename Audience dialog. Type your new audience name in the field, and then click Rename.
