Configuring connections
You can configure one or more connections and modify connections on the app's Connections tab.
Prerequisites
- Install the Salesforce Integration app.
- Salesforce connected app: Create an external client app in Salesforce so that you can get the following values to enter when creating a connection:
- Consumer key: Displayed in the Salesforce connected app after creation.
- Consumer secret: Displayed in the Salesforce connected app
In this topic, you'll learn about:
Creating an external client app
The following instructions are based on Salesforce Lightning. For Lightning Experience and Classic details, see the Salesforce's external client apps and connected apps documentation .
Important: Salesforce Connected apps creation is restricted as of Salesforce Spring ‘26 release. You can continue to use existing connected apps during and after Spring ‘26. However, we recommend using external client apps instead. If you must continue creating connected apps, contact Salesforce Support. See New connected apps can no longer be created in Spring ‘26 for more details.
To configure an external client app in Salesforce:
- Go to https://login.salesforce.com/ and log in to your Salesforce account.
- From the profile drop-down list, select Setup.
- In the Apps section on the left side, select External Client Apps > External Client App Manager. The External Client App Manager page is displayed.
- In the External Client App Manager section, click New External Client App. The New External Client App Manager page is displayed.
- Enter the following required values and any optional values if needed:
- External Client App Name: Enter a descriptive name such as Eloqua Integration.
- API Name: You can accept the default value or enter a different name.
- Contact Email: Enter the email address of the user who will manage the connected app.
- In the API (Enable OAuth Settings) section, select Enable OAuth . Additional options are displayed. Keep the following default security options selected:Require Secret for Web Server Flow , Require secret for Refresh Token Flow, Require Proof Key for Code Exchange (PKCE) extension for Supported Authorization Flows.
- Enter your Oracle Eloqua Callback URL, which depends on your Eloqua pod number:
Pod Callback URL Pod 1 https://apps.p01.eloqua.com/eloqua/salesforce/callback Pod 2 https://apps.p02.eloqua.com/eloqua/salesforce/callback Pod 3 https://apps.p03.eloqua.com/eloqua/salesforce/callback Pod 4 https://apps.p04.eloqua.com/eloqua/salesforce/callback Pod 6 https://apps.p06.eloqua.com/eloqua/salesforce/callback Pod 7 https://apps.p07.eloqua.com/eloqua/salesforce/callback Pod 8 https://apps.p08.eloqua.com/eloqua/salesforce/callback - In the Selected OAuth Scopes section, select the appropriate scopes or select all available scopes.
Important: At the very least, the three Salesforce OAuth Scopes are required. See the FAQ for more information.
- Click Create.
-
Note: The actual Salesforce base URL should be used in the app configuration. The app name is used for labeling and identification purposes only.
- In the External Client Apps section, find your external client app in the list and click its name.
- In the external client app's API (Enable OAuth Settings) section, record the Consumer Key and Consumer Secret values.
Learn more: Salesforce external client app documentation
Configuring a connection in the Salesforce Integration app
To configure a connection:
- Log in to Oracle Eloqua.
- Click the settings icon
 .
. - In the Platform Extensions section, click Apps.
- From the apps list, click Salesforce Integration for Eloqua. The Salesforce Integration for Eloqua page is displayed.
- Click the configure icon . The App Configuration for Salesforce Integration for Eloqua page is displayed.
- Click Connections.
- Click Create Connection.
- Enter a connection name and click Create Connection.
- Click Add an Integration App, which refers to either Salesforce External Client App or Salesforce Connected App.
- In the Add an Integration App section, first select the application type (Salesforce External Client App is recommended by default) enter the Consumer Key and Consumer Secret from your Salesforce External Client app (or Salesforce Connected App). Please note that while Salesforce Connected Apps and External Client Apps both provide OAuth credentials, but they are not drop-in replacements.
- In the "Environment" dropdown, select the target Salesforce environment setting. The "Login URL" value will adjust accordingly.
- Click Add App.
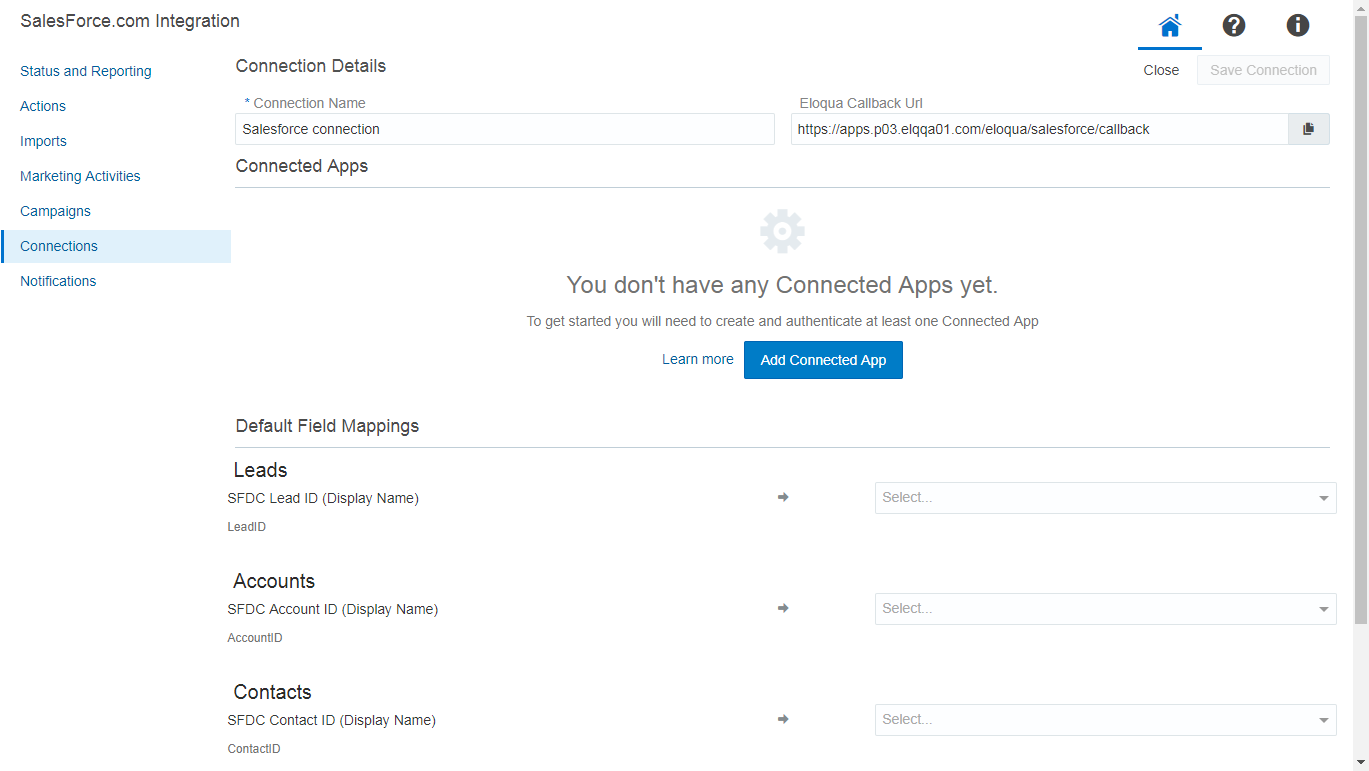
- In the Default Field Mappings section, select the Oracle Eloqua fields to map to the corresponding Salesforce Unique Identifier fields.
- Leads: Select an Eloqua field to map to the lead ID field for Salesforce contacts. By default, it is named SFDC Lead ID.
- Accounts: Select an Eloqua field to map to the registry ID field for Salesforce accounts. By default, it is named SFDC Accounts ID.
- Contacts: Select an Eloqua field to map to the registry ID field for Salesforce contacts. By default, it is named SFDC Contact ID.
- Click Save Connection.
Note: Please verify the value of the SFDC refresh token policy. If it is set to expire immediately, the App authentication will fail.
- Click Close. The Connections page lists existing CRM connections and associated integration apps.
- Next to the new integrated app, click Authenticate App. A Salesforce login dialog is displayed.
Tip: You can choose to have your data routed through a CipherCloud gateway. To do so, configure the login dialog to point to the CipherCloud gateway. You may need to adjust your CipherCloud firewall settings to allow calls from Oracle Eloqua servers.
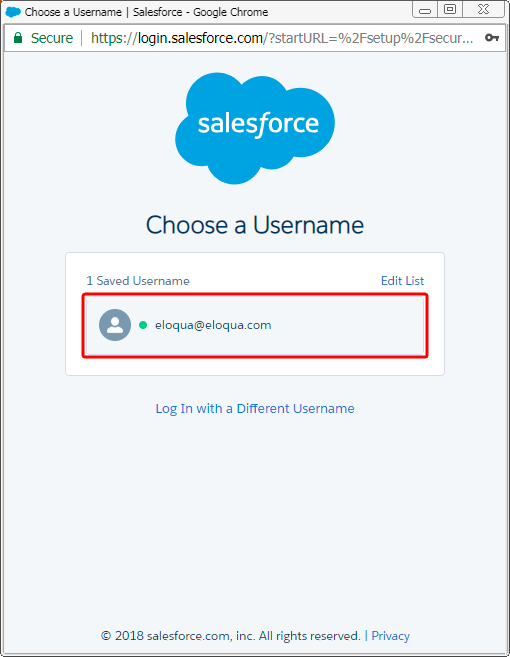
- Click the default user name or log in with a different user name. The Allow Access? dialog is displayed.
- Click Allow. If authentication succeeds, your connected app is ready to be used.
Modifying a connection
To modify an existing connection:
- In the Salesforce Integration app, click the Connections tab.
- Click the connection's menu icon
 and select any of the following options:
- Add Action: Click to create an action and automatically associate it with the current connection.
- Add Import: Click to create an import and automatically associate it with the current connection.
- Add New Integrated App: Add another integrated app to the connection.
- Configure Defaults: Create default imports, actions, and marketing activities if you did not already do this as part of the connection set up.
- Delete: You can delete connections if there are no associated actions or imports. A confirmation dialog will list any dependencies. The dependent actions and imports need to be disabled and deleted before deleting the connection.
- Edit: Open the connection in Edit mode so that you can modify its field mappings or connected app values. You cannot modify the callback URL.
- Migrate Native Assets: You can migrate assets from your native integration to the Salesforce Integration app.

- If a connection has multiple credentials, you can select the radio button to set the default credential. Only one credential per connection can be active at once. For example, one connected may have production credentials while another connected app has credentials linked to a sandbox or test environment.
Configuring defaults for a connection
Once you configure a connection, you can open the Create Defaults section to create default actions, imports, and marketing activities using default mappings. You can alternatively create actions, imports, and marketing activities by manually configuring them.
Note: You can only configure defaults for an authenticated connection.
To configure default imports, actions, and marketing activities for a connection:
- In the Salesforce Integration app, click the Connections tab.
- Click the connection's menu icon and select Configure Defaults.
The Create Defaults page displays all the available imports, actions, and marketing activities for your connection.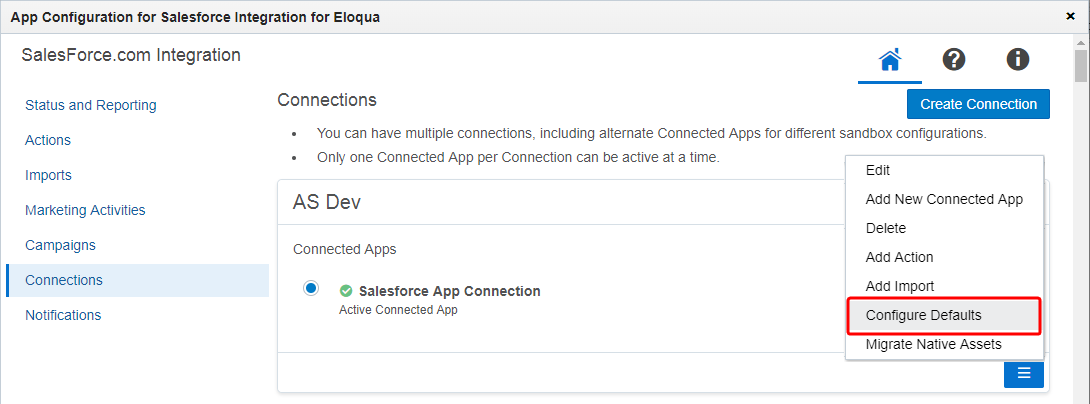
- Select the default fields you want to create for this connection.
- Click Create Defaults. The selected imports, actions, and marketing activities are created with a name that includes the name of your connection. You need to enable imports before you can use them. To do it, go to the Imports tab and click the import's menu icon . After an import is done, you can use a feeder service to make updates on a canvas . Unlike imports, actions and marketing activities are enabled by default and you can start using them right away in a program or campaign.
Note: You will create duplicate actions, imports, and programs if you configure the same defaults for the same connection more than once. The duplicate asset names will include the connection name and either the words New Import or New Action.
Viewing connection errors
The Status and Reporting screen displays errors associated with a current connection. If you have multiple active connections, and a hidden connection reported an error, the Salesforce Integration app will display a notification message at the top of the Status and Reporting screen. To find out which hidden connections have errors, open the connection drop-down.

Connections that have errors will have a warning icon  beside them.
Creating sample programs
You can create sample programs from the Configure Defaults option. If you select this option, the Salesforce Integration app will create the selected programs in a predefined folder named System - SFDC App. The Salesforce Integration app will create all assets required to support these programs, and these assets will include the program name.
Note: The Salesforce Integration app will not create a new program (and related assets) if the program already exists.
To create a sample program:
- In the Salesforce Integration app, click the Connections tab.
- Click the connection's menu icon and select Configure Defaults.
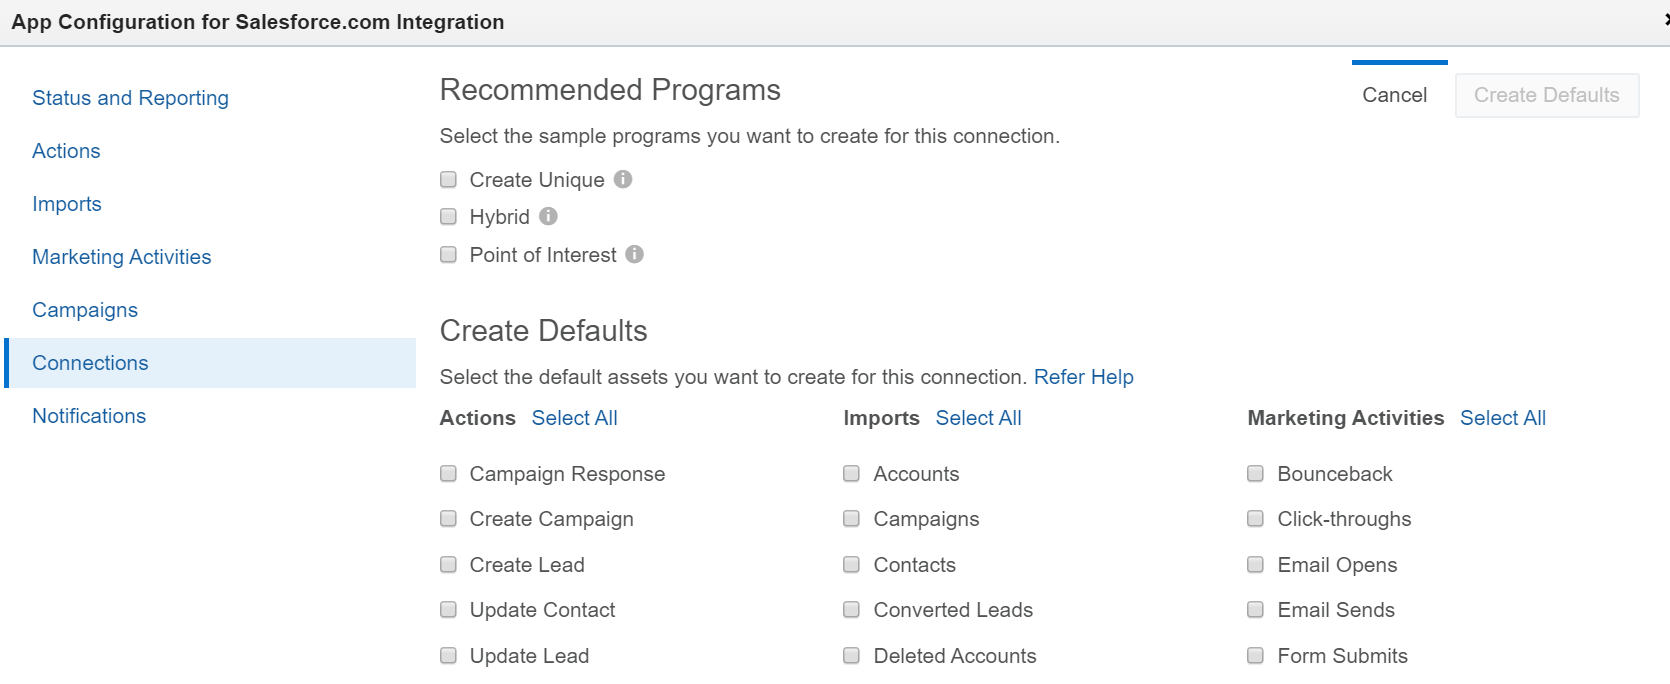
- Select which sample programs should be created. You can create up to three different kinds of programs:
Note: When you select any of the 3 sample programs, required assets are automatically selected as well. For example, if you select the Create Unique sample program, then Create Lead, Update Contact, and Update Lead are automatically selected as well.
- Create Unique: In this program, a new lead record is created in Salesforce only if there is no contact or lead record with the same email address in Salesforce. If there is an existing contact record, the contact record is updated with contact information as defined in the Update Contact action.
- Hybrid: In this program, a new lead is created in SFDC only if there is no unconverted lead record with the same email address in SFDC. Existing unconverted lead records in SFDC are updated with contact information as defined in the Update Contact action.
- Point of Interest: A new lead record is created if there are no leads with the same email address in Salesforce, but an Salesforce contact already exists. If there is an existing contact record, the contact record is updated with contact information from Oracle Eloqua as defined in the Update Contact action.
- Click Create Defaults.
A status bar will display and indicate when the sample program's creation is complete.