Creating imports
Imports are data transactions from Salesforce into Oracle Eloqua. The Salesforce Integration app executes imports every 15 minutes. After an import has been scheduled, an import schedule does not display because imports are executed so often. If an import needs to be performed off schedule, it can be executed on demand. An import may fail due to various reasons such as connection or data related issues. Some of these issues will cause an entire import to fail. You can setup email notifications to alert you when import errors occur.
The following imports are recommended:
- Leads
- Contacts
- Accounts
- Opportunities
When viewing your imports, disabled imports are dimmed to indicate their status. There are several indicators in your list of imports to help you quickly get an overview of their status.
Good to know
- Users can map the Salesforce URL field to the Eloqua Large Text and Text fields. Use the Large Text field if the value in your URL field contains more than 100 characters. Mapping the URL field to any other Eloqua field results in an error.
- For the Account, Contact, and Lead Salesforce objects, you can split the Address field onto a new line in Oracle Eloqua, and the split will remain at the same place once that address is pushed to Salesforce and imported back into Eloqua. For example, if you split an address to a new line after 80 characters, and that's pushed to Salesforce, the address will still be split to a new line at 80 characters once it's imported back into Eloqua.
-
You can update the unsubscribe status using an import from Salesforce to Oracle Eloqua even if the related contact has been deleted in Oracle Eloqua. If you create this contact again, by default it will be unsubscribed from all emails. To update the subscription status, in the import configuration, select the Contact Email Address as the Eloqua target object.
- You can synchronize up to two Salesforce field values into an existing Eloqua picklist. By default, the Salesforce App will append values from Salesforce to an existing Eloqua picklist. Optionally, you can configure the App to overwrite existing Eloqua picklist values by turning on the "Delete Existing Picklist Values" toggle on the Import Edit screen.
Important: The Eloqua picklist Option Name must be unique. Eloqua will reject two pairs of values with the same Option Name, but different Option Value.
Prerequisites
Note: Campaign, opportunity, and user imports have additional prerequisites.
To create an import:
- In the Salesforce Integration app, click Imports.
- Click Add Import and select a connection for which you want to create a new import.
- Complete the import details:
Note: Each import can map up to a maximum of 100 fields. Learn more
- Name: Enter a name for the import.
- Object Mapping: To see available fields for mapping, select an Oracle Eloqua object and Salesforce object and click Fetch. The unique identifiers for field mappings will be determined once Fetch is clicked. Top-level objects from your Salesforce instance are available in the Salesforce Object drop-down.
Note: Salesforce History Objects, with an exception of Salesforce Login History Object, are available to Marketers in the app.
- Import Only Deleted Records: Select this option if you want to recognize only deleted Salesforce records in Eloqua by creating imports for deleted objects.
- Check Email Address Changes: Select this option to have the Salesforce Integration app check for email address changes before running an import. The app will then update a changed email address to the latest before running the import. To use this option, the unique identifier on the Eloqua side must be Email Address. Use this option with caution, as it will increase the import run as well as Salesforce API usage. Learn more about the Check Email Address Changes option.
Important: To use this feature, you must have history tracking enabled in your Salesforce account.
- Filter Details: Enter a Salesforce Object Query Language (SOQL) WHERE clause filter to use on the CRM source field when querying contacts to import and then click Test to test the filter. For details about creating SOQL filters, refer to the SOQL developer documentation.
Tip: When you build complex SOQL queries using logical operators, include parenthesis, otherwise you may encounter a syntax validation error. For example, the filter FirstName = 'Example' OR LastName = 'Contact' should be (FirstName = 'Example' OR LastName = 'Contact').
When your import is executed, the Salesforce App will only sync records that were created or modified since the last successful run. This default behavior is accomplished by adding the LastModifiedDate filter to your WHERE clause (if any).
If you need to use complex SOQL queries with custom date/time filters, select the Don't Include LastModifiedDate for scheduled runs option. The app will then skip the default LastModifiedDate filter when executing the import.
Use the Insert LastSuccessfulUpload option to insert the LastSuccessfulUpload literal into your query. The actual timestamp of the last successful sync when the import executes.
If you use the LastModifiedDate override, the WHERE clause cannot be left blank. For details about creating SOQL filters, refer to the SOQL developer documentation.
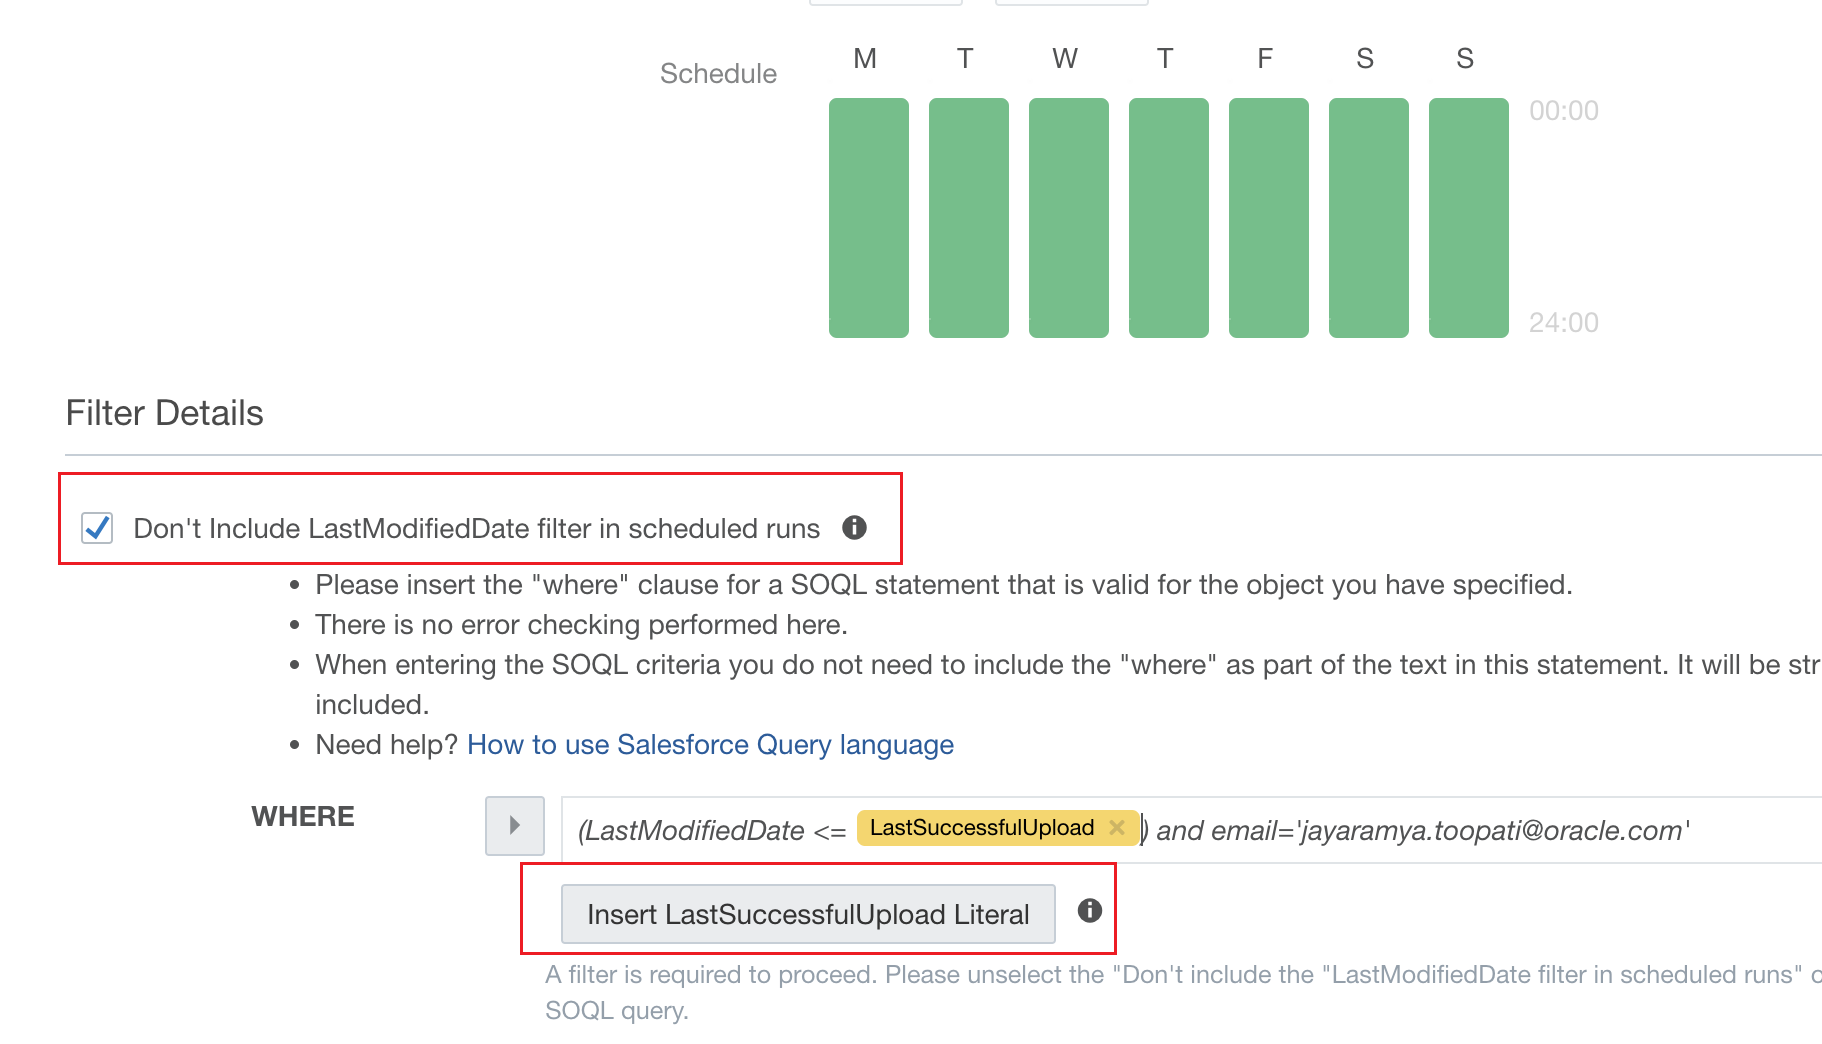
Important: The ability to use the LastModifiedDate override is currently released under our Controlled Availability program. To request access to this feature, please log in to My Oracle Support and create a service request.
- Update Eloqua Fields: Map your unique identifier to specify the object in Oracle Eloqua to update or create. For each field, select the Oracle Eloqua field that will be mapped to Salesforce contacts. If you are creating contact records, the unique identifier is the first mapping shown in this list. Add more mappings by clicking Add Import Field Mapping. Click the menu
 to delete the mapping, to switch the field type to static text, static date, or dynamic date, or to configure the Eloqua field update rules. If you map fields for related objects, you can select the Keep records updated option to trigger updates to all fields of a related object when only fields from one of the objects are changed. For example, if your contact import has a related account object and you select this option, fields from both objects will be updated even if there is a change to only the account object. Additionally, note that:
- You can choose whether or not the Salesforce Integration app will Always update Eloqua fields, even if the new value is blank upon import.
- For any picklist mapping, you can use the Synchronize picklist values from Salesforce before running the import option. After saving the import, the Salesforce Integration app adds the Salesforce picklist values to the existing list of picklist values on the Eloqua side before running the import. Synchronized picklist values from Salesforce are appended to the end of the existing picklist in Eloqua, and the app will remove any duplicate picklist values. Additionally, if users choose to synchronize picklists, it will be reflected in import reports. Specifically, users will see another step in the process and its status. If the picklist's synchronization fails, the import itself will continue to run.
Important: This feature is currently released under our Controlled Availability program. To request access to this feature, please log in to My Oracle Support and create a service request.
- For Contact and Account imports, the Last Modified by CRM Sys field allows you to record when an Eloqua contact or account was last modified by the Salesforce Integration app.
- For Contact, Lead, and Account imports, addresses exceeding 100 characters in Salesforce are split into up to 3 address fields upon import.
- The Salesforce Integration app allows users to map Salesforce boolean values to Oracle Eloqua integer (numeric) values in Eloqua standard objects and custom objects. During the import, Salesforce sends the values of 1 or 0 for boolean fields. The Salesforce Integration app will assign these values as numbers to respective Eloqua numeric fields.
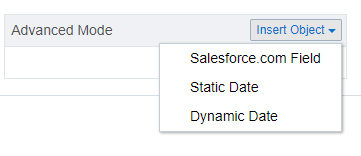
- If you select Advanced Mode from the menu, you can enter multiple objects to be sent to a single Salesforce field: Eloqua Object, Date, or Dynamic Date. You can also type static text into the box as needed. For contacts, you can use advanced mode to select contact and related account fields. For CDOs, advanced mode allows you to select a CDO and its related contact and account fields. You can also select Advanced Mode for Salesforce fields.
- Import Rules: Specify data priority and deduplication rules.

- Data Priority: Select the priority of data to resolve conflicts on imports, such as Bulk API and CRM Integration. If leads and contacts are being imported to Oracle Eloqua contacts, there may be situations where a lead and contact with the same email address exist. Oracle Eloqua's data priority can be used to instruct Oracle Eloqua which source, lead or contact, is higher priority. If the contact import is set to have a higher priority than the lead import, the data imported from the contact will not be overwritten by the lower priority lead data. Higher priority sources are never overwritten by lower priority sources.
- Deduplication type: Specify how to handle duplicate import records. For example, you can chose the most recently updated record or import all records. Deduplication runs per import execution. If multiple records with the same match field value are imported in a single execution, those records will be deduplicated based on the setting specified here. . Learn more about how the different deduplication types work.
- Post Processing: Specify an action to be performed on a contact after import. You can specify a maximum of ten post processing items, including the following actions and any Salesforce feeder elements that you add to a canvas.

- Add to Shared List / Remove from Shared List: Specify whether after the import, contacts should be added to or removed from a shared list.
- Subscribe to Email Group / Unsubscribe from Email Group: Specify whether after the import, contacts should be subscribed to or unsubscribed from an email group.
- Global Subscribe: Specify whether after the import, contacts should be globally subscribed globally unsubscribed.
- SMS Opt-in Phone Number / SMS Opt-out Phone Number: Specify whether after the import, phone number(s) should be opted in or opted out from receiving SMS messages.
- Add Action: Click to add another action to be performed after the import.
Note: The Post Processing steps are only available if the import is defined on Eloqua Contact Object.
- Click Save.
Click the import's drop-down list to modify the import or view reports. You can edit and enable or disable an import. Once an import is disabled, you can delete it.
Clicking Disable temporarily stops the imports. If the import is currently running and has not yet started (it is in either the Retrieve from Salesforce or Deduplicating steps), the import is canceled and disabled. If the import has begun importing to Oracle Eloqua, the import will finish, then be disabled.
Clicking Enable enables your import. Note that the Salesforce Integration app stops imports after 20 consecutive failures, in which case a notification displays at the top of the dialog. The notification remains, and the import is excluded from scheduled runs, until the import's configuration is edited and saved again. You will also not be able to manually trigger the import until the issue is resolved.
Tip: It is encouraged that you configure your notification settings so that you are notified if an import is stopped.
Scheduling an import
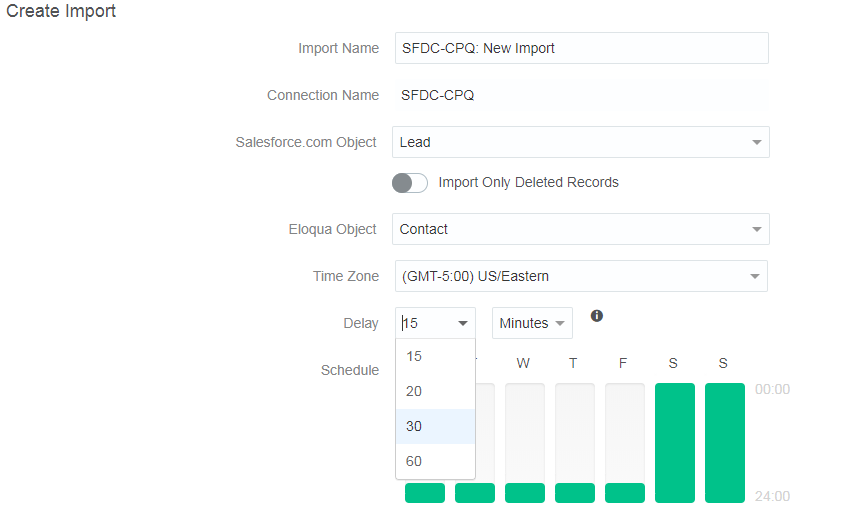
Once you enable an import, it is scheduled to run automatically every 15 minutes by default 7 days per week.
You can alternatively specify a delay between when the previous run finishes and when the next run begins:
- Time zone
- 15, 20, 30, or 60 minutes
- 1, 2, 3, 4, 6, 8, 12, or 24 hours
- Monday through Sunday for a specific range of hours
You can also run the import on demand clicking Run Now and then selecting one of the following:
- A specific date range: When Run Now is used with a date and time filter, the current date and time is pre-populated. The date and time can be changed to a time in the past as desired. Selecting a specific date allows a partial import to be performed.
- All Records: If no date is selected, the import retrieves all matching records from Salesforce and imports them to Oracle Eloqua.
Once you select a specific date range, click Run Import.
Note: The Last Import date indicates the last successful import.
Clicking Disable temporarily stops the imports. If the import is currently running and has not yet started (it is in either the Retrieve from Salesforce or Deduplicating steps), the import is canceled and disabled. If the import has begun importing to Oracle Eloqua, the import will finish, then be disabled. Click Enable to schedule your import to run every 15 minutes.
Deduplication types
To understand how the different record deduplication types affect an import, we will take a look at an example import that includes these 5 example Salesforce records:
| First Name | Last Name | Comment | ||
|---|---|---|---|---|
| Record #1 | Record | One | record_1@example.com | This is the oldest record by creation date |
| Record #2 | Record | One | record_1@example.com | |
| Record #3 | Record | One | record_1@example.com | This is the newest record by last update date |
| Record #4 | Record | Four | record_4@example.com | |
| Record #5 | Record | Five | record_5@example.com |
Based on which deduplication type you select, different records are imported:
| Deduplication Type | Expected Results | Comments |
|---|---|---|
| Import Everything | Only records #4 and #5 are imported into Eloqua. | The remaining three records will be marked as “failed” in the import report with an error message “C_EmailAddress: Multiple matches”. |
| Ignore all duplicates and do not import | Only records #4, and #5 are imported into Eloqua. | The remaining three records will be ignored. No error will be reported. |
| Choose youngest record by last update date | Records #3, #4, and #5 are imported into Eloqua. | The remaining two records will be ignored. No error will be reported. |
| Choose oldest record by creation date | Records #1, #4, and #5 are imported into Eloqua. | The remaining two records will be ignored. No error will be reported. |