Creating user imports
Salesforce users can be imported into Oracle Eloqua. By importing, users can be created and updated, they can be placed in a folder, and added to or removed from a security group.
For example, use user imports to import your Profiler users from Salesforce to Oracle Eloqua. You can configure the import to add these users to the Prospect Profiler security group so that they can access Profiler. In addition, integrating Oracle Eloqua with Salesforce SSO would ensure that these users can easily login to Profiler using their Salesforce login credentials.
Imports are data transactions from Salesforce into Oracle Eloqua. The Salesforce Integration app executes imports every 15 minutes. After an import has been scheduled, an import schedule does not display because imports are executed so often. If an import needs to be performed off schedule, it can be executed on demand. An import may fail due to various reasons such as connection or data related issues. Some of these issues will cause an entire import to fail. You can setup email notifications to alert you when import errors occur.
Good to know
- Map out the Salesforce users and what you want them to be able to do in Oracle Eloqua. For example, a Profiler user will need to be added to the Active Users - Sales and the Prospect Profiler User security groups.
- We recommend using the email address as the unique identifier for users. Additionally, you must map the user's first and last names, email address, user name, and display names.
- The Oracle Eloqua user name must be in the format <first name>.<last name>.
- If you use signature rules in Oracle Eloqua, we recommend mapping signature fields. Learn more
- When mapping user fields, understand the values accepted by Oracle Eloqua.
- Boolean fields accept values of True and False.
-
For testing, use a Salesforce Object Query Language (SOQL) statement to import only one test account. For example, filter for a specific user based on ID.
Prerequisites
- Configured connection
- A BI user report must exist in Salesforce.
To create a user import:
- In the Salesforce Integration app, click Imports.
- Click Add Import and select a connection for which you want to create a new import.
- Complete the Import Details:
- Name: Enter a name for the import.
- Salesforce Object: Select User.
- Eloqua Object: Select User.
- Check Email Address Changes: Select this option to have the Salesforce Integration app check for email address changes before running an import. The app will then update a changed email address to the latest before running the import. To use this option, the unique identifier on the Eloqua side must be Email Address. Use this option with caution, as it will increase the import run as well as Salesforce API usage. Learn more about the Check Email Address Changes option.
Important: To use this feature, you must have history tracking enabled in your Salesforce account.
-
Complete the Filter Details:
- Filter Details: Enter a Salesforce Object Query Language (SOQL) WHERE clause filter to use on the CRM source field when querying users to import and then click the test icon to test the filter. For details about creating SOQL filters, refer to the SOQL developer documentation.
Tip: When you build complex SOQL queries using logical operators, include parenthesis, otherwise you may encounter a syntax validation error. For example, the filter FirstName = 'Example' OR LastName = 'Contact' should be (FirstName = 'Example' OR LastName = 'Contact').
- Filter Details: Enter a Salesforce Object Query Language (SOQL) WHERE clause filter to use on the CRM source field when querying users to import and then click the test icon to test the filter. For details about creating SOQL filters, refer to the SOQL developer documentation.
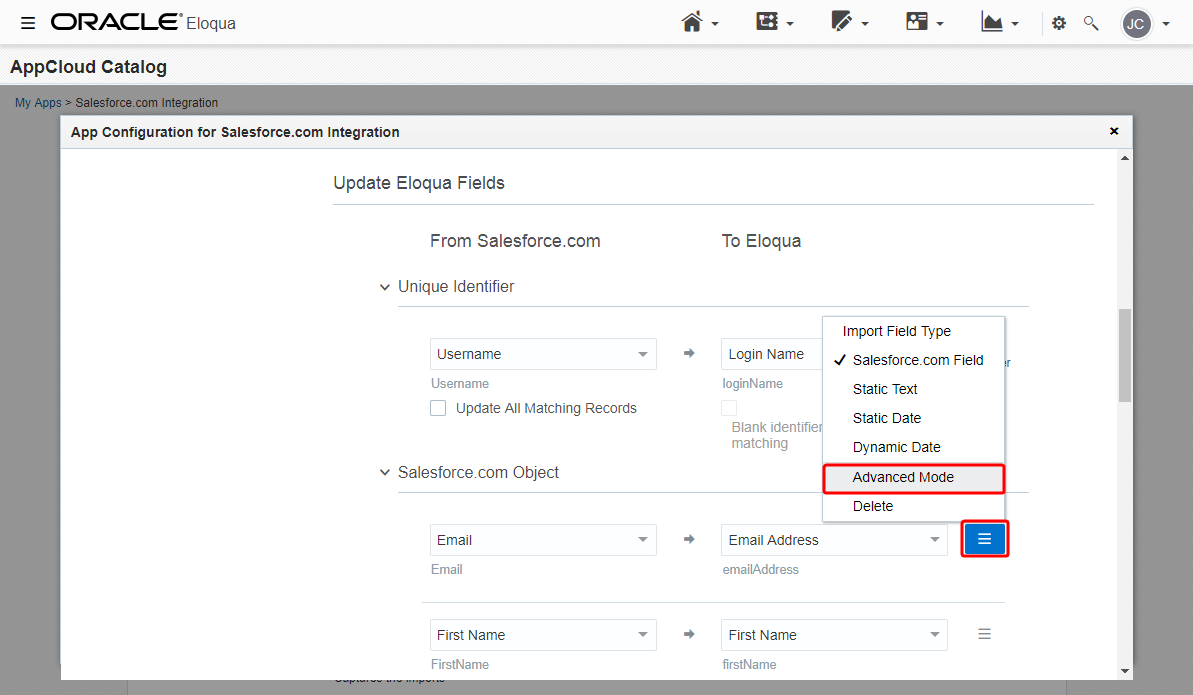
- Complete the field mapping in the Update Eloqua Fields:
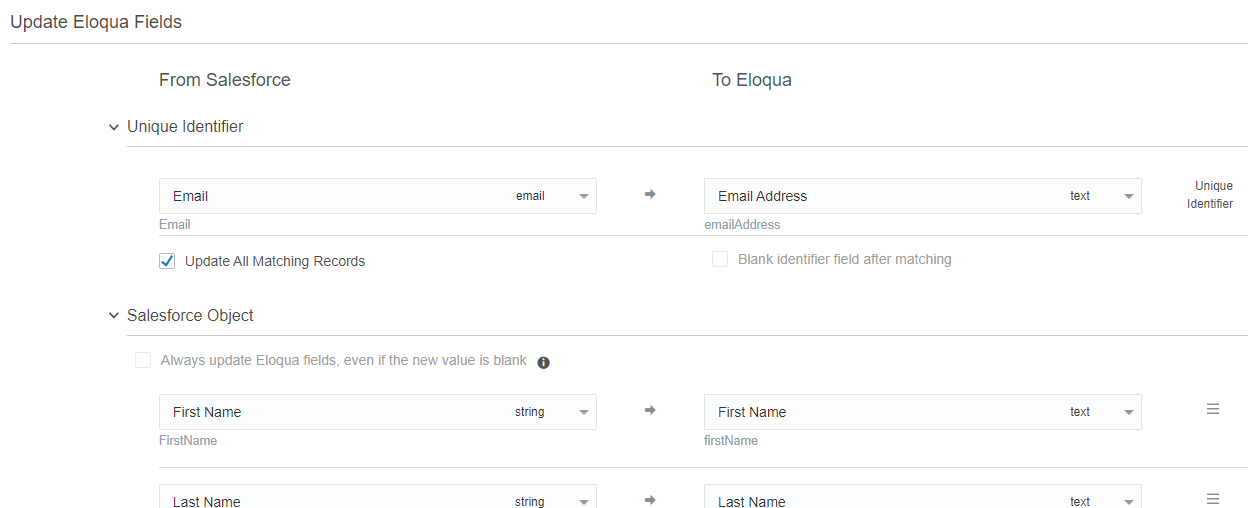
- Map the Unique Identifier fields. We recommend using the user's email address as the unique identifier.
- Map the required fields. Oracle Eloqua requires the user's first and last names, email address, user name, and display names.
- The Oracle Eloqua user name must be in the format <first name>.<last name>.
- Add more mappings by clicking Add Import Field Mapping.
- Click the menu
 to delete the mapping or switch the field type to static text, static date, or dynamic date. Click the menu to delete the mapping or switch the field type to static text, static date, dynamic date, or advanced mode.
 - If you select Advanced Mode from the menu, you can enter multiple items to be sent to a single Eloqua field: Salesforce Field, Static Date, or Dynamic Date. You can also type static text into the box as needed.
If you map fields for related objects, you can select the Keep records updated option to trigger updates to all fields of a related object when only fields from one of the objects are changed.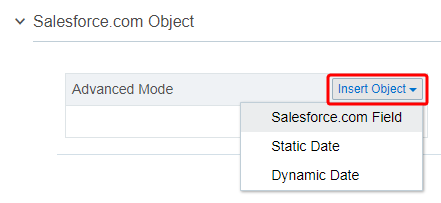
Note: Each import can map up to a maximum of 100 fields. Learn more
- Complete the Import Rules:
- Folder: Select an Oracle Eloqua folder where the users should be added to.
- Deduplication type: Specify how to handle duplicate import records. For example, you can chose the most recently updated record or import all records. Deduplication runs per import execution. If multiple records with the same match field value are imported in a single execution, those records will be deduplicated based on the setting specified here.
- Complete the Post Processing setup:
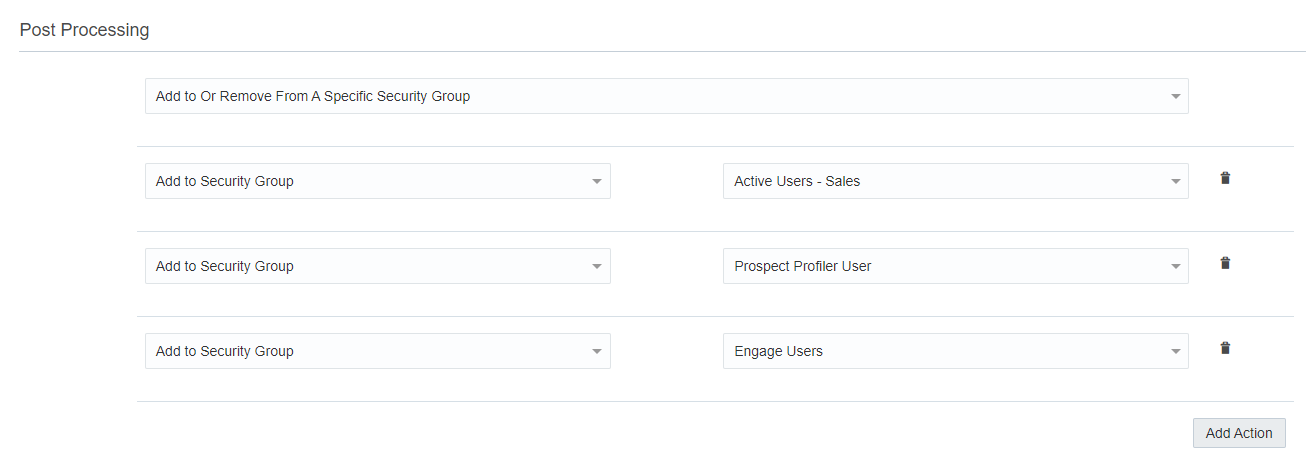
Add to Or Remove From A Specific Security Group / Add to Or Remove from All Security Groups: Specify whether after the import, users should be added to or removed from a security group or all security groups.
- Click Add Action to specify an action to be performed on a user after import.
- Scroll to the top and click Save Import and then Close.
- From the Imports list, click next to the import to edit, enable (to schedule your import) and disable, or view report data for an import.
Clicking Enable enables your import.
Clicking Disable temporarily stops the import. If the import is currently running and has not yet started (it is in either the Retrieve from Salesforce or Deduplicating steps), the import is canceled and disabled. If the import has begun importing to Oracle Eloqua, the import will finish, then be disabled.
After you finish:
-
Once your import is enabled, it automatically runs every 15 minutes.
-
If an import is disabled, you can delete it.
- The Last Import date indicates the last successful import.
- Note that the Salesforce Integration app stops imports after 20 consecutive failures, in which case a notification displays at the top of the dialog. The notification remains, and the import is excluded from scheduled runs, until the import's configuration is edited and saved again. You will also not be able to manually trigger the import until the issue is resolved.
Tip: It is encouraged that you configure your notification settings so that you are notified if an import is stopped.