Creating step actions
Note: This page outlines how to create step actions in the Salesforce Integration app. Learn how to create campaign actions and response actions.
Actions are data transactions between Oracle Eloqua and Salesforce. The Step Actions page is where you create the types of actions to be used in a program or campaign when using the app. You can create two types of actions: Create and Update. Create will create a new record in Salesforce, and Update will take an existing Oracle Eloqua contact and update their information in Salesforce. You can put actions through a test run with pre-configured contacts.
Good to know
- Users can map the Salesforce URL field to the Eloqua Large Text and Text fields. Use the Large Text field if the value in your URL field contains more than 100 characters. Mapping the URL field to any other Eloqua field results in an error.
- For the Account, Contact, and Lead Salesforce objects, you can split the Address field onto a new line in Oracle Eloqua, and the split will remain at the same place once that address is pushed to Salesforce and imported back into Eloqua. For example, if you split an address to a new line after 80 characters, and that's pushed to Salesforce, the address will still be split to a new line at 80 characters once it's imported back into Eloqua.
Prerequisites
To create a step action:
- In the Salesforce Integration app, click Actions.
- Click Add Action and select a connection for which you want to create a new action.
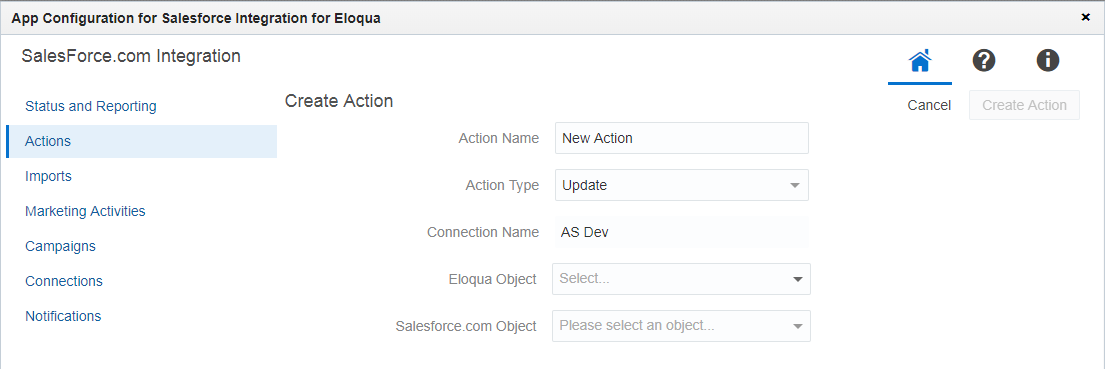
- Complete the action details:
Note: Each action can map up to a maximum of 249 fields. See the Eloqua Developer Help Center for more information.

- Name: Enter a name for the action.
- Action Type: Select an action type from the list to either create, update, or upsert contact records. Note that:
- The Upsert option creates a new campaign member in Salesforce if one doesn't exist, and updates an existing Campaign Member if it exists. The Upsert action type only applies to campaign responses managed by the user and not those managed by Oracle Eloqua. Users need to map the fields themselves and update the status field for Eloqua contacts, as any change to the status of the contact will not be pushed automatically by Eloqua. You can configure the Upsert action with Eloqua custom objects.
Important: When you're using Upsert in an action step in the Campaign Canvas, the Salesforce Integration app will retrieve the Campaign ID automatically. If you're using Upsert action steps on the Program Canvas, you will need to provide the Campaign ID as one of the mappings in the Salesforce Integration app itself.
- You can map any Eloqua custom object field to a static Salesforce ID for the Update action type.
- The Upsert option creates a new campaign member in Salesforce if one doesn't exist, and updates an existing Campaign Member if it exists. The Upsert action type only applies to campaign responses managed by the user and not those managed by Oracle Eloqua. Users need to map the fields themselves and update the status field for Eloqua contacts, as any change to the status of the contact will not be pushed automatically by Eloqua. You can configure the Upsert action with Eloqua custom objects.
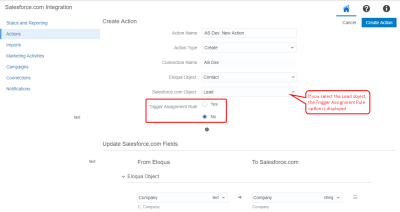
- Object Mapping: To see available fields for mapping, select an Eloqua object and Salesforce object. Top-level objects from your Salesforce instance are available in the Salesforce Object list.
If you select the Lead object from the Salesforce Object list for either a Create or Update action type, the Trigger Assignment Rule option is displayed. If you select Yes, a default assignment rule will be triggered in Salesforce upon lead creation when new Eloqua contacts are added. Only select Yes if you are using lead assignment rules in Salesforce. Setting it to Yes will cause the action to take longer to run and will increase your Salesforce API usage.
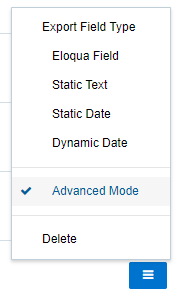
- Update Salesforce Fields: For each set of fields, specify the Salesforce field that will be mapped to Oracle Eloqua contacts. If you are updating contact records, the unique identifier is the first mapping shown in this list. If you are creating records, this option is optional. Add more mappings by clicking Add Field Mapping. Click the menu
 to delete the mapping, or switch the field type to static text, static date, or dynamic date. You can also choose whether or not the Salesforce Integration app should Allow Eloqua field blank values to be sent to Salesforce. By default, this option is always unchecked, that is, the Salesforce Integration app will not send blank Eloqua fields values to Salesforce by default.
 - (Optional) Update Eloqua Fields: For each set of fields, specify the Eloqua field that will be mapped to Salesforce contacts. If you are creating contact records, the unique identifier is the first mapping shown in this list. If it is a Create or Upsert action type, you can set the To Eloqua field to None to avoid a callback to Eloqua. Please note that if you choose to avoid a callback to Eloqua, the related Salesforce record ID will not be populated on an Eloqua object (for example, SFDC Lead ID). In addition, you can add static text, static dates or dynamic dates to the same callback to Eloqua. For example, it may be useful to pass the dynamic date on the Create Lead call to track the exact time when the SFDC Lead ID was populated in Eloqua.
Note: After mapping a lead scoring model in an action, the other models will no longer be available for mapping in that action. Users will need to create another action to map another lead scoring model.
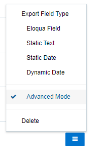
Add more mappings by clicking Add Field Mapping. Click the menu to delete the mapping or switch a From Salesforce field type to static text, static date, or dynamic date. - If you select Advanced Mode from the menu, you can enter multiple objects to be sent to a single Salesforce field: Eloqua Object, Date, or Dynamic Date. You can also type static text into the box as needed. For contacts, you can use Advanced Mode to select a Contact and its fields. For custom objects, the Advanced Mode allows you to select a custom object and its related Contact fields.
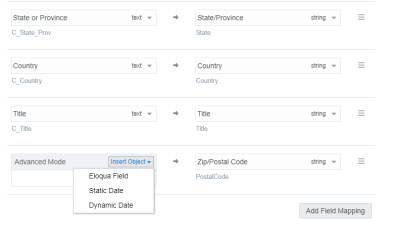
In Advanced Mode, concatenated Eloqua values can be mapped to Salesforce fields of the following types: reference, double, currency, text, string, ID type, and integer.
- Import Rules: Specify data priority.
- Data Priority: Select the priority of data to resolve conflicts on imports, such as Bulk API and CRM Integration. If leads and contacts are being imported to Oracle Eloqua contacts, there may be situations where a lead and contact with the same email address exist. Eloqua's data priority can be used to instruct Eloqua which source, lead or contact, is higher priority. If the contact import is set to have a higher priority than the lead import, the data imported from the contact will not be overwritten by the lower priority lead data. Higher priority sources are never overwritten by lower priority sources. Data priority needs to be specified as part of an action to ensure that higher priority sources are not overwritten by lower priority sources from other imports.
Important: If you are mapping fields that have boolean picklist values, Salesforce requires that your picklist values are represented as either True/False or 1/0
- Click Save.


Your action is created and can be used in a program or campaign.
Click the drop-down list to modify the action. You can edit, enable, disable, duplicate, or view report data for the action. If an action is disabled, you can delete it. If you attempt to delete an action that is used on a canvas, a warning message will display, but it can be overwritten if desired.
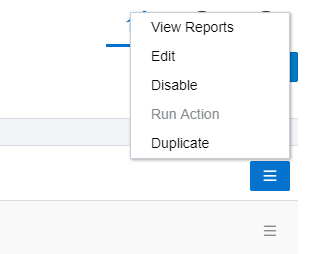
Important: If an action is being used within a program or campaign and the action is disabled, contacts will not be processed until the action is enabled. Once the action has been re-enabled, the app will process all contacts.
Copying Salesforce fields into Eloqua