Configuring campaign canvas elements: Actions
When you add an Action element to a campaign you are specifying campaign details such as where and when contacts will be redirected, or if they will be added to a certain list or to another campaign.
The following is a list of each Action element available on the campaign canvas:
- Add to Campaign
- Add to Program Builder
- Move to Campaign
- Add to Shared List
- Move to Program Builder
- Move to Shared List
- Wait
- Remove from Shared List
- Add to Program
- Cloud Action
- Update Rules
Add to Campaign
This element lets you add segment members from the current campaign to specific elements (including cloud step elements) in a different campaign for further routing and processing.
To configure the Add to Campaign element:
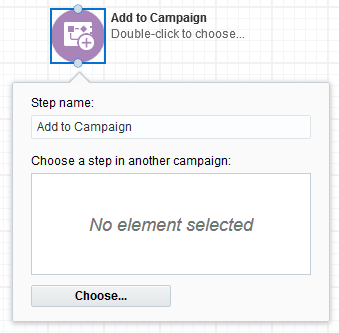
- Type a new name into the Step name text box.
- Click Choose to open the Choose a Campaign Step window.
- Select a campaign from the Choose a campaign drop-down list. The selected campaign opens.
- Select the specific element in that campaign to which you want to send the members from your current campaign, then click Choose.
The window closes and the element from the other campaign appears in the Add to Campaign configuration window. The name of the added campaign and campaign element are now displayed in the new element.
Add to Program Builder
This element lets you add segment members to a selected step in an automated marketing program for further routing and processing.
To configure the Add to Program Builder element:
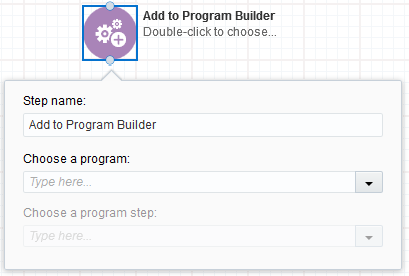
- Type a new name into the Step name text box.
- Select a program from the Choose a program drop-down list or type the name in the field.
- Click a program step from the Choose a program step drop-down list. This is the specific step in the automated marketing program to which you want to send the campaign members.
Move to Campaign
This element lets you move segment members from the current campaign to specific elements (including cloud step elements) in a different campaign for further routing and processing.
To configure the Move to Campaign element:
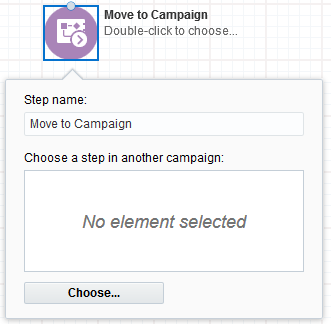
- Type a new name into the Step name text box.
- Click Choose. The Choose a Campaign step window opens.
- Select a campaign from the Choose a campaign drop-down list. The selected campaign opens.
- Click the specific element in that campaign to which you want to move the campaign members from your current campaign, then click Choose.
The window closes and the element from the other campaign appears in the Move to Campaign configuration window. The name of the other campaign and campaign element are now displayed in the new element.
Add to Shared List
This element lets you add segment members in the current campaign to a shared contact list. Adding members to a shared list is a dynamic process. As contacts progress through the campaign steps, Oracle Eloqua adds them to the shared list that you have specified.
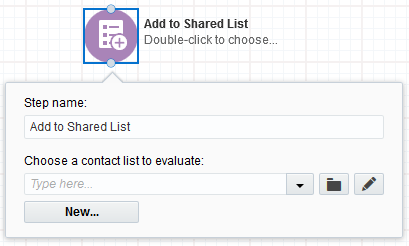
To configure the Add to Shared List element:
- Type a new name into the Step name text box.
- Select a contact list from the Choose a contact list to evaluate drop-down list, or click File Chooser
 and select one from the chooser. To create a new list, click New.
 - Click Edit
 and configure the contact list.
Move to Program Builder
This element lets you move campaign members to a program created using the
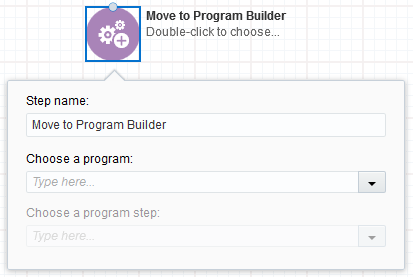
To configure the Move to Program Builder element:
- Type a new name into the Step name text box.
- Select a program from the Choose a program drop-down list, or type the name in the field.
- Select a program step from the Choose a program step drop-down list. This is the specific step in the program to which you want to move the campaign members.
Move to Shared List
This element lets you move segment members to a shared list that can be used by other marketers (users) in your organization in campaigns and segments.
To configure the Move to Shared List element:
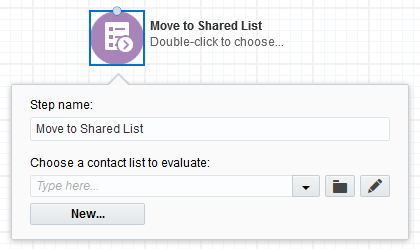
- Type a new name into the Step name text box.
- Select a contact list from the Choose a contact list to evaluate drop-down list, or click File Chooser and select one from the chooser. To create a new list, click New.
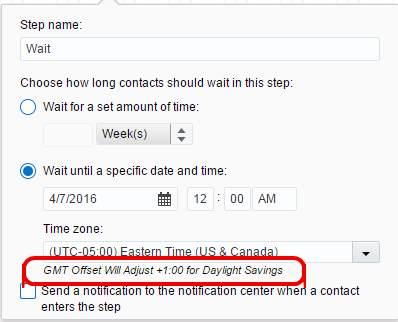
Wait
This element allows you to specify how much time will elapse between steps of your campaign. You can also set up a wait step notification for when contacts enter the step.
Example: If you want to send an email alerting contacts and prospects to register for an upcoming seminar, after the initial email step, you can add a wait step. You can specify an amount of time to wait (hours, days or weeks) before continuing on to the next step, perhaps sending a reminder to those who have not yet responded.
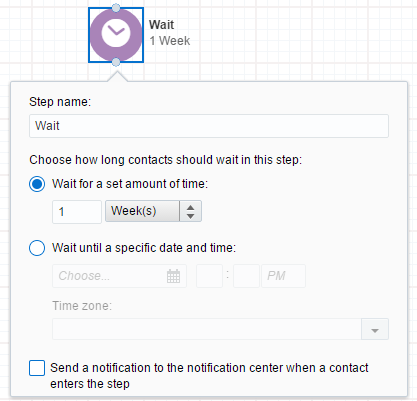
To configure the Wait element:
- Type a new name into the Step name text box.
- Select one of the following options to determine how long the wait interval should be:
Wait for a set amount of time: Specify the number of hour(s), day(s), week(s) or month(s) for the wait period.
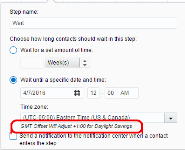
Wait until a specific date and time: Set a specific date and time as the target wait period. Confirm the correct time zone is selected.
Note: If Daylight Savings Time affects your time zone, a message shows you how the time will be adjusted.
Remove from Shared List
This element lets you remove segment members from a shared list used by other marketers (users) in your organization in campaigns and segments.
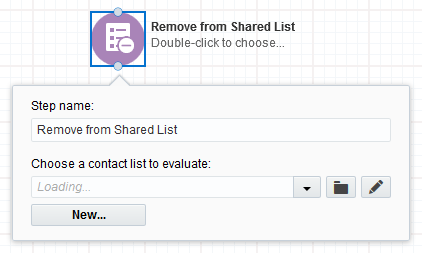
To configure the Remove from Shared List element:
- Type a new name into the Step name text box.
- Select a contact list from the Choose a contact list to evaluate drop-down list, or click File Chooser and select one from the chooser.
Add to Program
This element lets you add segment members to a selected step in an existing program, built using the program canvas.
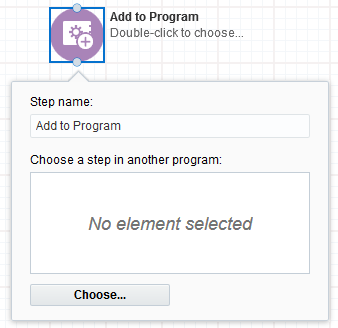
To configure the Add to Program element:
- Type a new name into the Step name text box.
- Click Choose to open the Choose a Program Step window.
- Select a campaign from the Choose a Program drop-down list. The selected program opens.
- Select the specific element in that program to which you want to send the members from your current campaign, and then click Choose.
The window closes and the element from the other campaign appears in the Add to Program configuration window. The name of the added program and the program element are now displayed in the new element.
Cloud Action
Oracle Eloqua AppCloud apps extend Oracle Eloqua's functionality and allow you to integrate Oracle Eloqua with external systems. These apps rely on external systems and require additional configuration so that your campaign progresses even if the app is down or unresponsive. Oracle Eloqua prevents you from adding an app to the canvas if it is down or unresponsive. This prevents you from building a campaign that uses a broken or deactivated service.
Note: Your administrator must add AppCloud apps to your catalog and install them before you can start using them in your campaigns.
To configure the Cloud Action element:
- Enable the check box next to Automatically route contacts with errors from cloud app to prevent contacts from becoming "stuck" in an cloud action step.
- Click Edit to configure the cloud action.
-
Configure the element as desired.
- Scheduling: Select the days and the specific time range that you want to send the email.
- Routing: Enable the check box if you want to automatically route contacts excluded from the email send. Click Choose and specify a target.
- Click Save and close the tab once you have completed your configuration.
Note: You cannot activate a campaign until you fully configure the campaign's AppCloud app.
Update Rules
Move contacts through a rule set in order to update contact fields or custom object records.
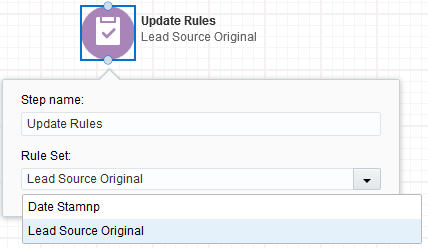
To configure the Update Rules element:
- Type a new name into the Step name text box.
- Select a rule set from the Rule Set drop-down list or type the name in the field.