Android Step-By-Step
This topic provides detailed instructions for integrating your Android app with Oracle Responsys Mobile App Platform Cloud Service.
SDK Support Policy
The Oracle SDK Support Policy for the Oracle Responsys Mobile App Platform Cloud Service SDK / Responsys Push SDK covers only the four most recent Major SDK Releases. For example, if the most current SDK is 6.48.0, the SDK Support Policy covers SDK Versions 6.48.x, 6.47.x, 6.46.x, and 6.45.x.
Supported Platforms and Languages
Supported Android versions: Android 7 (API level 24, Nougat) and later. While the SDK itself supports Android 4.1.x and later for maximum device reach, Oracle provides support/assistance only for the 3 most recent public Android versions.
Supported IDE: Android Studio
Supported languages: Java
Step 1: Set Up an Android Platform for Your App
[1.1] Locate your project's cloud messaging credentials.
[1.2] Configure Oracle Responsys Mobile App Platform Cloud Service for your app using the Responsys Mobile App Developer Console.
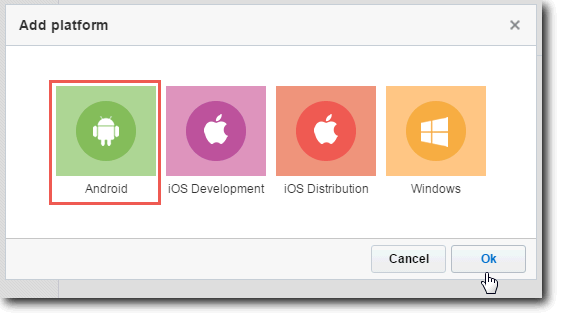
From the Mobile App Developer Console, click Add Platform, select Android, and then click Ok.
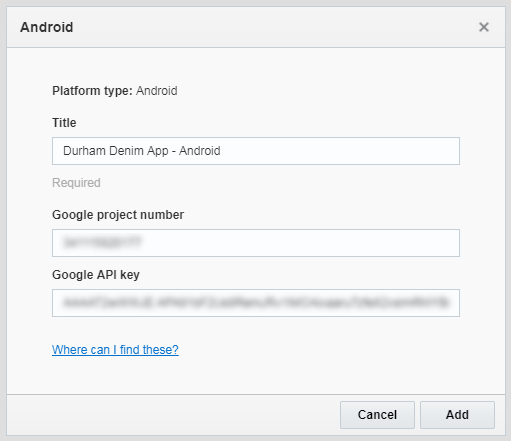
Enter your project's FCM credentials (as described in Getting Your Project's FCM Credentials) in the Android platform dialog.
| FCM Credentials | |
|---|---|
| Google project number field: | Sender ID |
| Google API key field: | Server Key |
These values enable Oracle Responsys Mobile App Platform Cloud Service to target your application through the cloud messaging platform.
Click Add.
Step 2: SDK Installation - Obtain Necessary Files and Add Them to Your Project
Once you have entered your project's FCM Credentials, Oracle Responsys Mobile App Platform Cloud Service generates a pushio_config.json file for you to include in your application. This JSON file is packaged with your FCM Credentials which you entered in Step 1. Oracle Responsys Mobile App Platform Cloud Service uses these cloud messaging credentials to target your application properly. Your application must also include the PushIO Manager SDK for Android.
[2.1] Before you obtain the SDK file, ensure that you have an assets folder in the project structure. Open your app project in Android Studio, and then select the Project view of your project. Expand the folder that shows your project name, and then expand the app folder.
- Expand the
srcfolder, and then expand themainfolder. In themainfolder, create a directory calledassets, if it is not present already. This is where you will put thepushio_config.jsonfile.
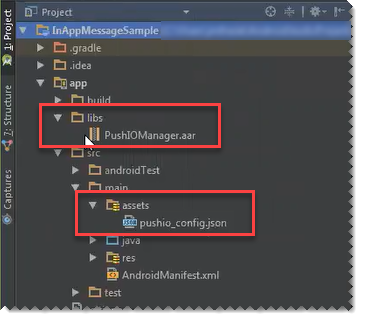
[2.2] Click the Download button for the Android platform, and select pushio_config.json to download the file. Include the file in your project's assets folder:
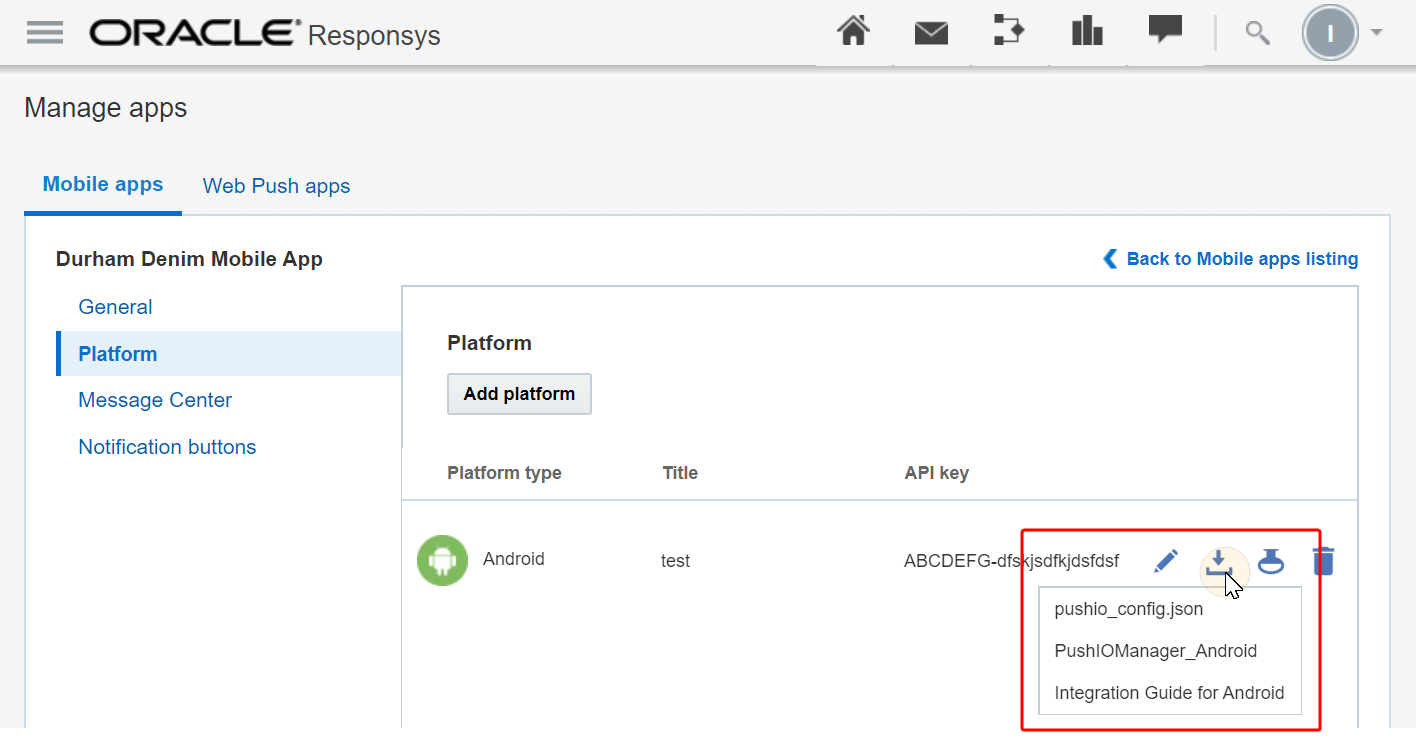
[2.3] Your application must also include the PushIO Manager for Android SDK library. To download the SDK library, select PushIOManager_Android from the download menu, or click this link: Download PushIO Manager for Android.
Locate the libs folder in the project. It should be at the same level as the src folder. This is where you will put the PushIO Manager SDK for Android file, PushIOManager.aar.
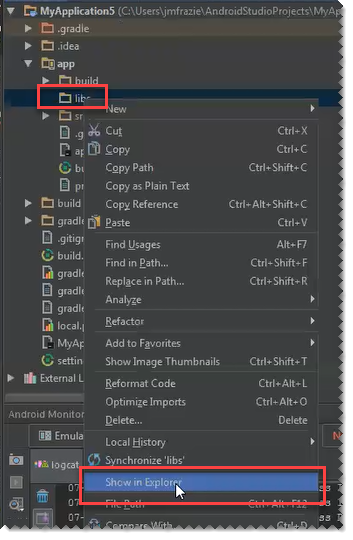
Step 3: Adding Dependencies Using Android Studio
In this section, you'll update your project's build.gradle files. Android Studio projects contain a project-level build.gradle file (contained in the project's top-level folder, typically project-name/build.gradle) and a module level build.gradle file (contained in the project's app folder, typically project-name/app/build.gradle). Ensure that you edit the correct file in the following steps.
[3.1] In your module-level build.gradle file, verify that your compileSdkVersion and targetSdkVersion are set to 28 (Android SDK version 28, Pie) and that your minSdkVersion is set to 16 (API level 16, Jelly Bean) or higher.
    android {
        compileSdkVersion 28
        .
        .
        .
        defaultConfig {
            targetSdkVersion 28
            minSdkVersion 16
       }
    }
[3.2] Open your module's build.gradle file and add the following build rules to the dependencies section, below the existing contents:
dependencies {

    .

    .

    .

    // Place the following SDK-specific build rules below the default Android Studio contents

    implementation fileTree(dir: 'libs', include: ['PushIOManager-6.49.1.aar'])

    implementation 'com.google.firebase:firebase-messaging:22.0.0'

    implementation 'com.google.android.gms:play-services-base:16.1.0'

    implementation 'androidx.core:core:1.6.0'

}
-
If your app uses firebase-messaging library version 21.x.x or later, remember to include the play-services-base dependency.
[3.3] Sync the project with the updated Gradle file.
Step 4: Integrate the SDK
[4.1] In your AndroidManifest.xml file (typically located in the project-name/app/src/main folder), the following user-permissions are required to use push notifications.
Put them inside the manifest element, above the application element.
Note that ${applicationId} will be substituted with the value of the package attribute in the manifest element; that is, your app and package name.
    <uses-permission android:name="${applicationId}.permission.C2D_MESSAGE" />
    <uses-permission android:name="com.google.android.c2dm.permission.RECEIVE" />
    <uses-permission android:name="android.permission.WAKE_LOCK" />
    <uses-permission android:name="android.permission.INTERNET"/>

    <permission android:name="${applicationId}.permission.C2D_MESSAGE" android:protectionLevel="signature" />

    <!-- Permission for your app to handle push notifications -->
    <permission android:name="${applicationId}.permission.PUSHIO_MESSAGE" android:protectionLevel="signature"/>
    <uses-permission android:name="${applicationId}.permission.PUSHIO_MESSAGE"/>

    <!-- Optional permission -->
    <uses-permission android:name="android.permission.ACCESS_FINE_LOCATION" />
[4.2] In your AndroidManifest.xml file, make the following two changes:
1) Set up the PushIOBroadcastReceiver by adding the following lines inside the <application> element, below the main activity element.
    <receiver android:name="com.pushio.manager.PushIOBroadcastReceiver"
        android:permission="com.google.android.c2dm.permission.SEND">
        <intent-filter>
            <action  android:name="com.google.android.c2dm.intent.RECEIVE" />
            <action android:name="com.google.android.c2dm.intent.REGISTRATION" />
            <category android:name="${applicationId}" />
        </intent-filter>
    </receiver>
Even though Google has moved from C2DM, the permissions still use the C2DM name for backward compatibility with older devices.
[4.3] Add the following <intent-filter> in the AndroidManifest.xml, inside the activity that opens when the user taps on the push notification.
        <!-- put inside an <activity> element -->
        <intent-filter>
            <action android:name="${applicationId}.NOTIFICATIONPRESSED"/>
            <category android:name="android.intent.category.DEFAULT"/>
       </intent-filter>
[4.4] In your main Activity class, import the PushIOManager library by adding the following line below the other import statements.
(Your main Activity class is typically located in project-name/app/src/main/java/package-name. If you have not renamed the class from the Android project default, it is called MainActivity.java.)
import com.pushio.manager.PushIOManager;
[4.5] In your main Activity class, override the onCreate() method if it is not already present, and then call PushIOManager.registerApp() from it. This ensures that registration is maintained between all application restarts.
                    // The following line initializes the SDK, ensures that any registration changes are reflected with Responsys,
                    // and sets up users to receive push notifications

                    PushIOManager.getInstance(getApplicationContext()).registerApp();
                        // The following line initializes the SDK, ensures that any registration changes are reflected with Responsys,
                        // and sets up users to receive push notifications

                        PushIOManager.getInstance(applicationContext).registerApp()
To defer the permission prompt for location access: Starting with SDK v6.49.1, you can use the following API to exclude location data as part of the registration. You may find this useful in a scenario where your app would like to defer the request for access to the user's location.
PushIOManager.getInstance(getApplicationContext()).setUseLocation(boolean enabled)
PushIOManager.getInstance(applicationContext).setUseLocation(useLocation: Boolean)
Note that if you do a registration without location data, you should also do a registration with location data at a later stage, when your app is ready to request access to the user's location. You can do this by calling the above API with the parameter value set to true or call PushIOManager.registerApp(true).
Registration Optimization
From SDK Version 6.49 onwards, the SDK sends a registration request to the backend server at the app launch. There is a 12-hour interval between two subsequent registration requests to prevent repeated requests to the Responsys server.
However, this interval is skipped when there is a change in the following parameters:
- Device Location: If the device location changes by more than 500 meters, it is considered a location change.
- Change in the following data:
- User ID
- Notification Permission
- Responsys SDK Version
- FCM Device token
- App Upgrade
- Time Zone
- Notification Preference
- External Device Tracking ID
- Advertising Identifier
[4.6] Add code for known user identification.
Responsys uses the USER_IDENTIFIER parameter to uniquely identify known users of your app. To do this, when the user signs in or signs up in the app, you need to call the register user ID function of the SDK (where <match_key_value> is the value of the match key field):
PushIOManager.getInstance(getApplicationContext()).registerUserId("<match_key_value>");
PushIOManager.getInstance(applicationContext).registerUserId("<match_key_value>")
Coordinate with the Responsys Account Admin regarding which match key field to use; the match key field must be chosen when the Account Admin creates the app channel list and it cannot be changed later. For more information about the match key, and recommendations for choosing which Profile List field to use as the match key, see the Setting up the App Channel List topic in the Mobile App Channel Configuration Guide.
Example of how known user identification works
In the following example, the match key field is CUSTOMER_ID, and let's assume that the CUSTOMER_ID values are normalized on all systems involved (that is, leading and trailing spaces are removed).
1) A customer named John Doe with a customer ID of A1B2C3D4 logs in to your app:
Username: JohnDoe
Password: ABC123
2) Next, the backend server authenticates the user, and sends the app the user's customer ID in the form of a string:
Successful Login to backend server > the customer ID A1B2C3D4 is obtained
3) Finally, the app registers the user with Push SDK Register User Identifier method:
PushIOManager.getInstance(this).registerUserId("A1B2C3D4");
PushIOManager.getInstance(this).registerUserId("A1B2C3D4")
Push SDK User Identifier methods (Android)
public void registerUserId(String userId)- Registers a known userpublic String getRegisteredUserId()- Retrieves the registered userID of a known userpublic void unregisterUserId()- Removes the value from theUSER_IDENTIFIER_field in the App Channel List record
Ready, Set, Push!
This completes the basic Android SDK setup. Once you have built your application and have installed it on a test device or emulator on which Google Play services are installed and updated, you can test your integration.
NOTE: Before you test, verify with the Responsys Account Admin that he or she has completed the mobile app configuration in Responsys, as described in Responsys Mobile App Config.
[1] Obtain the Device ID: From the logging session of a test device or emulator, obtain the device ID from the following line in the log output (where device identifier string is the string unique to the test device):
Your PushIO Device ID is: <device identifier string>
[2] Log in to the Mobile App Developer Console.
[3] Navigate to your app's Platform page.
[4] Click Test.
[5] Enter the Device ID and your message, and then click Send test message.
For more information about testing your app, refer to the Test App topic.
What's Next?
Now that you have completed the basic configurations, it's time to prepare your app for the additional capabilities available when you use Oracle Responsys to send your push and in-app messaging campaigns. We recommend that you continue to the following topics to add features to your app:
- Sounds & Notifications Icons
- Notification Preferences
- Location-based Push
- In-App Messaging & Rich Push
- Listening for Callbacks
- Passing Extra Data
- Engagements & Push Conversions
- Managing Interactive Notifications
- Developing Message Centers on Android
- Customizing UX for Destination URLs
- Importing external device data
- Cross-channel Conversion Tracking
- Geofences and beacons
- Debugging & Logging
Also, see our Android FAQ for troubleshooting information and answers to general questions about PushIO SDK for Android.
Optional - Customize how incoming push messages are handled
On Android, Oracle Responsys Mobile App Platform Cloud Service broadcasts push notifications using the action ${applicationId}.PUSHIOPUSH. If you don't choose to have your app handle this broadcast, the Oracle Responsys Mobile App Platform Cloud Service will create a standard notification for you, using the badge name and sound name to gather the proper resources from your application assets.
If you choose to customize the notification, you must register a broadcast receiver under <application>:
        <receiver
        android:name="${applicationId}.NotificationBroadcastReceiver"
        android:exported="false">
            <intent-filter>
                <action  android:name="${applicationId}.PUSHIOPUSH"/>
                <category android:name="android.intent.category.DEFAULT" />
            </intent-filter>
        </receiver>
Important: Make sure to add attribute android:exported with value as false to the broadcast receiver.
From this broadcast receiver, you can direct the push anywhere you would like. A common practice is to create a JobIntentService that creates the notification. It is important that this BroadcastReceiver notifies PushIOManager that it is handling the notification using setResultExtras(), so that PushIOManager doesn’t create a duplicate notification.
                   public void onReceive(Context context, Intent intent) {
                        CustomNotificationService.runIntentInService(context, intent);
                        Bundle extras = getResultExtras(true);
                        extras.putInt(PushIOManager.PUSH_STATUS, PushIOManager.PUSH_HANDLED_NOTIFICATION);
                        setResultExtras(extras);
                    }
                    override fun onReceive(context: Context, intent: Intent) {
                        CustomNotificationService.runIntentInService(context, intent)
                        val extras = getResultExtras(true)
                        extras.putInt(PushIOManager.PUSH_STATUS, PushIOManager.PUSH_HANDLED_NOTIFICATION)
                        setResultExtras(extras)
                    }
Tip: Use the PushIOActivityLauncher for the PendingIntent of your notifications. Using this class will automatically handle push engagement tracking for you. The PushIOActivityLauncher expects you to pass the notification intent as extras that were received from the broadcast receiver.
                    Intent newIntent = new Intent(this, PushIOActivityLauncher.class);
                    newIntent.putExtras(intent);
                    PendingIntent lPendingIntent = PendingIntent.getActivity(this, 0, newIntent, PendingIntent.FLAG_UPDATE_CURRENT);
                    val newIntent = Intent(context, PushIOActivityLauncher::class.java)
                    newIntent.putExtras(intent)
                    val lPendingIntent = PendingIntent.getActivity(context, 0, newIntent, PendingIntent.FLAG_UPDATE_CURRENT)
To handle an incoming push while your app is running, register a broadcast receiver in the onResume() of your activity, and unregister the receiver in the activity's onPause().
The following example creates a local broadcast receiver, handles the push, and tells PushIOManager that the push was handled in the app. This will automatically track the engagement and prevent PushIOManager from creating a custom notification. this.abortBroadcast() is used to stop the broadcast from hitting the application-wide NotificationBroadcastReceiver that we created earlier.
                    private BroadcastReceiver mBroadcastReceiver;
                    .
                    .
                    .
                    @Override
                    public void onResume(){
                        mBroadcastReceiver = new BroadcastReceiver() {
                            @Override
                            public void onReceive(Context context, Intent intent) {
                                Bundle extras = getResultExtras(true);
                                extras.putInt(PushIOManager.PUSH_STATUS, PushIOManager.PUSH_HANDLED_IN_APP);
                                setResultExtras(extras);
                                this.abortBroadcast();

                                // Your code to handle the push notification.

                            }
                        };
                        registerReceiver( mBroadcastReceiver, new IntentFilter("${applicationId}.PUSHIOPUSH") );
                    }
                    private var mBroadcastReceiver: BroadcastReceiver? = null
                    .
                    .
                    .

                    override fun onResume() {
                        super.onResume()
                        mBroadcastReceiver = object : BroadcastReceiver() {
                            override fun onReceive(context: Context?, intent: Intent?) {
                                val extras = getResultExtras(true)
                                extras.putInt(PushIOManager.PUSH_STATUS, PushIOManager.PUSH_HANDLED_IN_APP)
                                setResultExtras(extras)
                                abortBroadcast()

                                // Your code to handle the push notification.
                            }
                        }
                        registerReceiver(mBroadcastReceiver, IntentFilter("\${applicationId}.PUSHIOPUSH"))
                    }
In onPause(), call unregisterReceiver() to stop listening for incoming push when this activity closes. When this activity is in background/not visible, the incoming push will be directed to the application-wide NotificationBroadcastReceiver that we declared in <manifest> earlier.
                    @Override
                    public void onPause(){
                        super.onPause();

                        unregisterReceiver(mBroadcastReceiver);
                    }
                    override fun onPause() {
                        super.onPause()
                        unregisterReceiver(mBroadcastReceiver);
                    }