In-App – Designing a campaign
Note: The In-app Campaign Workbook has an updated interface and is now called the In-app Campaign Designer. Campaign Designer is now enabled for all accounts, and it replaces Campaign Workbook for this channel. Unlike the Campaign Designer, there were no major changes made to the Message Designer's interface.
Important: This feature is only available if it is enabled for your account.
In this step, you use the In-App Message Designer to create and edit the message. For a description of the In-App Message Designer, see In-App Message Designer Overview. Note also that if your account is enabled for the In-app Redesign feature (available 18D Update or later), you may observe different behaviors in the In-App Message Designer and in your In-App campaigns. Those differences are called out with notes in this topic.
The In-App size of the HTML message must not exceed 3.5 KB. This does not include the referenced image or hosted content. You can see the message size at the bottom of the Message Designer and during preview of personalized messages. If the personalized message exceeds the maximum size for a given recipient, the message will be skipped during launch.
Note: If the In-App Redesign feature is enabled for your account, message length restrictions do not apply when sent to mobile apps built with the Responsys Mobile App SDK version 6.39.0 or greater.
Tasks:
- Selecting a message style
- Creating messages
- Working with dynamic content
- Enabling Link Tracking
- Previewing the message
- Using the toolbar buttons
Selecting a message style
To select the message style, click the style you want under the Message Style heading.
Responsys supports the following In-app message styles:
-
Full Screen: A Full Screen style message completely covers the app, and the app is displayed in the background.
-
Alert: An Alert style message is displayed in the center of the app.
-
Interstitial: An Interstitial message displays in the app but is not full screen. It can be contained within elements in the app display.
-
Banner-Header: The heading of the In-App message displays as a banner at the top of the app.
-
Banner-Footer: The heading of the In-App message display as a banner at the bottom of the app.

Creating messages
You can add message content in one of the following ways:
- Click Choose from Library
 . The Select content dialog opens.
 - Select the file you want and click Select.
Tip: To display the files as tiles, click  . To display the files as a list, click
  .
.
- Drag the file from any location on your computer to the canvas.
- Click Start upload.
- Click browse for a file.
The Open dialog opens.
- Select the file you want and click Open.
The upload dialog opens.
- Optionally, change the character set and upload folder.
- Click Start Upload.
Keep in mind the following:
- Audio and video content must be externally hosted.
- The file size must not exceed the limits shown in the error messages. Larger messages will be skipped.
Note: If your account has the classic personalization token user interface, learn how to configure your token with the classic user interface.
To personalize a message, you insert a token. A token is a placeholder for a value of a data source column.
For compatibility with future releases, we recommend that you limit the number of personalization tokens in your In-App campaign messages. Oracle Responsys will support five or fewer average length personalization token-value pairs (25 characters long each). If your account has the In-app Redesign feature enabled, this limit does not apply.
- In the HTML editor, place the cursor where you want the personalization token to appear.

- Click Insert personalization token
 on the toolbar.
The Insert personalization dialog opens.
- Drag the column you want to the right pane.
Tip: To add columns, click
 .
. - Click OK.

Note: If your account has the classic personalization token user interface, learn how to configure your token with the classic user interface.
Important: The new personalization token user interface simplifies the user experience for marketers.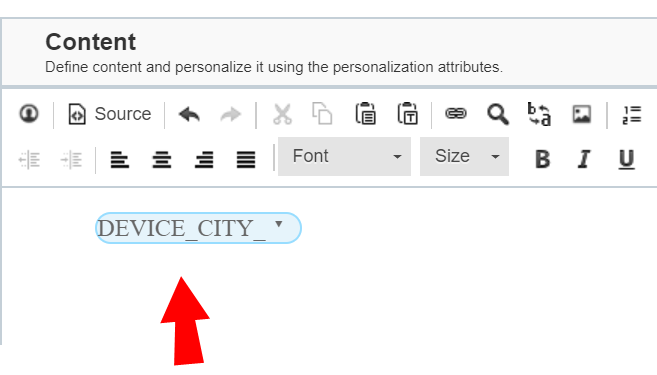
To personalize a message, you insert a token. A token is a placeholder for a value of a data source column.
For compatibility with future releases, we recommend that you limit the number of personalization tokens in your In-App campaign messages. Oracle Responsys will support five or fewer average length personalization token-value pairs (25 characters long each). If your account has the In-app Redesign feature enabled, this limit does not apply.
- In the HTML editor, place the cursor where you want the personalization token to appear.
- Click Insert personalization token on the toolbar.
The possible fields for personalization are displayed in a side panel.
- Double click or drag the column you want to the HTML editor. You can also search for a column using
 .
.Tip: To see further fields, change the data source type from the drop-down or expand profile extensions. The drop-down allows you to choose between Device Data, Profile Data, Supplemental Data, Dynamic Variable, and Recent/Selected.
-
(Optional) Click on the region >
 > Edit HTML then click on the token to select from Styling Options or to delete the token.
Depending on how the Account Administrator set up your account, the Message Designer shows the message in one of two modes:
- Side by side HTML and visual panels
In this mode, the message is displayed in two side-by-side panels. The left panel displays the HTML source, and the right panel which displays the message the way it will appear to your recipients.
Use the HTML panel for editing HTML directly.
You can use the toolbar buttons to edit content.
- Visual and Source tabs
In this mode, you can edit the HTML message in either the Source tab, which shows the source code, or the Visual tab, which shows the message the way it will appear to your recipients.
To switch between the source and visual views, click the Source or Visual button.
You can use the toolbar buttons to edit content.
- Click Change.
The Select content dialog opens.
- Select a file from the Content Library and click Select, or click Upload Content to upload a file then follow the instructions on your screen.
Tip: To display the Content Library files as tiles, click
. To display the files as a list, click .
Working with dynamic content
If the In-App Redesign feature is enabled for your account, dynamic content cannot be used in In-app messages. Oracle Responsys will disable the campaign if it has Dynamic Content Regions in the message.
To create and use dynamic content you need to:
- Create the content regions.
- Define dynamic content rules for the region and specify the action to take, such as display a document or skip recipient, when the rule conditions are met.
- Click in the region you want and click
 .
.The Create dynamic region dialog opens.
- In Dynamic region Name, type the name for the new region then click Create.
The name can include only the following characters: A-Z a-z 0-9 space ! - = @ _ [ ] { }
- Click in the content region you want.
- Click
 and select Remove dynamic region.
A confirmation message opens.
- Click Yes.
Enabling Link Tracking
Link tracking gives you the ability to track recipient clicks for the campaign. For more information, see Understanding Link Tables.
When you set up link tracking, you can either use an existing link table or automatically generate a link table.
Before you begin:
- The Account Administrator must enable automatic link table generation. Learn more about enabling this option.
- For Mobile App campaigns, the campaign must include Rich Message (HTML) content.
- In-app campaigns contain Rich Message content by default.
- For Push campaigns, you must select Notification Action: Open Rich Message.
To enable link tracking in a campaign:
- With the message open in the campaign's Message Designer, click Link Tracking.
For Push campaigns, you must select the option to include Rich Message content in your message. This causes the Link Tracking button to be displayed on the Message Designer page.
- Make sure that the Track links setting is On.
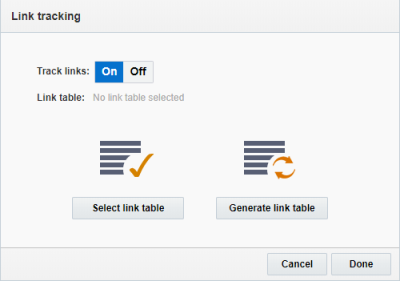
- Choose an option:
- If you want to use an existing Link Table, click Select link table and locate the link table you want to use.
- If you want to generate a new Link Table, click Generate link table. Oracle Responsys generates a link table based on the links in the HTML content.
After you select or generate the link table, you can manage the link table from the campaign Message Designer. You can replace the Link Table, edit the links, or update existing Link Table.
![]()
Enabling External Tracking
External tracking automatically appends tracking parameters to link URLs. You can enable external tracking if you use a third-party web analytics service.
Before you begin:
Before you can enable external tracking, the Account Administrator must define external tracking parameters. Learn more about these account settings.
To enable external tracking
- In the campaign Message Designer, click Link Tracking.
- Select External Tracking.
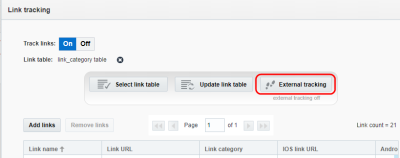
- Click On.
- In the list of available parameters, select the parameters you want to include and select or specify the values for each parameter.
The required parameters are selected by default and cannot be omitted.
- Click Done.
After you enable external tracking, use the External tracking column in the link table to manage the external tracking settings for individual links.
Previewing the message
As you are creating the message, the right pane of the In-App Message Designer displays your text without personalization.
To preview the message with personalization, click Preview.
The preview screen displays the first 25 records from the App Channel List. To preview the message on a device, click View on Device.
Using the toolbar buttons
Use the toolbar buttons as shown below when creating or editing messages.
| To Do This | Use This Button | Notes |
|---|---|---|
| Insert a personalization field |
|
Add personalization to your message. Learn more about configuring this option via the classic user interface or the new user interface. |
| Track link clicks (if Link Tracking is enabled) |

|
|
| Remove all content from the canvas |
|
|
| Undo the most recent action |

|
|
| Redo the most recent action |

|
|
| Cut the selection |

|
|
| Copy the selection |

|
|
| Paste the selection |

|
Next step
- Specify when to trigger the campaign and when it will be visible to the app users.
Additional guidelines for Mobile App campaigns that use rich HTML content
If you have designed a Mobile App campaign that uses rich HTML content, and that campaign is either being sent to a Message Center or is an In-app campaign created with the In-app Redesign setting turned on for your account, you must consider the following:
- Personalization limitations: For compatibility with future releases, we recommend that you limit the number of personalization tokens in your rich HTML content campaign messages. Oracle Responsys supports five or fewer average length personalization token-value pairs (25 characters long each).
- Dynamic Content Regions incompatible: The system does not allow use of Dynamic Content Regions (DCR) in campaigns that meet the conditions described above. Dynamic Content Region (DCR) usage for such campaigns will be disabled in a future update. When this takes effect, any launches you have scheduled for such campaigns will not work. If you do launch any campaigns with Dynamic Content Region (DCR), such campaigns will be disabled / “Closed” by Oracle.
- Editing a launched campaign: Editing or deleting a campaign that has already been launched to your mobile app's end users may cause recipients to see the modified content and not the original content. Instead, if campaign changes are required, create and launch a new campaign.
- SDK Versions: (For accounts with the In-app Redesign feature enabled when they create and launch an In-app campaign.) Messages greater than 3.5 KB will be skipped for recipients who have not upgraded their mobile app to a version using Responsys Mobile App SDK version 6.39.0 or greater. You can add a filter (SDK_VERSION_ is greater than or equal to 6.39.0) to send only to users who have upgraded their mobile app.