Creating a Center Tab
This topic describes how to create a center tab. For general information about creating center tabs, see Creating Center Tabs.
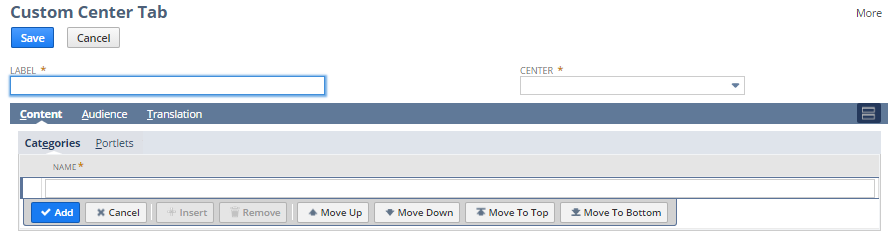
To create a center tab:
-
Go to Customization > Centers and Tabs > Center Tabs > New.
-
In the Label field, enter a name for the tab.
Users click the name to view the contents of the tab.
-
From the Center list, select where you want to add the tab.
If you want to show the tab in all centers, select -All-.
Important:If you choose -All- (to apply the tab to all centers) any custom categories added to this tab must be created using the Classic Center center type. Other center types are not compatible for associating categories with tabs applied across all centers in NetSuite.
Note:If you create a custom center tab and specify that it be shown in all centers, it will not appear in a dashboard that is already published.
-
Click the Content subtab. Then, on the Categories subtab, enter a name for a category of links in the Name column. After creating the categories, you will later follow the steps in Creating Center Links to assign specific links to each category.
Warning:This step is for adding custom categories to custom tabs. If you want to add custom categories to standard, built-in NetSuite tabs, see Creating Center Categories.
-
Click Add.
-
Add all the category links that should appear on the tab.
-
Click the Portlets subtab.
-
In the Type column, add Links.
-
In the Column column, enter left, right, or center to define the location where the portlet appears on the tab.
-
To have the link show, check the Show box.
-
Click Add.
-
Add all the required portlets to the tab.
-
Click the Audience subtab.

-
Define who can access the custom center. For each area, you can make the custom center available to all by checking the Select All box. Indicate the areas that have access. You can specify:
-
roles
-
employees - giving permission to specific employees could create extra maintenance requirements when employees change roles or leave the company. The best practice is to assign a custom center to a role instead of directly to an employee.
-
departments
-
groups
-
customers
-
vendors
-
partners
-
-
On the Translation subtab, enter translated labels for the custom center tab. The Translation subtab is available only if the Multi-Languages feature is enabled in your account. For more information, see Configuring Multiple Languages.
-
Click Save.
-
Next, add links to the categories. See Creating Center Links for details.