Creating Center Categories
Administrators and users with the Custom Center Categories permission can create center categories.
Use the following steps to add custom categories to standard, built-in NetSuite tabs. After creating custom categories for standard tabs, you can then add links to each category. The links can go to NetSuite pages, custom records, Suitelets, or external websites. You need to enable the Custom Records feature to customize center categories.
To add custom categories to custom tabs, see Creating Center Tabs. On the Categories subtab, in the Label column, enter a name for a category of links. After creating the categories, you will later follow the steps in Creating Center Links to assign specific links to each category.
To add custom categories to standard tabs:
-
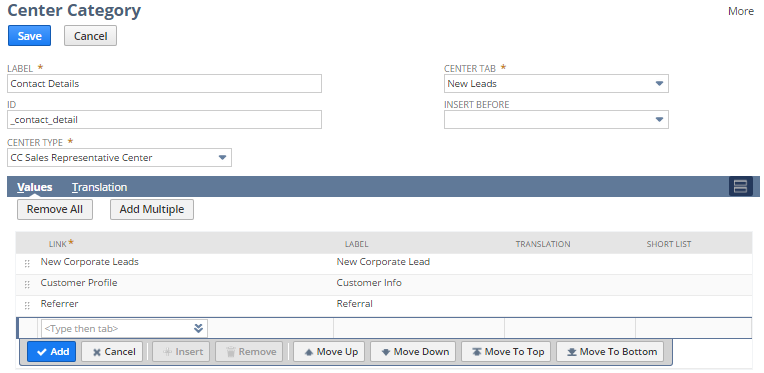
Go to Customization > Center and Tabs > Center Categories > New.
-
On the Center Category page, complete the following steps:
-
In the Label field, enter a category name.
-
In the ID field, enter an ID for the category, if required.
-
From the Center Type list, select an existing center.
Note:If you're adding a custom category to a center tab that's configured to appear in all centers, you must select Classic Center as the Center Type. Selecting any other center type won't permit association of the category with an all-centers tab.
-
From the Center Tab list, select one of the standard, built-in NetSuite tabs (also referred to as sections).
-
From the Insert Before list, select where to insert the custom category.
-
-
On the Values subtab, in the Link list, select the appropriate link.
Available links include NetSuite pages, custom records, Suitelets, and external websites. Links to NetSuite pages, custom records, and Suitelets appear by default.
To select a link to an external website, you must have already created that link by going to Customization > Centers and Tabs > Center Link. See Creating Center Links for details. After the link is created, the link appears in the Link list.
-
In the Label field, enter a UI label for the link.
-
The short list setting is applicable to some center types. In the Short List column, to indicate that the link should appear in a portlet when the link is in a narrow column of the dashboard, check the box.
-
Click Add.
-
Click Save.
-
On the Translation subtab, enter translated labels for the category. The Translation subtab is available only if the Multi-Languages feature is enabled in your account. For more information, see Configuring Multiple Languages.
If you return to the tab and don't see the changes you've made, clear your browser cache.
You can use SuiteCloud Development Framework (SDF) to manage custom center categories as part of file-based customization projects. For information about SDF, see SuiteCloud Development Framework. You can use the Copy to Account feature to copy an individual custom center category to another of your accounts. Each custom center category page has a clickable Copy to Account option in the upper right corner. For information about Copy to Account, see Copy to Account.