Product Lead Time
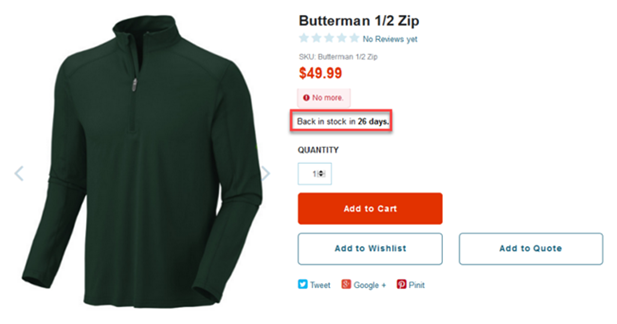
The Product Lead Time extension lets you show the estimated wait time for an out-of-stock item to be available again. This extension uses NetSuite's Lead Time feature to calculate the wait time.
Commerce extensions are available only if provisioned, installed, and activated for a selected domain in your account. For more information, see Commerce Extensions.
Extensions require SuiteCommerce or the Aconcagua release of SuiteCommerce Advanced or later.
To show Product Lead Time for a product, perform the following steps:
Before You Begin
To use the Product Lead Time extension, you need to enable the Advanced Inventory Management feature in NetSuite. Go to Setup > Company > Enable Features > Items & Inventory > Inventory and check the Advanced Inventory Management box.
Configure Properties
To control how Product Lead Time shows up on your website, set the properties in the SuiteCommerce Configuration record. You can choose the message to display on the product page and whether to show lead time as a daily countdown or date.
To configure properties:
-
After you've activated the Product Lead Time extension for a domain, go to Commerce > Websites > Configuration.
For more information about activating an extension, see Manage Themes and Extensions.
-
Select the website and domain where you've activated the Product Lead Time extension, then click Configure.
-
Go to the Extensions tab.
-
In the Product Lead Time subtab, set the following fields:
Field
Description
Message Text
Sets the message to display on the product page of your webstore.
The calculated time automatically replaces the
[[leadtime]]placeholder.You can use basic HTML tags in this field.
Show Lead Time As
Determines how the wait time displays on your website.
Selecting Day Countdown displays the number of days until the item is back in stock.
Selecting Date displays the date when the product will be back, using the format you set in the Date Format field.
If the lead time is less than a day, the wait time shows as one day or the current date.
Date Format
Sets the date format for when the Show Lead Time As field is set to Date.
Maximum Number of Days
Sets the maximum number of days to display.
If the number of days until the product is back is more than the maximum, the maximum number shows in the Message Text.
You can set the Maximum Number of Days at the extension and item level. To override it for a specific item, set the Maximum Number of Days field on the Item record (SuiteCommerce Extensions tab > Product Lead Time subtab).
-
Click Save.
Add Field Sets
The field sets for a website determine the data that is exposed to site templates. To use the Product Lead Time feature, you need to add the Show Lead Time Message field to your site's field sets. For more information about field sets, see Define Field Sets.
To add a Product Lead Time field to the Web Site Setup Record:
-
Go to Commerce > Websites > Website List.
-
Click Edit next to the website where you want to add Product Lead Time.
-
Go to the Field Sets subtab.
-
Add the Show Lead Time Message (Custom) field to both the details and matrixchilditems field sets. For each field set, follow these steps:
-
Find the Fields Included in Field Set column and click Set.
-
Select Show Lead Time Message (Custom) from the Field Name list and click Add.
-
In the Field Set window, click Submit.
-
In the Field Set row, click OK.
-
-
After you add the field to both field sets, click Save.
Enable Product Lead Time for an Item
To show Product Lead Time on your product pages, you need to enable the extension at the item level. You can update item records one at a time or use Mass Update to add Product Lead Time to entire commerce categories. For more information about using Mass Update, see Mass Updates.
To enable Product Lead Time for an item:
-
Go to Lists > Accounting > Items.
-
Click Edit next to the item you want to add Product Lead Time to.
-
Go to the SuiteCommerce Extensions tab.
-
In the Product Lead Time subtab, set these fields:
Field
Description
Show Lead Time Message
If checked, enables the Product Lead Time feature for this item.
Maximum Number of Days
Sets the maximum number of days to display.
If the number of days until the product is back is more than the maximum, the maximum number shows in the Message Text.
You can set the Maximum Number of Days at the extension and item level. This field overrides the Maximum Number of Days field on the SuiteCommerce Configuration record (Extensions tab > Product Lead Time subtab).
-
Click Save.
-
If it's a Matrix Item, click Update Matrix.
-
If not, click Save.
-