Stock Notifications
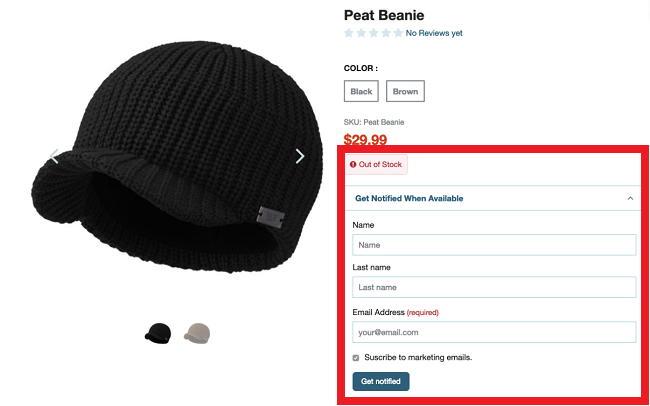
The Stock Notifications extension lets users sign up for an email alert when an out-of-stock item is available again. If enabled, users see a stock notification option on the Product Details pages. Logged-in users can go to the Stock Notifications tab in their My Account page to see the items they're subscribed to, check notification statuses, and cancel notifications if they want.
Commerce extensions are available only if provisioned, installed, and activated for a specific domain in your account. For more information, see Commerce Extensions.
Extensions require SuiteCommerce or the Aconcagua release of SuiteCommerce Advanced or later.
This topic explains how to:
Before You Begin
To use the Stock Notifications extension, set the Out of Stock Behavior field to whatever works best for you. You can choose this setting for each item, so Stock Notifications doesn't have to work the same way for every item. You'll find the Out of Stock Behavior field on the Web Store tab of the Item record.
Check the table below for Out of Stock Behavior field options and how they affect Stock Notifications.
|
Out of Stock Behavior |
Does Stock Notifications Appear on the PDP? |
|---|---|
|
Default |
No |
|
Disallow back orders but display out-of-stock message |
Yes |
|
Allow back orders but display out-of-stock message |
Yes |
|
Remove item when out-of-stock |
No The item is removed from the web store. |
|
Allow back orders with no out-of-stock message |
No If you switch to this option after using one where Stock Notifications showed on the product detail page, subscribers get an email letting them know the item is ready to order. |
For more information, see Item Inventory.
Set Up the Stock Notifications Email Template
After you install the Stock Notifications bundle, create the email template that notifies users when their item is back in stock. You need to create an email template for the extension to work. To set up the notification email, create a new email template in NetSuite using the file included in the Stock Notifications bundle. For more information about modifying an email template, see Customizing Templates for System-Automated Email.
If you know HTML and FreeMarker, you can use the variables in the header of the included file to customize the email template even more. For more information about modifying a template with FreeMarker, see Scriptable Templates.
To set up the email template:
-
Go to File Cabinet > SuiteBundles > [BUNDLE ID] > com.netsuite.backinstocknotification100 > Email Templates.
In the path above, [BUNDLE ID] is the Stock Notifications bundle ID. For the bundle ID, see Commerce Extensions.
-
Click Download next to the stock_notifications_email.template.ftl file.
-
Use this file to create a new email template:
-
Go to Documents > Templates > Email Templates > New.
-
In the Name field, enter a name for your new template.
This name shows up as an option in the Email Template field of the SC Configuration Record, where you pick it to set up the extension's email template.
-
In the Record Type field, select Custom Record.
-
In the Template tab, perform the following steps:
-
In the Subject field, enter the subject for the stock notification email.
For example:
${customRecord.custrecord_ns_sc_ext_sn_s_item?split(":")?last} is back in stock!If you know HTML and FreeMarker, you can change this subject to fit your needs.
-
In the Create Template From: field, select File.
-
Click the New icon to add a file.
-
In the Select File field, choose the stock_notifications_email.template.ftl file you downloaded from the File Cabinet.
-
Click Save.
-
-
Click Save to finish creating the email template.
-
Configure Properties
To control how Stock Notifications show up on your website, configure the properties in the SuiteCommerce Configuration record. You can choose section titles, placeholder texts, feedback messages, and more.
To configure properties:
-
After you've activated the Stock Notifications extension in your NetSuite account, go to Commerce > Websites > Configuration.
For more information about activating an extension, see Manage Themes and Extensions.
-
Select the website and domain where you've activated the Stock Notifications extension, then click Configure.
-
Go to the Extensions tab.
-
In the Stock Notifications subtab, fill out the fields for each category using the tables below as a guide.
-
Click Save.
General Fields:
|
Field |
Description |
|---|---|
|
Section Title - Items |
Sets the title for the Stock Notifications option on the Product Details page (PDP). |
|
Section Text - Items |
Sets the description for the Stock Notifications section. |
|
Subscribe to Matrix Options - Items |
If checked, shows the option for users to subscribe to Stock Notifications for each matrix item variation. |
|
Subscribe to Matrix Options Label - Items |
Sets the label for the Subscribe To Matrix Options - Items box on the PDP. |
User Information Fields:
|
Field |
Description |
|---|---|
|
Email Address Label |
Sets the label for the Email field. Users are asked to enter an email address when signing up for a stock notification. |
|
Email Address Placeholder |
Sets the placeholder text for the Email field. |
|
Mandatory First Name |
Determines if the First Name field is required. |
|
First Name Label |
Sets the label for the First Name field. Users are asked to enter a first name when signing up for a stock notification. |
|
First Name Placeholder |
Sets the placeholder text for the First Name field. |
|
Default Lead First Name |
Sets the default text for the First Name field in the Lead record if the user doesn't enter a first name. |
|
Mandatory Last Name |
Sets whether the Last Name field is required. |
|
Last Name Label |
Sets the label for the Last Name field. Users are asked to enter a last name when signing up for a stock notification. |
|
Last Name Placeholder |
Sets the placeholder text for the Last Name field. |
|
Default Lead Last Name |
Sets the default text for the Last Name field in the Lead record if the user doesn't enter a last name. |
Submission Fields:
|
Field |
Description |
|---|---|
|
Subscription Agreement Label |
Sets the label for the Subscription Agreement field that asks users to subscribe to marketing emails. |
|
Submit Button Label |
Sets the label for the signup submit button. |
|
Success Message |
Sets the message that shows when the form is submitted successfully. |
|
Error Message |
Sets the message that shows if there's an error during form submission. |
My Account Fields:
|
Field |
Description |
|---|---|
|
Subscriptions Page Title - My Account |
Sets the title for the Subscriptions page and menu item associated with My Account. |
|
Subscriptions Empty State - My Account |
Sets the message that shows on the Subscriptions page when there are no current Stock Notifications subscriptions. |
|
Item Column Label - Subscriptions Table |
Sets the label for the Item column in the Subscriptions table, showing the name of the item the user subscribed to. |
|
Show Item SKU |
Sets whether the item SKU is shown. |
|
Price Column Label - Subscriptions Table |
Sets the label for the Price column in the Subscriptions table, showing the price of the item the user subscribed to. |
|
Status Column Label - Subscriptions Table |
Sets the label for the Status column in the Subscriptions table, showing the notification status of the item the user subscribed to. |
|
Active Subscription Label - Subscriptions Table |
Sets the label to show in the Status column of the Subscriptions table if the stock notification is active for the item. |
|
Subscription Date Label - Subscriptions Table |
Sets the label for the subscription date to show in the Status column of the Subscriptions table if the stock notification is active. |
|
Cancel Subscription Button Label - Subscriptions Table |
Sets the label for the Cancel Subscription button to display for each active item in the Subscriptions table. |
|
Subscription Canceled Message - Subscriptions Table |
Determines the message to display when stock notifications are canceled for an item. |
|
Undo Cancel Subscription Label - Subscriptions Table |
Sets the label for the button to undo canceled stock notifications for an item. |
|
Cancel All Subscriptions Button Label - Subscriptions Table |
Sets the label for the Cancel All Subscriptions button to display for each active matrix item in the Subscriptions table. |
|
Undo Cancel All Subscriptions Button Label - Subscriptions Table |
Sets the label for the button to undo all canceled Stock Notifications for a matrix item. |
|
Date Format - Subscriptions Table |
Determines the format in which the date appears. |
Email Fields:
|
Field |
Description |
|---|---|
|
Email Template (Required) |
Sets the email template used for stock notification emails. Select the email template you created in the Set Up the Stock Notifications Email Template section. |
|
Email Employee Sender |
Determines from which employee the stock notification email originates. |
View Saved Searches for Stock Notifications
After you set up the extension, you can view the saved searches for Stock Notifications. These saved searches are created automatically when you install the extension:
-
Stock Notifications Customers Waitlist - Check which customers are waiting on an item.
-
Stock Notifications TOP 10 Requested items - Find out which products have been requested the most.
-
Stock Notifications Sent Mails - Check which stock notification emails have been sent.
-
Stock Subscriptions Newsletter - See which customers elected to subscribe to the newsletter when signing up for a stock notification.
These saved searches help you learn more about your customers and give you information you can use for marketing and inventory.
To view a saved search:
-
Go to Reports > Saved Searches > All Saved Searches.
-
Click View next to the saved search you want to see.
For more information about how to view or use a saved search, see Accessing a Saved Search.