Sales Order Processes
The following are common tasks for managing sales order transactions in NetSuite POS. Note that many retailers have button layouts unique to their business, so your Sales Order button may be in a different location on your registers.
Before opening sales order mode, you must complete or suspend any open sales transactions displayed in the journal.
Do not perform an item Return while creating or updating a sales order. Making Returns during a sales order can cause an error that requires restarting NetSuite POS on the register.
Create a Sales Order
Follow these steps to set up the order. Note that your sales order buttons may be in a different location.
Do not accept a Gift Card or Gift Certificate as deposit for a sales order. These deposit tenders aren't supported by NetSuite ERP. If taken as a deposit, any remaining card or certificate balance will become unusable on NSPOS registers.
To create a sales order:
-
Complete any open sales transactions.
-
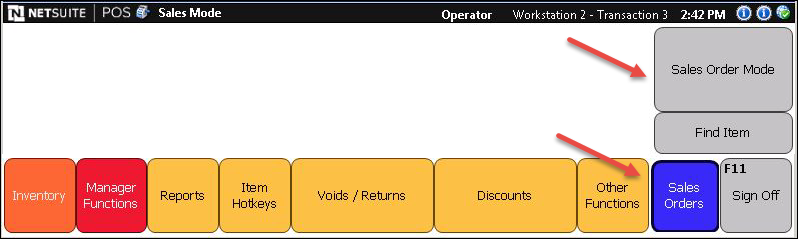
Tap Sales Orders.
Your Sales Orders button may be under Other Functions or in a custom location.
-
Tap Sales Order Mode.
-
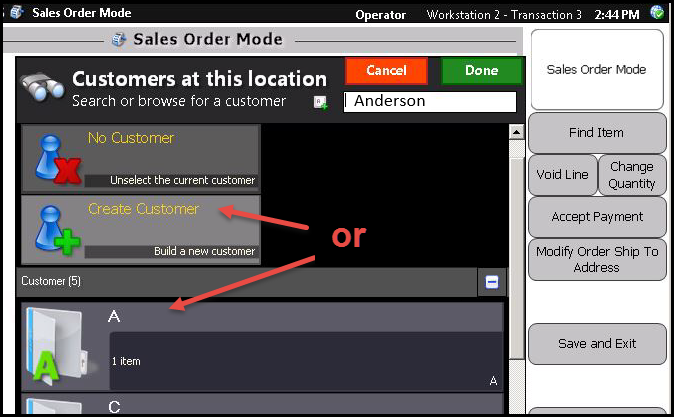
Search for the Customer by entering any part of their name in the search field.
-
If needed, tap the
 icon to open a keyboard.
 -
Tap Create Customer to add a new customer.
-
-
Tap the customer Name.
-
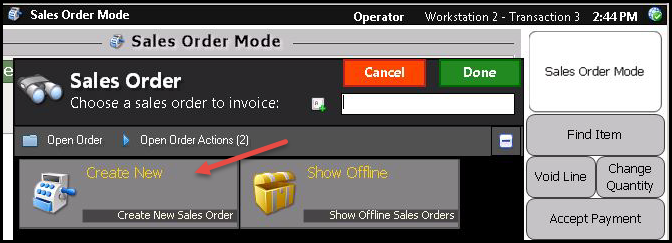
Tap Create New sales order.
-
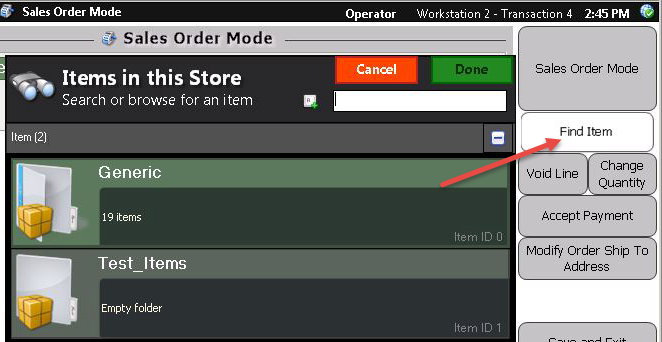
Locate the Item to order. You can scan a barcode or search using Find Item.
To search for the item:
-
Tap Find Item.
-
Enter any portion of the item name or ID, or drill into a category.
-
Tap the item Name.
 Tip:
Tip:To go back while drilling into an item list, tap the Item
 icon at the top left.
-
-
For more than one of the item, tap Change Quantity.
-
To add another item, scan a barcode or tap Find Item.
-
Shipping orders use the customer address on file. To verify or change the address, tap Modify Order Ship to Address.
-
Tap Amt Due or Accept Payment. This can be the initial deposit or payment in full.
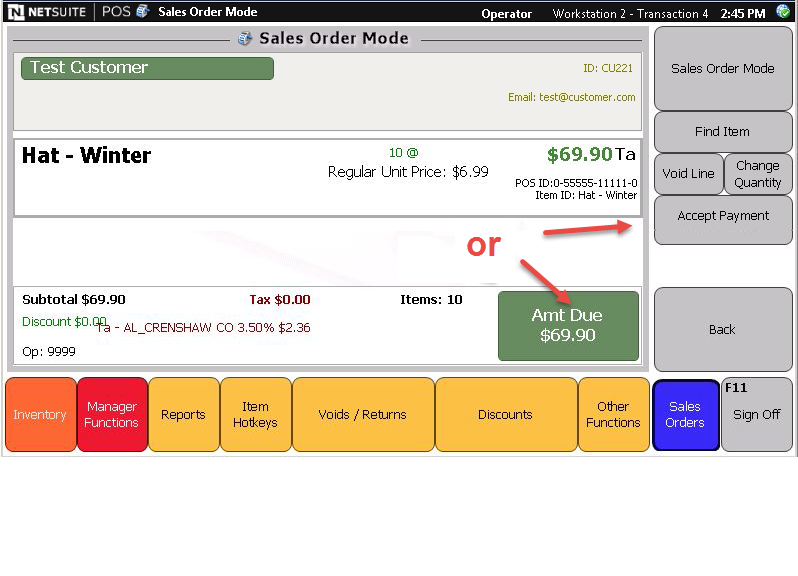
-
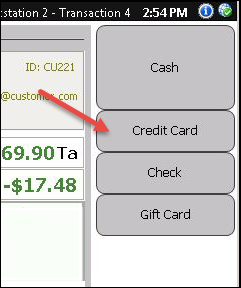
Tap the payment method.
-
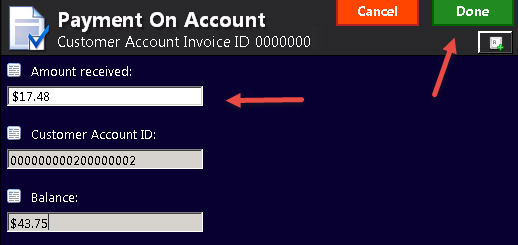
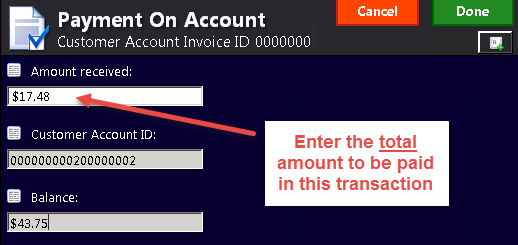
Enter the amount to pay.
The initial deposit displays in the payment window. You can increase this as needed, up to the full amount due.
-
Tap Done.
-
Enter the payment amount and tap Enter or the green check mark.

-
Accept the payment. If credit or debit card, ask the customer to swipe their card.
-
Give customer their receipt.
Split Tender Payments and Sales Orders
Split tender payments are when a customer uses more than one payment type to tender-out a single transaction. Customers can use any combination of cash, credit cards and debit cards as payment, but it's important that you don't make any changes to the order between accepting payment types.
Making changes between accepting the first and subsequent forms of payment can cause the sales order to error. Changes to avoid during payment include adding items, adjusting a price or adding a discount. All changes to the order should occur before taking payment or after the payment is complete.
To accept Split Tender Payments for Sales Order Deposits:
-
Create the sales order.
-
Tap Amt Due or Accept Payment.
-
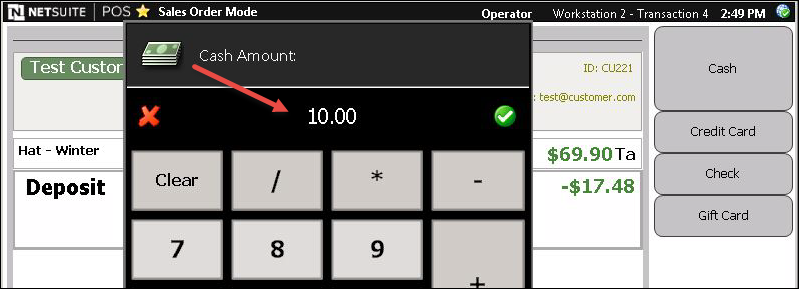
Tap the first tender type, such as Cash.
-
For Amount received, adjust the total amount to be paid (if needed) and tap Done.
The total payment should be at least the minimum deposit shown, up to the full amount.
-
Enter the first tender amount and tap Enter or the green check mark.
-
Tap the second tender method.
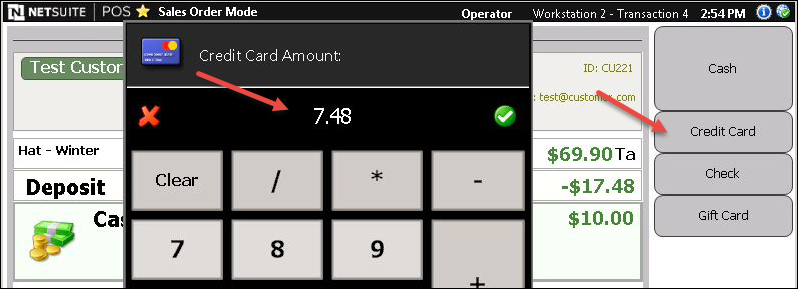
-
Enter the second tender amount.
-
Tap and enter additional tenders as needed to complete the deposit.
-
NSPOS prints a receipt when the deposit is paid in full.
Add Partial Payment for an existing Sales Order
If you store allows partial payments, follow these steps to accept a payment that reduces the total amount owed.
To accept partial payment for a sales order:
-
Complete any open sales transactions.
-
Tap Sales Orders.
Your Sales Orders button may be under Other Functions or in a custom location.
-
Tap Sales Order Mode.
-
Search for the Customer by entering any part of their name in the search field.
-
Tap the customer Name. Existing sales orders display.
-
Tap the sales order to pay.
-
Tap Edit.
-
Tap Amt Due or Accept Payment.
-
Tap the payment method.
-
Enter the amount to pay.
-
Accept the payment. If credit or debit card, ask the customer to swipe their card.
-
Give customer their receipt.
Edit Items in a Sales Order
Follow these steps to adjust the items in an existing order. You can add items, remove items or change item quantities.
You can't exchange one item for another through a return until the entire sales order is fulfilled.
Changing a sales order in the main NetSuite online application while also changing it at a register that is currently offline will cause the order to error.
To edit items in a sales order:
-
Complete any open sales transactions.
-
Tap Sales Orders.
Your Sales Orders button may be under Other Functions or in a custom location.
-
Tap Sales Order Mode.
-
Search for the Customer by entering any part of their name in the search field.
-
Tap the customer Name. Existing sales orders display.
-
Tap the sales order to edit.
-
Tap Edit.
-
Edit the order:
-
To add an item, scan a barcode or tap Find Item.
-
To remove an item, tap the item to expand it. Tap Void Line.
-
To change the amount of an item, tap the item to expand it. Tap Change Quantity.
-
-
Tap Save and Exit.
Note:If prompted for additional payment, tap Amt Due or Accept Payment and process the payment. The minimum amount required displays in the payment window.
Any refund due to the customer displays in parenthesis ( ).
Fulfill and Invoice some Items in a Sales Order
If some items are ready for pickup before others, you can fulfill and invoice just the available items. The sales order remains open for fulfillment of the remaining items later. Fulfilling includes invoicing for the amount due.
To fulfill some items:
-
Complete any open sales transactions.
-
Tap Sales Orders.
Your Sales Orders button may be under Other Functions or in a custom location.
-
Tap Sales Order Mode.
-
Search for the Customer by entering any part of their name in the search field.
-
Tap the customer Name. Existing sales orders display.
-
Tap the sales order to partially fulfill.
-
Tap Fulfill.
Note:Your setup might show Edit or Invoice instead of Fulfill. If your business requires fulfillment before you can accept full payment, see Fulfillment and Invoicing as Separate Tasks.
-
Tap the first item you do not want to fulfill now.
-
Tap Void Line.
-
Enter the quantity of the item to temporarily void.
-
Tap Fulfill Later.
-
Repeat for any other items to fulfill later.
-
Tap Amt Due or Accept Payment.
-
Tap the payment method. The minimum amount required displays in the payment window.
-
Enter the amount to pay.
-
Accept the payment. If credit or debit card, ask the customer to swipe their card.
-
Give customer their receipt.
-
Provide fulfilled items to the customer.
You can't exchange one item for another through a return until the entire sales order is fulfilled.
Fulfill and Invoice all Items in a Sales Order
When the items arrive and the customer is ready to receive the merchandise, follow these steps to fulfill and invoice the order. Fulfilling includes invoicing for the amount due.
To fulfill all items:
-
Complete any open sales transactions.
-
Tap Sales Orders.
Your Sales Orders button may be under Other Functions or in a custom location.
-
Tap Sales Order Mode.
-
Search for the Customer by entering any part of their name in the search field.
-
Tap the customer Name. Existing sales orders display.
-
Tap the sales order to fulfill.
-
Tap Fulfill. The payment amount required displays under Amt Due.
Note:Your setup might show Edit or Invoice instead of Fulfill. If your business requires fulfillment before you can accept full payment, see Fulfillment and Invoicing as Separate Tasks.
-
Tap Amt Due or Accept Payment.
-
Tap the payment method.
-
Enter the full amount needed to complete the order.
-
Accept the payment. If credit or debit card, ask the customer to swipe their card.
-
Give customer their receipt.
-
Provide items to the customer.
Cancel a Sales Order
You can cancel an entire order if the customer requests the cancellation and the request meets your store policy. This is done by opening the order and voiding each item. The process typically requires refunding money the customer has paid towards the order.
To cancel a sales order:
-
Complete any open sales transactions.
-
Tap Sales Orders.
Your Sales Orders button may be under Other Functions or in a custom location.
-
Tap Sales Order Mode.
-
Search for the Customer by entering any part of their name in the search field.
-
Tap the customer Name. Existing sales orders display.
-
Tap the sales order to cancel.
-
Tap Edit.
-
Tap to expand the first item to void.
-
Tap Void Line.
-
Enter the item quantity to void.
-
Tap Cancel.
-
Tap the next item, click Void Line and Cancel.
-
If the Amt Due shows an amount in parenthesis, refund the customer their deposit. For example, ($9.99).