Using Customized Sales Order Processes
Your company policies might set restrictions or have procedures on what actions can be performed at the register.
Restrict Editing
Your company can disable the register option to edit which items are included in a sales order. If disabled, associates can create sales orders and take payment, but all edits must be performed in NetSuite ERP. This is useful for when sales order item-handling is performed away from the store, such as in a warehouse.
Require Fulfillment before Invoicing
Traditionally, cashiers can invoice and take payment for all items in a sales order, even if some items are not immediately available for fulfillment. However, NSPOS includes the option to restrict invoicing to fulfilled items only. In sales orders with multiple items, the cashier can invoice the fulfilled items, but the order remains open until all items are fulfilled. An initial deposit is still required to open the order.
Requiring fulfillment before invoicing is useful for deliveries, where some localities prohibit invoicing until the order has shipped. It also reduces the chance of having to refund an invoice because the materials required to fulfill the order are not on hand.
Fulfillment and Invoicing as Separate Tasks
In addition to requiring fulfillment before invoicing, retailers can split the fulfillment and invoicing process into separate tasks. Fulfillment is performed using a custom button called Sales Order Fulfillment or something similar. This method is typically used when orders are placed in the store but fulfilled at a warehouse, requiring confirmation that the item is ready before fulfilling it. Often, the fulfillment button will be restricted to manager roles and above.
Some businesses might restrict the fulfillment button to headquarters or the back office. This prevents fulfilling items too soon, such as when a shopper has three days to cancel an order for a custom-built item. Your business will wait to fulfill the order until the cancellation period has passed.
One option is to not set up a button on an NSPOS register. Instead, fulfillment happens by logging in to NetSuite ERP and going to Transactions > Sales > Enter Sales Orders > List > View.

For information about handling sales orders in NetSuite ERP, see Sales Orders.
If all fulfillment is performed at a warehouse or other facility using NetSuite ERP only, it's not necessary for the administrator to set up a fulfillment button on NSPOS registers.
Using the Sales Order Fulfillment button requires different processes for completing sales orders. These tasks are described in the following steps.
Considerations when Fulfillment is separate from Invoicing
-
Fulfillment mode does not display prices.
-
You cannot edit fulfillment items at the register. Editing must be performed in NetSuite ERP.
-
You can change fulfillment quantities at the register by tapping the Change Quantity button.
-
You can only Invoice full payment for fulfilled items.
-
To accept additional deposit payments, tap Edit, not Invoice. Your customers have the option to pay the full amount when requesting a new sales order.
To fulfill all items using Sales Order Fulfillment:
-
Complete any open sales transactions.
-
Tap Sales Orders.
Your Sales Orders button may be under Other Functions or in a custom location.
-
Tap the custom button Sales Order Fulfillment. Your setup might use a different name for this button.
-
Search for the Customer by entering any part of their name in the search field.
-
Tap the customer Name. Existing sales orders display.
-
Tap the Sales Order to fulfill.
-
Tap Amt Due or Accept Payment.
Important:The amount will show $0.00 due. No money will be taken during fulfillment. No payment record will be created in NetSuite ERP.
-
Tap Cash.
-
Leave the amount as $0.00 and tap Enter.
The order is fulfilled and can be invoiced using the next set of steps. A confirmation receipt prints.
To invoice a sales order after fulfillment:
-
Complete any open sales transactions.
-
Tap Sales Orders.
Your Sales Orders button may be under Other Functions or in a custom location.
-
Tap Sales Order Mode.
-
Search for the Customer by entering any part of their name in the search field.
-
Tap the customer Name. Existing sales orders display.
-
Tap the Sales Order to invoice.
-
Tap the payment method.
-
Enter the full amount needed to complete the order.
-
Accept the payment. If credit or debit card, ask the customer to swipe their card.
-
Give customer their receipt.
Fulfill Partial Items
You can fulfill and take payment for a subset of items in a sales order. First fulfill the desired items and then invoice them.
To partially fulfill and invoice:
-
Complete any open sales transactions.
-
Tap Sales Orders.
Your Sales Orders button may be under Other Functions or in a custom location.
-
Tap the custom button Sales Order Fulfillment. Your setup might use a different name for this button.
-
Search for the Customer by entering any part of their name in the search field.
-
Tap the customer Name. Existing sales orders display.
-
Tap the Sales Order to fulfill.
-
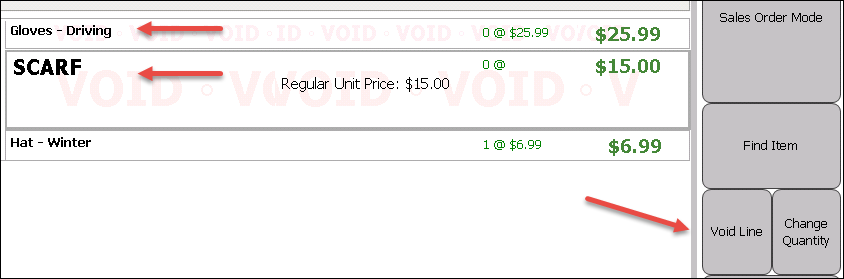
Select the items that are not ready to be fulfilled and tap Void Line.
Voided items will display the next time you open the order. They aren't deleted. In this example we are fulfilling the Hat - Winter item only.
-
Tap Amt Due or Accept Payment.
Important:The amount will show $0.00 due. No money will be taken during fulfillment. No payment record will be created in NetSuite ERP.
-
Tap Cash.
-
Leave the amount as $0.00 and tap Enter.
The subset of items are fulfilled and can be invoiced.
Invoice Partial Items
-
Tap Sales Orders.
-
Tap Sales Order Mode.
-
Search for the Customer by entering any part of their name in the search field.
-
Tap the customer Name. Existing sales orders display.
-
Tap the Sales Order to invoice.
-
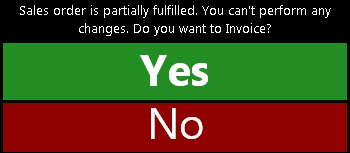
You are prompted to invoice the partial fulfillment. Tap Yes.
-
Tap Amt Due or Accept Payment.
-
Tap the payment method.
-
Enter the amount paid.
-
Accept the payment. If credit or debit card, ask the customer to swipe their card.
-
Give customer their receipt.