Image Manager
Images play an important role on your website. They make your pages more interesting, grab your visitor's attention, and break up long blocks of text. Plus, images can instantly share a message or feeling that might take a lot of words to explain. For example, you might add a banner image at the top of every page to promote a sale or showcase summer clearance items.
The Image Manager is a Site Management Tools (SMT) feature that helps you add images to your site. You can upload new images or choose images you've already saved in the file cabinet. For more information about SMT, see Site Management Tools Overview.
With the Image Manager, you can:
-
Drag and drop one or more image files.
-
Select and upload multiple files by browsing to the file location.
-
Create subfolders within the site's file folder.
-
Switch between multiple views, including thumbnail view and list view.
All images are stored in the SMT site image folder, located at Web Site Hosting Files > Live Hosting Files > SSP Applications > NetSuite Inc. - CMS > CMS > [Site Number] > files. You can upload images directly to this folder in NetSuite, and they'll be ready to use with the Image Manager. The Image Manager only works with images in this folder. You won't be able to select images stored anywhere else in the File Cabinet.
Watch the following video to learn about the Image Manager:
There are two ways you can access the Image Manager:
-
Image Content Type - The Image Content Type utilizes the image manager when the selecting images for the content. For details, see Site Management Tools Image Content Type.
-
Text Content Type - The text editor tool bar includes a Image Manager button. For details, see Site Management Tools Text Content.
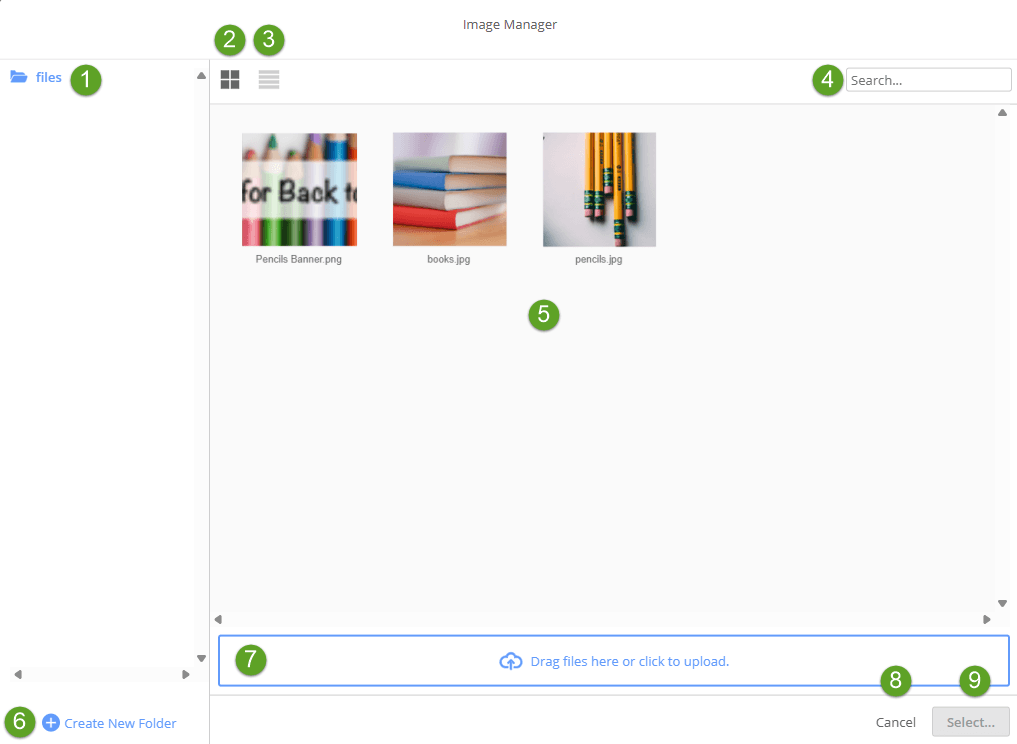
The following screenshot shows the options available from the Image Manager:
|
Item |
Description |
|---|---|
|
1 |
This panel displays the SMT files folder and any subfolders. This folder is located in the file cabinet at Web Site Hosting Files > Live Hosting Files > SSP Applications > NetSuite Inc. - CMS > CMS > [Site Number] > files. |
|
2 |
Click this icon to display thumbnails of the images in the selected folder. |
|
3 |
Click this icon to display a list of images in the selected folder. |
|
4 |
Enter text to limit the listed images to only those files that match your search term. |
|
5 |
Lists all images in the currently selected folder. Click an image to select it. |
|
6 |
Click Create New Folder to add a new subfolder. |
|
7 |
Click this area to browse to in image file on your computer and upload it to the selected folder. You can also drag one or more files to this area to upload them to the selected folder. Supported file types include, JPG, GIF, PNG, PJPG, SVG, and TIFF. |
|
8 |
Click Cancel to close the Image Manager without selecting a file. |
|
9 |
Select is enabled only after you click an image to select it. Click Select to choose the image and insert it into your image content type or into the text editor. |