Using File Drag and Drop
You can drag and drop one or more files from your desktop to the Drag and Drop-enabled file cabinet, or to a record or sublist line item.
The Drag and Drop-enabled cabinet is separate from the built-in file cabinet. You can access the Drag and Drop enabled File Cabinet from Documents > Drag and Drop Files > File Cabinet.
For more information, see To add files to the Drag and Drop-enabled File Cabinet:.
Read the following topics for more information about using File Drag and Drop:
Setting File Drag and Drop User Preferences
Set user preferences before using the File Drag and Drop SuiteApp.
Users with File Drag and Drop feature enabled need write access to the destination folder. If you do not have access to the folder, you can pick a different destination folder from the drop zone options.
The options only include active folders and private folders you have access to.
To set user preferences for File Drag and Drop:
-
Go to Home > Set Preferences.
-
Click the Custom Preferences subtab.
-
Under File Drag and Drop, set values for the following preferences:
-
Enable File Drag and Drop in View Mode - Check this box to enable File Drag and Drop in view mode for all users of this account.
-
Enable File Drag and Drop - Check this box to enable File Drag and Drop in your account.
Note:File Drag and Drop is only available on forms with a Files subtab. If the Files subtab is removed from a custom form, the drop zone will not be displayed.
-
Hide Tutorial Notification - Check this box to hide the File Drag and Drop tutorial notification on record pages.
When you open a record with File Drag and Drop enabled, a pop-up notification appears. The notification lets you start the File Drag and Drop tutorial.
You can also hide or show the tutorial right from the record page. To hide the tutorial, click Don't Show this message again on the tutorial notification.
To view the tutorial again, click the drop zone to view more options, and then click Tutorial.
-
Adding Files to a Record Page and Line Item
Add files to an existing record page and line time using File Drag and Drop.
To add files to a record page:
-
Create or edit an existing record.
Tip:A star on the folder icon in the drop zone indicates that the record contains file attachments. You can click the folder to view the attached files.
When you create a record, changing some field values might refresh the page. This refresh can make File Drag and Drop create multiple unique folders for the record you're creating.
For example, if you change the Customer field on a Sales Order, the page might make you use a different form if the customer is in another subsidiary or under a different nexus. Every time the Sales Order page refreshes, File Drag and Drop creates a new folder.
-
On your computer, select the files you want to upload and drag them to the drop zone. Dropping the file starts uploading.
-
If there's already a file with the same name, a popup asks if you want to overwrite it or cancel the upload.
Click Yes to upload the file, or click No to cancel.
-
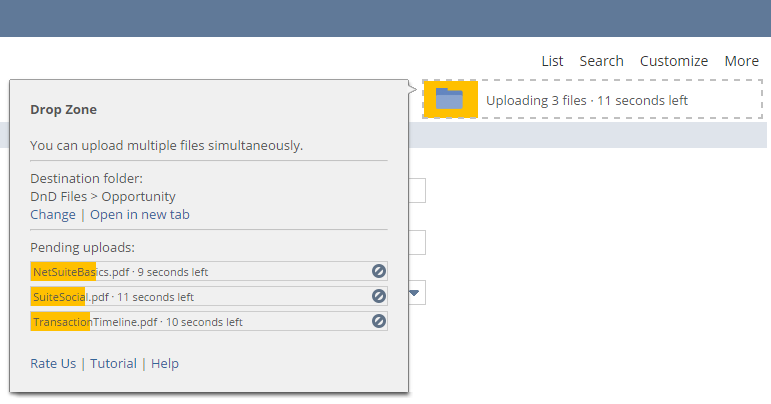
To cancel a file upload, click the drop zone to see more options. In the Pending uploads section, click the cancel icon.
The following image shows a screenshot of the drop zone during file uploads:
The record updates right away to show the uploaded file. Files you attach to the record appear under Communication > Files.
-
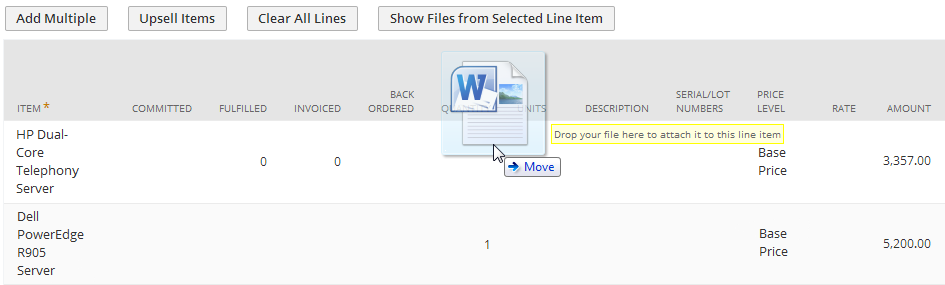
To attach files to a line item, drag a file from your computer and drop it onto the transaction line.
To add a files to a line item in a record:
-
Create a record or edit an existing one.
-
To attach files to a line item, drag a file from your computer and drop it onto the transaction line.
Important:The maximum file size allowed is 10 MB.
You can drop files onto line items you've already added to the record. If you want to attach a file to a line item you added, save the record first, then open it in edit mode.
You can attach files to line items only in edit mode.
The following screenshot shows dropping of a file in a line item:
 Note:
Note:Files you upload to new records you're creating won't be deleted if you don't save the record.
-
Click Show Files from Selected Line Item to view files attached to the selected transaction line.
Adding Files to the File Cabinet
Add files to the File Cabinet using the File Drag and Drop SuiteApp.
To add files to the Drag and Drop-enabled File Cabinet:
-
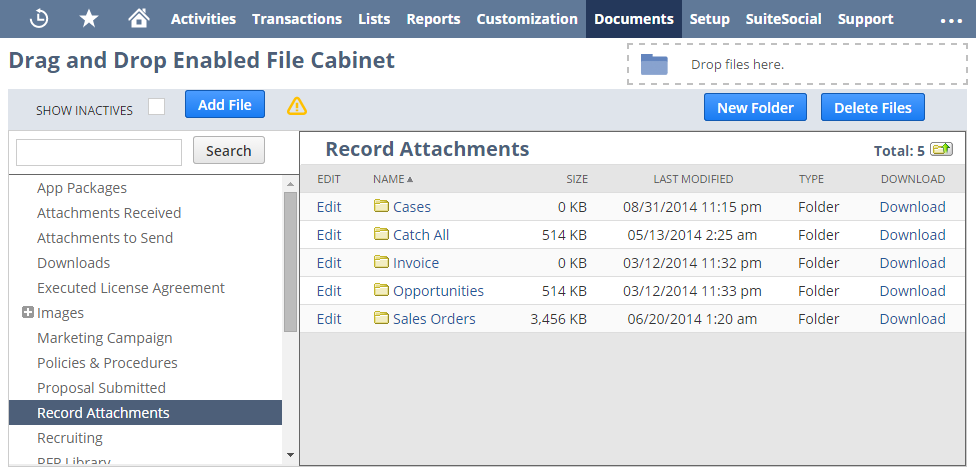
Go to Documents > Drag and Drop Files > File Cabinet.
The following screenshot shows a portion of the Drag and Drop-enabled File Cabinet:
-
Choose the destination folder from the Folders list. The selected folder shows up inside the drop zone.
-
Drag files from your computer to the drop zone to upload them to the selected folder.
Inserting URLs of Uploaded Files
You can automatically add the URL for a file you uploaded into text fields in the record.
To insert URLs of uploaded files:
-
Create or edit an existing record.
-
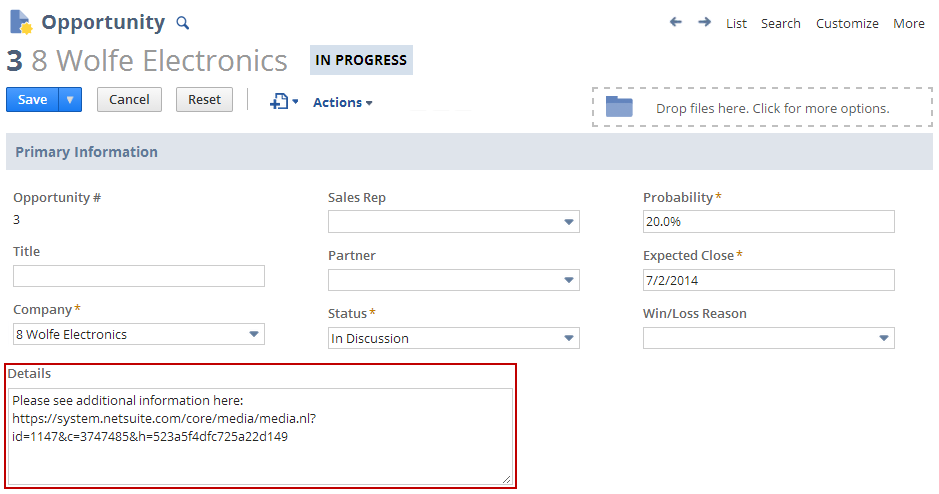
On your computer, select the files you want to upload, then drag and drop them to the text area where you want to insert the URL.
The system automatically adds the URL in the text field. You can add text after the URL, or drag more files to the field to add more URLs. You can copy and paste the URL into your browser to open the file.
Note:The inserting of URLs of uploaded files does not apply to text fields within sublists.
The following screenshot displays an example where a URL is automatically added on the text field boxed in red:
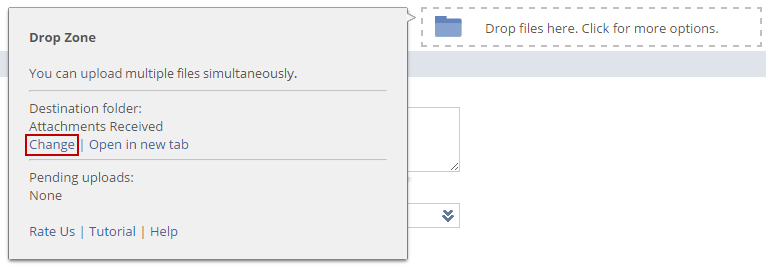
Changing the Destination Folder from the Drop Zone
When you upload files to a record page, you can change the default destination folder for that record. The change will only applies for the current instance.
When you refresh the page, the destination folder goes back to the default folder.
To change the destination folder from the drop zone:
-
Create or edit an existing record.
-
Click the drop zone to display more options.
The following screenshot shows the popup that displays when you click the drop zone:
-
Click Change to open the File Cabinet popup.
-
Select a destination folder for this instance, and then click Select Folder.
Removing Files from the File Cabinet
You can remove files from a record or the File Cabinet.
To remove files:
-
Edit an existing record.
-
On the Communication subtab, click Files. Files attached to the record are listed here.
-
Select the file you want to delete and remove the attachment.
This deletes the file from the record but not the File Cabinet.
-
Go to Documents > Drag and Drop Files > File Cabinet.
-
Delete the file.
This also removes the file attached to the record.