Configure Button Bars
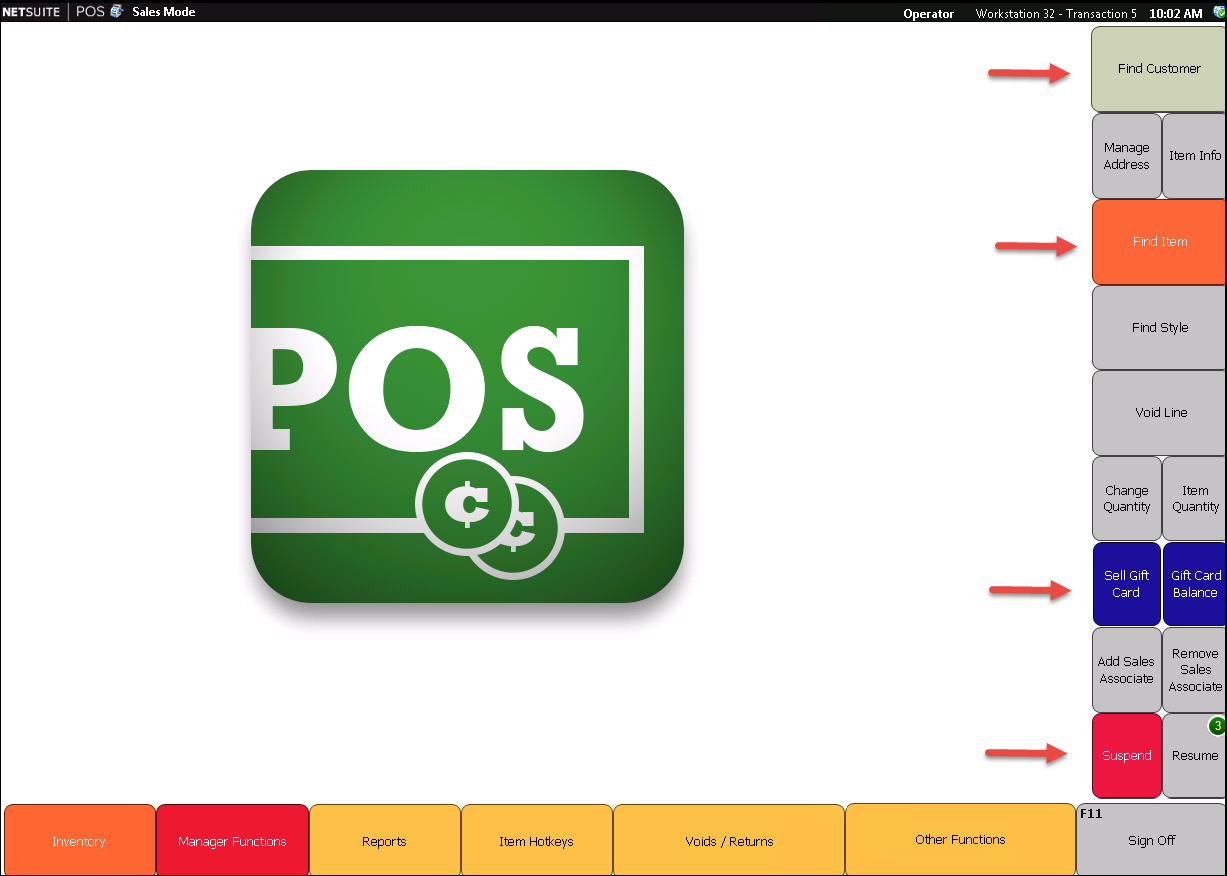
The main button bar in NetSuite POS is at the bottom of the journal. These buttons change what appears in the side button bar on the right. As sales associates work, each choice on the main bar or side bar can display a new button bar, form or journal entry.
The NSPOS layout is flexible. You can configure any button or button bar to fit your business needs. You can change the button placement, color and size. You can add or remove buttons or even entire button bars. Any function available in NSPOS can be mapped to a button. To provide more control over specific processes, you can set levels such as requiring manager permission to accept returns without a receipt. (See Set Button Security.)
In the following example, the administrator uses colors to highlight a few frequently-used buttons. This makes locating the buttons faster, even during busy shopping hours. Some business prefer to make all discount buttons green and buttons that void lines or cancel transactions red. Another option is to create buttons for ringing up items that don't have barcodes, such as produce and self-serve beverages.
By default, button bars are arranged as:
-
Main button bar - 11 buttons per page, with pages corresponding to modes, such as Sales Mode or Closed Mode.
-
Side button bar - 11 buttons per main bar button. Tapping a main button opens a unique set of side bar buttons. Like main bars, side bar sets are called pages.
You can adjust each button's width and height. By reducing a button's size, you can stack buttons to display two in a single position. So, instead of having only 11 buttons on a page, you can have up to 22.
For testing. At maximum button size, each page can display 11 buttons on each bar. Adding another button at maximum size may hide one of the existing buttons. For testing, make sure all buttons display and review how resizing the window affects the layout.
When tapped, the Amt Due (amount due) button displays the page of Tender buttons. The amount due process is tied to the Tender page name. Renaming "Tender" will cause the Amt Due button to stop working. Do not rename the Tender button page.
To configure the Button Bars:
-
Sign in to any NetSuite POS register as an administrator (9090 level operator).
-
Press Ctrl+F12 on the keyboard to open the Function List.
-
Enter Button Edit in the search field.
-
Tap Button Edit.
-
Tap Main (bottom) or Side and then tap Pages.
-
Tap a Button Page. For example, tap Discounts.
-
Tap Activate to see the changes immediately.
-
Tap Buttons
-
Select a button and configure it using the options below:
-
Tap New to create a new button.
-
Tap Delete to remove a button.
-
Set the Caption field to the name you want for the button.
-
Set the Style to change the button's color.
-
Set the Function for the button by tapping Browse to search. Select the function and tap Done.
-
Tap Edit Function to change advanced configuration settings for the function.
-
(Optional) In the HotKey field, enter a key users can press to quickly access a function. For example, the default hotkey to sign off is F11.
-
(Optional) Set the Target page. This defaults to None. If you specify a page, when the user taps the button, NetSuite POS will go to that page when the function completes.
-
Check Go Back to display a green arrow on the Back button.
-
Adjust the position of the button in a grid by setting its Column number and Row number.
-
Adjust the size of the button by setting its Width and Height in blocks or units.
-
-
Close the window when your setup is complete.
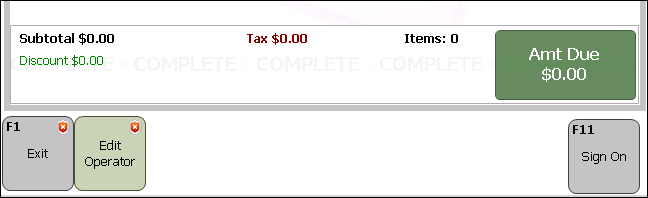
Some retailers want a button that administrators can use to quickly reset an operator's password. This button can appear on the 'Closed' page that displays prior to signing on. Use this example to set up that button and other buttons.
Example Button Setup for Edit Operator function:
-
Sign in to any NetSuite POS register as an administrator (9090 level operator).
-
Press Ctrl+F12 on the keyboard to open the Function List.
-
Enter Button Edit in the search field.
-
Tap Button Edit.
-
Tap Main for the bottom bar and then tap Pages.
-
Tap the Closed button set. This button bar displays when no operator is signed on.
-
Tap Activate so that you can see the changes immediately.
-
Tap Buttons
The buttons currently set up for the Closed set display on the left.
-
Tap New to create a new button.
-
Search for the words
Edit Operator. -
Tap the Edit Operator function.
-
Enter a name for the button in the Caption field or leave it at the default.
-
Choose a color from the Style list.
-
Set the placement for your button by changing the Column and Row fields.
-
If you want to make your button smaller or larger, adjust the Width and Height.
-
Close the Button Edit form when your setup is complete.