Set up Item Hotkeys
Item hotkeys are buttons or groups of buttons that add items to the Journal when tapped. Set up hotkeys in NetSuite POS so sales associates can quickly ring up store specials, common items or hard-to-scan items. First, find the Item ID and then set it up as a hotkey.
Find the Item ID:
-
Sign in to any NetSuite POS register as an administrator (9090 level operator).
-
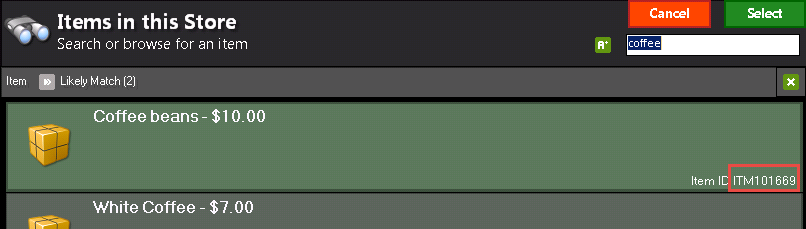
In Sales Mode, tap Find Item and look up the item to associate with the hotkey. You can just start typing and press Enter.
-
Make a note of the Item ID. This ID isn't the Item ID that displays during sales transactions. Instead, it's the internal Item ID as shown in the following image.
-
Tap Cancel to close the Find window.
Create the item hotkey:
-
Sign in to any NetSuite POS register as an administrator (9090 level operator).
-
Press Ctrl+F12 on the keyboard to open the Function List.
-
Enter Button Edit in the search field.
-
Tap Button Edit.
-
Tap the Side set of buttons in the Button Bar list.
-
Tap Pages.

-
Tap the Item Hotkeys set of buttons in the Button Page list.
-
Tap Buttons in the lower-right corner.
-
Tap New.
-
In the Select a Function window, tap Create Function.
-
Tap Yes for Edit a function by name. Do you want to proceed?
-
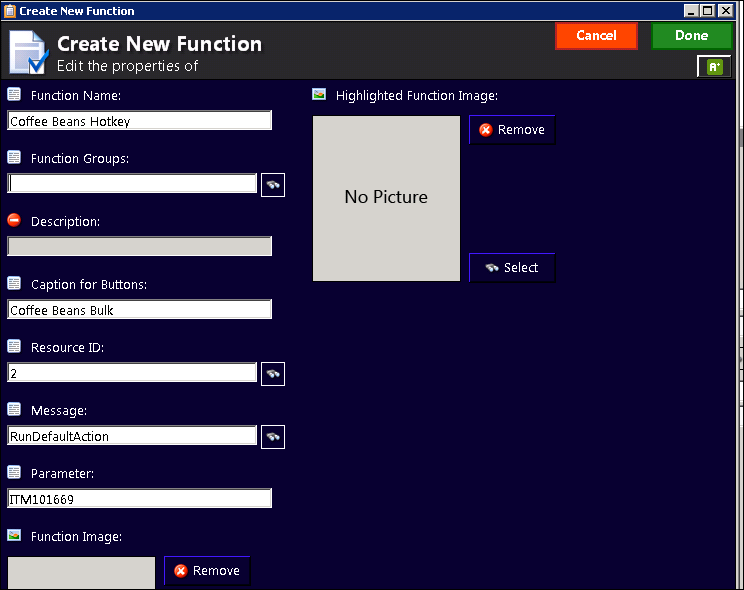
In the Function Name field, enter a descriptive name for the function.
-
For Caption for Buttons, enter the text to appear on the button.
-
For Resource ID, tap the
 red blocked icon. It changes to the enter value icon
  .
. -
Enter the security level required to use hotkey. Only enter the minimum level required.
-
2 - Sales Associates, Specialists
-
9050 - Openers/Closers
-
9070 - Managers
-
9090 - System Administrators
-
-
In the Message field, enter RunDefaultAction.
-
For Parameter, tap the
red blocked icon. It changes to the enter value icon . -
In the Parameter field, enter the Item ID. For example, ITM101669.
-
Tap Done.
-
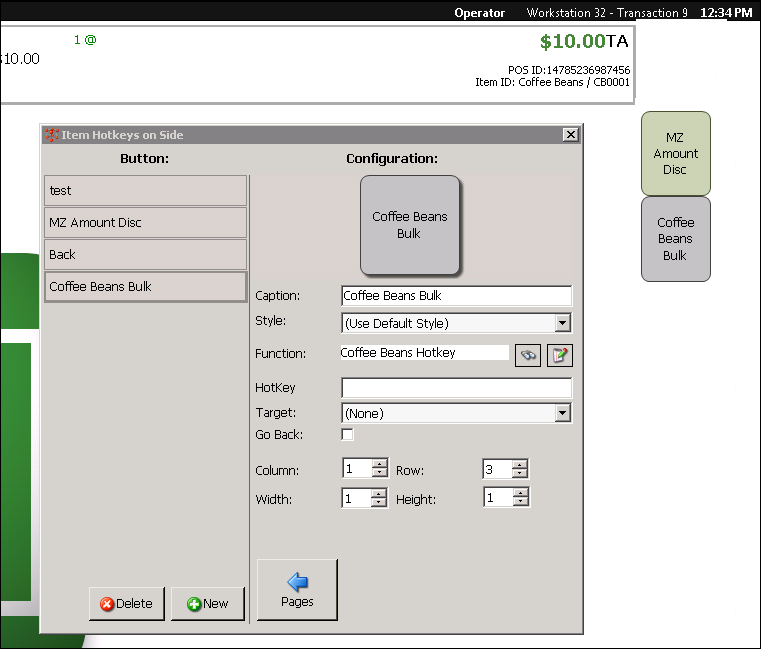
In the Item Hotkeys on Side window, add formatting if desired. See Configure Button Bars for options.
-
To test the hotkey, tap outside the Button Configuration window. Then tap Item Hotkeys and tap the new button in the side bar. You don't need to close the setup window to test.
-
When your setup is complete, tap X in the upper right to close the Button Configuration window.