GUA for Site Builder with Site Builder Extensions
Google Analytics 4 (GA4) has replaced Google Universal Analytics (GAU) as Google's cross-platform Analytics solution. All standard GUA properties stopped processing new hits on July 1, 2023. 360 Universal Analytics properties will stop processing new hits on July 1, 2024. See Google Analytics 4 for information about GA4, including information about migrating from GUA to GA4.
If you are implementing GUA on Site Builder with Site Builder Extensions and an External (WSDK) site, see the following help topics:
If you are implementing GUA on Site Builder without Site Builder Extensions, see Working with Google Analytics.
Step 1: Retrieve Tracking Code from an Existing GUA Account
If you already have a GUA account and website property, use the following procedure to retrieve your tracking ID and the GUA tracking code. If you do not have a GUA account and website property, see Set Up GUA Account and Website Property.
To retrieve GUA tracking code:
-
Click the Sign in link and choose Google Analytics.
-
Click the Admin tab.
-
If you have only one GUA account, it is automatically selected for you. If you have multiple GUA accounts, select the account that contains the website property.
-
Select the website property for which you need the tracking code. If you have only one property, it is automatically selected for you.
-
Under Property click Tracking Info.
-
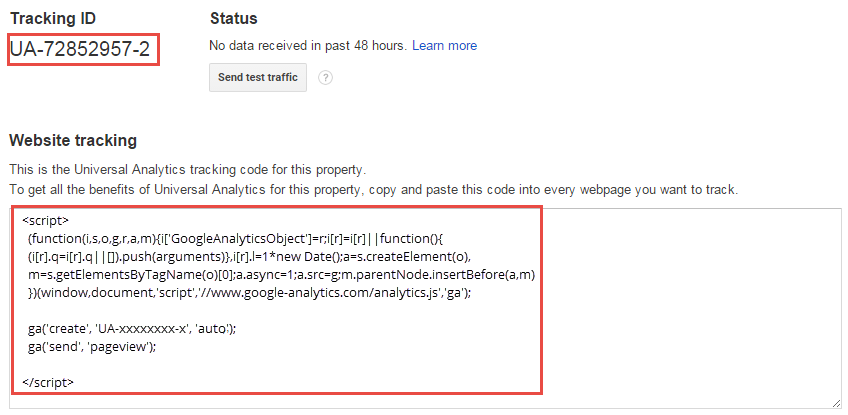
Click Tracking Code. This displays the following Tracking Code page:
-
Copy the Tracking ID and paste it in a text editor document so you have it for later.
-
Copy the Website tracking code and paste it in a text editor document so you have it for later.
Step 2: Update Tracking Code for Cross-Domain Tracking
The tracking code generated by GUA requires modification before you place it on the pages of your external site and in the Site Builder Addition to <head> field. Locate the following line of code:
ga('create', 'UA-xxxxxx-x', 'auto');
Change the code to this:
ga('create', 'UA-xxxxxx-x', 'auto', {'allowLinker': true});
In this example make sure that UA-xxxxxx-x is the tracking ID for the website property.
Step 3: Add GUA Tracking Code to Site Builder
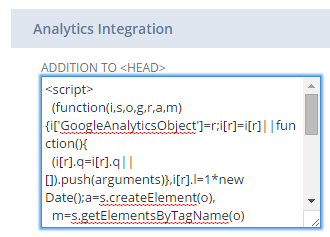
After you update the GUA tracking code for cross domain integration, the next step is to place the updated code in the Addition to <head> field on the Analytics subtab of the web site setup record.
For the following procedure, have the GUA tracking code available, either in a text editor document or stored on your clipboard.
To add GUA tracking code to site builder:
-
Go to Commerce > Websites > Website List.
-
Click the Edit link for the site.
-
Select the Analytics sub tab.
-
Paste the GUA tracking code into the Addition to <head> field.
-
Check the Enable Google Analytics Integration box.
-
Click the Save button.
Step 4: Enable GUA in Checkout
When using site builder with checkout in a Site Builder extension bundle or Site Builder with checkout in an extension bundle and an External (WSDK) site, you must also enable GUA in the checkout application by setting your GUA tracking ID and checkout domain in the checkout application. After it is implemented, GUA enables you to track all website activities from the homepage of your external site to your purchase confirmation page.
To enable GUA in Checkout
-
Select the domain to configure at Commerce > Websites > Configuration.
-
In the configuration record, go to the Integrations tab and the Google Universal Analytics subtab.
-
Set feature properties as required. For more information about each configurable property, see Google Universal Analytics Subtab.
-
Save the configuration record.
Enable GUA in Checkout (pre-Vinson)
This information refers to the Denali and Mont Blanc releases of SuiteCommerce Advanced only.
The following procedure details the steps for creating a custom configuration module to enable Google Universal Analytics in checkout. See Develop Your SCA Customization for more information.
To enable GUA in Checkout (pre-Vinson)
-
In your source files create the following custom module directory structure:
Modules/extensions/Configuration@1.0.0/JavaScript
-
In the JavaScript folder create the javascript file to define your custom configuration options. In this example, the file is named
ConfiguratorCheckout.js. -
Add the following javascript to the
ConfiguratorCheckout.jsfile to set the GUA configuration options.define('ConfiguratorCheckout' , [ 'SC.Checkout.Configuration' ] , function ( Configuration ) { 'use strict'; return { mountToApp: function() { Configuration.tracking.googleUniversalAnalytics.propertyID = 'UA-12345678-9'; Configuration.tracking.googleUniversalAnalytics.domainName = 'my.webstore'; } } });Note:Use your domain and GUA property ID. See Configuring GUA for information about obtaining your GUA property id.
-
Create an
ns.package.jsonfile in the Configuration@1.0.0 directory.{ "gulp": { "javascript": [ "JavaScript/*.js" ] } } -
Edit the
distro.jsonfile and add the custom module to the modules object. Your entry should be similar to the following:"modules": { "extensions/Configuration": "1.0.0", "suitecommerce/Account": "2.0.1", ... -
In the distro.json file, add your custom module to the list of taskConfig, javascript dependencies for the
checkout.jsfile. To do this, locate the following section of code:"entryPoint": "SC.Checkout.Starter", "exportFile": "checkout.js", "dependencies": [ "Backbone.View.Plugins", -
Add your custom configuration file as the first dependency in the list:
"entryPoint": "SC.Checkout.Starter", "exportFile": "checkout.js", "dependencies": [ "ConfiguratorCheckout", "Backbone.View.Plugins", ... -
Test your custom module on the local server and then deploy to the development SSP application in NetSuite. See Set Up SCA Developer Tools for more information.
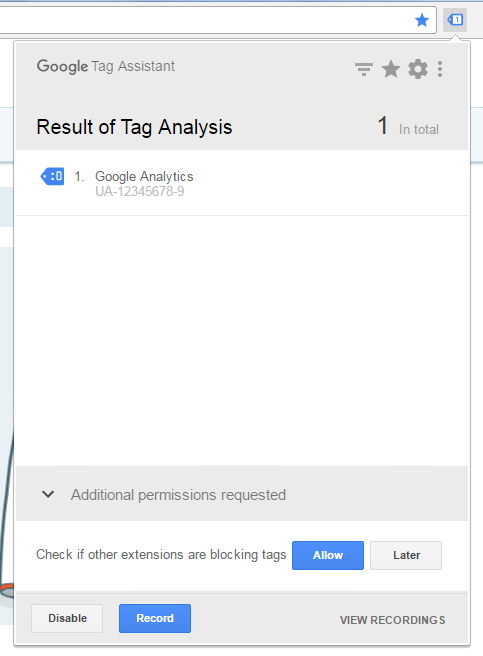
Note:You can use the Tag Assistant extension for Google Chrome to verify your GUA implementation on your site. In the following screenshot you see an entry for Google Universal Analytics on the site:
Step 5: GUA with Site Builder with Site Builder Extensions and an External Site (WSDK)
If you use an External Site (WSDK) with your Site Builder with Site Builder Extensions site, you must place the same GUA tracking code on your external site that you placed in the Site Builder site setup record. Because the external site is a third party site, the method that you use for putting the tracking code on your site varies depending on how and where your third party site is hosted. The tracking code needs be placed on your site before the closing </head> tag.
Many content management systems have an addition to head option for this purpose. Ideally, addition to head is at the site level, so that tracking code is automatically placed on every page. In some instances, addition to head is at the page level, in which case you need to place it on all pages.