Setting Up AsiaPay External Checkout Integration
Follow these steps to set up AsiaPay External Checkout in your NetSuite account:
-
Enable prerequisites. See Enabling prerequisites for AsiaPay External Checkout.
-
Install the Payment Gateway SuiteApp using the following bundle name and ID. See Installing the Payment Gateway SuiteApp.
-
Bundle name: Payment Gateway
-
Bundle ID: 47196
-
-
Activate the payment processing plug-in. See To activate the payment processing plug-in:.
Plug-in implementation name: PGP - AsiaPay Checkout
-
Create payment methods. See Creating payment methods for AsiaPay External Checkout.
-
Create payment processing files. See Creating payment processing profiles for AsiaPay External Checkout.
-
Update the merchant administration site. See Updating the AsiaPay Merchant Administration Site.
Enabling prerequisites for AsiaPay External Checkout
To set up the external checkout integration, you must have an active AsiaPay merchant account, with the following options enabled:
-
Secure Hash
-
Extra Datafeed Handler
-
3D Secure 2.0
Note:Payment Gateway Processing SuiteApp supports 3D Secure 2.0 as an add-on service by AsiaPay External Checkout.
Contact AsiaPay's service team for assistance in enabling these options in your merchant account.
Before installing the Payment Gateway Processing SuiteApp, be sure to enable the required features in your NetSuite account.
-
Go to Setup > Company > Enable Features.
-
On the Web Presence subtab, check the box for the following features :
-
Customer Access
-
Online Ordering
-
-
Go to Setup > Accounting > Accounting Preferences, and then click the Items/Transactions subtab. Check the box for the following preference: Enable 'Sale' Payment Operations on a Sales Order by Automatically Creating a Customer Deposit.
-
Go to Commerce > Websites > Website List, and then open the record for your web store. On the Web Site Setup page, click the Shopping subtab to do the following:
-
On the Shopping Basics section, check the box for Require Authorisation for Credit Card Transactions.
-
On Payments Page section, check the box for Allow non-credit card payment methods during Checkout.
-
On the Checkout Preferences section, select Standard Sales Order from the list in the Sales Order Type field.
-
For more information, see the following topics:
-
For enabling required features and preferences, see Enabling Features.
-
For settings for alternative payment methods, see Alternative Non-Credit Card Payment Methods for Web Store Orders.
-
For setting web site preferences, see Shopping Preferences.
Creating payment methods for AsiaPay External Checkout
Add payment methods that you can set up on the payment processing profiles for AsiaPay External Checkout.
To create payment methods for AsiaPay External Checkout:
-
Go to Setup > Accounting > Setup Tasks > Accounting Lists > New.
-
On the Add to Accounting Lists page, click the Payment Method link.
-
On the Payment Method page, enter the payment method details.
For more information about creating payment methods, see the following topics:
Follow the setup procedures that are required for AsiaPay External Checkout:
-
Check the box for the following options:
-
External Checkout
-
Display in Web Site
-
-
In the Account subtab, select the default account for the payment method.
-
On the Payment Visuals subtab, setup the image for the payment method that you want to display in your web store.
-
In the Flags column, if you are using a SiteBuilder site, enter web/standard. If you are using a SuiteCommerce Advanced site, you can use any flag used in the code on your site.
-
For a list of default URLs that you can use in the URL column, see NetSuite Default URLs for Major Payment Methods.
-
-
-
Click Save.
Creating payment processing profiles for AsiaPay External Checkout
Refer to the following guidelines when setting up payment processing profiles for AsiaPay External Checkout:
-
You can create one profile for each AsiaPay merchant account.
-
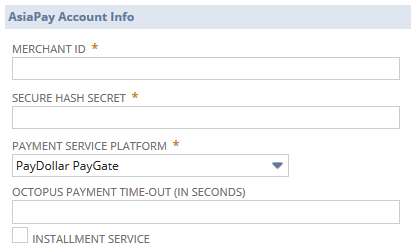
Get your AsiaPay account information:
-
Merchant ID
-
Secure Hash Secret
Note:If you want to test your external checkout integration, be sure to use test credentials provided by AsiaPay. On your AsiaPay External Checkout payment processing profile, enter these test credentials and then check the Test Mode box.
-
-
If you have multiple AsiaPay accounts that use the same currency, assign the currency to one account only. This prevents duplicate payment methods from being displayed in your web store. For more information, see Limitations.
To create payment processing profiles for AsiaPay External Checkout:
-
Go to Setup > Accounting > Payment Processing Profiles > New.
-
On the Payment Processing Profiles page, click Add Profile next to AsiaPay.
-
On the AsiaPay Payment Processing Profile form, enter the payment profile information.
Note:For PesoPay and SiamPay profiles, the settlement currency must be set to Philippine Peso (PHP) and Thai Baht (THB) respectively.
For instructions on creating payment profiles, see To add a new credit card processing profile:.
Follow the setup procedures specific to AsiaPay External Checkout profiles:
-
In the AsiaPay Account Info section, do the following:
-
Enter your AsiaPay account information.
-
In the Payment Service Platform field, select the payment service platform for this profile.
Note:If you offer Octopus payments through PayDollar, you can enter your own time-out value, in seconds, in the Octopus Payment Time-out field. More information about Octopus payments can be viewed on the website of AsiaPay or PayDollar.
-
For AsiaPay accounts with the installment option enabled, you can check the Installment Service box.
-
-
In the Payment Information section, select the payment methods to be supported by this profile and made available in your web store.
For information about payment methods, see Creating payment methods for AsiaPay External Checkout.
-
In the Gateway Request Types section, check the Sales box.
Note:All web store transactions are treated as sales requests in the payment gateway.
-
-
Click Save.
On the saved profile page, the Postback URL field is displayed in the Payment Information section. This field contains the NetSuite URL that you must set up on AsiaPay's Merchant Administration site. For more information, see Updating the AsiaPay Merchant Administration Site.
Updating the AsiaPay Merchant Administration Site
After you have created the payment processing profile, you must set up the Datafeed page location on your AsiaPay Merchant Administration site. You must assign the Postback URL displayed in the profile, which is used by AsiaPay to send the latest updates for payment transactions submitted by your web store shoppers. If this isn't set up in your AsiaPay account, successful payment transactions of your customers are not reflected on their corresponding NetSuite transactions.
To update the AsiaPay Merchant Administration site:
-
Go to Setup >Accounting > Payment Processing Profiles.
-
Click View next to your AsiaPay payment processing profile.
-
On the AsiaPay Checkout Payment Processing Profile page, copy the text in the Postback URL field.
-
Log in to your AsiaPay Merchant Administration site and then do the following:
-
On the Profile tab, click the Payment Options link.
-
On the Payment Options Update page, in the Return Value Link field, paste the URL that you copied from the payment processing profile.
-
Choose the Enable option beside the field.
-
Click Update.
Note:On the AsiaPay site, don't click the Test button. This option isn't supported in the AsiaPay External Checkout Integration.
-
On the Confirmation page, verify that the correct Postback URL is displayed, and then click Confirm.
-