Create Smart Actions
Users interact with records by entering actions in the Action Bar. These "smart actions" include Create, Add, Show, Delete, Remove and so on. For each custom object, you must create its own set of smart actions. When you use the CX Extension Generator to create your application from custom objects, the required smart actions are automatically created for you. However, you must create smart actions for standard objects and for custom objects, if you're creating panels and suviews manually.
Smart Actions in the Action Bar
In the Redwood user experience of Oracle Sales, the Action Bar is a field at the top of many pages where users can type keywords to access and update information, and take actions. For example, users can enter create or add and the Action Bar will automatically populate with a list of possible actions.
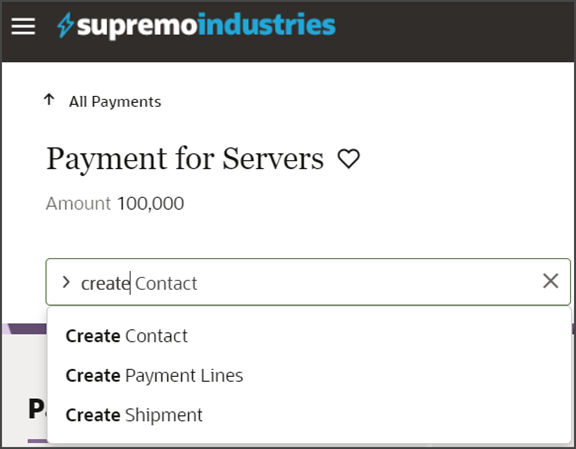
Here's a screenshot of the Action Bar:

Here's a screenshot of the Action Bar with suggested actions, after typing
create:
The Extension Generator can create the smart actions required for top-level and child custom objects, but you must create smart actions for related objects using Application Composer. Here's a list of the smart actions you must create for related objects:
|
Object Type |
Create This Smart Action: |
|---|---|
|
Related object (via a one-to-many relationship) |
See Create a "Create" Smart Action for a Related Object (One-to-Many). |
|
Related object (via a many-to-many relationship) |
See Create an "Add" Smart Action for a Related Object (Many-to-Many). |
What About Show Actions in the Action Bar?
Whenever you add a subview to your extension, a Show action is automatically created and displays in the Action Bar.
Show actions, however, are not smart actions and you don't need to manually create them.
Create a "Create" Smart Action for a Related Object (One-to-Many)
This procedure illustrates how to create a smart action for related objects.
Let's look at an example where our Payment object is in a one-to-many relationship with a custom object called Shipment. At runtime, users should be able to create shipments directly from a payment. To enable this, you must create a create smart action for the Shipment object.
First, you must retrieve the relationship name from Application Composer.
To create the Create Shipment smart action:
-
Create a sandbox.
-
In Application Composer, under the Common Setup menu, click Smart Actions.
-
At the top of the page, click Create.
-
On the Kind of Action page:
-
Click UI-based action.
-
Click Continue.
-
-
On the Basic Details page:
-
In the Name field, enter the smart action name.
For example, enter
Create Shipment. -
In the Object field, select the one-to-many relationship's source object.
In this case, select Payment.
-
Click Continue.
-
-
On the Availability page:
-
In the Application field, select Sales.
-
In the UI Availability field, select List Page.
-
Click Continue.
-
-
On the Action Type page:
-
In the Type field, select Create.
-
In the Target Object field, under the Top Level Object heading, select the one-to-many relationship's target object.
For example, select Shipment.
-
In the Field Mapping region, click Add.
-
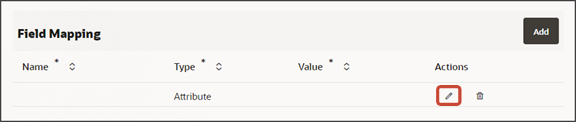
In the Actions column, click the Edit icon and then set these field values:
Field Mapping
Column
Value
Name
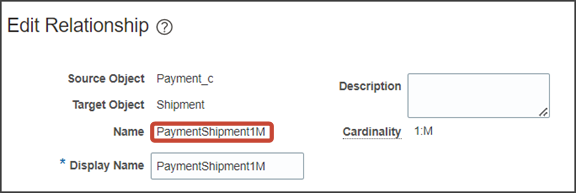
Select the field on the one-to-many relationship's target object that holds the source object's ID and relationship name. This is a standard field on the target object (Shipment).
The format of the field name is always
<Source object
                                                  name>_Id_<Relationship name>
. For example, select Payment ID PaymentShipment1M (Payment_Id_PaymentShipment1M).Note: You won't see this field on the target object in Application Composer.Type
Attribute
Value
Select Record ID (Id). This is a standard field on the source object (Payment).
This means that when users create a shipment, the create smart action defaults the payment's ID into the shipment record's Payment ID PaymentShipment1M (Payment_Id_PaymentShipment1M) attribute.
When users navigate to the page to create a shipment, you might want the create shipment page to be prepopulated with additional values from the payment record. Here's how to configure the Create Shipment smart action to do that.
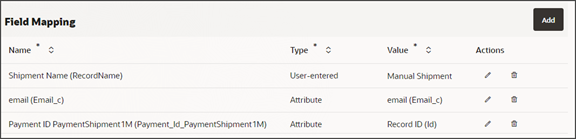
Field Mapping
What to Pass?
Smart Action Setting
Pass a value from the source object record to the target object record
Let's say that both the Payment and Shipment objects have Email fields. You can configure the Create Shipment smart action to prepopulate the payment's email on the new shipment record.
-
Name: Email (Email_c)
-
Type: Attribute
-
Value: Email (Email_c)
Pass a hard-coded value to the target object record
You can configure the Create Shipment smart action so that it always passes a hard-coded value to the new shipment record. For example, maybe each time the Create Shipment smart action creates a shipment record, the shipment name is prepopulated as
Manual payment.-
Name: Shipment Name (RecordName)
-
Type: User-entered
-
Value: Manual payment
Here's a screenshot of the settings described above:
-
-
Click Done.
-
Click Continue.
-
-
On the Action Details page:
-
In the Navigation Target field, select Local.
-
Click Continue.
-
-
On the Confirmation Message page:
-
In the Confirmation Message After Action Execution field, optionally enter a message to display to users.
-
Use the Add tokens region to include a token in your message.
-
Click Continue.
-
-
On the Review and Submit page, click Submit.
After creating this smart action, make sure that the CX Extension Generator generated the pages and layout for the Shipment object. Then, add the Shipment panel and subview to the Payment detail page:
Create an "Add" Smart Action for a Related Object (Many-to-Many)
This procedure illustrates how to create a smart action for a related object, where the objects are related in a many-to-many relationship.
Let's look at an example where our Payment object is in a many-to-many relationship with the Contact object. At runtime, users should be able to add contacts to a payment. To enable this, you must create an add smart action for the Payment object.
-
Create a sandbox.
-
In Application Composer, under the Common Setup menu, click Smart Actions.
-
At the top of the page, click Create.
-
On the Kind of Action page:
-
Click UI-based action.
-
Click Continue.
-
-
On the Basic Details page:
-
In the Name field, enter the smart action name.
For example, enter
Add Contact. -
In the Object field, select the many-to-many relationship's source object.
In this case, select Payment.
-
Click Continue.
-
-
On the Availability page:
-
In the Application field, select Sales.
-
In the UI Availability field, select List Page.
-
Click Continue.
-
-
On the Action Type page:
-
In the Type field, select Add.
-
In the Target Object field, select the many-to-many relationship's intersection object.
For example, select PaymentContactMMInter_Src_Payment_cToPaymentContactMMInter_c_Tgt.
-
Click Continue.
-
-
On the Action Details page:
-
In the Navigation Target field, select Local.
-
Click Continue.
-
-
On the Confirmation Message page:
-
In the Confirmation Message After Action Execution field, optionally enter a message to display to users.
-
Use the Add tokens region to include a token in your message.
-
Click Continue.
-
-
On the Review and Submit page, click Submit.
After creating this smart action, add the Contact UI components to the Payment detail page so that users can add and view contacts for a payment record.
Create a "Delete" Smart Action for a Top-Level Object
Even though the Extension Generator can create the smart actions required for top-level custom objects, you might need to manually create some smart actions if you ever add new custom objects to an existing extension. If that happens, then follow these instructions.
To create a delete smart action for a top-level object:
-
Create a sandbox.
-
In Application Composer, under the Common Setup menu, click Smart Actions.
-
At the top of the page, click Create.
-
On the Kind of Action page:
-
Click REST-based action.
-
Click Continue.
-
-
On the Basic Details page:
-
In the Name field, enter the smart action name.
For example, enter
Delete Payment.Note: If needed, you can translate the strings that you enter when defining a smart action. For example, you can translate theDelete Paymentstring to Spanish. See Modify Text Using User Interface Text Tool. -
In the Object field, select your object. In this case, select Payment.
-
Click Continue.
-
-
On the Availability page:
-
In the Application field, select Sales.
-
In the UI Availability field, select List Page.
-
Click Continue.
-
-
On the Action Details page:
-
In the Path field, select /crmRestApi/resources/11.13.18.05/Payment_c/{Payment__c_Id}.
-
In the Method field, select DELETE.
-
In the Path Parameters region, in the Actions column, click the pencil icon.
-
In the Value field, select Record ID (Id).
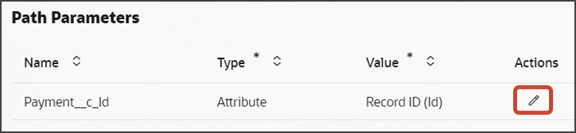
-
Click Done.
-
Click Continue.
-
-
On the Confirmation Message page:
-
In the Primary Message field, enter
Are you sure you want to delete this record? -
In the Continue Button Label field, enter
Yes. -
In the Cancel Button Label field, enter
No. -
Click Continue.
-
-
On the Review and Submit page, click Submit.
Create a "Create" Smart Action for a Child Object
Even though the Extension Generator can create the smart actions required for child objects, you might need to manually create some smart actions if you ever add new child objects to an existing extension. If that happens, then follow these instructions.
To create a create smart action for a custom child object:
-
Create a sandbox.
-
In Application Composer, under the Common Setup menu, click Smart Actions.
-
At the top of the page, click Create.
-
On the Kind of Action page:
-
Click UI-based action.
-
Click Continue.
-
-
On the Basic Details page:
-
In the Name field, enter the smart action name.
For example, enter
Create Payment Lines. -
In the Object field, select your child object's parent object. In this case, select Payment.
-
Click Continue.
-
-
On the Availability page:
-
In the Application field, select Sales.
-
In the UI Availability field, select List Page.
-
Click Continue.
-
-
On the Action Type page:
-
In the Type field, select Create.
-
In the Target Object field, select the child object.
For example, select PaymentLineCollection_c.
-
In the Field Mapping region, click Add.
-
In the Actions column, click the Edit icon and then set these field values:
Attribute Defaults
Column
Value
Name
Select the field on the child object that holds the parent object's ID. This is a standard field on the child object.
The format of the field name is always
<Parent object name>_Id_c. For example, select Payment_Id_c.Type
Attribute
Value
Select Record ID (Id). This is a standard field on the top-level object.
This means that when users create a payment line, the create smart action defaults the payment's ID into the payment line's Payment_Id_c attribute.
-
Click Done.
-
Click Continue.
-
-
On the Action Details page:
-
In the Navigation Target field, select Local.
-
Click Continue.
-
-
On the Confirmation Message page:
-
In the Confirmation Message After Action Execution field, optionally enter a message to display to users.
-
Use the Add tokens region to include a token in your message.
-
Click Continue.
-
-
On the Review and Submit page, click Submit.
Publish Your Sandbox
If you're still testing your extension, then you don't need to publish your sandbox just yet.
But, if you're ready, then you can publish your sandbox after creating the required smart actions.