Guidelines for Setting Up Your Integration
Use a proven sequence when you integrate Order Management.
Step 1: Get the Privileges That You Need
These privileges allow you to call web services that provide a response from your fulfillment system.
-
Manage Orchestration Generic Web Service
-
Manage Orchestration Order Activity Interface Web Service
-
Manage Orchestration Order Fulfillment Interface Web Service
-
Manage Orchestration Order Modification
-
Manage Orchestration Order Purchasing Interface Web Service
-
Manage Orchestration Order Receiving Interface Web Service
-
Manage Orchestration Order Shipping Interface Web Service
-
Manage Orchestration Order Template Interface Web Service
-
Manage Web Service Interface to Transportation Data for Sales Order
Get the privilege that you need to call the web service. For example, if your integration manages shipping details, then get the Manage Orchestration Order Shipping Interface Web Service privilege.
For details about how to set up privileges, see Security Reference for Order Management.
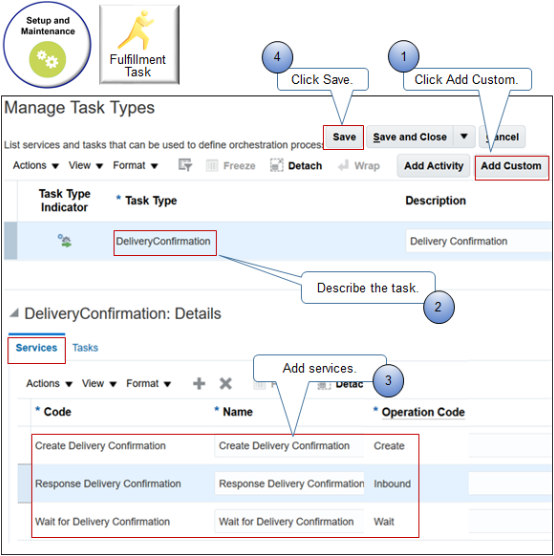
Step 2: Set Up Task Type
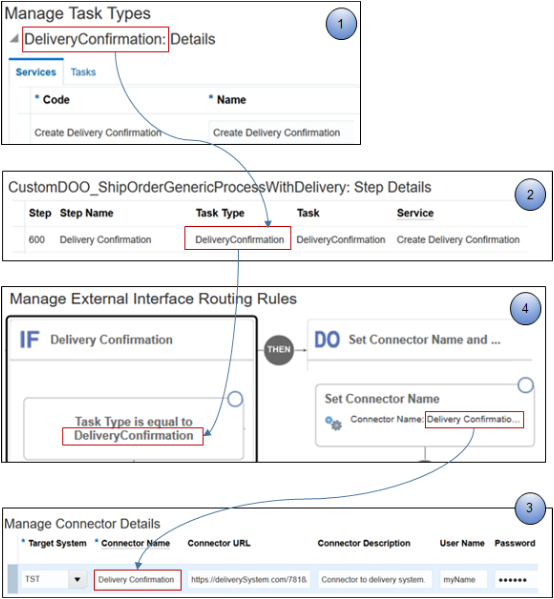
Use the Manage Task Type page in the Setup and Maintenance work area to set up the task type.
Note
-
Click Add Custom. Use this action you to specify services.
-
Use the Task Type attribute and the Description attribute to describe how your orchestration process uses the task, such as Delivery Confirmation.
-
Use the Services tab to add the service that does the task, such as Create Delivery Confirmation.
-
Click Save so you can reference the task type from your orchestration process.
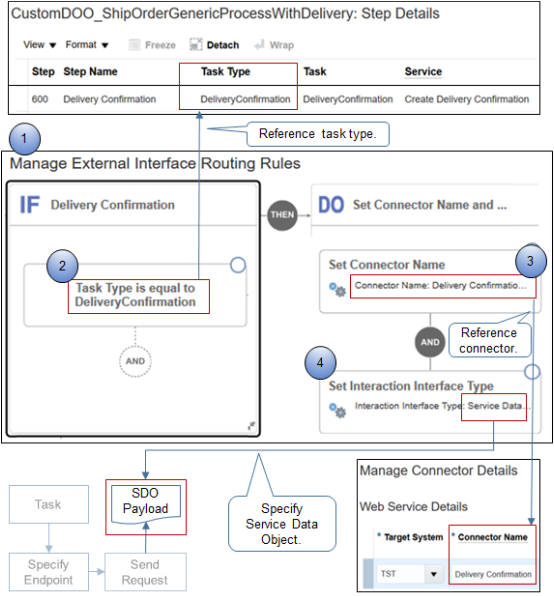
The task type specifies the type of task that each orchestration process step does, such as to schedule a fulfillment line for shipment, to ship it, or to confirm delivery. For details, see Create Your Own Task Type.
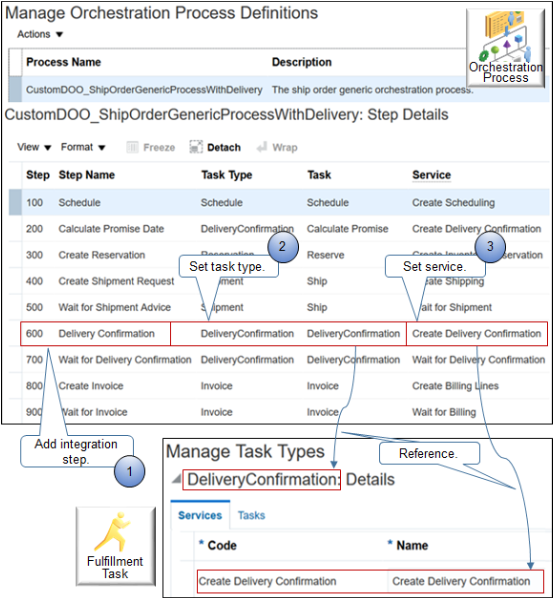
Step 3: Add Integration Step
Add the step in your orchestration process that integrates with your fulfillment system.
Note
-
Add the step at the point in your orchestration process where you must integrate. This example integrates after the orchestration process finishes the schedule, promise, reserve, and ship tasks, but before the invoice task.
-
On the integration step, set the Task Type attribute and the Task attribute to the task type you set up on the Manage Task Types page.
-
Set the Service attribute to the service you set up on the Services tab of the Manage Task Types page.
For details, see Set Up Orchestration Processes.
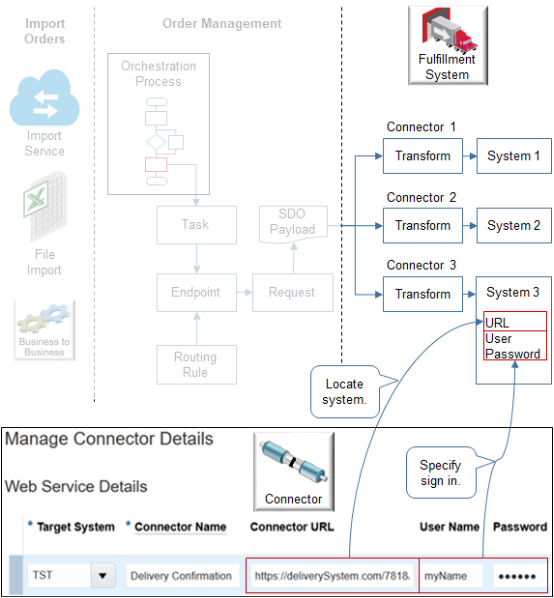
Step 4: Create Connector
Go to the Setup and Maintenance work area, search for Manage External Interface Web Service Details, then use the Manage Connector Details page to specify how to connect to your fulfillment system.
Note
-
Create a separate connector for each of your fulfillment systems.
-
Use the Connector URL attribute to locate your fulfillment system. In this example, assume you defined a URL on the server that serves System 3.
https://server:port/7818/soa-infra/services/default/ConfirmDeliveryTo make sure the connection is secure, use https in the URL. Don't use http.
-
Use the User Name and Password attributes to specify the name and password you use when you sign into fulfillment system 3. In this example, assume you set up a user named myName on System 3.
-
Use a user name that works with an SSL security policy (secure sockets layers) that you set up on your fulfillment system.
-
Make sure the user name and password you specify are valid on your fulfillment system. Use them to verify that you can successfully sign into your fulfillment system. Note that this name isn't the name you use to sign into Oracle Applications.
-
Use CA signed certificates (certification authority) on your fulfillment system and on the connector.
-
-
For details, see Integrate Order Management with Source Systems and Manage Connector Details Between Order Management and Your Fulfillment System.
Set other attributes on the connector.
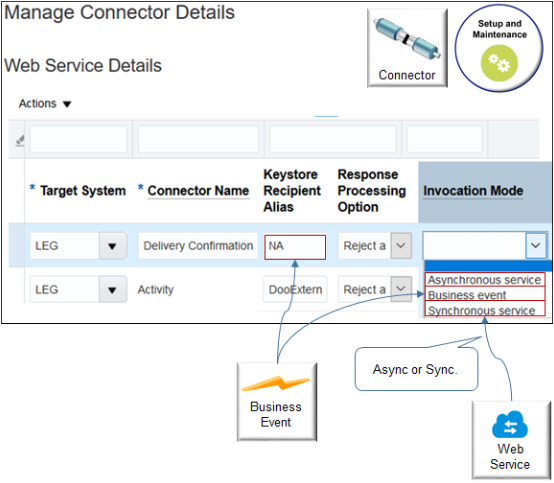
For example:
-
If you use this connector to communicate a business event, then set the Keystore Recipient Alias attribute to NA, and set the Invocation Mode attribute to Business Event.
-
If you use this connector with a web service, then set Invocation Mode to Asynchronous Service or Synchronous Service.
Step 5: Create Routing Rule
Create the rule that routes the orchestration process to the connector you just created.
Note
-
Use Visual Information Builder to create the rule. For details, see Overview of Using Business Rules With Order Management.
-
Add an If statement to determine whether the task type matches the type you specified in the Task Type attribute on the orchestration process step.
If Task Type is equal to DeliveryConfirmation -
Add a Then statement to set the Connector Name attribute to the connector you created earlier that connects to your fulfillment system.
Set Connector Name: Delivery Confirmation -
Add a Then statement to set the Interaction Interface Type attribute. Recall from the flow that order orchestration uses an SDO payload to communicate with your fulfillment system. You must use Service Data Object for any new implementation. Use other values only for backward compatibility to an earlier Oracle Applications update.
Set Interaction Interface Type: Service Data Object
Summary
Here's a summary of the set up you do.
Use these pages.
-
Manage Task Types to create the task type.
-
Manage Orchestration Process Definitions to add the integration step.
-
Manage Connector Details to create the connector.
-
Manage External Interface Routing rules to route the fulfillment line to your fulfillment system.